Page 105 of 280

Using the manual lumbar support (if equipped)
The lumbar control is located on the
inboard side of the seat under the
armrest.
Rotate the control to change the
firmness of the lumbar support.
Kangaroo pouch and map pocket (if equipped)
The front of the cushion contains a pocket which can be used to hold
small objects that need to be easily accessible. The rear of the seat back
also contains a pocket for larger items which need to be easily
accessible.
Memory seats/rearview mirrors/adjustable pedals (if equipped)
This system allows automatic
positioning of the driver seat,
outside rearview mirrors, and
adjustable pedals to two
programmable positions.
The memory seat control is located
on the door next to the window
inside from the mirror.
•To program position one, move
the driver seat to the desired
position using the seat controls. Press the SET control. The SET
control indicator light will briefly illuminate. While the light is
illuminated, press control 1.
•To program position two, repeat the previous procedure using control
2.
A position can only be recalled when the transmission gearshift is in
Park. A memory seat position may be programmed at any time.
The memory seat positions are also recalled when you press your remote
entry transmitter UNLOCK control.
To program the memory seat to remote entry transmitter, refer to
Remote entry systemin theLocks and securitychapter.
SE T
12
2004 Windstar(win)
Owners Guide (post-2002-fmt)
USA English(fus)
Seating and Safety Restraints
105
Page 106 of 280
REAR SEATS
Head restraints
Lift the head restraint so that it is located directly or as close as possible
behind your head.
The head restraints can be moved
up and down by pulling up on the
head restraint.
Push button to lower head restraint.
Seat mounted cup holders (if equipped)
Deploy by pressing the button on
top of the cupholder.
2004 Windstar(win)
Owners Guide (post-2002-fmt)
USA English(fus)
Seating and Safety Restraints
106
Page 107 of 280
The cupholder is designed to detach from the seat when subjected to
heavy load. The cupholder can be reinstalled by returning to the closed
position.
Adjusting 2nd row seats (if equipped)
Lift control to adjust seat forward or backward.
•2nd row bucket seat (if
equipped)
2004 Windstar(win)
Owners Guide (post-2002-fmt)
USA English(fus)
Seating and Safety Restraints
107
Page 108 of 280
•2nd row bench seat (if equipped)
Note: This seat can be moved
forward to keep a child in a
LATCH child restraint attached
to the LATCH anchors at the
center of the bench seat close to
the front seat occupants or to
increase cargo room without
removing the seat. The seat
should be moved to the full
rearward position when it is
occupied by older children or adults.
Adjusting second row bucket and bench seat back
Pull control forward to adjust seat
back. Using same control will fold
the seat back flat.
Reclining the seatback can cause an occupant to slide under the
seat’s safety belt, resulting in severe personal injuries in the
event of a collision.
Accessing the third row seat with a second row bucket seat
Ensure head restraint is in the full
down position and seat is adjusted
to full rear position (if equipped).
2004 Windstar(win)
Owners Guide (post-2002-fmt)
USA English(fus)
Seating and Safety Restraints
108
Page 109 of 280
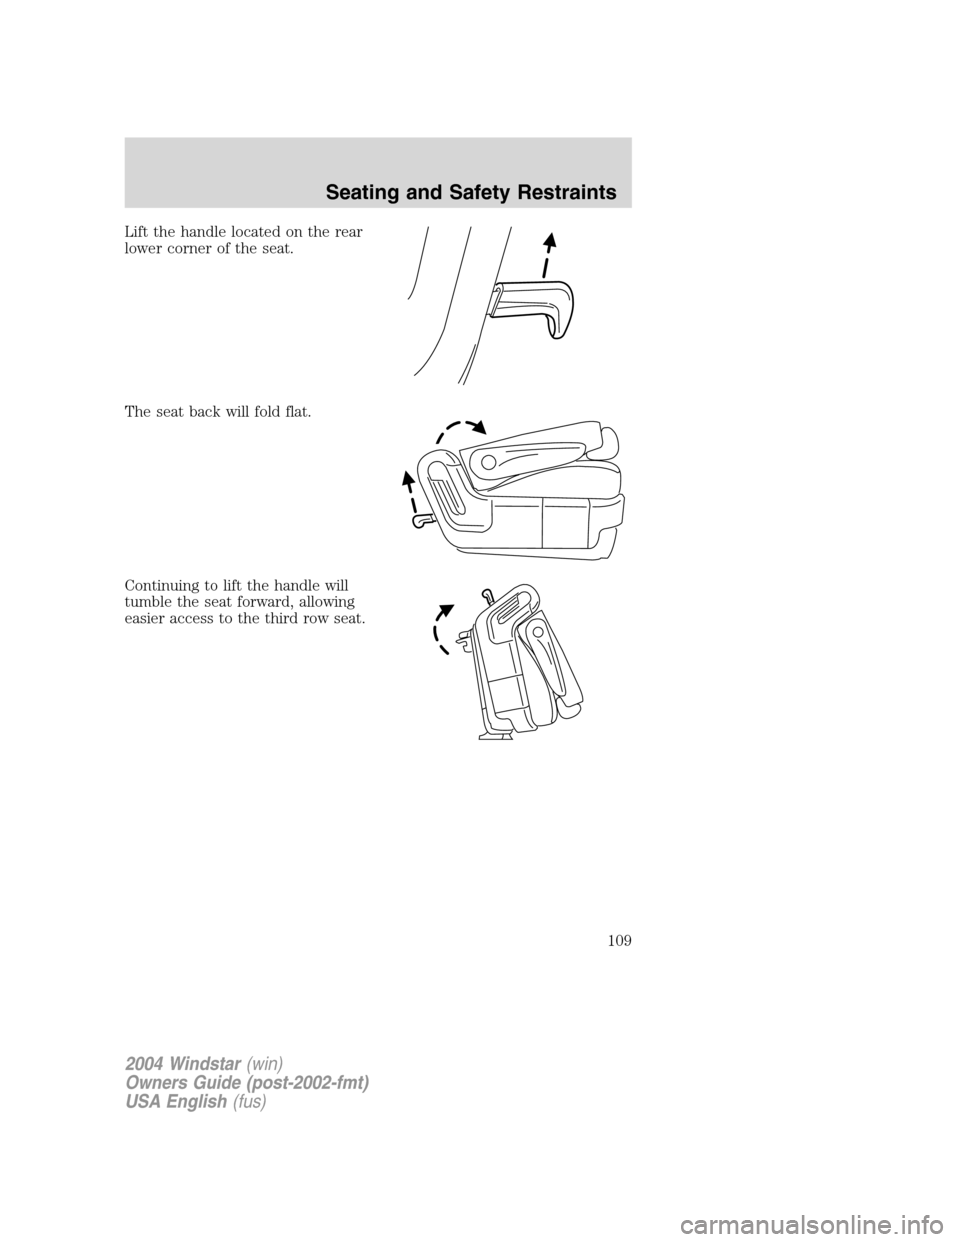
Lift the handle located on the rear
lower corner of the seat.
The seat back will fold flat.
Continuing to lift the handle will
tumble the seat forward, allowing
easier access to the third row seat.
2004 Windstar(win)
Owners Guide (post-2002-fmt)
USA English(fus)
Seating and Safety Restraints
109
Page 110 of 280
After entering the 3rd row seat,
return the seat from the tumbled
position and latch it to the floor.
Operate recline control to return the
seatback to the upright position.
Note:
•Ensure that the seat and seatback
is latched securely in position.
•Keep floor area free of objects
that would prevent proper seat
engagement.
•Do not adjust or release the seat
floor latch while vehicle is in
motion.
•Do not operate the vehicle with seats in tumbled position.
Always latch the vehicle seat to the floor, whether the seat is
occupied or empty. If not latched, the seat may cause injury
during a sudden stop.
2004 Windstar(win)
Owners Guide (post-2002-fmt)
USA English(fus)
Seating and Safety Restraints
110
Page 111 of 280
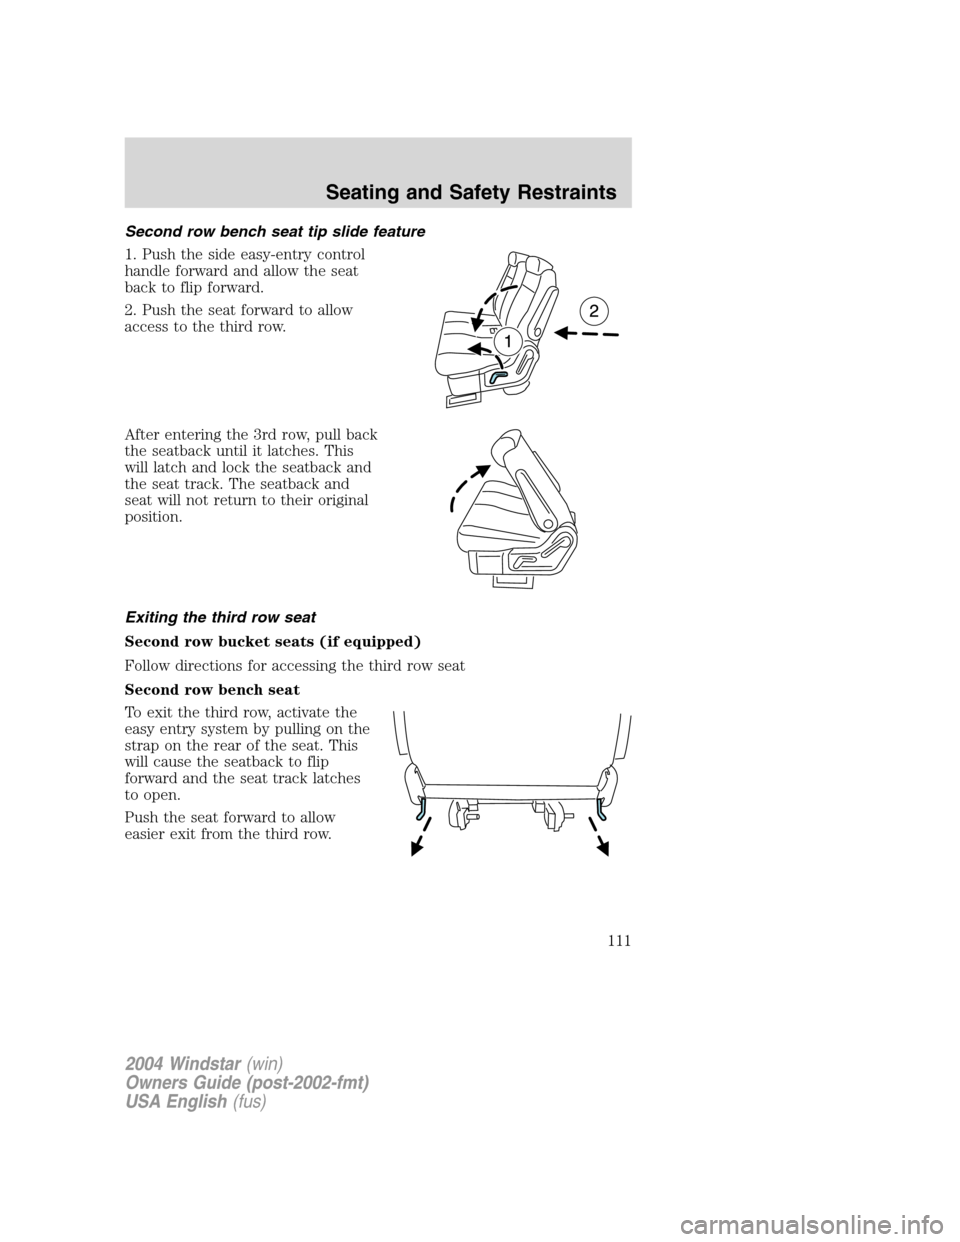
Second row bench seat tip slide feature
1. Push the side easy-entry control
handle forward and allow the seat
back to flip forward.
2. Push the seat forward to allow
access to the third row.
After entering the 3rd row, pull back
the seatback until it latches. This
will latch and lock the seatback and
the seat track. The seatback and
seat will not return to their original
position.
Exiting the third row seat
Second row bucket seats (if equipped)
Follow directions for accessing the third row seat
Second row bench seat
To exit the third row, activate the
easy entry system by pulling on the
strap on the rear of the seat. This
will cause the seatback to flip
forward and the seat track latches
to open.
Push the seat forward to allow
easier exit from the third row.
2004 Windstar(win)
Owners Guide (post-2002-fmt)
USA English(fus)
Seating and Safety Restraints
111
Page 112 of 280
After exiting the third row, push
rearward on the cushion of the seat
to return the seat to its original
position.
Push the seatback rearward until it
latches. This will latch and lock the
seatback and the seat track.
Note:Do not attempt to return the seat by pushing on the seatback, as
this will cause the seat tracks to re-lock before the seat can be returned.
Push on the cushion to return the seat.
Removal of second row seats from vehicle
Second row bucket seats
1. Place seat in tumbled position.
(SeeAccessing 3rd row seat)
2. Pull up on front floor release
handle (yellow).
2004 Windstar(win)
Owners Guide (post-2002-fmt)
USA English(fus)
Seating and Safety Restraints
112