2004 FORD F150 parking brake
[x] Cancel search: parking brakePage 12 of 280

On vehicles equipped with a message center, ªENGINE FAILSAFE
MODEº will be displayed, refer toMessage Centerin theDriver
Controlschapter.
Brake system warning light:To
confirm the brake system warning
light is functional, it will
momentarily illuminate when the
ignition is turned to the ON position
when the engine is not running, or in a position between ON and START,
or by applying the parking brake when the ignition is turned to the ON
position. If the brake system warning light does not illuminate at this
time, seek service immediately from your dealership. Illumination after
releasing the parking brake indicates low brake fluid level and the brake
system should be inspected immediately by your servicing dealership.
Driving a vehicle with the brake system warning light on is
dangerous. A significant decrease in braking performance may
occur. It will take you longer to stop the vehicle. Have the vehicle
checked by your dealer immediately.
Anti-lock brake system:If the
ABS light stays illuminated or
continues to flash, a malfunction has
been detected, have the system
serviced immediately. Normal
braking is still functional unless the brake warning light also is
illuminated.
Air bag readiness:If this light fails
to illuminate when ignition is turned
to ON, continues to flash or remains
on, have the system serviced
immediately. A chime will also
sound when a malfunction in the supplemental restraint system has been
detected.
Safety belt:Reminds you to fasten
your safety belt. A chime will also
sound to remind you to fasten your
safety belt.
!
BRAKE
ABS
Instrument Cluster
12
Page 49 of 280

Replacing front parking lamp/turn signal/sidemarker bulbs
1. Make sure the headlamp control
is in the OFF position and open the
hood.
2. At the top and inboard side of the
headlamp, loosen the three retaining
screws.
3. Once the three retaining screws
have been removed, disengage the
tab at the top center of the
headlamp assembly by lifting it up.
4. Slide the headlamp assembly
forward disconnecting the snap
attachment at the fender and
disconnect the electrical connector
from the bulb by pulling rearward.
5. Remove bulb socket from the
parking lamp assembly by turning it
counterclockwise and then pull the
bulb straight out.
Install the new bulb(s) in reverse order.
Replacing tail/brake/turn signal/backup lamp bulbs
1. Make sure the headlamp control
is in the OFF position.
2. Open the tailgate to expose the
lamp assembly screws and remove
the two screws from the tail lamp
assembly.
Lights
49
Page 114 of 280
Reasons given... Consider...
ªI have an air bagº Air bags offer greater protection when
used with safety belts. Frontal airbags
are not designed to inflate in rear and
side crashes or rollovers.
ªI'd rather be thrown clearº Not a good idea.Peoplewho are
ejected are 40 times more likely
to DIE.Safety belts help prevent
ejection, WE CAN'T ªPICK OUR
CRASHº.
Do not sit on top of a buckled safety belt to avoid the Belt
Minder chime. Sitting on the safety belt will increase the risk of
injury in an accident. To disable (one-time) or deactivate the Belt
Minder feature please follow the directions stated below.
One time disable for driver-only BeltMinder
Any time the safety belt is buckled and then unbuckled during an
ignition ON cycle, the BeltMinder will be disabled for that ignition cycle
only.
One time disable for driver/passenger BeltMinder
If at any time the driver/front passenger quickly buckles then unbuckles
the BeltMinder feature for that seating position, the BeltMinder is
disabled for the current ignition cycle. The BeltMinder feature will
re-enable during the same ignition cycle if the occupant buckles and
remains buckled for approximately 30 seconds. Confirmation is not given
for the one time disable.
Deactivating/activating the driver-only BeltMinder feature
Read steps1-9thoroughly before proceeding with the
deactivation/activation programming procedure.
The BeltMinder feature can be deactivated/activated by performing the
following procedure:
Before following the procedure, ensure that the following conditions are
met:
²The parking brake is set.
²The gearshift is in P (Park) (automatic transmission) or the neutral
position (manual transmission).
Seating and Safety Restraints
114
Page 116 of 280
Deactivating/activating the driver/passenger BeltMinder feature
The driver and front passenger BeltMinder are
deactivated/activated independently. When deactivating/activating
one seating position, do not buckle the other position as this will
terminate the process.
Read steps1-4thoroughly before proceeding with the
deactivation/activation programming procedure.
The driver and front passenger BeltMinder features can be
deactivated/activated by performing the following procedure:
Before following the procedure, make sure that:
²The parking brake is set
²The gearshift is in P (Park) (automatic transmission)
²The ignition switch is in the OFF position
²The driver and front passenger safety belts are unbuckled
To reduce the risk of injury, do not deactivate/activate the Belt
Minder feature while driving the vehicle.
1. Turn the ignition switch to the RUN (or ON) position. (DO NOT
START THE ENGINE)
2. Wait until the safety belt warning light turns off. (Approximately 1
minute)
²Step 3 must be completed within 50 seconds after the safety belt
warning light turns off.
3. For the seating position being disabled, buckle then unbuckle the
safety belt 9 times, ending in the unbuckled state. (Step 3 must be
completed within 50 seconds after the safety belt warning light turns
off.)
²After step 3, the restraint system warning light (airbag light) will be
turned on for three seconds.
4. Within 10 seconds of the light turning on, buckle then unbuckle the
safety belt.
²This will disable the BeltMinder feature for that seating position if it is
currently enabled. As confirmation, the restraint system warning light
will flash 4 times per second for 3 seconds.
²This will enable the BeltMinder feature for that seating position if it is
currently disabled. As confirmation, the restraint system warning light
Seating and Safety Restraints
116
Page 146 of 280
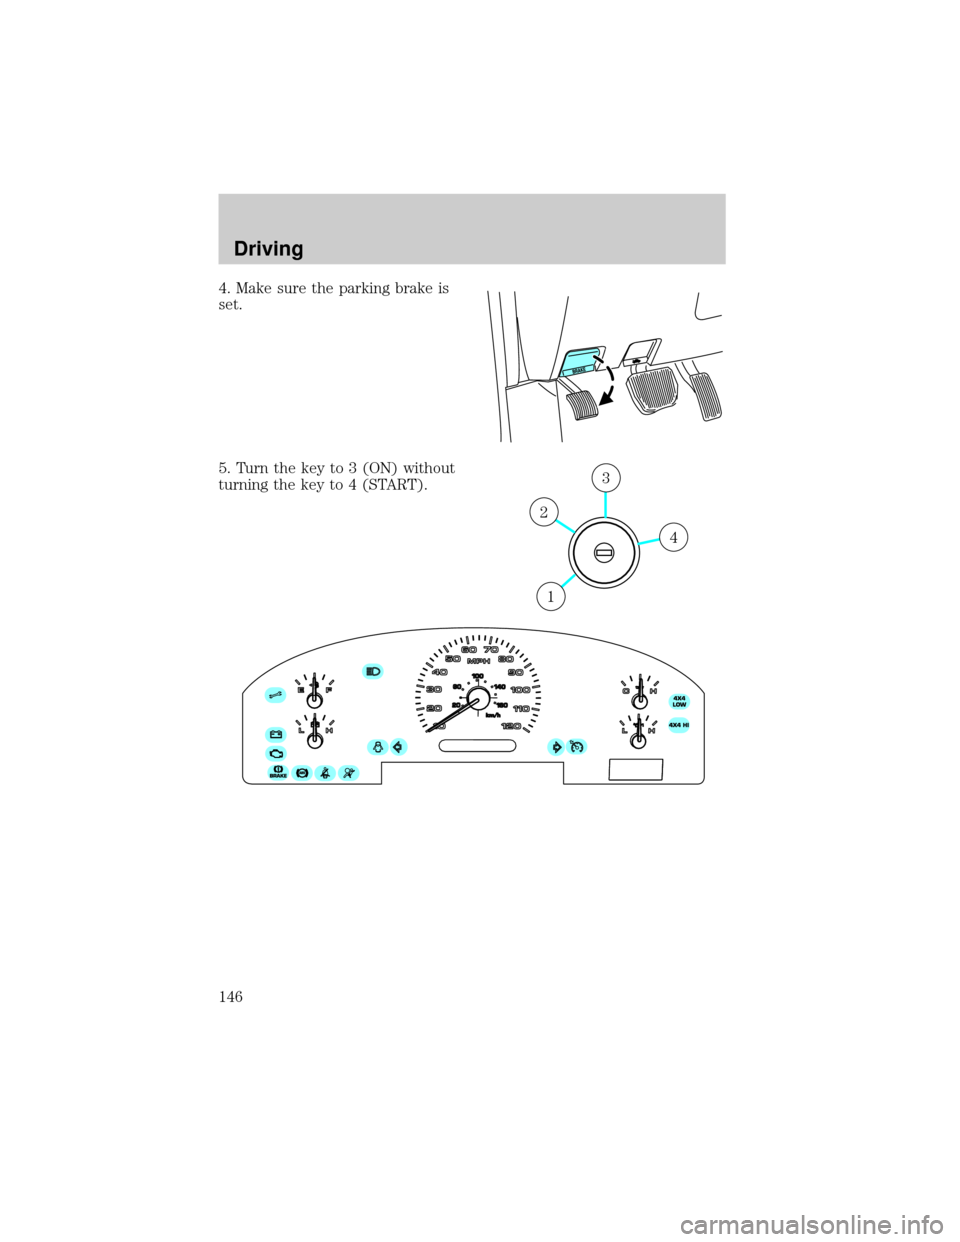
4. Make sure the parking brake is
set.
5. Turn the key to 3 (ON) without
turning the key to 4 (START).
4
3
2
1
Driving
146
Page 149 of 280

BRAKES
Occasional brake noise is normal. If a metal-to-metal, continuous grinding
or continuous squeal sound is present, the brake linings may be worn-out
and should be inspected by a qualified service technician. If the vehicle
has continuous vibration or shudder in the steering wheel while braking,
the vehicle should be inspected by a qualified service technician.
Four-wheel anti-lock brake system (ABS)
Your vehicle is equipped with an Anti-lock Braking System (ABS). This
system helps you maintain steering control during emergency stops by
keeping the brakes from locking. Noise from the ABS pump motor and
brake pedal pulsation may be observed during ABS braking; this is
normal and should be no reason for concern.
Using ABS
When hard braking is required, apply continuous force on the brake
pedal; do not pump the brake pedal since this will reduce the
effectiveness of the ABS and will increase your vehicle's stopping
distance. The ABS will be activated immediately, allowing you to retain
full steering control during hard braking and on slippery surfaces.
However, the ABS does not decrease stopping distance.
ABS warning lampABS
TheABSlamp in the instrument cluster momentarily illuminates when
the ignition is turned to ON. If the light does not illuminate during start
up, remains on or flashes, the ABS may be disabled and may need to be
serviced.
Even when the ABS is disabled,
normal braking is still effective. (If
your BRAKE warning lamp
illuminates with the parking brake
released, have your brake system
serviced immediately.)
!
BRAKE
Driving
149
Page 150 of 280
Parking brake
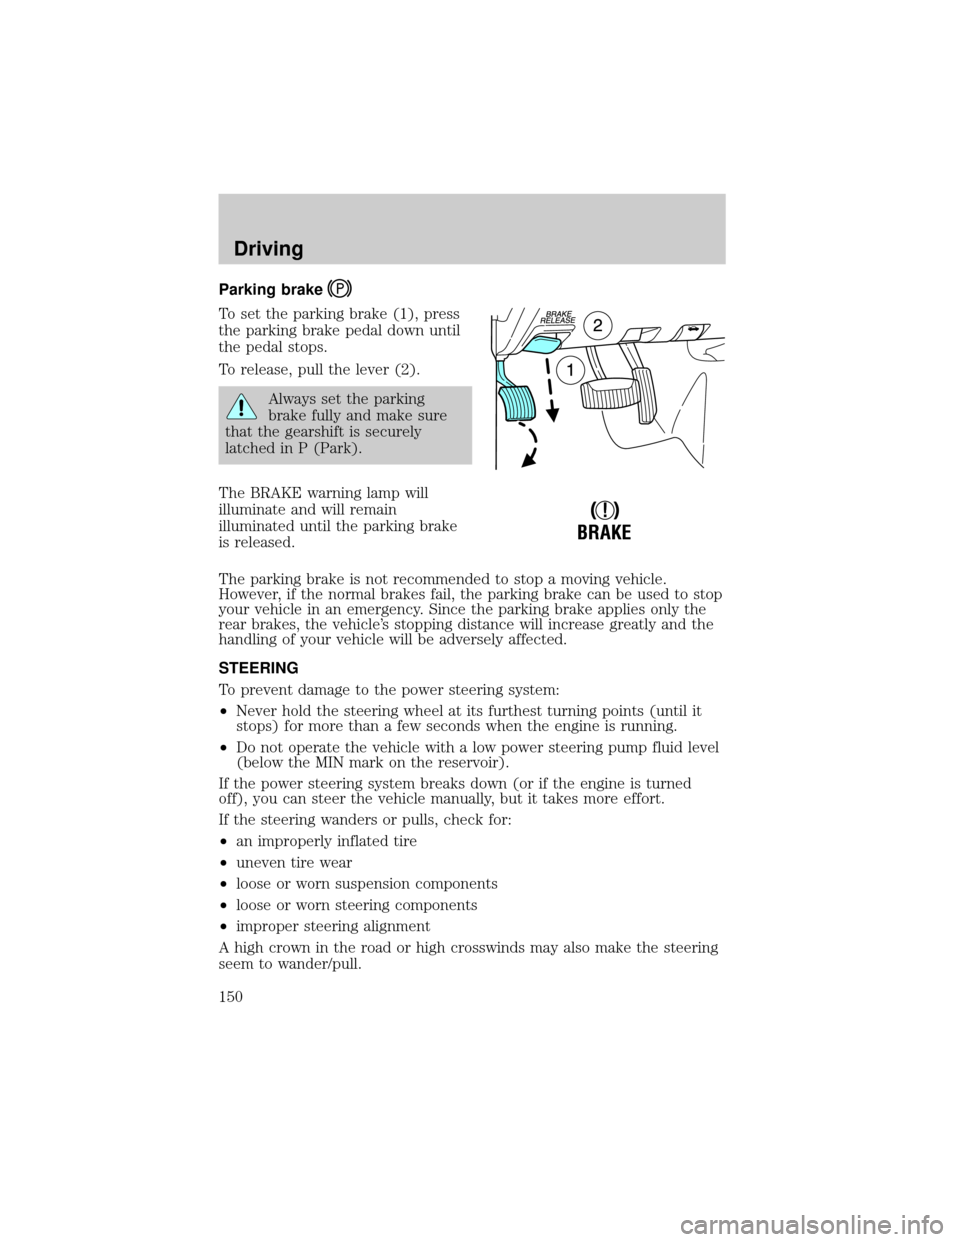
To set the parking brake (1), press
the parking brake pedal down until
the pedal stops.
To release, pull the lever (2).
Always set the parking
brake fully and make sure
that the gearshift is securely
latched in P (Park).
The BRAKE warning lamp will
illuminate and will remain
illuminated until the parking brake
is released.
The parking brake is not recommended to stop a moving vehicle.
However, if the normal brakes fail, the parking brake can be used to stop
your vehicle in an emergency. Since the parking brake applies only the
rear brakes, the vehicle's stopping distance will increase greatly and the
handling of your vehicle will be adversely affected.
STEERING
To prevent damage to the power steering system:
²Never hold the steering wheel at its furthest turning points (until it
stops) for more than a few seconds when the engine is running.
²Do not operate the vehicle with a low power steering pump fluid level
(below the MIN mark on the reservoir).
If the power steering system breaks down (or if the engine is turned
off), you can steer the vehicle manually, but it takes more effort.
If the steering wanders or pulls, check for:
²an improperly inflated tire
²uneven tire wear
²loose or worn suspension components
²loose or worn steering components
²improper steering alignment
A high crown in the road or high crosswinds may also make the steering
seem to wander/pull.
!
BRAKE
Driving
150
Page 152 of 280
has blown or the vehicle's brakelamps are not operating properly. Refer
toFuses and relaysin theRoadside emergencieschapter.
If the fuse is not blown, perform the following procedure:
1. Apply the parking brake, turn the ignition to OFF/LOCK, then remove
the key.
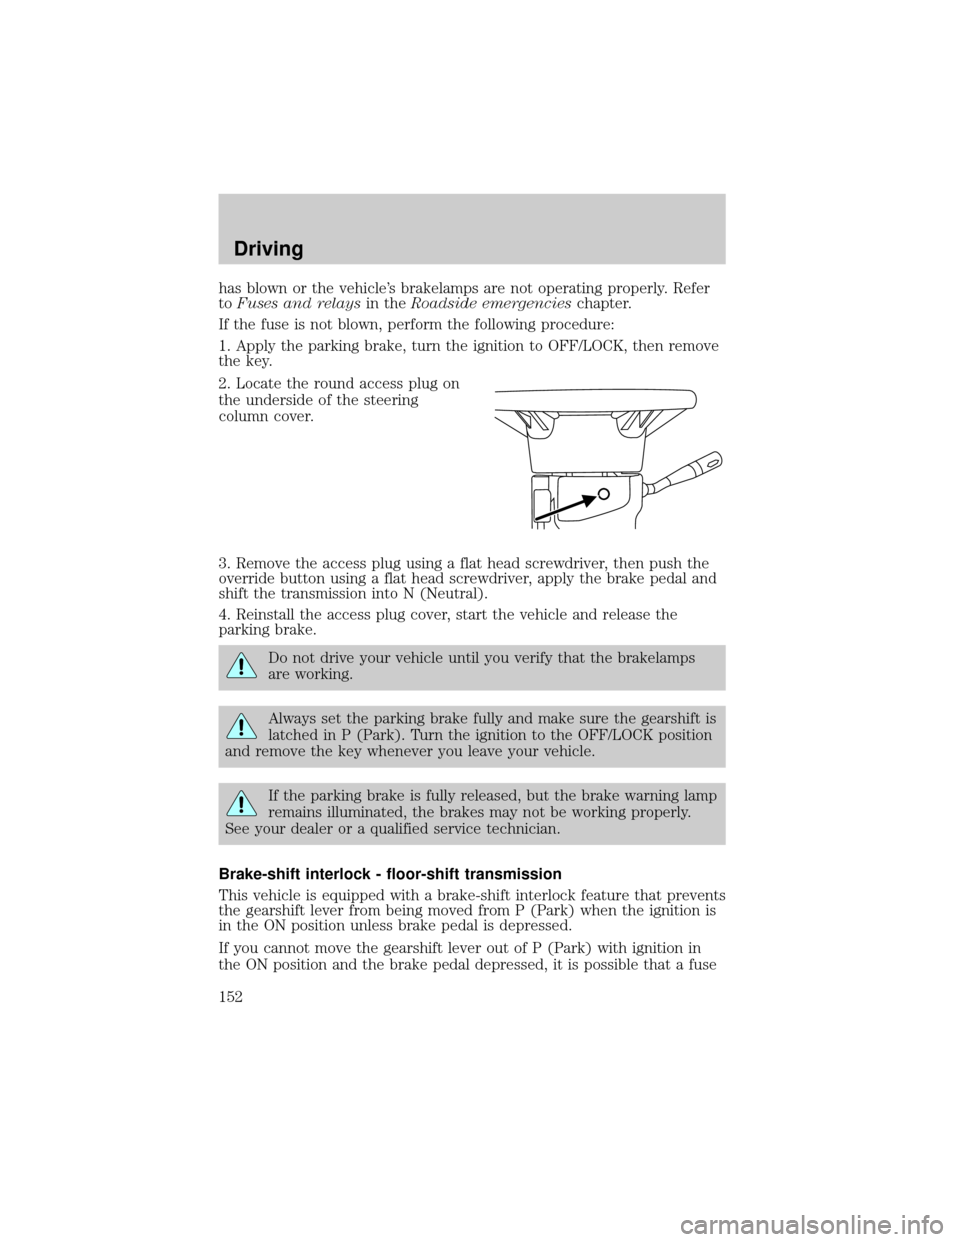
2. Locate the round access plug on
the underside of the steering
column cover.
3. Remove the access plug using a flat head screwdriver, then push the
override button using a flat head screwdriver, apply the brake pedal and
shift the transmission into N (Neutral).
4. Reinstall the access plug cover, start the vehicle and release the
parking brake.
Do not drive your vehicle until you verify that the brakelamps
are working.
Always set the parking brake fully and make sure the gearshift is
latched in P (Park). Turn the ignition to the OFF/LOCK position
and remove the key whenever you leave your vehicle.
If the parking brake is fully released, but the brake warning lamp
remains illuminated, the brakes may not be working properly.
See your dealer or a qualified service technician.
Brake-shift interlock - floor-shift transmission
This vehicle is equipped with a brake-shift interlock feature that prevents
the gearshift lever from being moved from P (Park) when the ignition is
in the ON position unless brake pedal is depressed.
If you cannot move the gearshift lever out of P (Park) with ignition in
the ON position and the brake pedal depressed, it is possible that a fuse
Driving
152