2004 FORD F150 brake fluid
[x] Cancel search: brake fluidPage 8 of 280

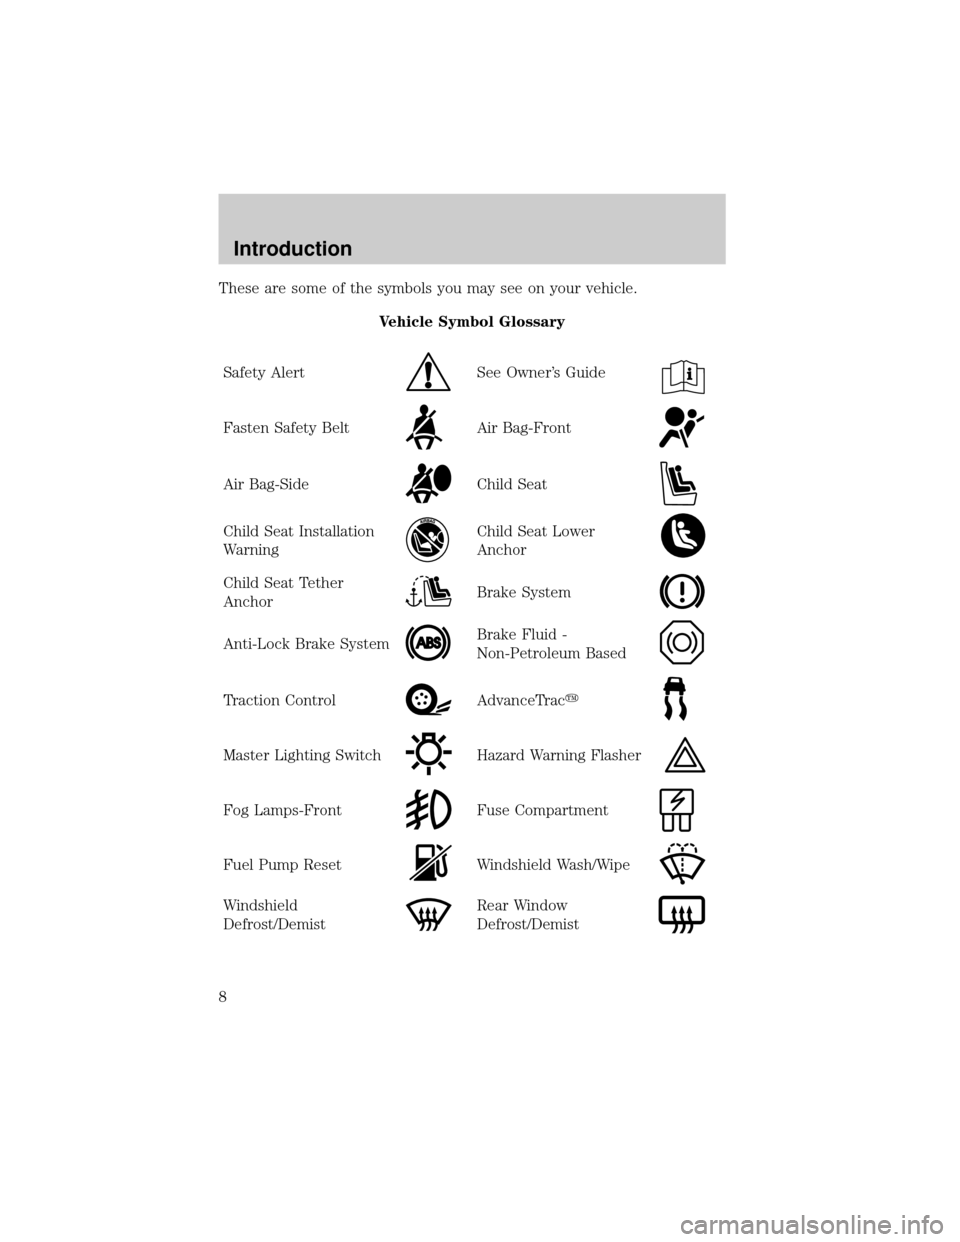
These are some of the symbols you may see on your vehicle.
Vehicle Symbol Glossary
Safety Alert
See Owner's Guide
Fasten Safety BeltAir Bag-Front
Air Bag-SideChild Seat
Child Seat Installation
WarningChild Seat Lower
Anchor
Child Seat Tether
AnchorBrake System
Anti-Lock Brake SystemBrake Fluid -
Non-Petroleum Based
Traction ControlAdvanceTracy
Master Lighting SwitchHazard Warning Flasher
Fog Lamps-FrontFuse Compartment
Fuel Pump ResetWindshield Wash/Wipe
Windshield
Defrost/DemistRear Window
Defrost/Demist
Introduction
8
Page 12 of 280

On vehicles equipped with a message center, ªENGINE FAILSAFE
MODEº will be displayed, refer toMessage Centerin theDriver
Controlschapter.
Brake system warning light:To
confirm the brake system warning
light is functional, it will
momentarily illuminate when the
ignition is turned to the ON position
when the engine is not running, or in a position between ON and START,
or by applying the parking brake when the ignition is turned to the ON
position. If the brake system warning light does not illuminate at this
time, seek service immediately from your dealership. Illumination after
releasing the parking brake indicates low brake fluid level and the brake
system should be inspected immediately by your servicing dealership.
Driving a vehicle with the brake system warning light on is
dangerous. A significant decrease in braking performance may
occur. It will take you longer to stop the vehicle. Have the vehicle
checked by your dealer immediately.
Anti-lock brake system:If the
ABS light stays illuminated or
continues to flash, a malfunction has
been detected, have the system
serviced immediately. Normal
braking is still functional unless the brake warning light also is
illuminated.
Air bag readiness:If this light fails
to illuminate when ignition is turned
to ON, continues to flash or remains
on, have the system serviced
immediately. A chime will also
sound when a malfunction in the supplemental restraint system has been
detected.
Safety belt:Reminds you to fasten
your safety belt. A chime will also
sound to remind you to fasten your
safety belt.
!
BRAKE
ABS
Instrument Cluster
12
Page 74 of 280

Setup menu
Press this control for the following
displays:
²System Check
²Units (English/Metric)
²Autolock
²Autolamp Delay
²Language
System check
Selecting this function from the
SETUP menu causes the message
center to cycle through each of the
systems being monitored. For each
of the monitored systems, the
message center will indicate either an OK message or a warning message
for three seconds.
Pressing the RESET control cycles the message center through each of
the systems being monitored.
The sequence of the system check report and how it appears in the
message center is as follows:
1. FUEL LEVEL
2. ENGINE TEMP
3. OIL PRESSURE
4. BRAKE FLUID LEVEL
5. CHARGING SYSTEM
Units (English/Metric)
1. Select this function from the
SETUP menu for the current units
to be displayed.
2. Press the RESET control to
change from English to Metric.
Autolocks
This feature automatically locks all vehicle doors when the vehicle is
shifted into any gear, putting the vehicle in motion.
Driver Controls
74
Page 76 of 280

In the event of a multiple warning situation, the message center will
cycle the display to show all warnings by displaying each one for 4
seconds.
The message center will display the last selected feature if there are no
more warning messages. This allows you to use the full functionality of
the message center after you acknowledge the warning by pressing the
RESET control and clearing the warning message.
Warning messages that have been reset are divided into two categories:
²They will reappear on the display ten minutes from the reset.
²They will not reappear until an ignition OFF-ON cycle has been
completed.
This acts as a reminder that these warning conditions still exist within
the vehicle.
Warning display Status
Door ajar Warning can be reset
Low fuel level Warning returns after 10 minutes
Check charging system
Low brake fluid level
Low oil pressure
Check engine temperature
Reduced engine power
Stop engine safely
Check fuel cap Warning returns after the ignition key
is turned from OFF to ON.
Engine failsafe mode
DOOR AJAR.Displayed when a door is not completely closed.
CHECK ENGINE TEMPERATURE.Displayed when the engine
coolant is overheating. Stop the vehicle as soon as safely possible, turn
off the engine and let it cool. Check the coolant and coolant level. Refer
toEngine coolantin theMaintenance and specificationschapter. If
the warning stays on or continues to come on, contact your dealer as
soon as possible.
REDUCED ENGINE POWER.Displayed when the engine is
overheating. Stop the vehicle as soon as safely possible, turn off the
engine. If the warning stays on or continues to come on, contact your
dealer as soon as possible.
Driver Controls
76
Page 77 of 280

STOP ENGINE SAFELY.Displayed when the engine is overheating.
Stop the vehicle as soon as safely possible, turn off the engine. If the
warning stays on or continues to come on, contact your dealer as soon as
possible.
LOW FUEL LEVEL.Displayed as an early reminder of a low fuel
condition.
CHECK CHARGING SYSTEM.Displayed when the electrical system is
not maintaining proper voltage. If you are operating electrical accessories
when the engine is idling at a low speed, turn off as many of the
electrical loads as soon as possible. If the warning stays on or comes on
when the engine is operating at normal speeds, have the electrical
system checked as soon as possible.
LOW BRAKE FLUID LEVEL.Indicates the brake fluid level is low and
the brake system should be inspected immediately. Refer toChecking and
adding brake fluidin theMaintenance and specificationschapter.
LOW OIL PRESSURE.Displayed when the engine oil pressure is low. If
this warning message is displayed, check the level of the engine oil.
Refer toEngine oilin theMaintenance and specificationschapter for
information about adding engine oil. If the oil level is OK and this
warning persists, shut down the engine immediately and contact your
dealership for service.
CHECK FUEL CAP.Displayed when the fuel filler cap is not properly
installed. Check the fuel filler cap for proper installation. Refer toFuel
filler capunder theFuel Information sectionin theMaintenance and
specificationschapter.
ENGINE FAILSAFE MODE.Displayed when the engine has defaulted
to a 'limp-home' operation. If the warning stays on or continues to come
on, contact your dealer as soon as possible.
DATA ERR.These messages indicate improper operation of the vehicle
network communication between electronic modules.
²Fuel computer
²Charging system
²Autolamp delay
²Auto locks²Brake fluid
²Compass
²Outside temperature
²Engine sensor
Contact your dealer as soon as possible if these messages occur on a
regular basis.
Driver Controls
77
Page 150 of 280

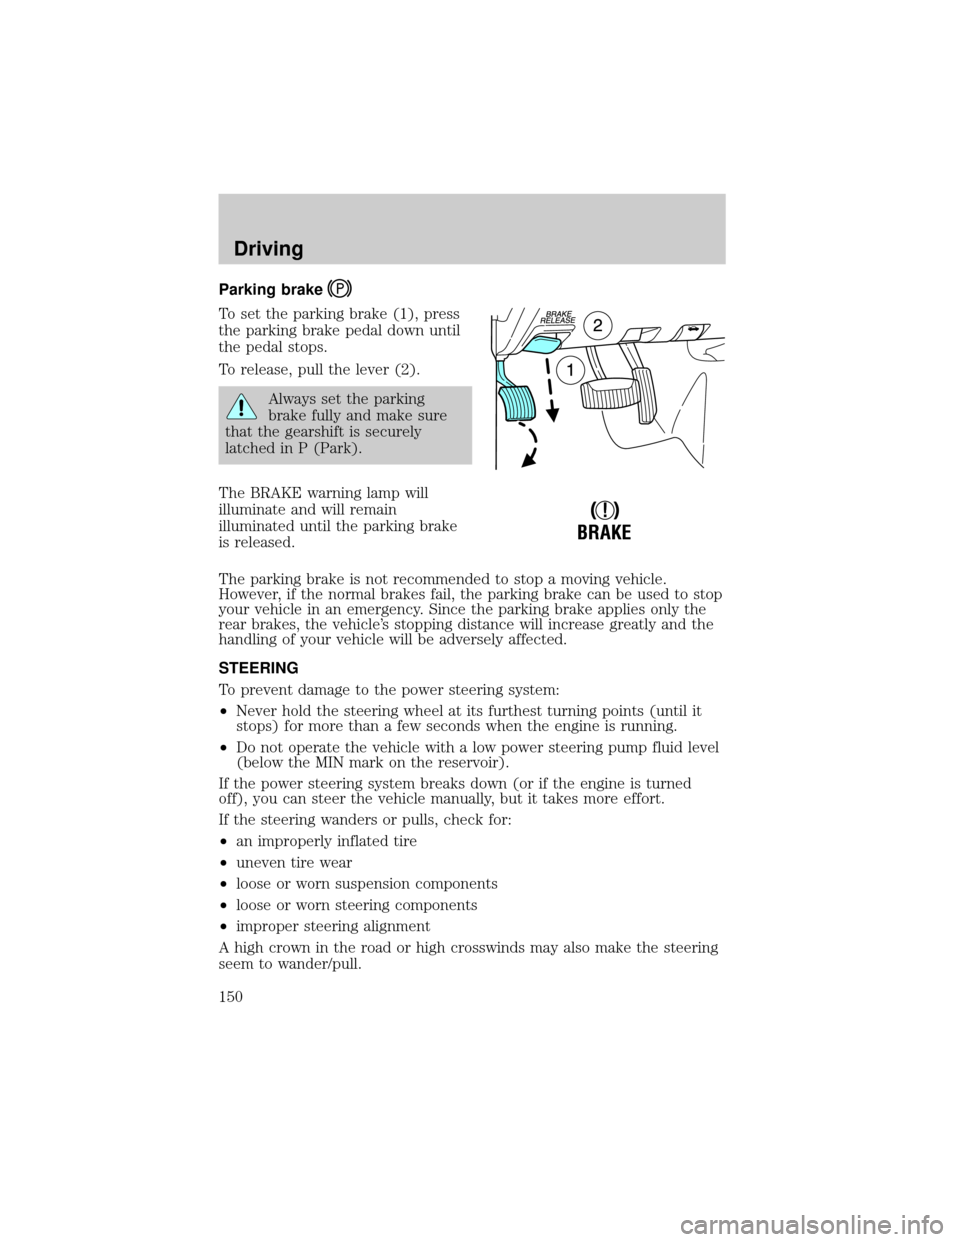
Parking brake
To set the parking brake (1), press
the parking brake pedal down until
the pedal stops.
To release, pull the lever (2).
Always set the parking
brake fully and make sure
that the gearshift is securely
latched in P (Park).
The BRAKE warning lamp will
illuminate and will remain
illuminated until the parking brake
is released.
The parking brake is not recommended to stop a moving vehicle.
However, if the normal brakes fail, the parking brake can be used to stop
your vehicle in an emergency. Since the parking brake applies only the
rear brakes, the vehicle's stopping distance will increase greatly and the
handling of your vehicle will be adversely affected.
STEERING
To prevent damage to the power steering system:
²Never hold the steering wheel at its furthest turning points (until it
stops) for more than a few seconds when the engine is running.
²Do not operate the vehicle with a low power steering pump fluid level
(below the MIN mark on the reservoir).
If the power steering system breaks down (or if the engine is turned
off), you can steer the vehicle manually, but it takes more effort.
If the steering wanders or pulls, check for:
²an improperly inflated tire
²uneven tire wear
²loose or worn suspension components
²loose or worn steering components
²improper steering alignment
A high crown in the road or high crosswinds may also make the steering
seem to wander/pull.
!
BRAKE
Driving
150
Page 166 of 280

Sand
When driving over sand, try to keep all four wheels on the most solid
area of the trail. Avoid reducing the tire pressures but shift to a lower
gear and drive steadily through the terrain. Apply the accelerator slowly
and avoid spinning the wheels.
If you must reduce the tire pressure for whatever reason in sand, make
sure you re-inflate the tires as soon as possible.
Avoid excessive speed because vehicle momentum can work against you
and cause the vehicle to become stuck to the point that assistance may
be required from another vehicle. Remember, you may be able to back
out the way you came if you proceed with caution.
Mud and water
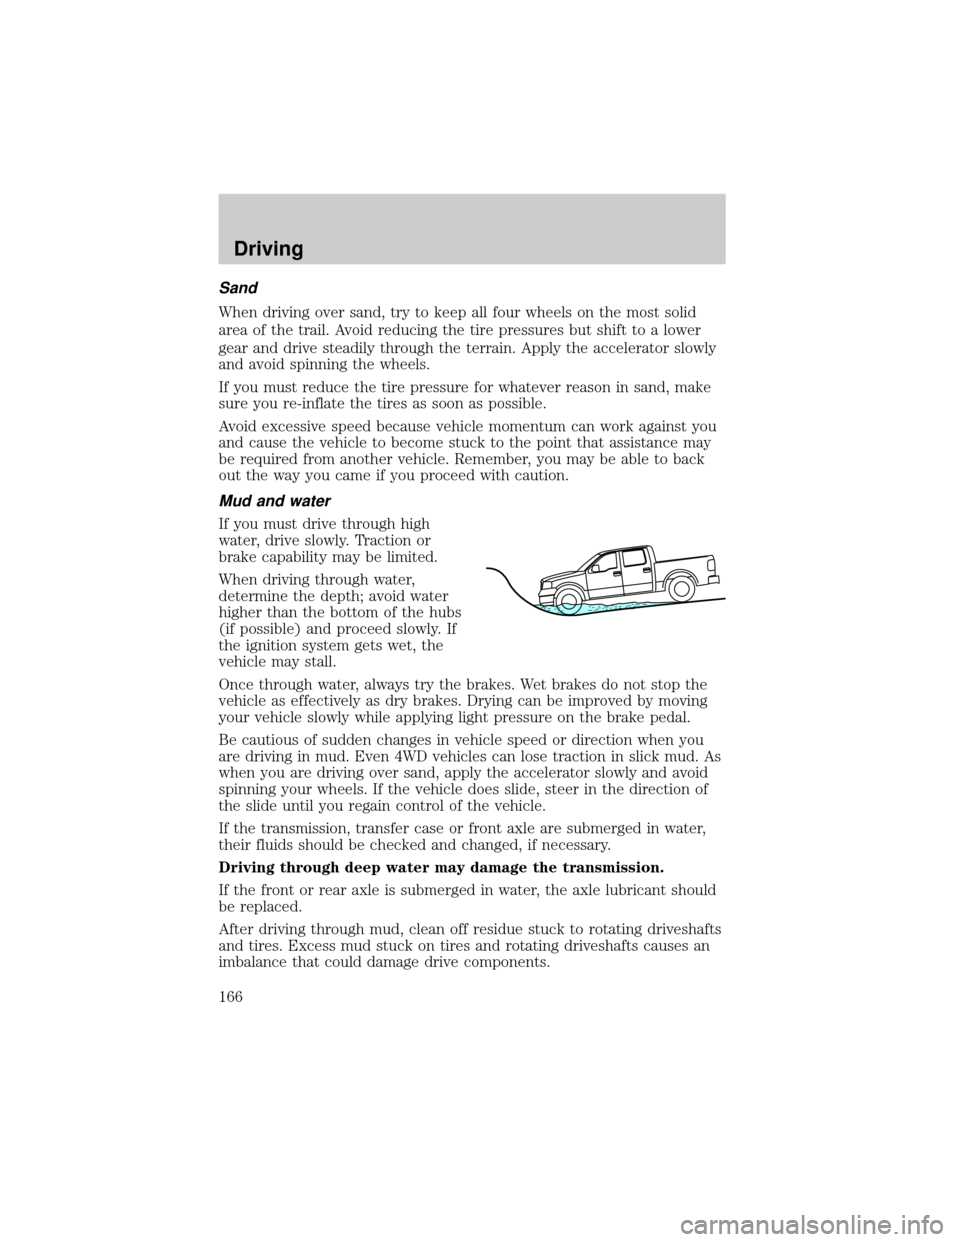
If you must drive through high
water, drive slowly. Traction or
brake capability may be limited.
When driving through water,
determine the depth; avoid water
higher than the bottom of the hubs
(if possible) and proceed slowly. If
the ignition system gets wet, the
vehicle may stall.
Once through water, always try the brakes. Wet brakes do not stop the
vehicle as effectively as dry brakes. Drying can be improved by moving
your vehicle slowly while applying light pressure on the brake pedal.
Be cautious of sudden changes in vehicle speed or direction when you
are driving in mud. Even 4WD vehicles can lose traction in slick mud. As
when you are driving over sand, apply the accelerator slowly and avoid
spinning your wheels. If the vehicle does slide, steer in the direction of
the slide until you regain control of the vehicle.
If the transmission, transfer case or front axle are submerged in water,
their fluids should be checked and changed, if necessary.
Driving through deep water may damage the transmission.
If the front or rear axle is submerged in water, the axle lubricant should
be replaced.
After driving through mud, clean off residue stuck to rotating driveshafts
and tires. Excess mud stuck on tires and rotating driveshafts causes an
imbalance that could damage drive components.
Driving
166
Page 171 of 280

the wheel rims (for cars). Traction or brake capability may be limited
and your vehicle may stall. Water may also enter your engine's air intake
and severely damage your engine.
Once through the water, always dry the brakes by moving your vehicle
slowly while applying light pressure on the brake pedal. Wet brakes do
not stop the vehicle as quickly as dry brakes.Driving through deep
water where the transmission vent tube is submerged may allow
water into the transmission and cause internal transmission
damage.
VEHICLE LOADING
Before loading a vehicle, familiarize yourself with the following terms:
²Base Curb Weight:Weight of the vehicle including any standard
equipment, fluids, lubricants, etc. It does not include occupants or
aftermarket equipment.
²Payload:Combined maximum allowable weight of cargo, occupants
and optional equipment. The payload equals the gross vehicle weight
rating minus base curb weight.
²
GVW (Gross Vehicle Weight):Base curb weight plus payload weight.
²GVWR (Gross Vehicle Weight Rating):Maximum allowable total
weight of the base vehicle, occupants, optional equipment and cargo.
The GVWR is specific to each vehicle and is listed on the Safety
Certification Label on the driver's door pillar.
²GAWR (Gross Axle Weight Rating):Carrying capacity for each axle
system. The GAWR is specific to each vehicle and is listed on the
Safety Certification Label on the driver's door pillar.
²GCW (Gross Combined Weight):The combined weight of the
towing vehicle (including occupants and cargo) and the loaded trailer.
²GCWR (Gross Combined Weight Rating):Maximum allowable
combined weight of towing vehicle (including occupants and cargo)
and the loaded trailer.
²Maximum Trailer Weight Rating:Maximum weight of a trailer the
vehicle is permitted to tow. The maximum trailer weight rating is
determined by subtracting the vehicle curb weight for each
engine/transmission combination, any required option weight for trailer
towing and the weight of the driver from the GCWR for the towing
vehicle.
Driving
171