Page 1 of 248
Introduction 4
Instrument Cluster 10
Warning and control lights 10
Gauges 14
Entertainment Systems 17
AM/FM stereo cassette 17
AM/FM stereo with CD 19
AM/FM stereo with in-dash six CD 22
AM/FM stereo cassette with CD 25
Climate Controls 31
Manual heating and air conditioning 31
Lights 34
Headlamps 34
Turn signal control 36
Bulb replacement 38
Driver Controls 44
Windshield wiper/washer control 44
Steering wheel adjustment 45
Power windows 49
Mirrors 50
Speed control 51
Locks and Security 55
Keys 55
Locks 55
Anti-theft system 56
Table of Contents
1
2004 F150 Classic(p96)
Owners Guide (post-2002-fmt)
USA English(fus)
Table of Contents
Page 13 of 248
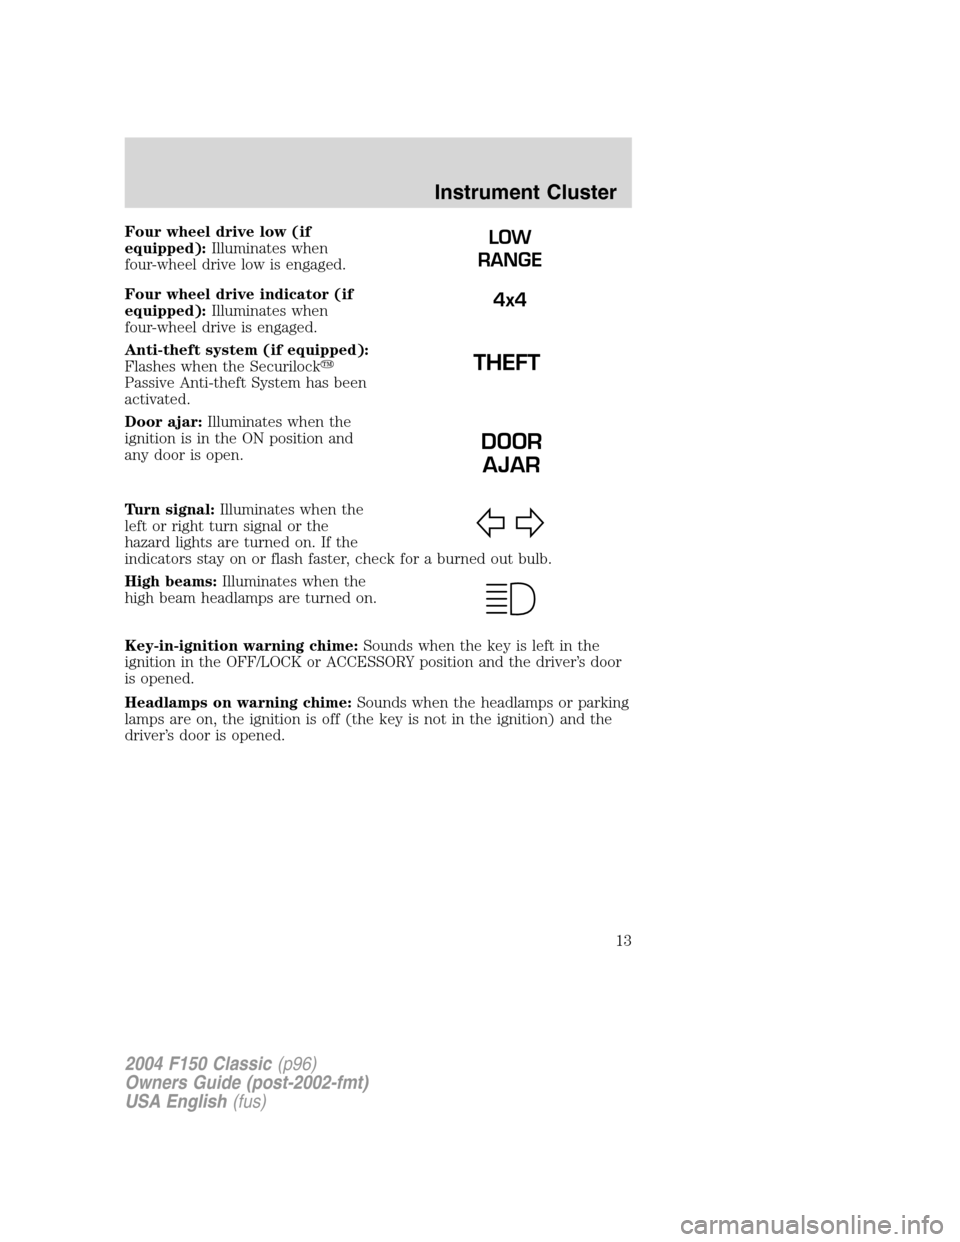
Four wheel drive low (if
equipped):Illuminates when
four-wheel drive low is engaged.
Four wheel drive indicator (if
equipped):Illuminates when
four-wheel drive is engaged.
Anti-theft system (if equipped):
Flashes when the Securilock�
Passive Anti-theft System has been
activated.
Door ajar:Illuminates when the
ignition is in the ON position and
any door is open.
Turn signal:Illuminates when the
left or right turn signal or the
hazard lights are turned on. If the
indicators stay on or flash faster, check for a burned out bulb.
High beams:Illuminates when the
high beam headlamps are turned on.
Key-in-ignition warning chime:Sounds when the key is left in the
ignition in the OFF/LOCK or ACCESSORY position and the driver’s door
is opened.
Headlamps on warning chime:Sounds when the headlamps or parking
lamps are on, the ignition is off (the key is not in the ignition) and the
driver’s door is opened.LOW
RANGE
4x4
DOOR
AJAR
2004 F150 Classic(p96)
Owners Guide (post-2002-fmt)
USA English(fus)
Instrument Cluster
13
Page 29 of 248
RADIO FREQUENCIES
AM and FM frequencies are established by the Federal Communications
Commission (FCC) and the Canadian Radio and Telecommunications
Commission (CRTC). Those frequencies are:
AM - 530, 540–1600, 1610 kHz
FM- 87.7, 87.9–107.7, 107.9 MHz
RADIO RECEPTION FACTORS
There are three factors that can effect radio reception:
•Distance/strength: The further you travel from an FM station, the
weaker the signal and the weaker the reception.
•Terrain: Hills, mountains, tall buildings, power lines, electric fences,
traffic lights and thunderstorms can interfere with your reception.
•Station overload: When you pass a broadcast tower, a stronger signal
may overtake a weaker one and play while the weak station frequency
is displayed.
CASSETTE/PLAYER CARE
Do:
•Use only cassettes that are 90 minutes long or less.
•Tighten very loose tapes by inserting a finger or pencil into the hole
and turning the hub.
•Remove loose labels before inserting tapes.
•Allow tapes which have been subjected to extreme heat, humidity or
cold to reach a moderate temperature before playing.
•Clean the cassette player head with a cassette cleaning cartridge after
10–12 hours of play to maintain good sound/operation.
Don’t:
•Expose tapes to direct sunlight, extreme humidity, heat or cold.
•Leave tapes in the cassette player for a long time when not being
played.
2004 F150 Classic(p96)
Owners Guide (post-2002-fmt)
USA English(fus)
Entertainment Systems
29
Page 36 of 248
PANEL DIMMER CONTROL
Use to adjust the brightness of the
instrument panel and all applicable
switches in the vehicle during
headlamp and parklamp operation.
Move the control to the full upright
position, past detent, to turn on the
interior lamps.
Move the control to the full down
position, past detent, to turn off the
interior lamps.
AIMING THE HEADLAMPS
The headlamps on your vehicle are properly aimed at the assembly plant.
If your vehicle has been in an accident the alignment of your headlamps
should be checked by a qualified service technician.
TURN SIGNAL CONTROL
•Push down to activate the left
turn signal.
•Push up to activate the right turn
signal.
2004 F150 Classic(p96)
Owners Guide (post-2002-fmt)
USA English(fus)
Lights
36
Page 40 of 248
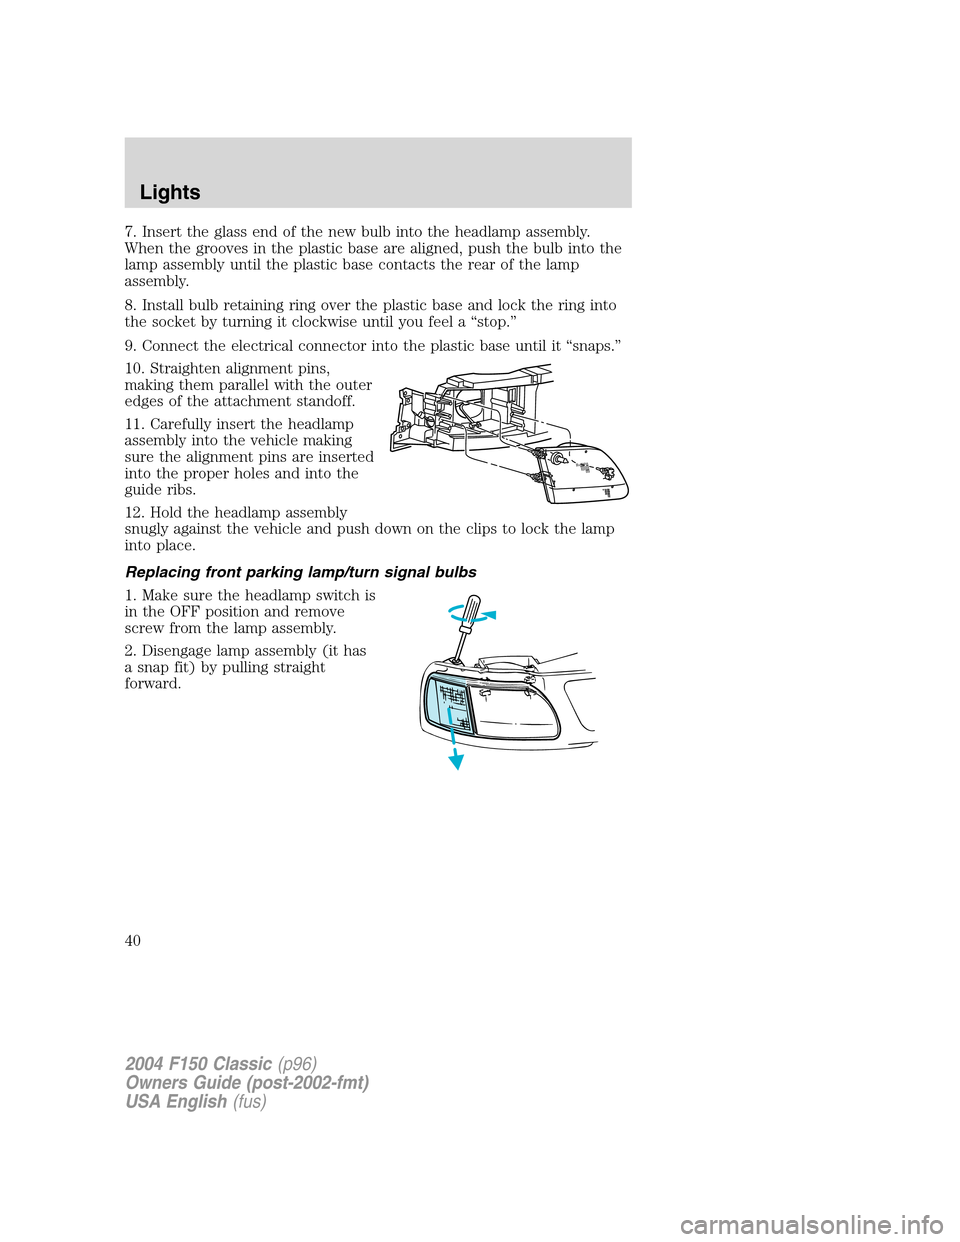
7. Insert the glass end of the new bulb into the headlamp assembly.
When the grooves in the plastic base are aligned, push the bulb into the
lamp assembly until the plastic base contacts the rear of the lamp
assembly.
8. Install bulb retaining ring over the plastic base and lock the ring into
the socket by turning it clockwise until you feel a“stop.”
9. Connect the electrical connector into the plastic base until it“snaps.”
10. Straighten alignment pins,
making them parallel with the outer
edges of the attachment standoff.
11. Carefully insert the headlamp
assembly into the vehicle making
sure the alignment pins are inserted
into the proper holes and into the
guide ribs.
12. Hold the headlamp assembly
snugly against the vehicle and push down on the clips to lock the lamp
into place.
Replacing front parking lamp/turn signal bulbs
1. Make sure the headlamp switch is
in the OFF position and remove
screw from the lamp assembly.
2. Disengage lamp assembly (it has
a snap fit) by pulling straight
forward.
2004 F150 Classic(p96)
Owners Guide (post-2002-fmt)
USA English(fus)
Lights
40
Page 41 of 248
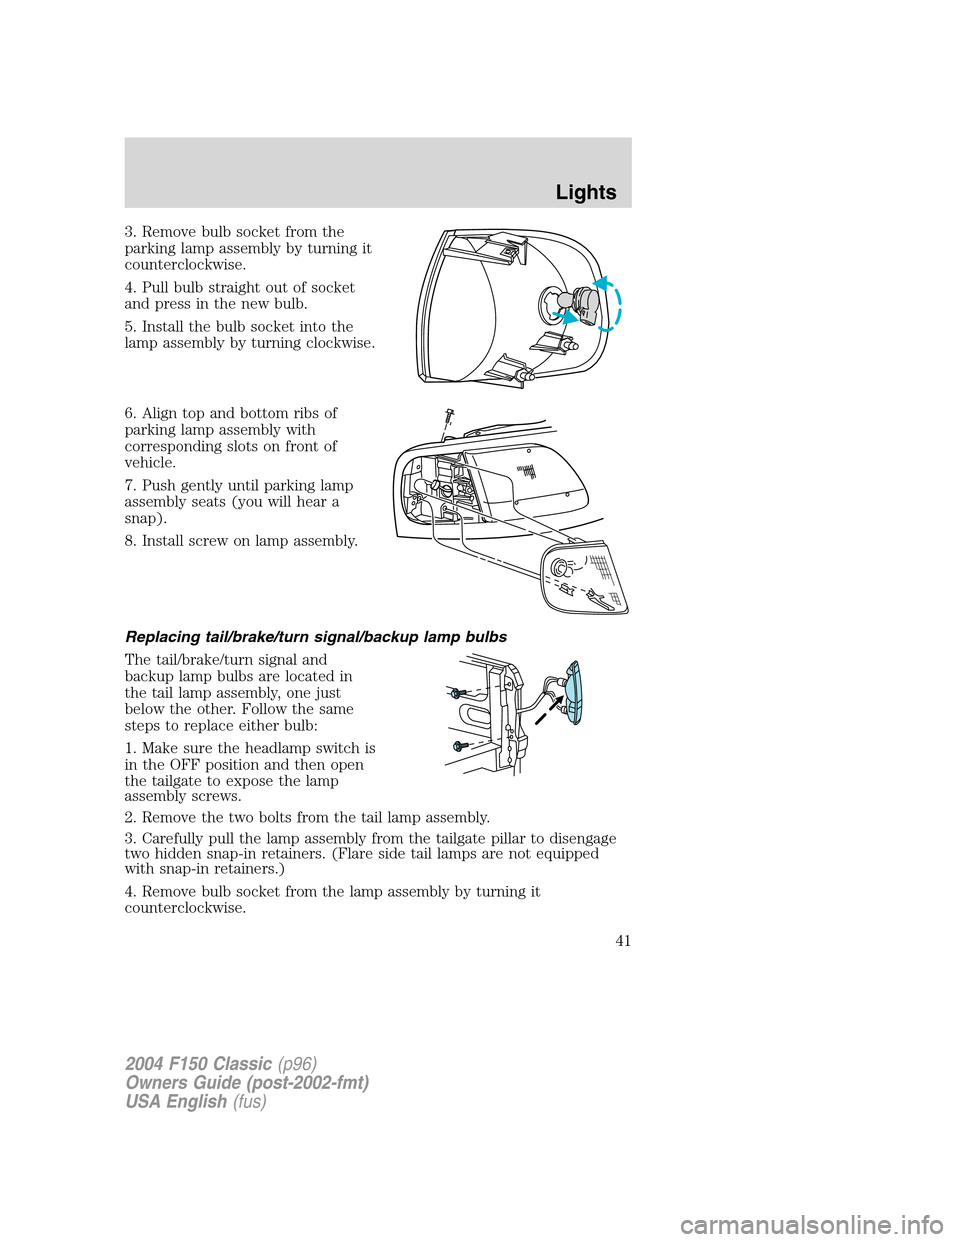
3. Remove bulb socket from the
parking lamp assembly by turning it
counterclockwise.
4. Pull bulb straight out of socket
and press in the new bulb.
5. Install the bulb socket into the
lamp assembly by turning clockwise.
6. Align top and bottom ribs of
parking lamp assembly with
corresponding slots on front of
vehicle.
7. Push gently until parking lamp
assembly seats (you will hear a
snap).
8. Install screw on lamp assembly.
Replacing tail/brake/turn signal/backup lamp bulbs
The tail/brake/turn signal and
backup lamp bulbs are located in
the tail lamp assembly, one just
below the other. Follow the same
steps to replace either bulb:
1. Make sure the headlamp switch is
in the OFF position and then open
the tailgate to expose the lamp
assembly screws.
2. Remove the two bolts from the tail lamp assembly.
3. Carefully pull the lamp assembly from the tailgate pillar to disengage
two hidden snap-in retainers. (Flare side tail lamps are not equipped
with snap-in retainers.)
4. Remove bulb socket from the lamp assembly by turning it
counterclockwise.
2004 F150 Classic(p96)
Owners Guide (post-2002-fmt)
USA English(fus)
Lights
41
Page 42 of 248
5. Pull bulb straight out of socket and press in the new bulb.
6. Install the bulb socket into the lamp assembly by turning clockwise.
7. Carefully install the tail lamp assembly on tailgate pillar snapping the
two snap-in retainers into place. (Flare side tail lamps do not snap into
place but have two tabs which fit into slots.)
8. Secure the tail lamp on the vehicle with two bolts.
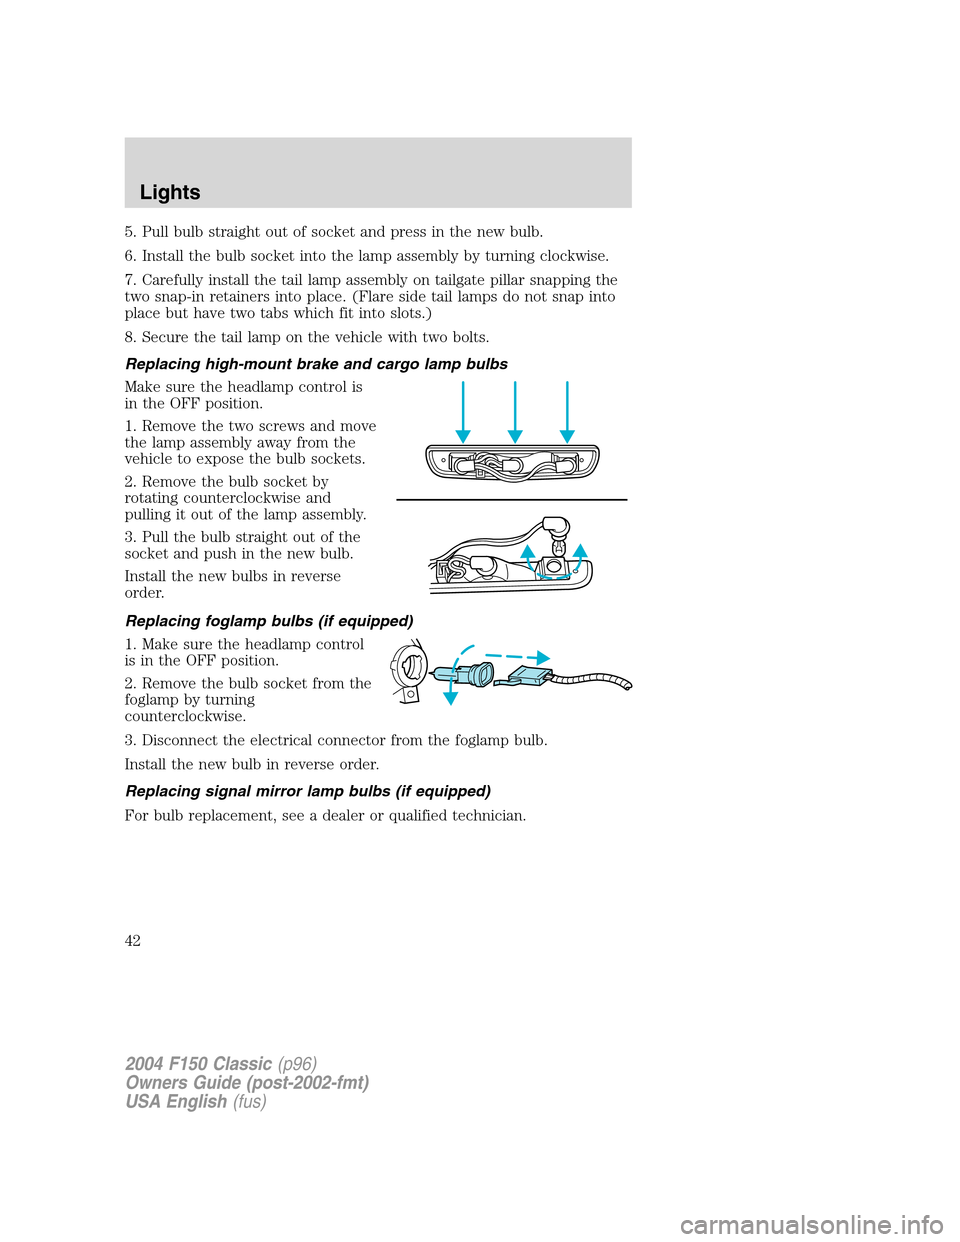
Replacing high-mount brake and cargo lamp bulbs
Make sure the headlamp control is
in the OFF position.
1. Remove the two screws and move
the lamp assembly away from the
vehicle to expose the bulb sockets.
2. Remove the bulb socket by
rotating counterclockwise and
pulling it out of the lamp assembly.
3. Pull the bulb straight out of the
socket and push in the new bulb.
Install the new bulbs in reverse
order.
Replacing foglamp bulbs (if equipped)
1. Make sure the headlamp control
is in the OFF position.
2. Remove the bulb socket from the
foglamp by turning
counterclockwise.
3. Disconnect the electrical connector from the foglamp bulb.
Install the new bulb in reverse order.
Replacing signal mirror lamp bulbs (if equipped)
For bulb replacement, see a dealer or qualified technician.
2004 F150 Classic(p96)
Owners Guide (post-2002-fmt)
USA English(fus)
Lights
42
Page 138 of 248
The braking system of the tow vehicle is rated for operation at the
GVWR not GCWR.
Trailer lamps
Trailer lamps are required on most towed vehicles. Make sure all running
lights, brake lights, turn signals and hazard lights are working. See your
dealer or trailer rental agency for proper instructions and equipment for
hooking up trailer lamps.
Using a step bumper (if equipped)
The rear bumper is equipped with an integral hitch and only requires a
ball with a one inch (25.4 mm) shank diameter. The bumper has a 5,000
lbs. (2,270 kg) trailer weight and 500 lbs. (227 kg) tongue weight
capacity.
If it is necessary to relocate the trailer hitch ball position, a
frame-mounted trailer hitch must be installed.
Driving while you tow
When towing a trailer:
•Turn off the speed control. The speed control may shut off
automatically when you are towing on long, steep grades.
•Consult your local motor vehicle speed regulations for towing a trailer.
•To eliminate excessive shifting, use a lower gear. This will also assist
in transmission cooling. (For additional information, refer to the
Understanding the positions of the 4–speed automatic
transmissionsection in this chapter.
•Anticipate stops and brake gradually.
•Do not exceed the GCWR rating or transmission damage may occur.
Servicing after towing
If you tow a trailer for long distances, your vehicle will require more
frequent service intervals. Refer to yourScheduled Maintenance Guide
for more information.
2004 F150 Classic(p96)
Owners Guide (post-2002-fmt)
USA English(fus)
Driving
138