2004 FORD F150 wheel
[x] Cancel search: wheelPage 133 of 248
Exceeding any vehicle weight rating limitation could result in
serious damage to the vehicle and/or personal injury.
Special loading instructions for owners of pickup trucks and
utility-type vehicles
For important information regarding safe operation of this type
of vehicle, see thePreparing to drive your vehiclesection in
this chapter.
Loaded vehicles may handle differently than unloaded vehicles.
Extra precautions, such as slower speeds and increased stopping
distance, should be taken when driving a heavily loaded vehicle.
Your vehicle can haul more cargo and people than most passenger cars.
Depending upon the type and placement of the load, hauling cargo and
people may raise the center of gravity of the vehicle.
Calculating the load your vehicle can carry/tow
1. Use the appropriate maximum GCWR chart (in theTrailer towing
section in this chapter) for your type of engine, wheel size and rear axle
ratio.
2. Weigh your vehicle without cargo. To obtain correct weights, take your
vehicle to a shipping company or an inspection station for trucks.
3. Subtract your loaded weight from the maximum GCWR in the chart.
This is the maximum trailer weight your vehicle can tow. It must be
below the maximum trailer weight shown in the chart.
TRAILER TOWING
Your vehicle may tow a class I, II or III trailer provided the maximum
trailer weight is less than or equal to the maximum trailer weight listed
for your engine and rear axle ratio on the following charts.
Your vehicle’s load capacity is designated by weight, not by volume, so
you cannot necessarily use all available space when loading a vehicle.
Towing a trailer places an additional load on your vehicle’s engine,
transmission, axle, brakes, tires and suspension. Inspect these
components carefully periodically during, and after any towing operation.
Exceeding the maximum GCWR could result in extensive damage
to your vehicle and personal injury.
2004 F150 Classic(p96)
Owners Guide (post-2002-fmt)
USA English(fus)
Driving
133
Page 139 of 248
Trailer towing tips
•Practice turning, stopping and backing up before starting on a trip to
get the feel of the vehicle trailer combination. When turning, make
wider turns so the trailer wheels will clear curbs and other obstacles.
•Allow more distance for stopping with a trailer attached.
•The trailer tongue weight should be 10–15% of the loaded trailer
weight.
•After you have traveled 50 miles (80 km), thoroughly check your
hitch, electrical connections and trailer wheel lug nuts.
•To aid in engine/transmission cooling and A/C efficiency during hot
weather while stopped in traffic, place the gearshift lever in P (Park)
(automatic transmission) or N (Neutral) (manual transmissions).
•Vehicles with trailers should not be parked on a grade. If you must
park on a grade, place wheel chocks under the trailer’s wheels.
Launching or retrieving a boat
Disconnect the wiring to the trailer before backing the trailer
into the water. Reconnect the wiring to the trailer after the
trailer is removed from the water.
When backing down a ramp during boat launching or retrieval:
•do not allow the static water level to rise above the bottom edge of
the rear bumper.
•do not allow waves to break higher than 6 inches (15 cm) above the
bottom edge of the rear bumper.
Exceeding these limits may allow water to enter vehicle components:
•causing internal damage to the components.
•affecting driveability, emissions and reliability.
Replace the rear axle lubricant any time the axle has been submerged in
water. Rear axle lubricant quantities are not to be checked or changed
unless a leak is suspected or repair required.
2004 F150 Classic(p96)
Owners Guide (post-2002-fmt)
USA English(fus)
Driving
139
Page 140 of 248
RECREATIONAL TOWING (ALL WHEELS ON THE GROUND)
An example of recreational towing would be towing your vehicle behind
a motorhome. Follow these guidelines if you have the need for
recreational towing your vehicle with all four wheels on the ground.
These guidelines are designed to ensure that your transmission is not
damaged.
2WD vehicles:
•Place the transmission in N (Neutral)
•Maximum speed is 35 mph (56 km)
•Maximum distance is 50 miles (80 km)
If a distance of 50 miles (80 km) or a speed of 35 mph (56 km) must be
exceeded, the drive shaft will have to be removed before the vehicle is
towed.
Ford recommends the driveshaft be removed/installed only by a qualified
technician. See your local dealer for driveshaft removal/installation.
Improper removal/installation of the driveshaft can cause
transmission fluid loss, damage to the driveshaft and internal
transmission components.
4WD vehicles electronic shift transfer case:
4x4 vehicles with electronic shift on the fly cannot be towed with any
wheels on the ground.
SNOWPLOWING
Your vehicle is not recommended for snowplowing. Ford makes no
representation as to the suitability of your vehicle for snowplowing, in
particular regarding the potential for exceeding vehicle weight limits,
airbag (SRS) deployment sensitivity, vehicle crash integrity, or
powertrain durability. The Snowplow Package Option is not available.
2004 F150 Classic(p96)
Owners Guide (post-2002-fmt)
USA English(fus)
Driving
140
Page 142 of 248
Canadian customers who require roadside assistance, call
1–800–665–2006.
If you need to arrange roadside assistance for yourself, Ford Motor
Company will reimburse a reasonable amount. To obtain reimbursement
information, U.S. Ford or Mercury vehicles customers call
1-800-241-3673; Lincoln vehicle customers call 1–800–521–4140.
Canadian customers who need to obtain reimbursement information, call
1–800–665–2006.
ROADSIDE COVERAGE BEYOND BASIC WARRANTY
In the United States, you may purchase additional roadside assistance
coverage beyond this period through the Ford Auto Club by contacting
your Ford or Lincoln Mercury dealer.
Similarly in Canada, for uninterrupted Roadside Assistance coverage, you
may purchase extended coverage prior to your Basic Warranty’s Roadside
Assistance expiring. For more information and enrollment, contact
1–877–294–2582 or visit our website at www.ford.ca.
HAZARD FLASHER
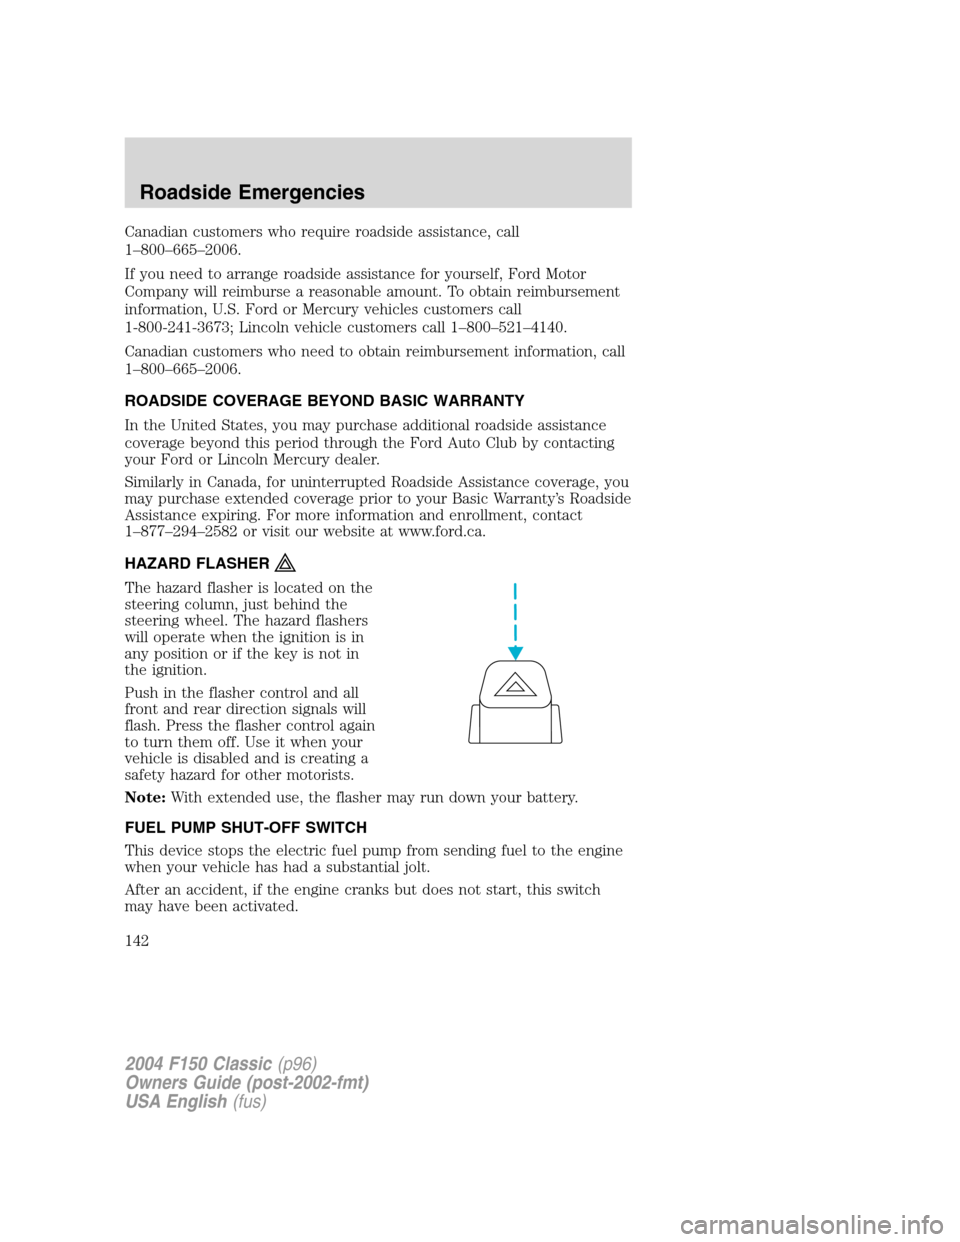
The hazard flasher is located on the
steering column, just behind the
steering wheel. The hazard flashers
will operate when the ignition is in
any position or if the key is not in
the ignition.
Push in the flasher control and all
front and rear direction signals will
flash. Press the flasher control again
to turn them off. Use it when your
vehicle is disabled and is creating a
safety hazard for other motorists.
Note:With extended use, the flasher may run down your battery.
FUEL PUMP SHUT-OFF SWITCH
This device stops the electric fuel pump from sending fuel to the engine
when your vehicle has had a substantial jolt.
After an accident, if the engine cranks but does not start, this switch
may have been activated.
2004 F150 Classic(p96)
Owners Guide (post-2002-fmt)
USA English(fus)
Roadside Emergencies
142
Page 144 of 248
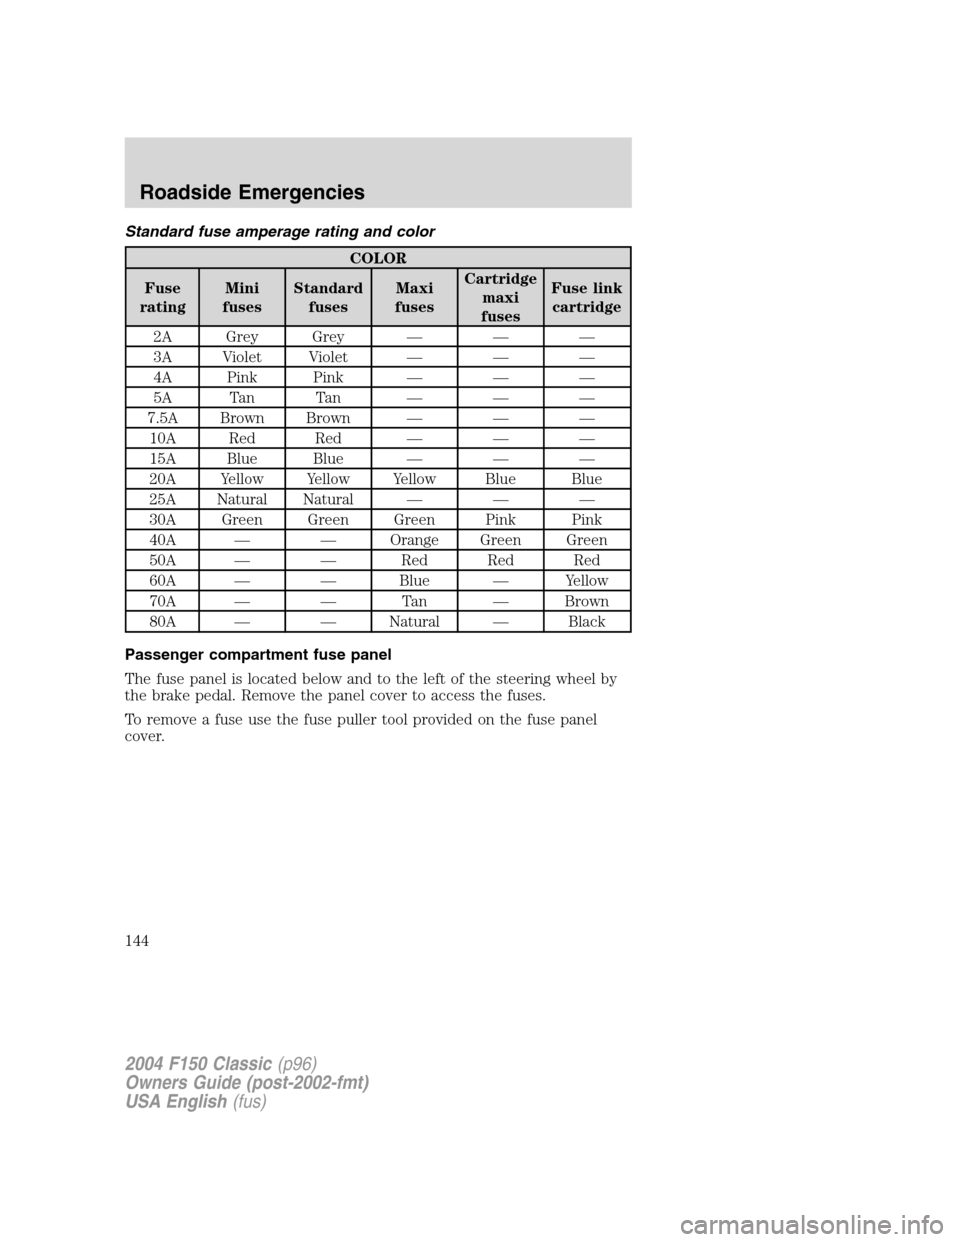
Standard fuse amperage rating and color
COLOR
Fuse
ratingMini
fusesStandard
fusesMaxi
fusesCartridge
maxi
fusesFuse link
cartridge
2A Grey Grey———
3A Violet Violet———
4A Pink Pink———
5A Tan Tan———
7.5A Brown Brown———
10A Red Red———
15A Blue Blue———
20A Yellow Yellow Yellow Blue Blue
25A Natural Natural———
30A Green Green Green Pink Pink
40A——Orange Green Green
50A——Red Red Red
60A——Blue—Yellow
70A——Ta n—Brown
80A——Natural—Black
Passenger compartment fuse panel
The fuse panel is located below and to the left of the steering wheel by
the brake pedal. Remove the panel cover to access the fuses.
To remove a fuse use the fuse puller tool provided on the fuse panel
cover.
2004 F150 Classic(p96)
Owners Guide (post-2002-fmt)
USA English(fus)
Roadside Emergencies
144
Page 146 of 248
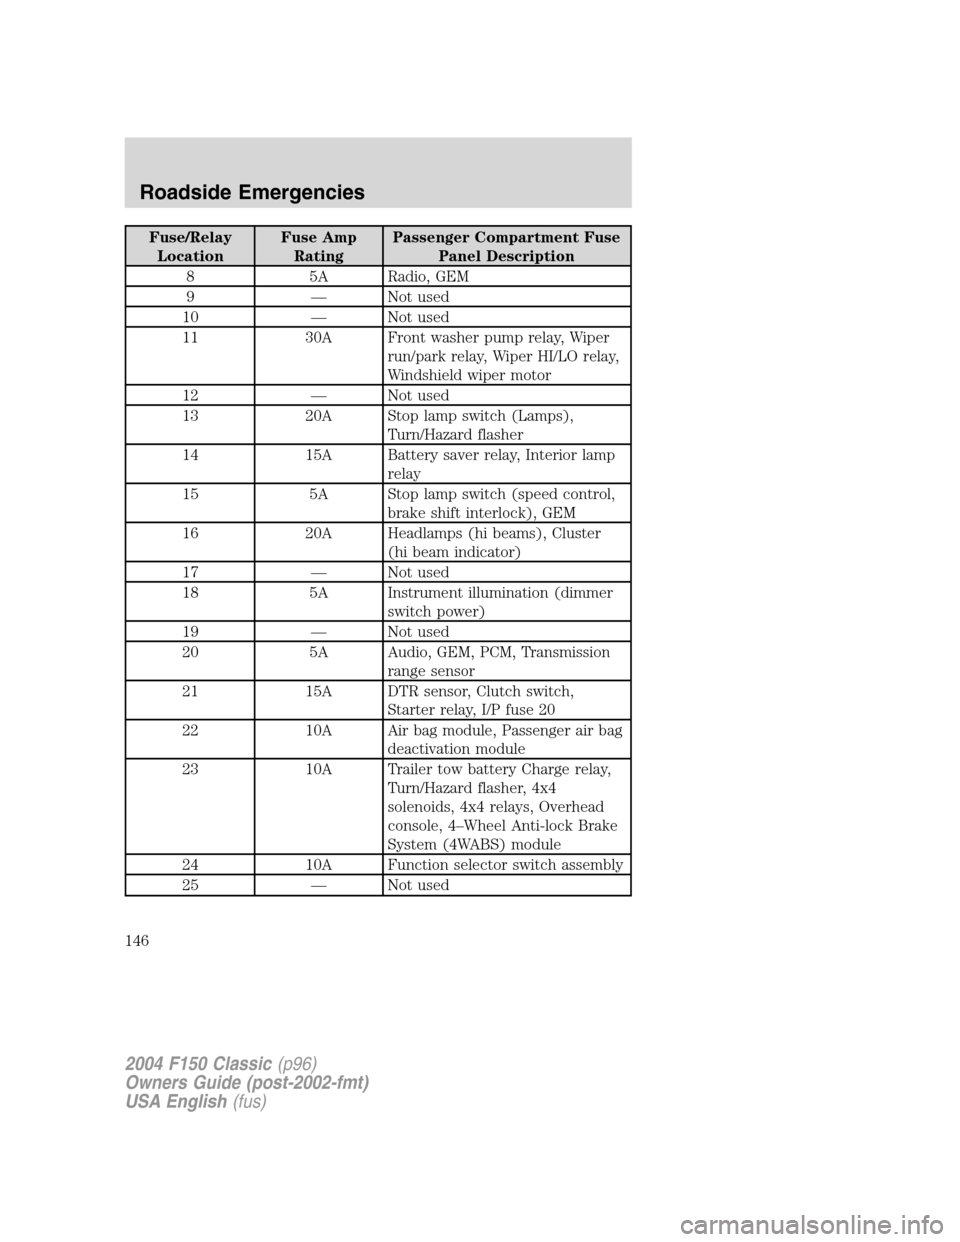
Fuse/Relay
LocationFuse Amp
RatingPassenger Compartment Fuse
Panel Description
8 5A Radio, GEM
9—Not used
10—Not used
11 30A Front washer pump relay, Wiper
run/park relay, Wiper HI/LO relay,
Windshield wiper motor
12—Not used
13 20A Stop lamp switch (Lamps),
Turn/Hazard flasher
14 15A Battery saver relay, Interior lamp
relay
15 5A Stop lamp switch (speed control,
brake shift interlock), GEM
16 20A Headlamps (hi beams), Cluster
(hi beam indicator)
17—Not used
18 5A Instrument illumination (dimmer
switch power)
19—Not used
20 5A Audio, GEM, PCM, Transmission
range sensor
21 15A DTR sensor, Clutch switch,
Starter relay, I/P fuse 20
22 10A Air bag module, Passenger air bag
deactivation module
23 10A Trailer tow battery Charge relay,
Turn/Hazard flasher, 4x4
solenoids, 4x4 relays, Overhead
console, 4–Wheel Anti-lock Brake
System (4WABS) module
24 10A Function selector switch assembly
25—Not used
2004 F150 Classic(p96)
Owners Guide (post-2002-fmt)
USA English(fus)
Roadside Emergencies
146
Page 149 of 248
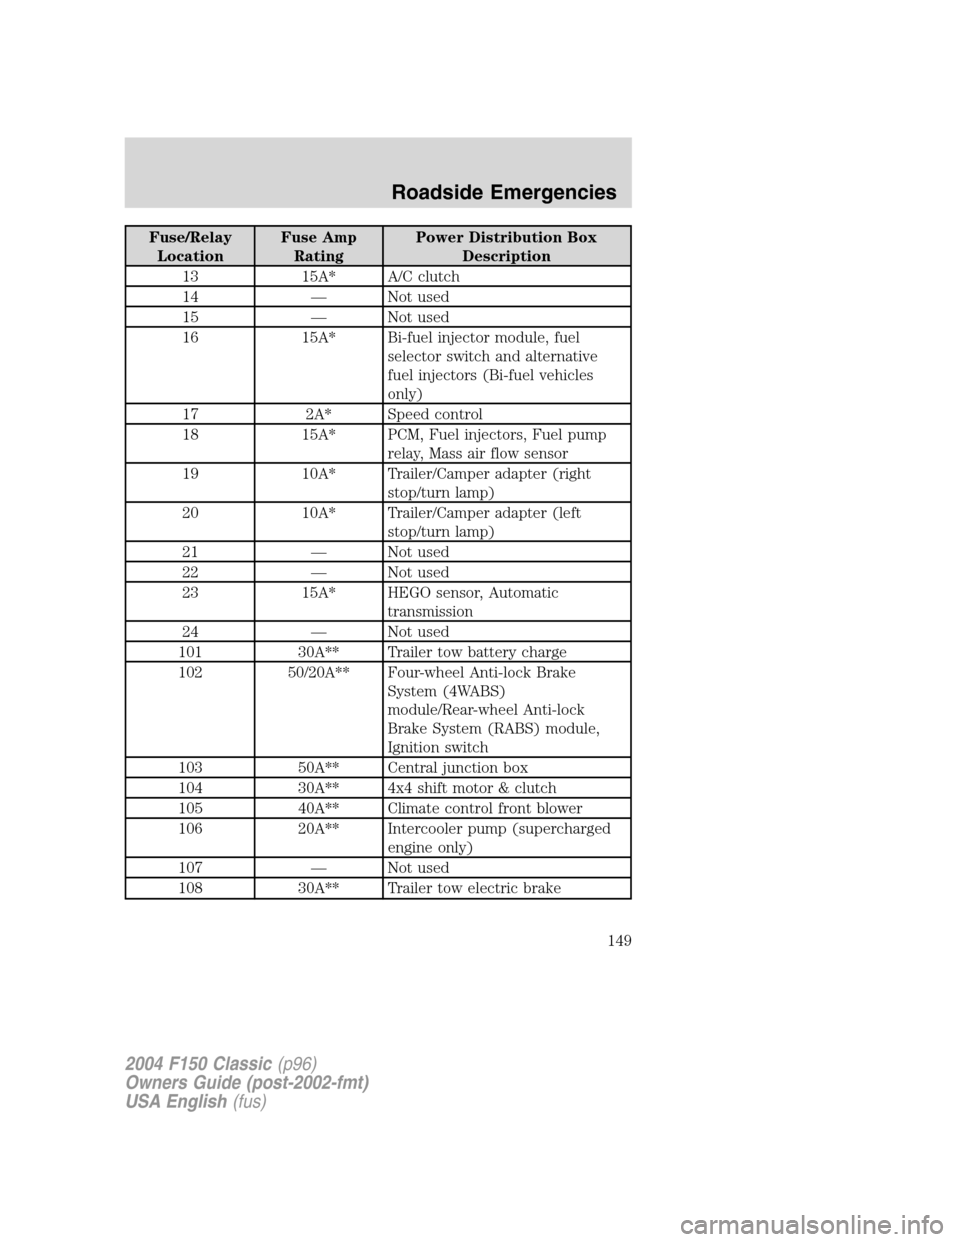
Fuse/Relay
LocationFuse Amp
RatingPower Distribution Box
Description
13 15A* A/C clutch
14—Not used
15—Not used
16 15A* Bi-fuel injector module, fuel
selector switch and alternative
fuel injectors (Bi-fuel vehicles
only)
17 2A* Speed control
18 15A* PCM, Fuel injectors, Fuel pump
relay, Mass air flow sensor
19 10A* Trailer/Camper adapter (right
stop/turn lamp)
20 10A* Trailer/Camper adapter (left
stop/turn lamp)
21—Not used
22—Not used
23 15A* HEGO sensor, Automatic
transmission
24—Not used
101 30A** Trailer tow battery charge
102 50/20A** Four-wheel Anti-lock Brake
System (4WABS)
module/Rear-wheel Anti-lock
Brake System (RABS) module,
Ignition switch
103 50A** Central junction box
104 30A** 4x4 shift motor & clutch
105 40A** Climate control front blower
106 20A** Intercooler pump (supercharged
engine only)
107—Not used
108 30A** Trailer tow electric brake
2004 F150 Classic(p96)
Owners Guide (post-2002-fmt)
USA English(fus)
Roadside Emergencies
149
Page 151 of 248
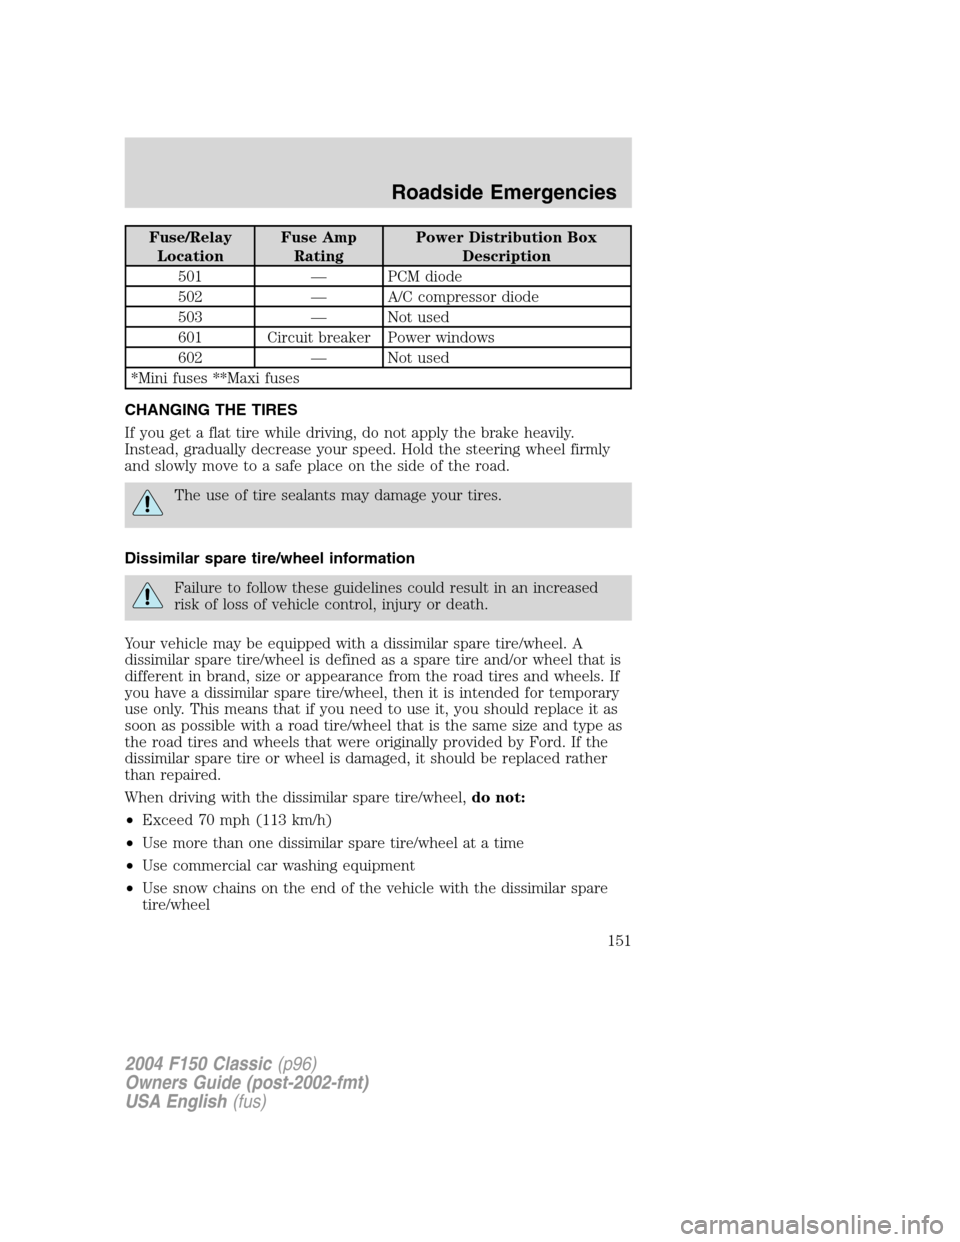
Fuse/Relay
LocationFuse Amp
RatingPower Distribution Box
Description
501—PCM diode
502—A/C compressor diode
503—Not used
601 Circuit breaker Power windows
602—Not used
*Mini fuses **Maxi fuses
CHANGING THE TIRES
If you get a flat tire while driving, do not apply the brake heavily.
Instead, gradually decrease your speed. Hold the steering wheel firmly
and slowly move to a safe place on the side of the road.
The use of tire sealants may damage your tires.
Dissimilar spare tire/wheel information
Failure to follow these guidelines could result in an increased
risk of loss of vehicle control, injury or death.
Your vehicle may be equipped with a dissimilar spare tire/wheel. A
dissimilar spare tire/wheel is defined as a spare tire and/or wheel that is
different in brand, size or appearance from the road tires and wheels. If
you have a dissimilar spare tire/wheel, then it is intended for temporary
use only. This means that if you need to use it, you should replace it as
soon as possible with a road tire/wheel that is the same size and type as
the road tires and wheels that were originally provided by Ford. If the
dissimilar spare tire or wheel is damaged, it should be replaced rather
than repaired.
When driving with the dissimilar spare tire/wheel,do not:
•Exceed 70 mph (113 km/h)
•Use more than one dissimilar spare tire/wheel at a time
•Use commercial car washing equipment
•Use snow chains on the end of the vehicle with the dissimilar spare
tire/wheel
2004 F150 Classic(p96)
Owners Guide (post-2002-fmt)
USA English(fus)
Roadside Emergencies
151