2004 FORD F SERIES MOTORHOME AND COMMERCIAL CHASSIS brake
[x] Cancel search: brakePage 29 of 120
P (Park)
This position locks the transmission and prevents the rear wheels from
turning.
To put your vehicle in gear:
•Start the engine
•Depress the brake pedal
•Move the gearshift lever into the desired gear
To put your vehicle in P (Park):
•Come to a complete stop
•Move the gearshift lever and securely latch it in P (Park)
Always set the parking brake fully and make sure the gearshift is
latched in P (Park). Turn the ignition to the LOCK position and
remove the key whenever you leave your vehicle.
R (Reverse)
With the gearshift lever in R (Reverse), the vehicle will move backward.
Always come to a complete stop before shifting into and out of R
(Reverse).
N (Neutral)
With the gearshift lever in N (Neutral), the vehicle can be started and is
free to roll. Hold the brake pedal down while in this position.
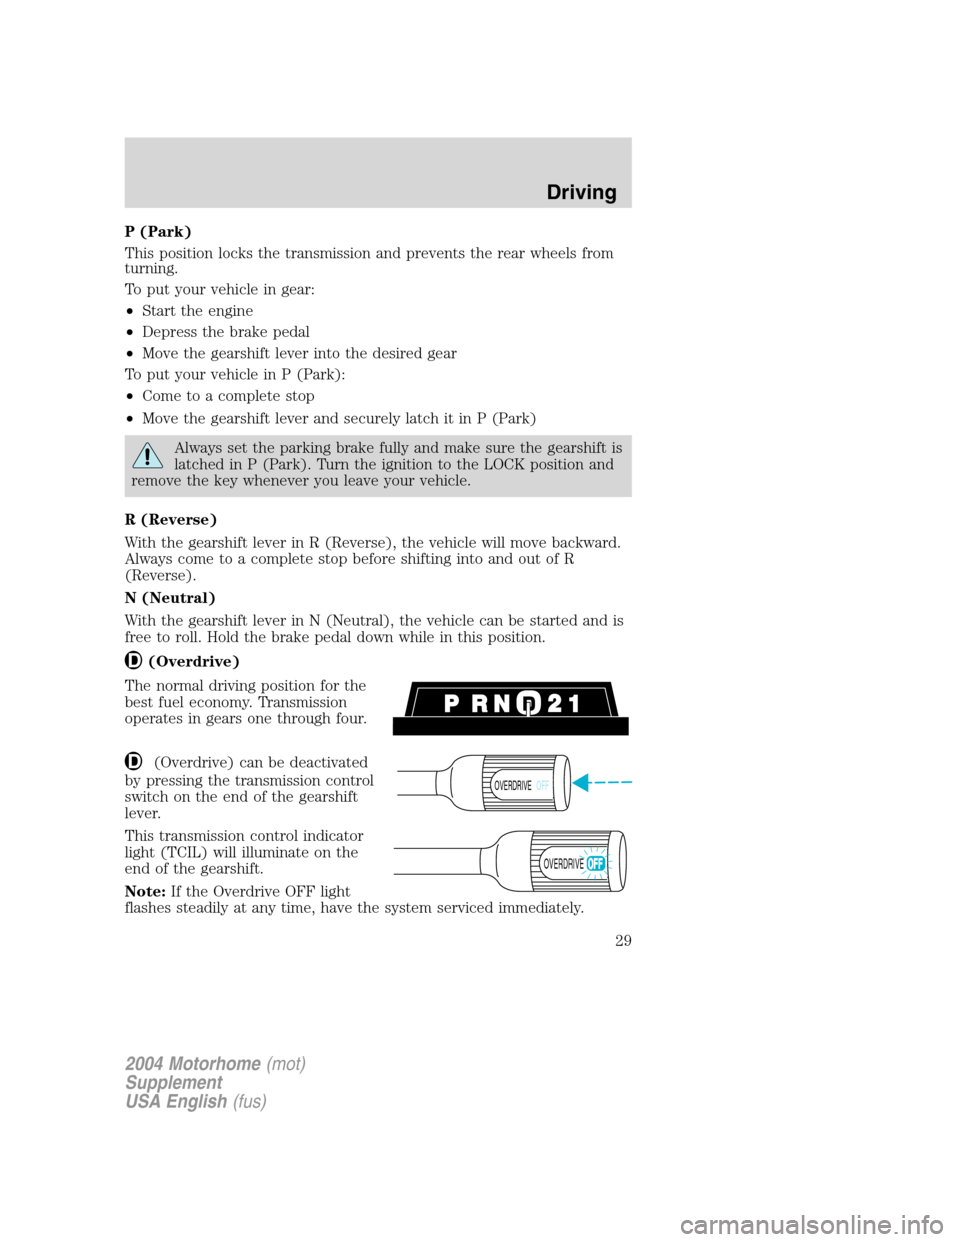
(Overdrive)
The normal driving position for the
best fuel economy. Transmission
operates in gears one through four.
(Overdrive) can be deactivated
by pressing the transmission control
switch on the end of the gearshift
lever.
This transmission control indicator
light (TCIL) will illuminate on the
end of the gearshift.
Note:If the Overdrive OFF light
flashes steadily at any time, have the system serviced immediately.
OVERDRIVEOFF
OVERDRIVE
2004 Motorhome(mot)
Supplement
USA English(fus)
Driving
29
Page 31 of 120
If your vehicle gets stuck in mud or snow
If your vehicle gets stuck in mud or snow, it may be rocked out by
shifting from forward and reverse gears, stopping between shifts in a
steady pattern. Press lightly on the accelerator in each gear.
Do not rock the vehicle if the engine is not at normal operating
temperature or damage to the transmission may occur.
Do not rock the vehicle for more than a minute or damage to the
transmission and tires may occur, or the engine may overheat.
DRIVING THROUGH WATER
Do not drive quickly through standing water, especially if the depth is
unknown. Traction or brake capability may be limited and if the ignition
system gets wet, your engine may stall. Water may also enter your
engine’s air intake and severely damage your engine.
If driving through deep or standing water is unavoidable, proceed very
slowly. Never drive through water that is higher than the bottom of the
hubs (for trucks) or the bottom of the wheel rims (for cars).
Once through the water, always try the brakes. Wet brakes do not stop
the vehicle as effectively as dry brakes. Drying can be improved by
moving your vehicle slowly while applying light pressure on the brake
pedal.
Driving through deep water where the transmission vent tube is
submerged may allow water into the transmission and cause
internal transmission damage. Have the fluid checked and, if
water is found, replace the fluid.
VEHICLE LOADING
Your vehicle’s load capacity is designed by weight, not volume, so you
cannot necessarily use all available space with large or heavy loads.
Maximum safe vehicle weights as well as tire, rim sizes and inflation
pressures are specified for your vehicle on the Safety Compliance
Certification Label. A Certification Label was supplied by Ford Motor
Company to the Motorhome Manufacturer. The manufacturer uses this
information and supplies a Certification Label which is located inside the
vehicle to the left of the driver.
Before loading a vehicle, familiarize yourself with the following terms:
•Base Curb Weight:Weight of the vehicle including any standard
equipment, fluids, lubricants, etc. It does not include occupants or
aftermarket equipment.
2004 Motorhome(mot)
Supplement
USA English(fus)
Driving
31
Page 35 of 120
Exceeding the Safety Certification Label axle weight rating limits
could result in substandard vehicle handling, performance,
engine, transmission and/or structural damage, serious damage to the
vehicle, loss of control and personal injury.
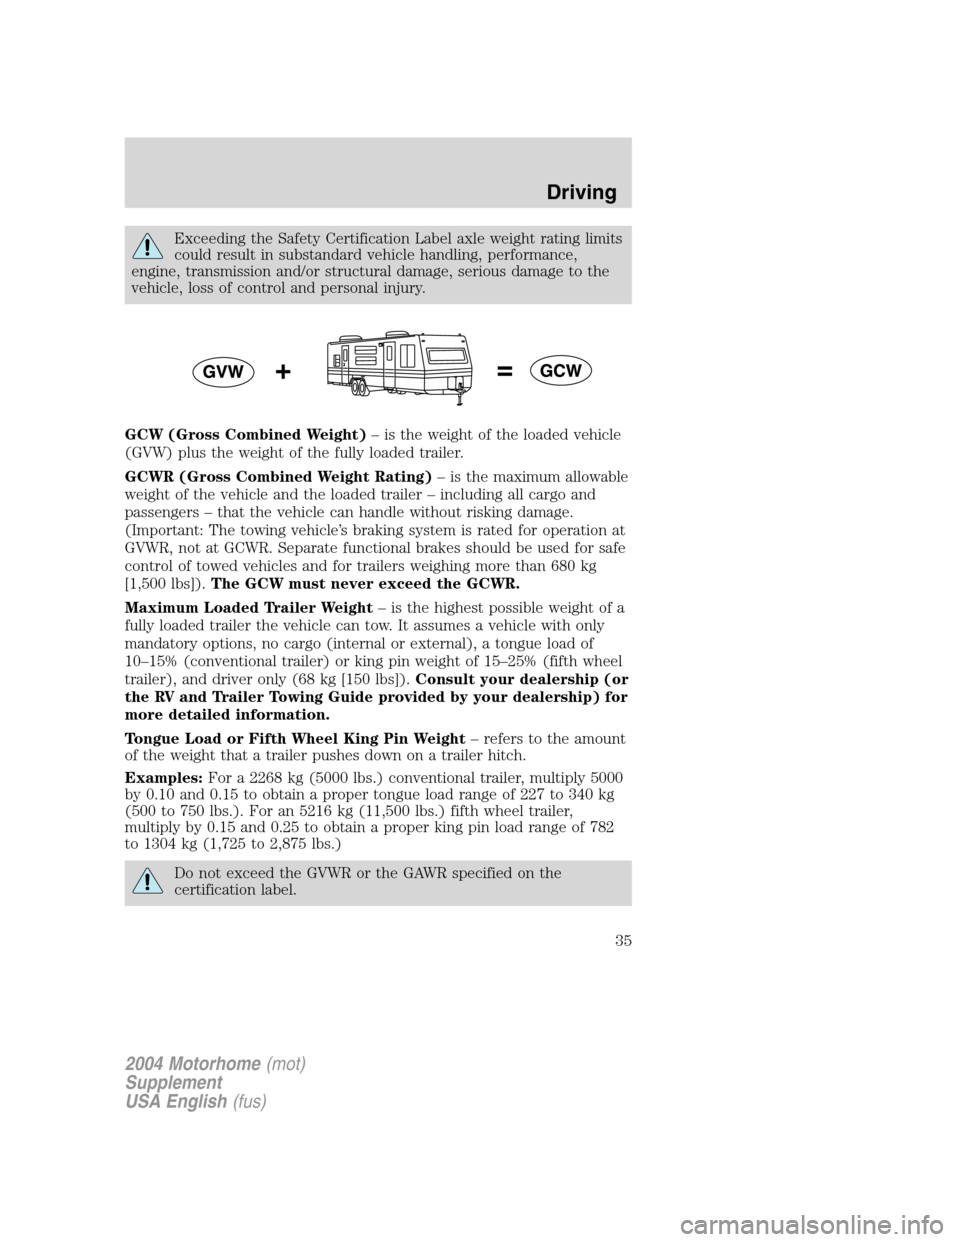
GCW (Gross Combined Weight)–is the weight of the loaded vehicle
(GVW) plus the weight of the fully loaded trailer.
GCWR (Gross Combined Weight Rating)–is the maximum allowable
weight of the vehicle and the loaded trailer–including all cargo and
passengers–that the vehicle can handle without risking damage.
(Important: The towing vehicle’s braking system is rated for operation at
GVWR, not at GCWR. Separate functional brakes should be used for safe
control of towed vehicles and for trailers weighing more than 680 kg
[1,500 lbs]).The GCW must never exceed the GCWR.
Maximum Loaded Trailer Weight–is the highest possible weight of a
fully loaded trailer the vehicle can tow. It assumes a vehicle with only
mandatory options, no cargo (internal or external), a tongue load of
10–15% (conventional trailer) or king pin weight of 15–25% (fifth wheel
trailer), and driver only (68 kg [150 lbs]).Consult your dealership (or
the RV and Trailer Towing Guide provided by your dealership) for
more detailed information.
Tongue Load or Fifth Wheel King Pin Weight–refers to the amount
of the weight that a trailer pushes down on a trailer hitch.
Examples:For a 2268 kg (5000 lbs.) conventional trailer, multiply 5000
by 0.10 and 0.15 to obtain a proper tongue load range of 227 to 340 kg
(500 to 750 lbs.). For an 5216 kg (11,500 lbs.) fifth wheel trailer,
multiply by 0.15 and 0.25 to obtain a proper king pin load range of 782
to 1304 kg (1,725 to 2,875 lbs.)
Do not exceed the GVWR or the GAWR specified on the
certification label.
2004 Motorhome(mot)
Supplement
USA English(fus)
Driving
35
Page 37 of 120
Load equalizing hitch
When hooking up a trailer using a load equalizing hitch, always use the
following procedure:
1. Park the unloaded vehicle on a level surface. With the ignition on and
all doors closed, allow the vehicle to stand for several minutes so that it
can level.
2. Measure the height of a reference point on the front and rear bumpers
at the center of the vehicle.
3. Attach the trailer to the vehicle and adjust the hitch equalizers so that
the front bumper height is within 0–13 mm (0.5 in) of the reference
point. After proper adjustment, the rear bumper should be no higher
than in Step 2.
Note:Adjusting an equalizing hitch so the rear bumper of the vehicle is
higher than it was unloaded will defeat the function of the load
equalizing hitch and may cause unpredictable handling.
Safety chains
Always connect the trailer’s safety chains to the frame or hook retainers
of the vehicle hitch. To connect the trailer’s safety chains, cross the
chains under the trailer tongue and allow slack for turning corners.
If you use a rental trailer, follow the instructions that the rental agency
gives to you.
Do not attach safety chains to the bumper.
Trailer brakes
Electric brakes and manual, automatic or surge-type brakes are safe if
installed properly and adjusted to the manufacturer’s specifications. The
trailer brakes must meet local and Federal regulations.
Do not connect a trailer’s hydraulic brake system directly to your
vehicle’s brake system. Your vehicle may not have enough
braking power and your chances of having a collision greatly increase.
The towing vehicle braking system is rated for operation at the
GVWR, not the GCWR.
Separate functioning brake systems are required for safe control
of towed vehicles and trailers weighing more than 680 kg (1 500
lbs) when loaded.
2004 Motorhome(mot)
Supplement
USA English(fus)
Driving
37
Page 38 of 120
Trailer lamps
Trailer lamps are required on most towed vehicles. Make sure all running
lights, brake lights, turn signals and hazard lights are working. See your
dealer or trailer rental agency for proper instructions and equipment for
hooking up trailer lamps.
Driving while you tow
When towing a trailer:
•Turn off the speed control. The speed control may shut off
automatically when you are towing on long, steep grades.
•Consult your local motor vehicle speed regulations for towing a trailer.
•To eliminate excessive shifting, use a lower gear. This will also assist
in transmission cooling.
•Anticipate stops and brake gradually.
Servicing after towing
If you tow a trailer for long distances, your vehicle will require more
frequent service intervals. Refer to your scheduled maintenance guide for
more information.
Trailer towing tips
•Practice turning, stopping and backing up before starting on a trip to
get the feel of the vehicle trailer combination. When turning, make
wider turns so the trailer wheels will clear curbs and other obstacles.
•Allow more distance for stopping with a trailer attached.
•If you are driving down a long or steep hill, shift to a lower gear. Do
not apply the brakes continuously, as they may overheat and become
less effective.
•The trailer tongue weight should be 10–15% of the loaded trailer
weight.
•After you have traveled 80 km (50 miles), thoroughly check your
hitch, electrical connections and trailer wheel lug nuts.
•To aid in engine/transmission cooling and A/C efficiency during hot
weather while stopped in traffic, place the gearshift lever in P (Park).
•Vehicles with trailers should not be parked on a grade. If you must
park on a grade, place wheel chocks under the trailer’s wheels.
2004 Motorhome(mot)
Supplement
USA English(fus)
Driving
38
Page 40 of 120
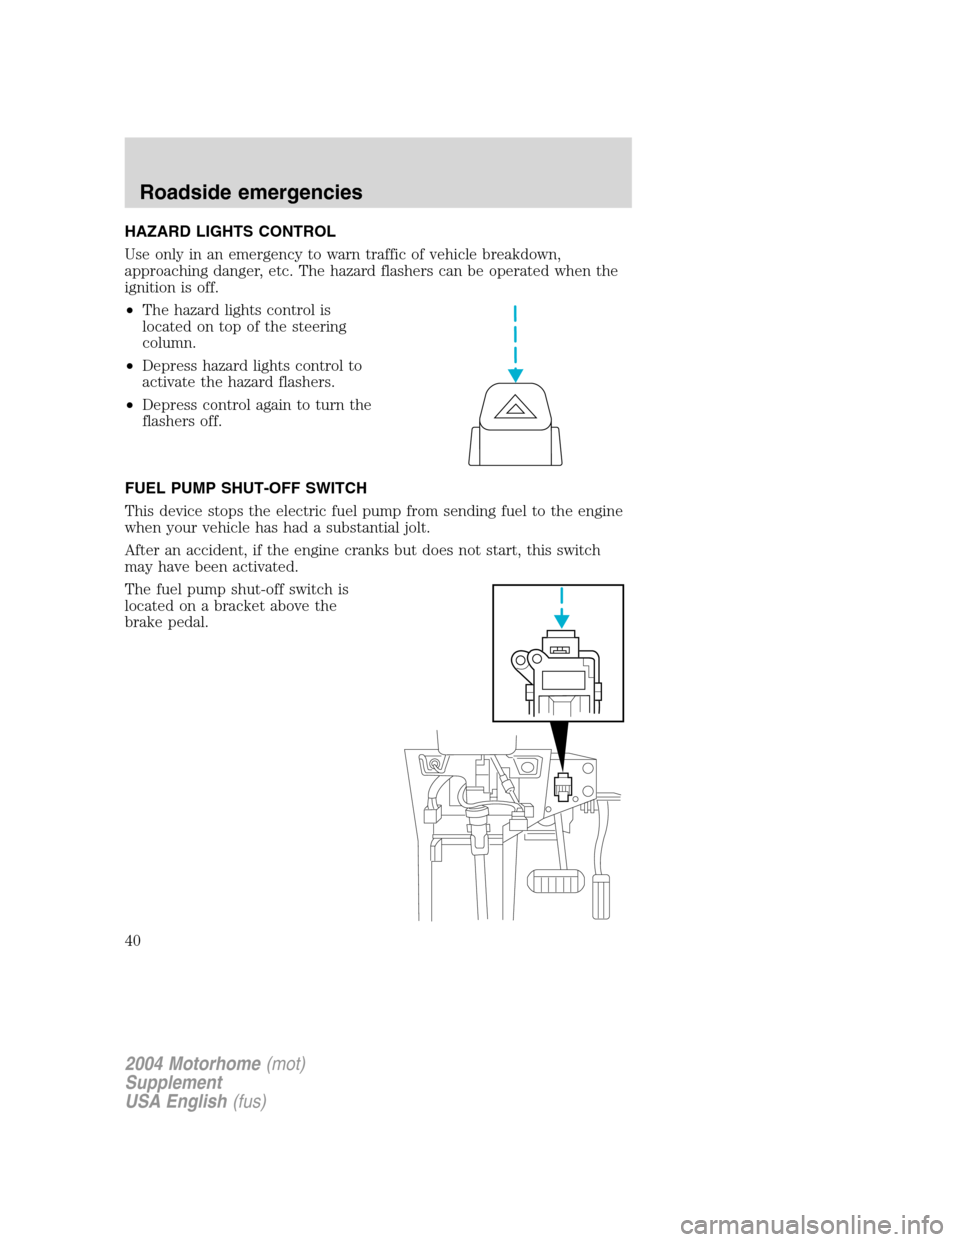
HAZARD LIGHTS CONTROL
Use only in an emergency to warn traffic of vehicle breakdown,
approaching danger, etc. The hazard flashers can be operated when the
ignition is off.
•The hazard lights control is
located on top of the steering
column.
•Depress hazard lights control to
activate the hazard flashers.
•Depress control again to turn the
flashers off.
FUEL PUMP SHUT-OFF SWITCH
This device stops the electric fuel pump from sending fuel to the engine
when your vehicle has had a substantial jolt.
After an accident, if the engine cranks but does not start, this switch
may have been activated.
The fuel pump shut-off switch is
located on a bracket above the
brake pedal.
2004 Motorhome(mot)
Supplement
USA English(fus)
Roadside emergencies
40
Page 42 of 120
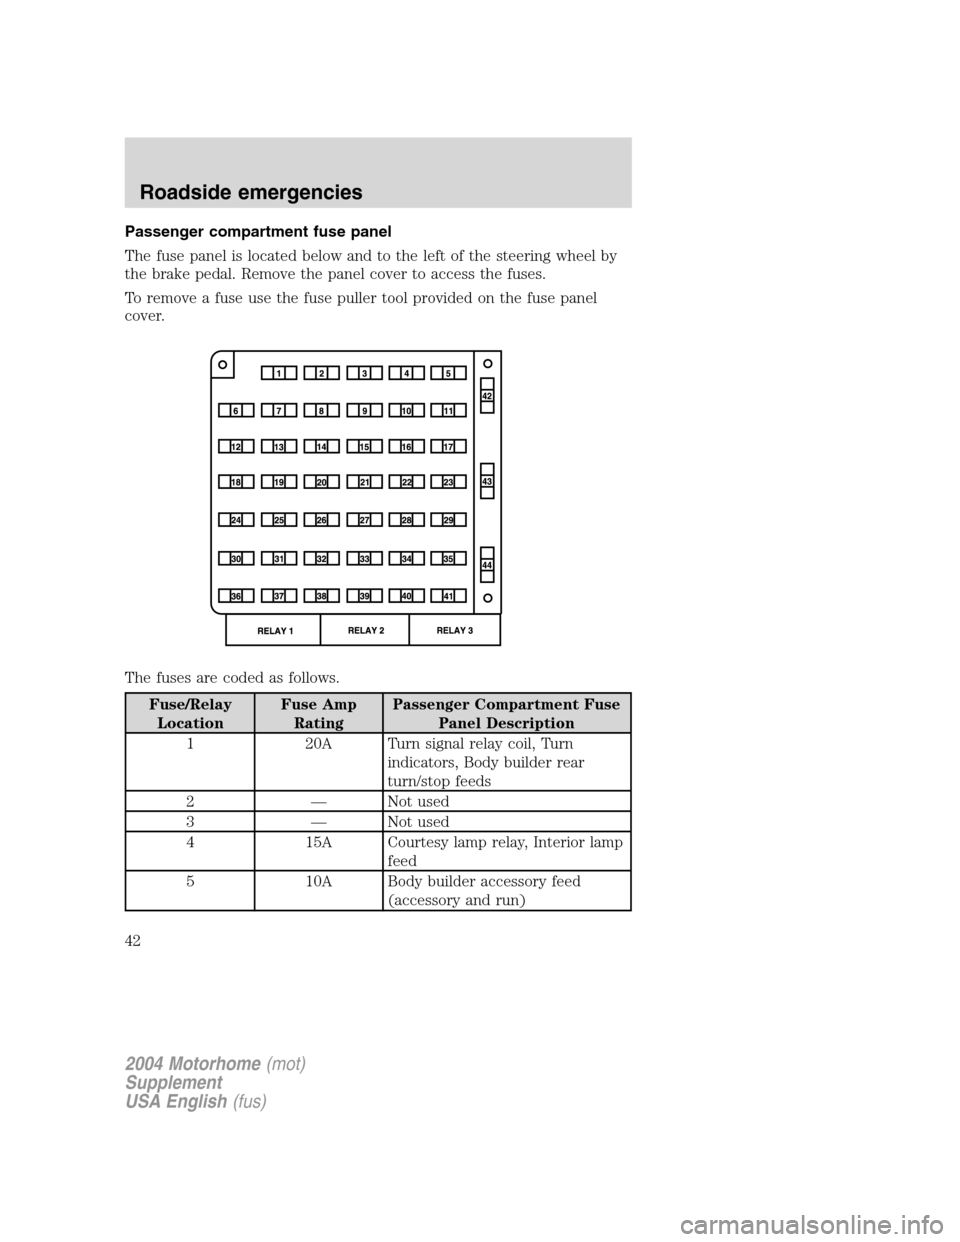
Passenger compartment fuse panel
The fuse panel is located below and to the left of the steering wheel by
the brake pedal. Remove the panel cover to access the fuses.
To remove a fuse use the fuse puller tool provided on the fuse panel
cover.
The fuses are coded as follows.
Fuse/Relay
LocationFuse Amp
RatingPassenger Compartment Fuse
Panel Description
1 20A Turn signal relay coil, Turn
indicators, Body builder rear
turn/stop feeds
2—Not used
3—Not used
4 15A Courtesy lamp relay, Interior lamp
feed
5 10A Body builder accessory feed
(accessory and run)
2004 Motorhome(mot)
Supplement
USA English(fus)
Roadside emergencies
42
Page 43 of 120
Fuse/Relay
LocationFuse Amp
RatingPassenger Compartment Fuse
Panel Description
6 10A Trailer tow left stop/turn feed
7 15A Blower motor relay coil
8—Not used
9 20A Stoplamps: Trailer tow Electric
Brake controller feed, Body
builder rear turn/stop feeds, Body
builder stop lamp feed, Trailer
turn/stop fuse feeds
10 5A Instrument cluster memory,
Power brake assist lamp*
11 30A Wiper/Washer module, Wiper feed
12 10A Trailer tow stop/turn feed
13 10A ABS module
14 10A Warning chime module, Power
brake assist module*, Instrument
cluster power, Instrument cluster
warning lamps, Transmission
control switch
15 15A Left turn signal feed
16 20A Body builder battery (+12V) feed
17 5A Body builder radio feed
18—Not used
19 5A DRL relays
20—Not used
21 15A Right turn signal feed
22—Not used
23—Not used
24—Not used
25 10A Right-hand low beam headlamp
feed
26 10A Speed control module, Brake shift
interlock actuator
2004 Motorhome(mot)
Supplement
USA English(fus)
Roadside emergencies
43