2004 FORD EXPLORER air condition
[x] Cancel search: air conditionPage 1 of 296

Introduction 4
Instrument Cluster 10
Warning and control lights 10
Gauges 15
Entertainment Systems 18
AM/FM stereo with CD 18
AM/FM stereo with in-dash six CD 21
AM/FM stereo cassette with CD 25
Climate Controls 31
Manual heating and air conditioning 31
Electronic automatic temperature control 32
Rear passenger climate control 35
Rear window defroster 36
Lights 37
Driver Controls 46
Windshield wiper/washer control 46
Steering wheel adjustment 47
Power windows 52
Mirrors 53
Speed control 54
Message center 66
Locks and Security 81
Keys 81
Locks 81
Anti-theft system 83
2004 Explorer(exp)
Owners Guide (post-2002-fmt)
USA English(fus)
Table of Contents
Table of Contents
1
Page 10 of 296
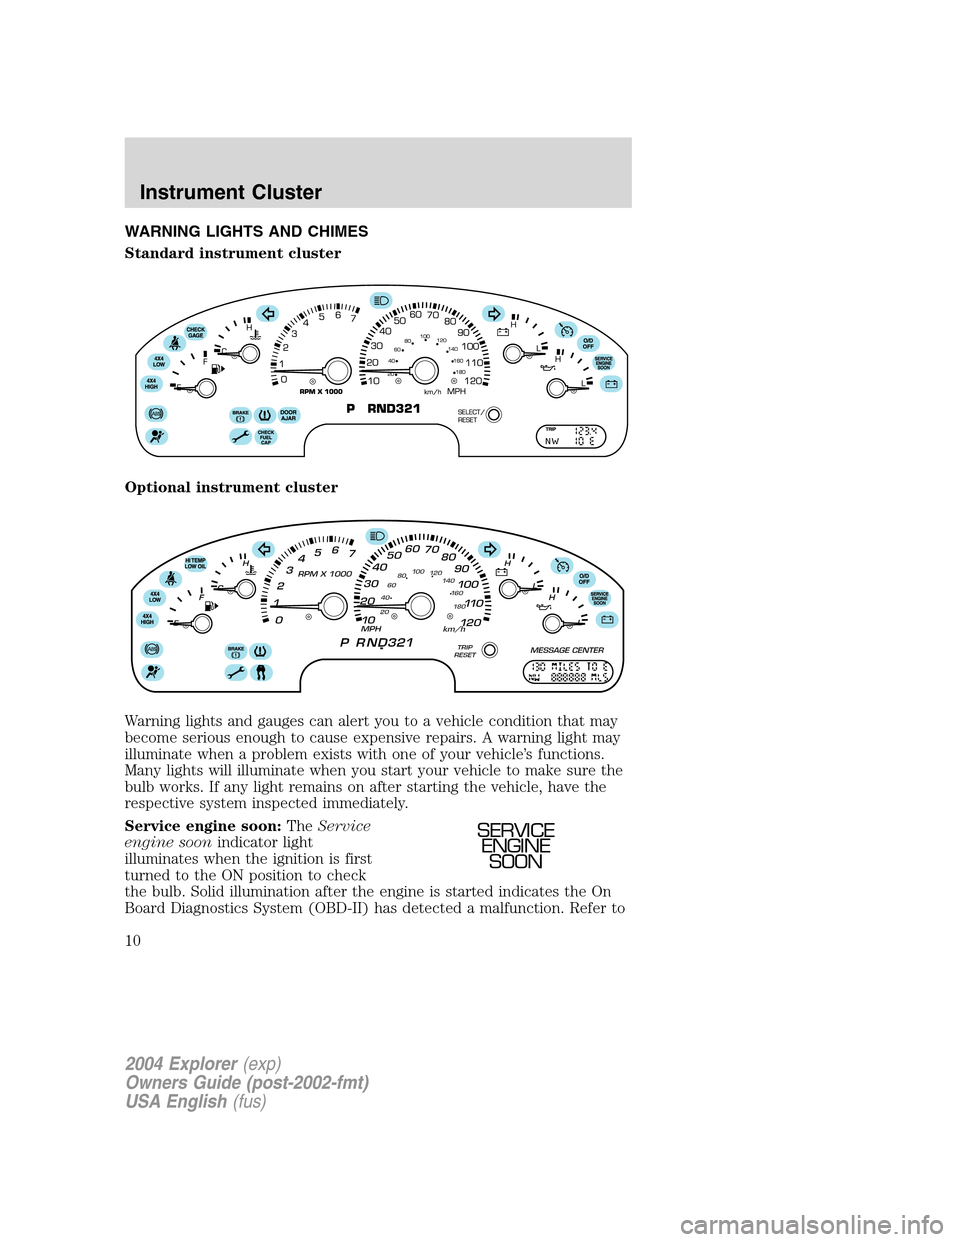
WARNING LIGHTS AND CHIMES
Standard instrument cluster
Optional instrument cluster
Warning lights and gauges can alert you to a vehicle condition that may
become serious enough to cause expensive repairs. A warning light may
illuminate when a problem exists with one of your vehicle’s functions.
Many lights will illuminate when you start your vehicle to make sure the
bulb works. If any light remains on after starting the vehicle, have the
respective system inspected immediately.
Service engine soon:TheService
engine soonindicator light
illuminates when the ignition is first
turned to the ON position to check
the bulb. Solid illumination after the engine is started indicates the On
Board Diagnostics System (OBD-II) has detected a malfunction. Refer to
SERVICE
ENGINE
SOON
2004 Explorer(exp)
Owners Guide (post-2002-fmt)
USA English(fus)
Instrument Cluster
Instrument Cluster
10
Page 12 of 296
serviced immediately. Normal braking is still functional unless the brake
warning light also is illuminated.
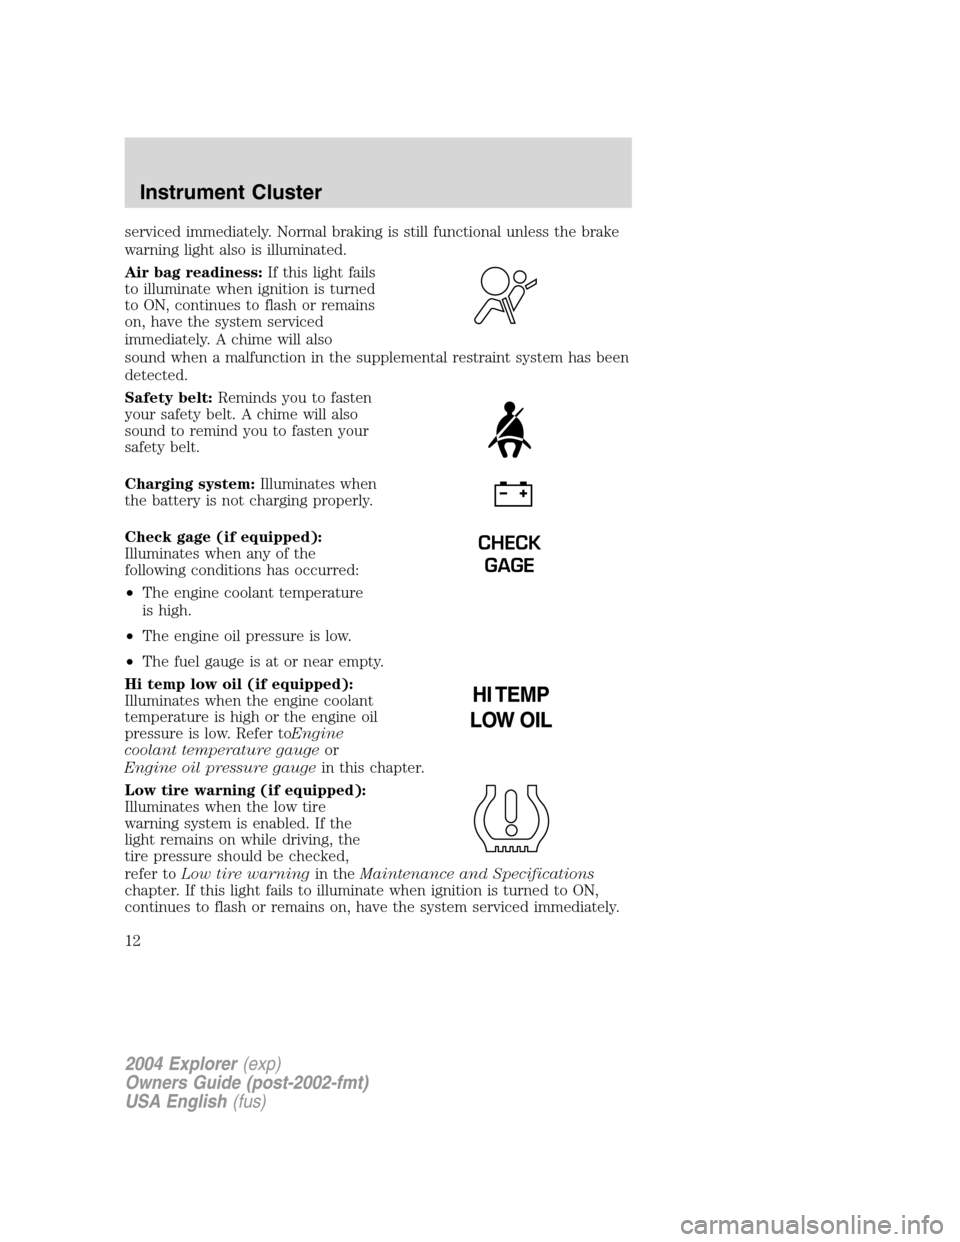
Air bag readiness:If this light fails
to illuminate when ignition is turned
to ON, continues to flash or remains
on, have the system serviced
immediately. A chime will also
sound when a malfunction in the supplemental restraint system has been
detected.
Safety belt:Reminds you to fasten
your safety belt. A chime will also
sound to remind you to fasten your
safety belt.
Charging system:Illuminates when
the battery is not charging properly.
Check gage (if equipped):
Illuminates when any of the
following conditions has occurred:
•The engine coolant temperature
is high.
•The engine oil pressure is low.
•The fuel gauge is at or near empty.
Hi temp low oil (if equipped):
Illuminates when the engine coolant
temperature is high or the engine oil
pressure is low. Refer toEngine
coolant temperature gaugeor
Engine oil pressure gaugein this chapter.
Low tire warning (if equipped):
Illuminates when the low tire
warning system is enabled. If the
light remains on while driving, the
tire pressure should be checked,
refer toLow tire warningin theMaintenance and Specifications
chapter. If this light fails to illuminate when ignition is turned to ON,
continues to flash or remains on, have the system serviced immediately.
CHECK
GAGE
2004 Explorer(exp)
Owners Guide (post-2002-fmt)
USA English(fus)
Instrument Cluster
12
Page 31 of 296
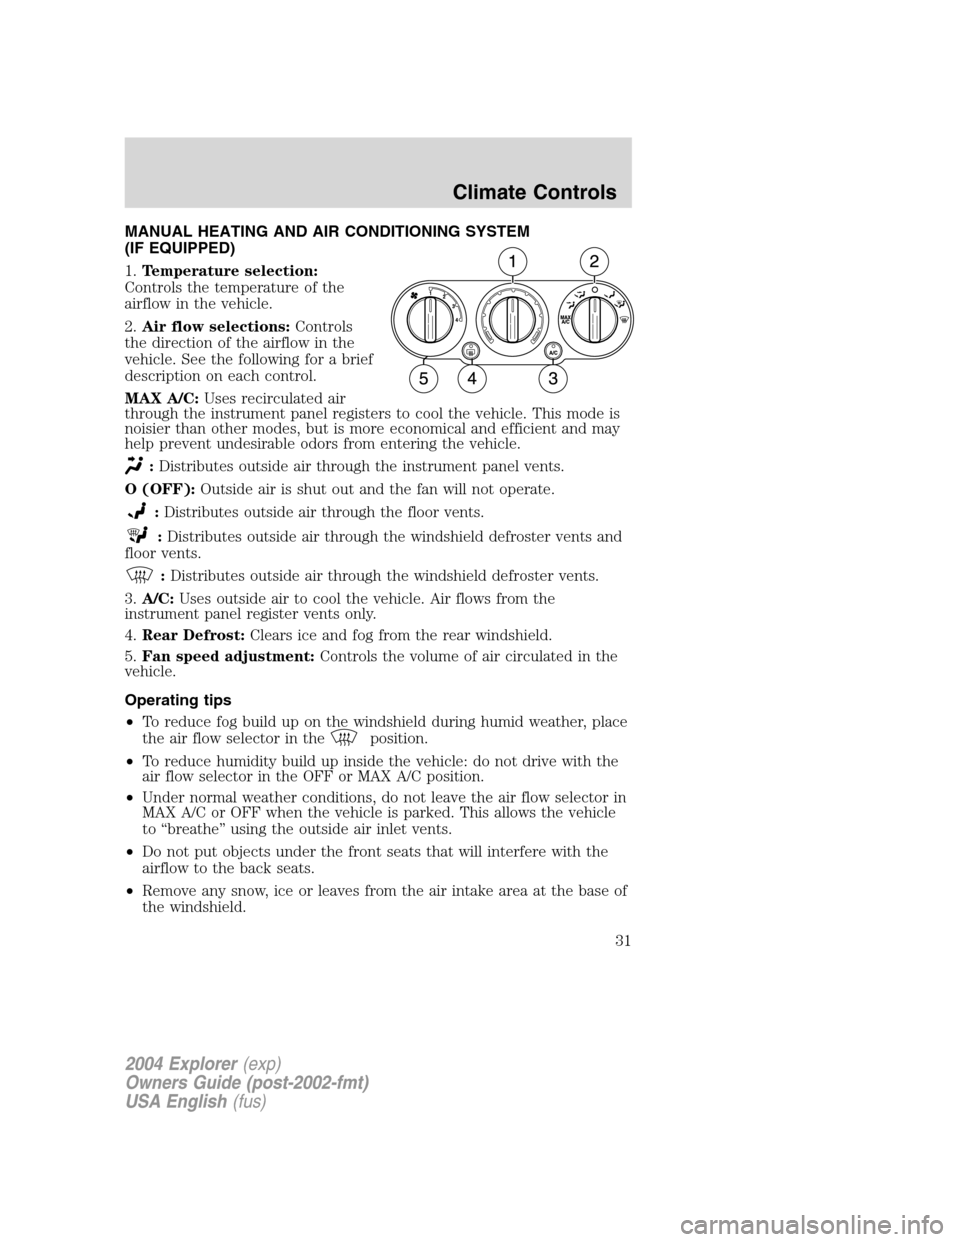
MANUAL HEATING AND AIR CONDITIONING SYSTEM
(IF EQUIPPED)
1.Temperature selection:
Controls the temperature of the
airflow in the vehicle.
2.Air flow selections:Controls
the direction of the airflow in the
vehicle. See the following for a brief
description on each control.
MAX A/C:Uses recirculated air
through the instrument panel registers to cool the vehicle. This mode is
noisier than other modes, but is more economical and efficient and may
help prevent undesirable odors from entering the vehicle.
:Distributes outside air through the instrument panel vents.
O (OFF):Outside air is shut out and the fan will not operate.
:Distributes outside air through the floor vents.
:Distributes outside air through the windshield defroster vents and
floor vents.
:Distributes outside air through the windshield defroster vents.
3.A/C:Uses outside air to cool the vehicle. Air flows from the
instrument panel register vents only.
4.Rear Defrost:Clears ice and fog from the rear windshield.
5.Fan speed adjustment:Controls the volume of air circulated in the
vehicle.
Operating tips
•To reduce fog build up on the windshield during humid weather, place
the air flow selector in the
position.
•To reduce humidity build up inside the vehicle: do not drive with the
air flow selector in the OFF or MAX A/C position.
•Under normal weather conditions, do not leave the air flow selector in
MAX A/C or OFF when the vehicle is parked. This allows the vehicle
to “breathe” using the outside air inlet vents.
•Do not put objects under the front seats that will interfere with the
airflow to the back seats.
•Remove any snow, ice or leaves from the air intake area at the base of
the windshield.
2004 Explorer(exp)
Owners Guide (post-2002-fmt)
USA English(fus)
Climate Controls
Climate Controls
31
Page 34 of 296

15.Fan Speed:Used to manually
enable or disable the fan speed.
16.EXT:Displays the outside air
temperature. It will remain
displayed until the EXT control is
pressed again. The external temperature will be most accurate when the
vehicle has been moving for a period of time.
17.Temperature conversion:
Press to toggle between Fahrenheit
and Celsius temperature on the
DATC display only. The set point temperatures in Celsius will be
displayed in half-degree increments.
Operating tips
•To reduce fog build up on the windshield during humid weather, place
the air flow selector in the
position.
•To reduce humidity build up inside the vehicle: do not drive with the
air flow selector in the OFF or MAX A/C position.
•Under normal weather conditions, do not leave the air flow selector in
MAX A/C or OFF when the vehicle is parked. This allows the vehicle
to “breathe” using the outside air inlet vents.
•Do not put objects under the front seats that will interfere with the
airflow to the back seats.
•Remove any snow, ice or leaves from the air intake area at the base of
the windshield.
To aid in side window defogging/demisting in cold weather:
1. Select
2. Select A/C
3. Modulate the temperature control to maintain comfort.
4. Set the fan speed to HI
5. Direct the outer instrument panel vents towards the side windows
To increase airflow to the outer instrument panel vents, close the vents
located in the middle of the instrument panel.
Do not place objects on top of the instrument panel as these
objects may become projectiles in a collision or sudden stop.
EXT
F C
2004 Explorer(exp)
Owners Guide (post-2002-fmt)
USA English(fus)
Climate Controls
34
Page 64 of 296
ELECTRONIC COMPASS/TEMPERATURE DISPLAY (IF EQUIPPED)
OUTSIDE AIR TEMPERATURE
The outside temperature display is
contained in the instrument cluster
and displays all the time. If
equipped with the DEATC climate
control system, the outside
temperature will be displayed there.
To turn the display off or change the display from English to metric see
your dealer.
Compass
The compass reading may be affected when you drive near large
buildings, bridges, power lines and powerful broadcast antennas.
Magnetic or metallic objects placed in, on or near the vehicle may also
affect compass accuracy.
Usually, when something affects the compass readings, the compass will
correct itself after a few days of operating your vehicle in normal
conditions. If the compass still appears to be inaccurate, a manual
calibration may be necessary. Refer toCompass calibration
adjustment.
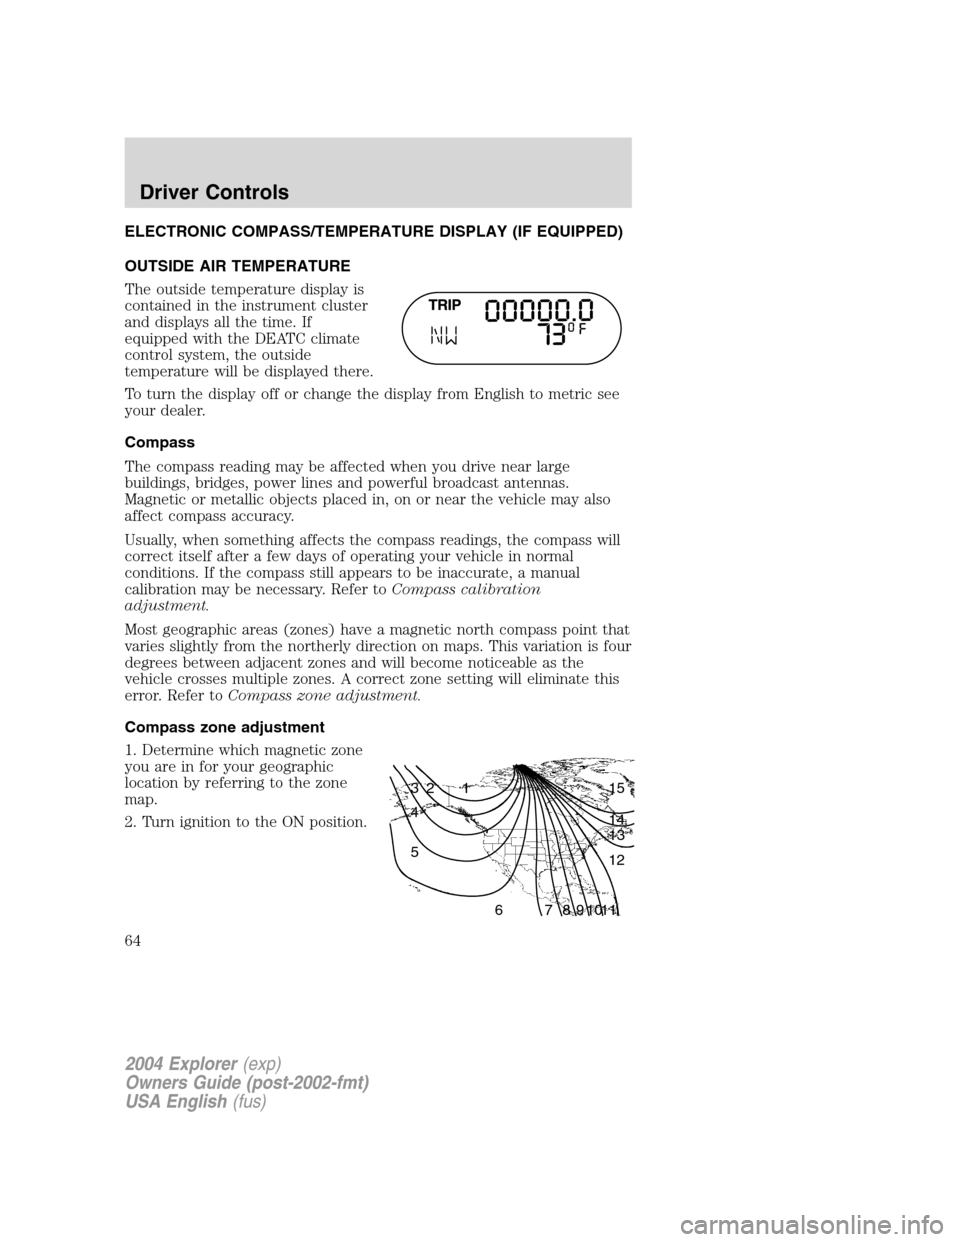
Most geographic areas (zones) have a magnetic north compass point that
varies slightly from the northerly direction on maps. This variation is four
degrees between adjacent zones and will become noticeable as the
vehicle crosses multiple zones. A correct zone setting will eliminate this
error. Refer toCompass zone adjustment.
Compass zone adjustment
1. Determine which magnetic zone
you are in for your geographic
location by referring to the zone
map.
2. Turn ignition to the ON position.
1 2 3
4
5
6 7 8 9 101112 13 14 15
2004 Explorer(exp)
Owners Guide (post-2002-fmt)
USA English(fus)
Driver Controls
64
Page 65 of 296
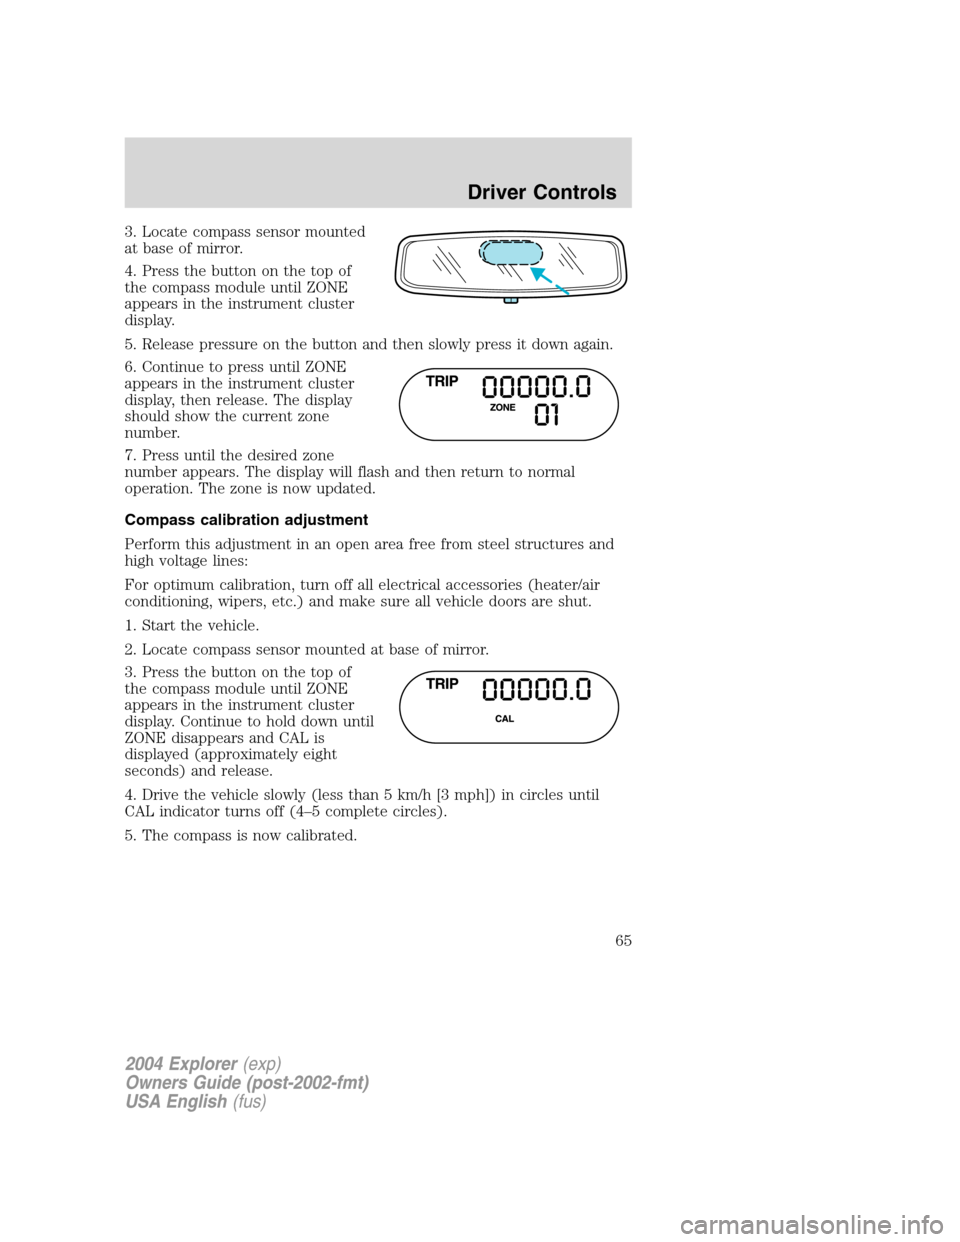
3. Locate compass sensor mounted
at base of mirror.
4. Press the button on the top of
the compass module until ZONE
appears in the instrument cluster
display.
5. Release pressure on the button and then slowly press it down again.
6. Continue to press until ZONE
appears in the instrument cluster
display, then release. The display
should show the current zone
number.
7. Press until the desired zone
number appears. The display will flash and then return to normal
operation. The zone is now updated.
Compass calibration adjustment
Perform this adjustment in an open area free from steel structures and
high voltage lines:
For optimum calibration, turn off all electrical accessories (heater/air
conditioning, wipers, etc.) and make sure all vehicle doors are shut.
1. Start the vehicle.
2. Locate compass sensor mounted at base of mirror.
3. Press the button on the top of
the compass module until ZONE
appears in the instrument cluster
display. Continue to hold down until
ZONE disappears and CAL is
displayed (approximately eight
seconds) and release.
4. Drive the vehicle slowly (less than 5 km/h [3 mph]) in circles until
CAL indicator turns off (4–5 complete circles).
5. The compass is now calibrated.
2004 Explorer(exp)
Owners Guide (post-2002-fmt)
USA English(fus)
Driver Controls
65
Page 67 of 296
Compass display
The compass reading may be affected when you drive near large
buildings, bridges, power lines and powerful broadcast antenna. Magnetic
or metallic objects placed in, on or near the vehicle may also affect
compass accuracy.
Usually, when something affects the compass readings, the compass will
correct itself after a few days of operating your vehicle in normal
conditions. If the compass still appears to be inaccurate, a manual
calibration may be necessary. Refer toCompass zone/calibration
adjustment.
Most geographic areas (zones) have a magnetic north compass point that
varies slightly from the northerly direction on maps. This variation is four
degrees between adjacent zones and will become noticeable as the
vehicle crosses multiple zones. A correct zone setting will eliminate this
error. Refer toCompass zone/calibration adjustment.
Compass zone/calibration adjustment
Perform this adjustment in an open area free from steel structures and
high voltage lines.
For optimum calibration, turn off all electrical accessories (heater/air
conditioning, wipers, etc.) and make sure all vehicle doors are shut.
1. Turn ignition to the ON position.
2. Start the engine.
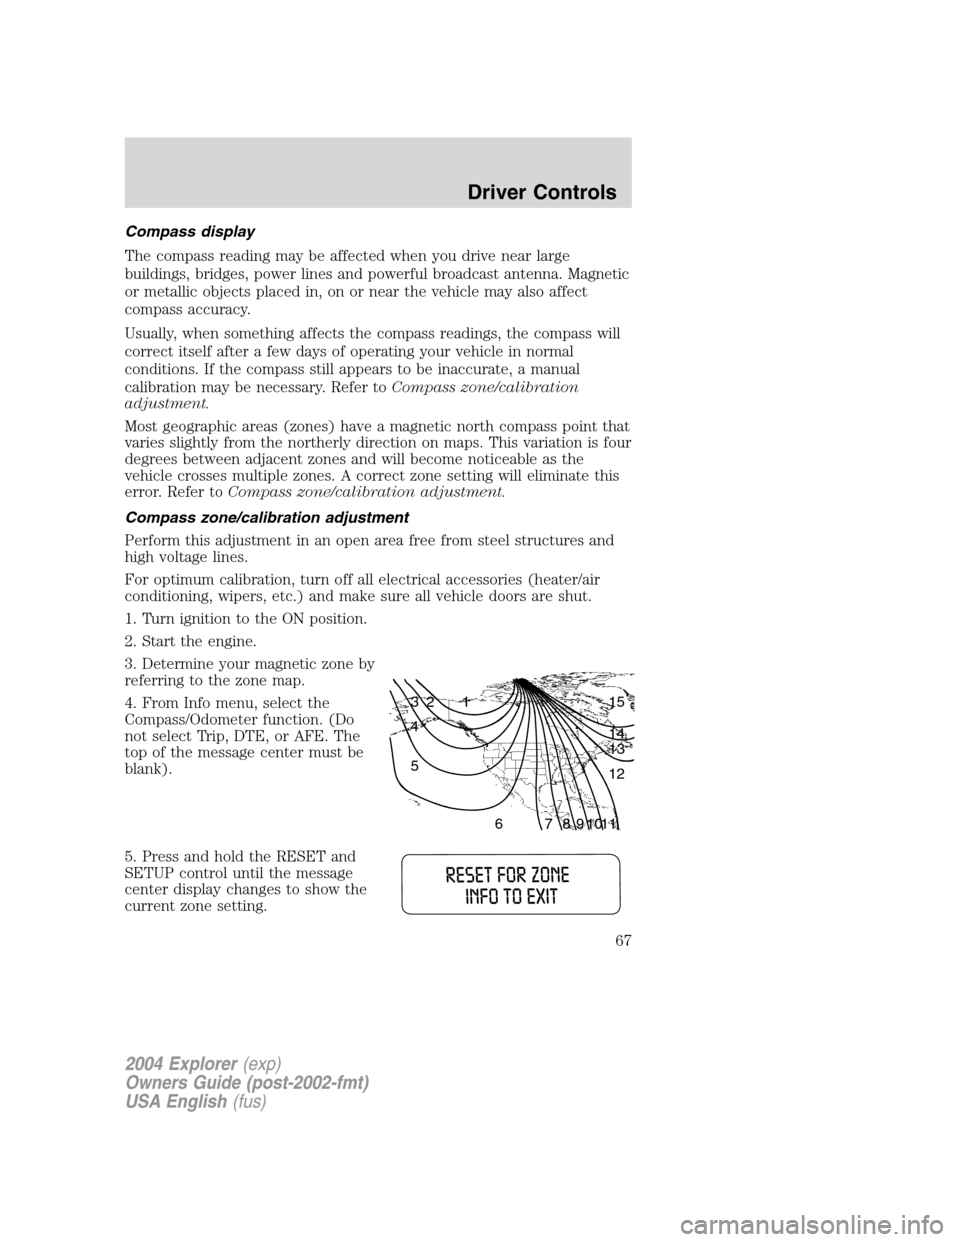
3. Determine your magnetic zone by
referring to the zone map.
4. From Info menu, select the
Compass/Odometer function. (Do
not select Trip, DTE, or AFE. The
top of the message center must be
blank).
5. Press and hold the RESET and
SETUP control until the message
center display changes to show the
current zone setting.
1 2 3
4
5
6 7 8 9 101112 13 14 15
2004 Explorer(exp)
Owners Guide (post-2002-fmt)
USA English(fus)
Driver Controls
67