2004 FORD EXPEDITION transmission fluid
[x] Cancel search: transmission fluidPage 126 of 344
This acts as a reminder that these warning conditions still exist within
the vehicle.
Warning display Status
Check backup aid (if equipped) Warning displays when R (reverse)
gear is selected.
PRNDL error no backup aid (if
equipped)
Door ajar Warning returns after 10 minutes
Liftgate or liftglass ajar
Warning-tire very low (if
equipped)
Low fuel level
Check charging system
Low brake fluid level
Low oil pressure
Check engine temperature
Reduced engine power
Stop engine safely
Check tire pressure (if
equipped)Warning returns after the ignition key
is turned from OFF to ON.
Tire pressure system fault (if
equipped)
Tire pressure sensor fault (if
equipped)
Low washer fluid level
Check AdvTrac (if equipped)
Check air suspension (if
equipped)
Air suspension switched OFF
(if equipped)
Check fuel cap
CHECK BACKUP AID (if equipped).Displayed when the
transmission is in R (Reverse).
2004 Expedition(exd)
Owners Guide (post-2002-fmt)
USA English(fus)
Driver Controls
126
Page 225 of 344
If the transmission, transfer case or front axle are submerged in water,
their fluids should be checked and changed, if necessary.
Driving through deep water may damage the transmission.
If the front or rear axle is submerged in water, the axle lubricant should
be replaced.
After driving through mud, clean off residue stuck to rotating driveshafts
and tires. Excess mud stuck on tires and rotating driveshafts causes an
imbalance that could damage drive components.
“Tread Lightly”is an educational
program designed to increase public
awareness of land-use regulations
and responsibilities in our nations
wilderness areas. Ford Motor
Company joins the U.S. Forest Service and the Bureau of Land
Management in encouraging you to help preserve our national forest and
other public and private lands by“treading lightly.”
Driving on hilly or sloping terrain
Although natural obstacles may make it necessary to travel diagonally up
or down a hill or steep incline, you should always try to drive straight up
or straight down.Avoid driving crosswise or turning on steep
slopes or hills. A danger lies in losing traction, slipping sideways and
possibly rolling over. Whenever driving on a hill, determine beforehand
the route you will use. Do not drive over the crest of a hill without
seeing what conditions are on the other side. Do not drive in reverse
over a hill without the aid of an observer.
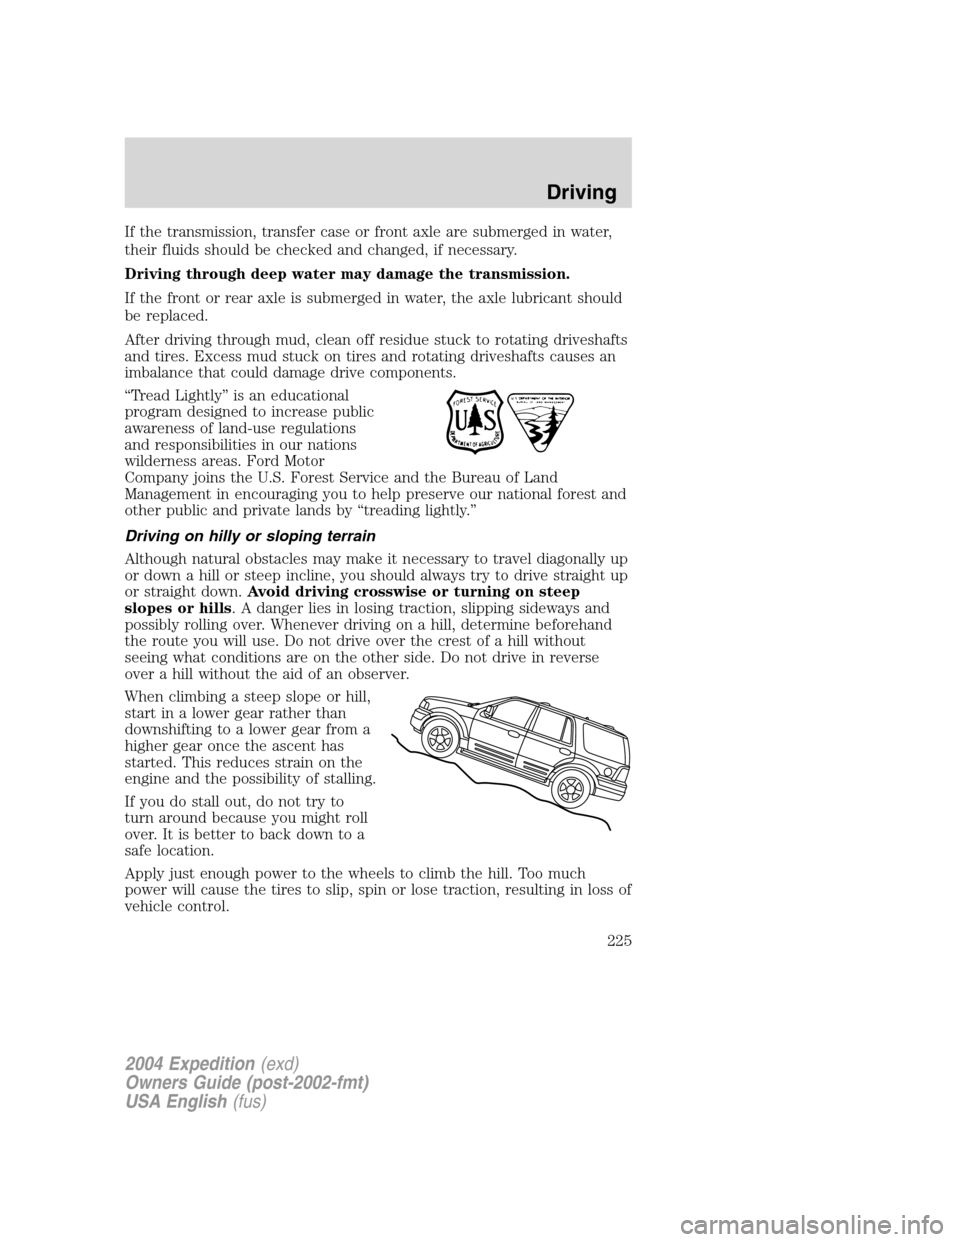
When climbing a steep slope or hill,
start in a lower gear rather than
downshifting to a lower gear from a
higher gear once the ascent has
started. This reduces strain on the
engine and the possibility of stalling.
If you do stall out, do not try to
turn around because you might roll
over. It is better to back down to a
safe location.
Apply just enough power to the wheels to climb the hill. Too much
power will cause the tires to slip, spin or lose traction, resulting in loss of
vehicle control.
2004 Expedition(exd)
Owners Guide (post-2002-fmt)
USA English(fus)
Driving
225
Page 229 of 344
If driving through deep or standing water is unavoidable, proceed very
slowly. Never drive through water that is higher than the bottom of the
hubs (for trucks) or the bottom of the wheel rims (for cars).
Once through the water, always try the brakes. Wet brakes do not stop
the vehicle as effectively as dry brakes. Drying can be improved by
moving your vehicle slowly while applying light pressure on the brake
pedal.
Driving through deep water where the transmission vent tube is
submerged may allow water into the transmission and cause
internal transmission damage. Have the fluid checked and, if
water is found, replace the fluid.
VEHICLE LOADING
Before loading a vehicle, familiarize yourself with the following terms:
•Base Curb Weight:Weight of the vehicle including any standard
equipment, fluids, lubricants, etc. It does not include occupants or
aftermarket equipment.
•Payload:Combined maximum allowable weight of cargo, occupants
and optional equipment. The payload equals the gross vehicle weight
rating minus base curb weight.
•GVW (Gross Vehicle Weight):Base curb weight plus payload
weight. The GVW is not a limit or a specification.
•GVWR (Gross Vehicle Weight Rating):Maximum permissible total
weight of the base vehicle, occupants, optional equipment and cargo.
The GVWR is specific to each vehicle and is listed on the Safety
Certification Label on the driver’s door pillar.
•GAWR (Gross Axle Weight Rating):Carrying capacity for each axle
system. The GAWR is specific to each vehicle and is listed on the
Safety Certification Label on the driver’s door pillar.
•GCW (Gross Combined Weight):The combined weight of the
towing vehicle (including occupants and cargo) and the loaded trailer.
•GCWR (Gross Combined Weight Rating):Maximum permissible
combined weight of towing vehicle (including occupants and cargo)
and the loaded trailer
•Maximum Trailer Weight Rating:Maximum weight of a trailer the
vehicle is permitted to tow. The maximum trailer weight rating is
determined by subtracting the vehicle curb weight for each
engine/transmission combination, any required option weight for trailer
towing and the weight of the driver from the GCWR for the towing
vehicle.
2004 Expedition(exd)
Owners Guide (post-2002-fmt)
USA English(fus)
Driving
229
Page 237 of 344
•Vehicles with trailers should not be parked on a grade. If you must
park on a grade, place wheel chocks under the trailer’s wheels.
Launching or retrieving a boat
Disconnect the wiring to the trailer before backing the trailer
into the water. Reconnect the wiring to the trailer after the
trailer is removed from the water.
When backing down a ramp during boat launching or retrieval:
•do not allow the static water level to rise above the bottom edge of
the rear bumper.
•do not allow waves to break higher than 15 cm (6 inches) above the
bottom edge of the rear bumper.
Exceeding these limits may allow water to enter vehicle components:
•causing internal damage to the components.
•affecting driveability, emissions and reliability.
Replace the rear axle lubricant any time the axle has been submerged in
water. Rear axle lubricant quantities are not to be checked or changed
unless a leak is suspected or repair required.
RECREATIONAL TOWING (ALL WHEELS ON THE GROUND)
An example of recreational towing would be towing your vehicle behind
a motorhome. Follow these guidelines if you have the need for
recreational towing your vehicle with all four wheels on the ground.
These guidelines are designed to ensure that your transmission is not
damaged.
2WD vehicles (with automatic transmissions):
•Place the transmission in N (Neutral)
•Maximum speed is 56 km (35 mph)
•Maximum distance is 80 km (50 miles)
If a distance of 80 km (50 miles) or a speed of 56 km (35 mph) must be
exceeded, the drive shaft will have to be removed before the vehicle is
towed.
Ford recommends the driveshaft be removed/installed only by a qualified
technician. See your local dealer for driveshaft removal/installation.
Improper removal/installation of the driveshaft can cause
transmission fluid loss, damage to the driveshaft and internal
transmission components.
2004 Expedition(exd)
Owners Guide (post-2002-fmt)
USA English(fus)
Driving
237
Page 283 of 344
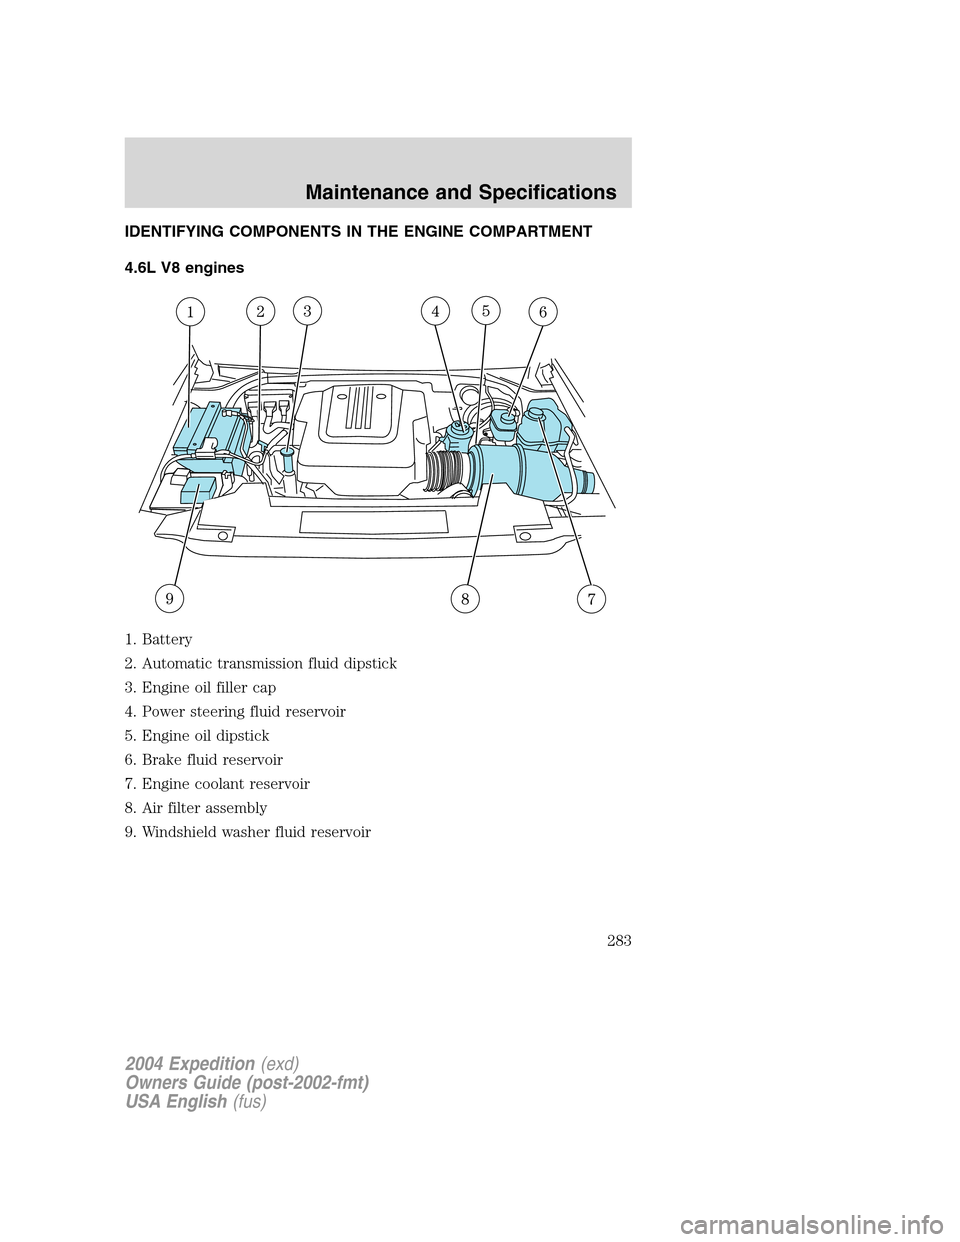
IDENTIFYING COMPONENTS IN THE ENGINE COMPARTMENT
4.6L V8 engines
1. Battery
2. Automatic transmission fluid dipstick
3. Engine oil filler cap
4. Power steering fluid reservoir
5. Engine oil dipstick
6. Brake fluid reservoir
7. Engine coolant reservoir
8. Air filter assembly
9. Windshield washer fluid reservoir
2004 Expedition(exd)
Owners Guide (post-2002-fmt)
USA English(fus)
Maintenance and Specifications
283
Page 284 of 344
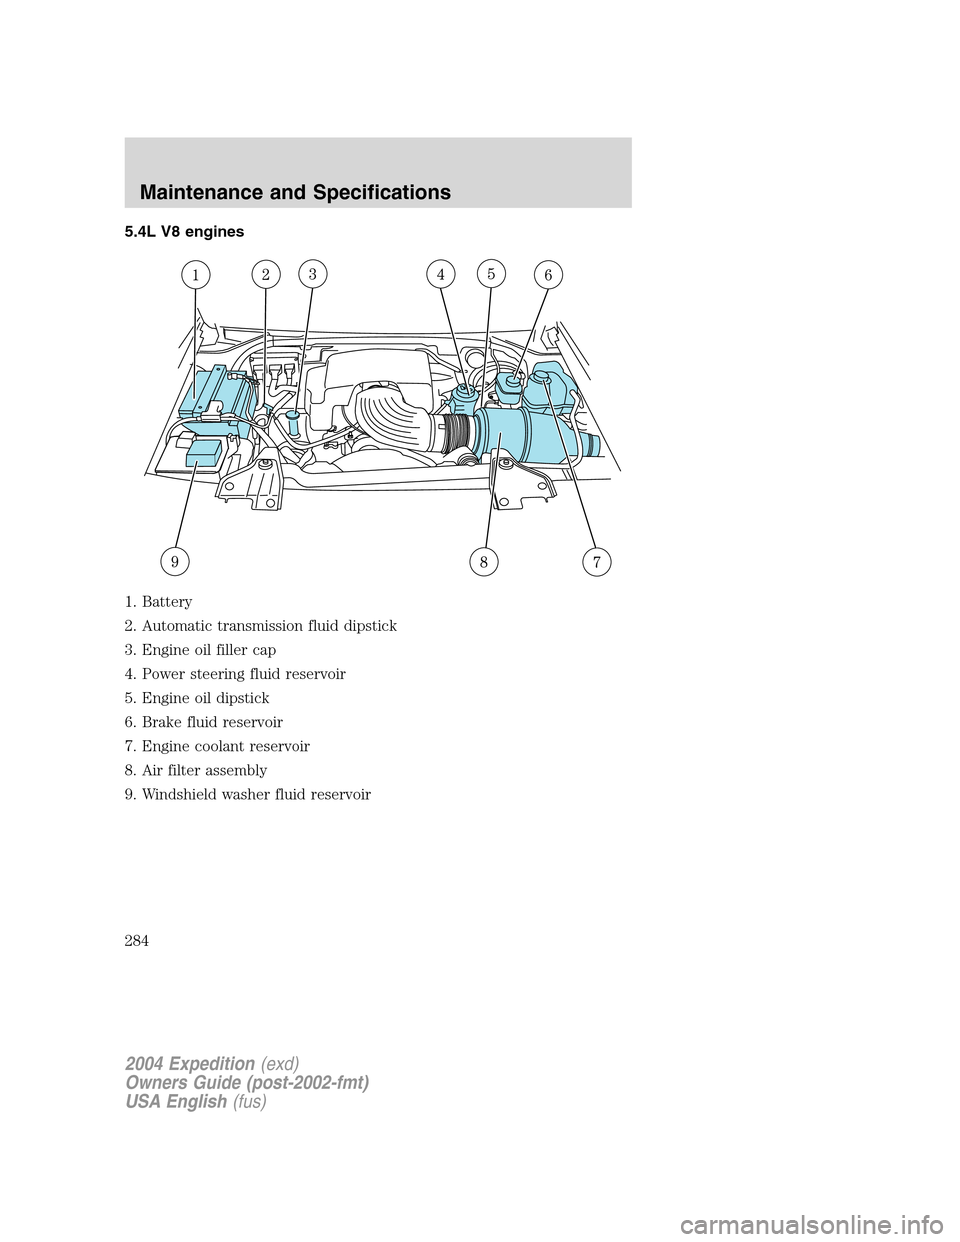
5.4L V8 engines
1. Battery
2. Automatic transmission fluid dipstick
3. Engine oil filler cap
4. Power steering fluid reservoir
5. Engine oil dipstick
6. Brake fluid reservoir
7. Engine coolant reservoir
8. Air filter assembly
9. Windshield washer fluid reservoir
2004 Expedition(exd)
Owners Guide (post-2002-fmt)
USA English(fus)
Maintenance and Specifications
284
Page 307 of 344
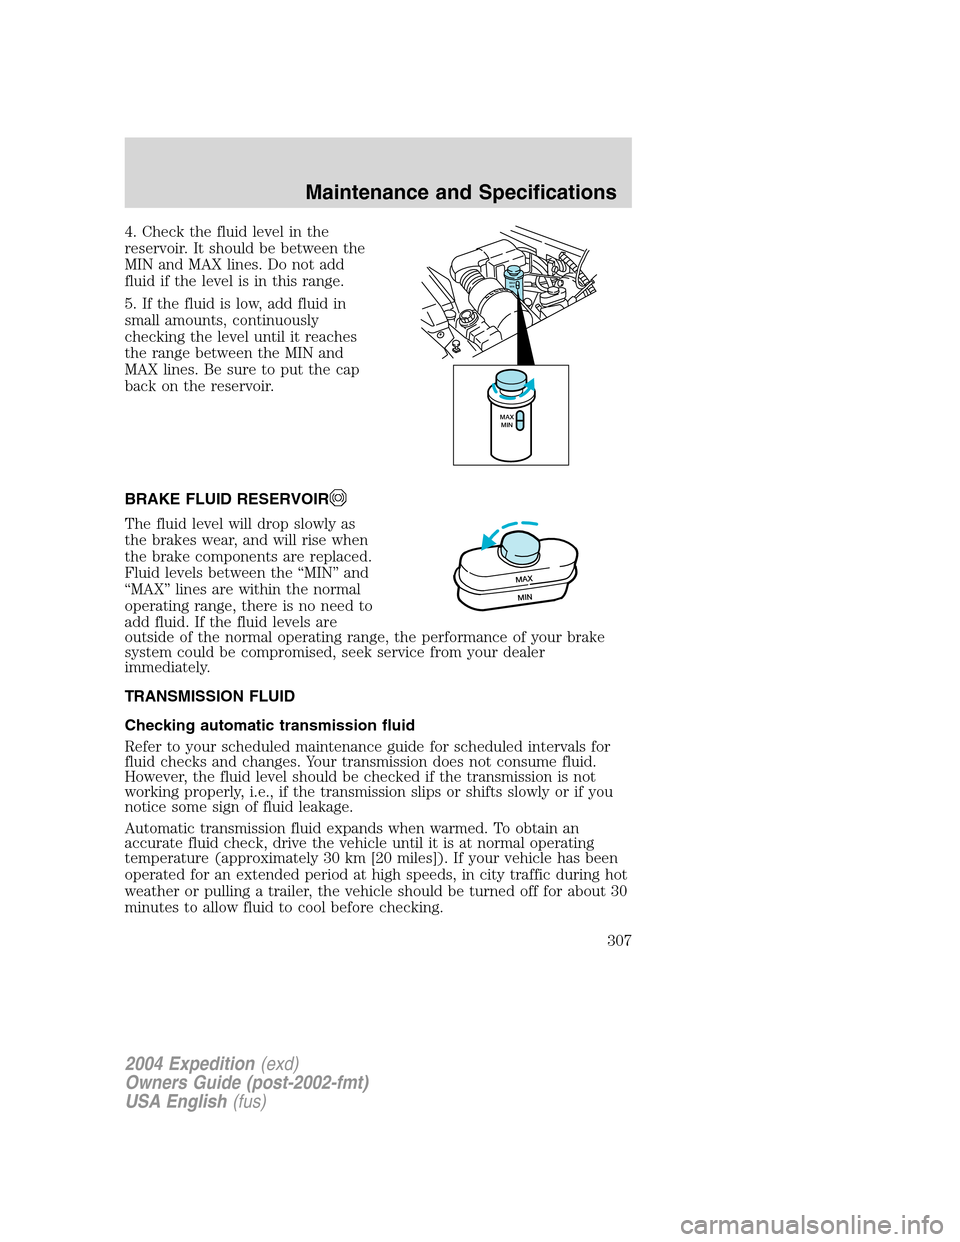
4. Check the fluid level in the
reservoir. It should be between the
MIN and MAX lines. Do not add
fluid if the level is in this range.
5. If the fluid is low, add fluid in
small amounts, continuously
checking the level until it reaches
the range between the MIN and
MAX lines. Be sure to put the cap
back on the reservoir.
BRAKE FLUID RESERVOIR
The fluid level will drop slowly as
the brakes wear, and will rise when
the brake components are replaced.
Fluid levels between the“MIN”and
“MAX”lines are within the normal
operating range, there is no need to
add fluid. If the fluid levels are
outside of the normal operating range, the performance of your brake
system could be compromised, seek service from your dealer
immediately.
TRANSMISSION FLUID
Checking automatic transmission fluid
Refer to your scheduled maintenance guide for scheduled intervals for
fluid checks and changes. Your transmission does not consume fluid.
However, the fluid level should be checked if the transmission is not
working properly, i.e., if the transmission slips or shifts slowly or if you
notice some sign of fluid leakage.
Automatic transmission fluid expands when warmed. To obtain an
accurate fluid check, drive the vehicle until it is at normal operating
temperature (approximately 30 km [20 miles]). If your vehicle has been
operated for an extended period at high speeds, in city traffic during hot
weather or pulling a trailer, the vehicle should be turned off for about 30
minutes to allow fluid to cool before checking.
MAX
MIN
MAX
MIN
MAX
MIN
2004 Expedition(exd)
Owners Guide (post-2002-fmt)
USA English(fus)
Maintenance and Specifications
307
Page 308 of 344
1. Drive the vehicle 30 km (20 miles) or until it reaches normal operating
temperature.
2. Park the vehicle on a level surface and engage the parking brake.
3. With the parking brake engaged and your foot on the brake pedal,
start the engine and move the gearshift lever through all of the gear
ranges. Allow sufficient time for each gear to engage.
4. Latch the gearshift lever in P (Park) and leave the engine running.
5. Remove the dipstick, wiping it clean with a clean, dry lint free rag. If
necessary, refer toIdentifying components in the engine compartment
in this chapter for the location of the dipstick.
6. Install the dipstick making sure it is fully seated in the filler tube.
7. Remove the dipstick and inspect the fluid level. The fluid should be in
the designated area for normal operating temperature or ambient
temperature.
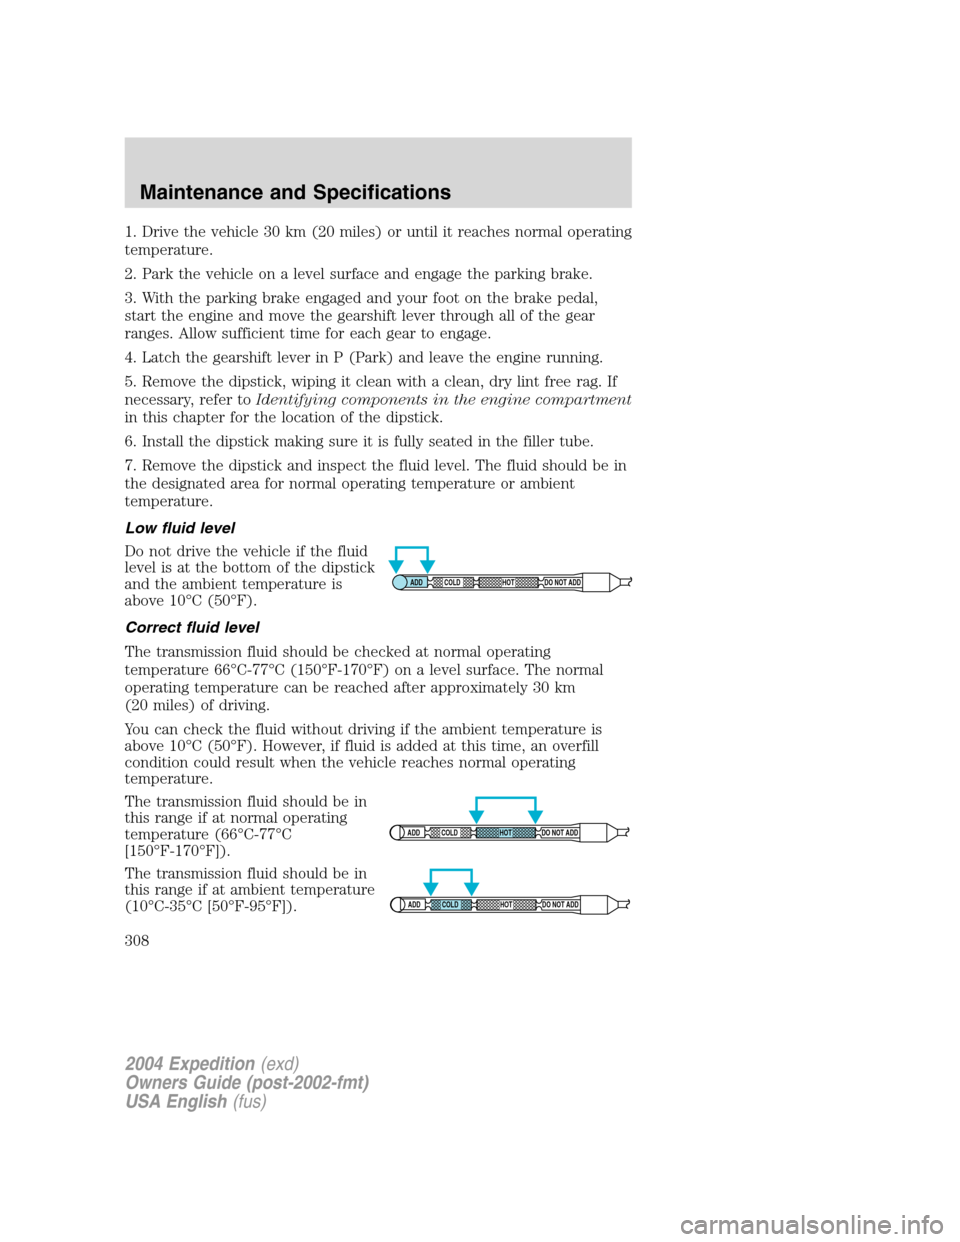
Low fluid level
Do not drive the vehicle if the fluid
level is at the bottom of the dipstick
and the ambient temperature is
above 10°C (50°F).
Correct fluid level
The transmission fluid should be checked at normal operating
temperature 66°C-77°C (150°F-170°F) on a level surface. The normal
operating temperature can be reached after approximately 30 km
(20 miles) of driving.
You can check the fluid without driving if the ambient temperature is
above 10°C (50°F). However, if fluid is added at this time, an overfill
condition could result when the vehicle reaches normal operating
temperature.
The transmission fluid should be in
this range if at normal operating
temperature (66°C-77°C
[150°F-170°F]).
The transmission fluid should be in
this range if at ambient temperature
(10°C-35°C [50°F-95°F]).
ADD COLD HOT DO NOT ADD
ADD COLD HOT DO NOT ADD
ADD COLD HOT DO NOT ADD
2004 Expedition(exd)
Owners Guide (post-2002-fmt)
USA English(fus)
Maintenance and Specifications
308