2004 FORD EXPEDITION interior lights
[x] Cancel search: interior lightsPage 10 of 344
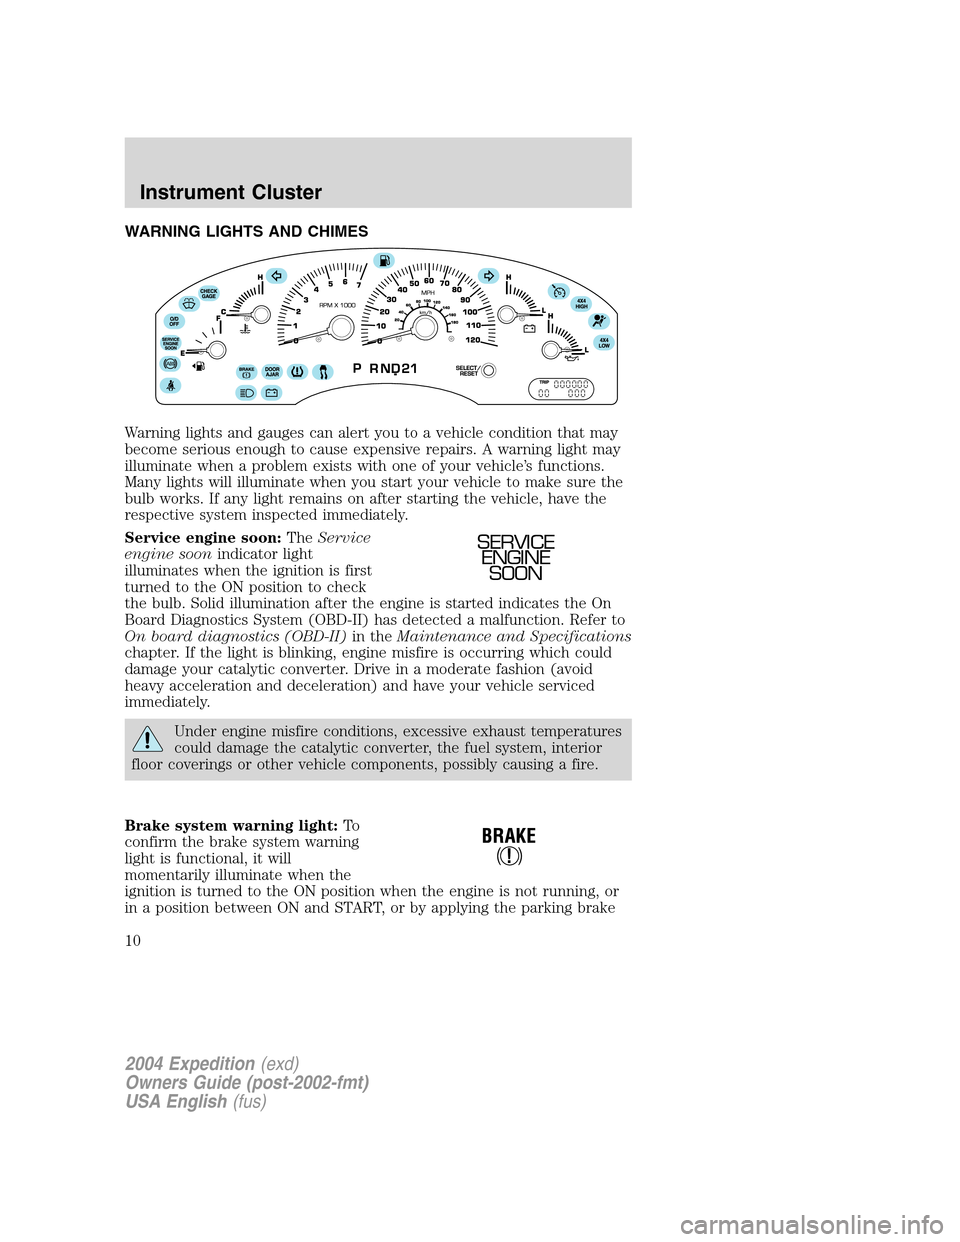
WARNING LIGHTS AND CHIMES
Warning lights and gauges can alert you to a vehicle condition that may
become serious enough to cause expensive repairs. A warning light may
illuminate when a problem exists with one of your vehicle’s functions.
Many lights will illuminate when you start your vehicle to make sure the
bulb works. If any light remains on after starting the vehicle, have the
respective system inspected immediately.
Service engine soon:TheService
engine soonindicator light
illuminates when the ignition is first
turned to the ON position to check
the bulb. Solid illumination after the engine is started indicates the On
Board Diagnostics System (OBD-II) has detected a malfunction. Refer to
On board diagnostics (OBD-II)in theMaintenance and Specifications
chapter. If the light is blinking, engine misfire is occurring which could
damage your catalytic converter. Drive in a moderate fashion (avoid
heavy acceleration and deceleration) and have your vehicle serviced
immediately.
Under engine misfire conditions, excessive exhaust temperatures
could damage the catalytic converter, the fuel system, interior
floor coverings or other vehicle components, possibly causing a fire.
Brake system warning light:To
confirm the brake system warning
light is functional, it will
momentarily illuminate when the
ignition is turned to the ON position when the engine is not running, or
in a position between ON and START, or by applying the parking brake
SERVICE
ENGINE
SOON
2004 Expedition(exd)
Owners Guide (post-2002-fmt)
USA English(fus)
Instrument Cluster
Instrument Cluster
10
Page 89 of 344
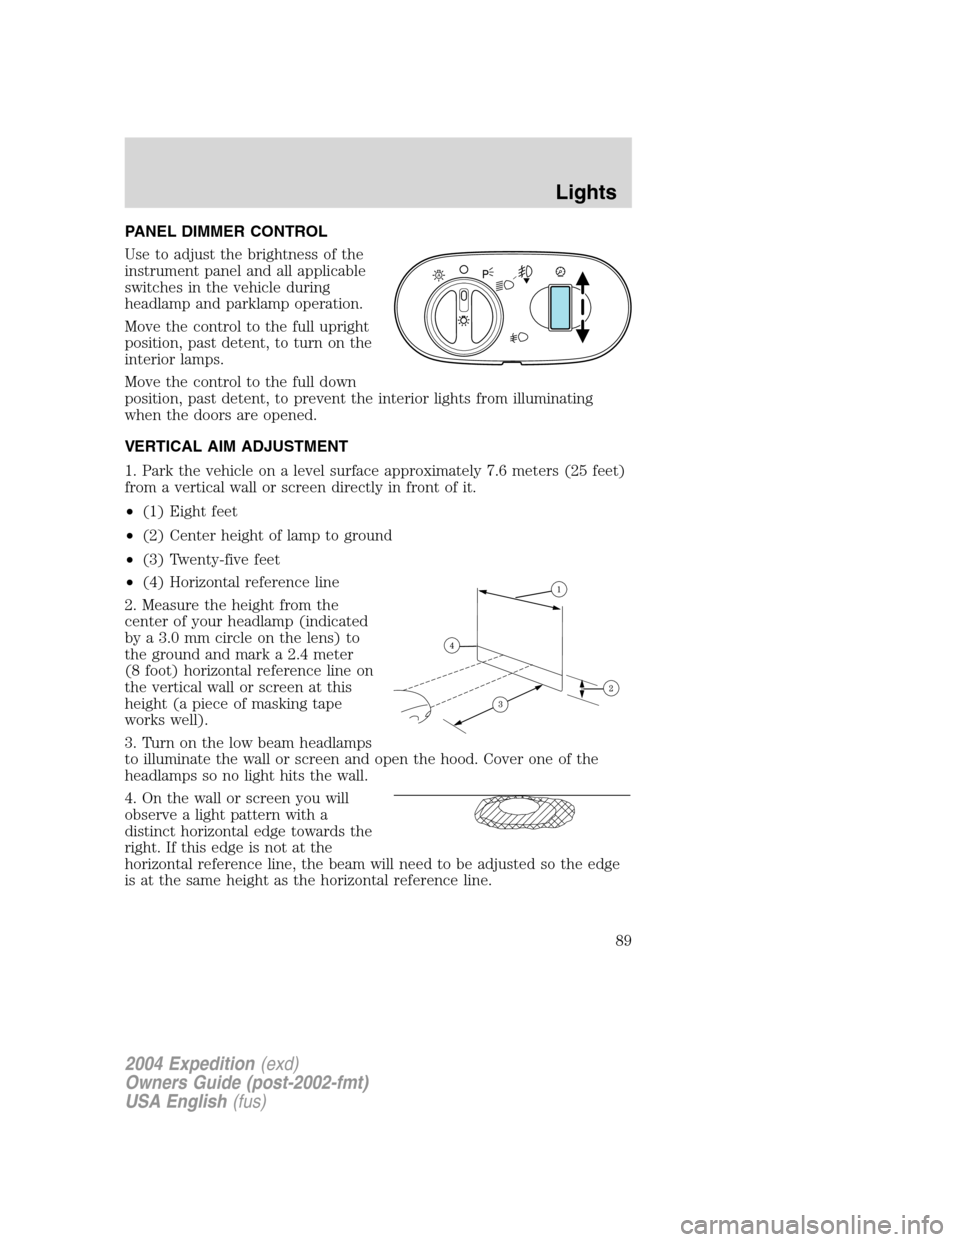
PANEL DIMMER CONTROL
Use to adjust the brightness of the
instrument panel and all applicable
switches in the vehicle during
headlamp and parklamp operation.
Move the control to the full upright
position, past detent, to turn on the
interior lamps.
Move the control to the full down
position, past detent, to prevent the interior lights from illuminating
when the doors are opened.
VERTICAL AIM ADJUSTMENT
1. Park the vehicle on a level surface approximately 7.6 meters (25 feet)
from a vertical wall or screen directly in front of it.
•(1) Eight feet
•(2) Center height of lamp to ground
•(3) Twenty-five feet
•(4) Horizontal reference line
2. Measure the height from the
center of your headlamp (indicated
by a 3.0 mm circle on the lens) to
the ground and mark a 2.4 meter
(8 foot) horizontal reference line on
the vertical wall or screen at this
height (a piece of masking tape
works well).
3. Turn on the low beam headlamps
to illuminate the wall or screen and open the hood. Cover one of the
headlamps so no light hits the wall.
4. On the wall or screen you will
observe a light pattern with a
distinct horizontal edge towards the
right. If this edge is not at the
horizontal reference line, the beam will need to be adjusted so the edge
is at the same height as the horizontal reference line.
A
2004 Expedition(exd)
Owners Guide (post-2002-fmt)
USA English(fus)
Lights
89
Page 90 of 344
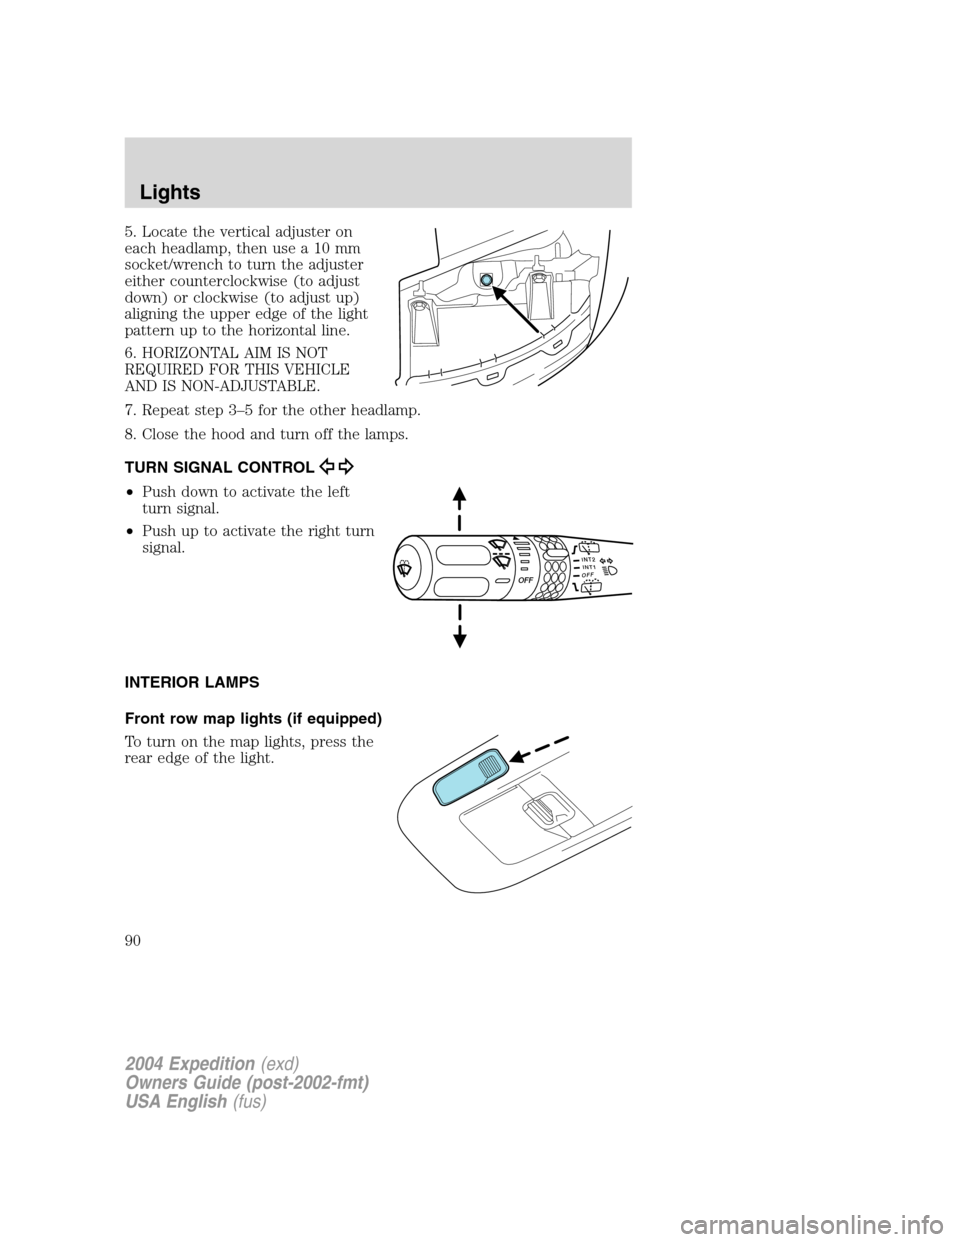
5. Locate the vertical adjuster on
each headlamp, then use a 10 mm
socket/wrench to turn the adjuster
either counterclockwise (to adjust
down) or clockwise (to adjust up)
aligning the upper edge of the light
pattern up to the horizontal line.
6. HORIZONTAL AIM IS NOT
REQUIRED FOR THIS VEHICLE
AND IS NON-ADJUSTABLE.
7. Repeat step 3–5 for the other headlamp.
8. Close the hood and turn off the lamps.
TURN SIGNAL CONTROL
•Push down to activate the left
turn signal.
•Push up to activate the right turn
signal.
INTERIOR LAMPS
Front row map lights (if equipped)
To turn on the map lights, press the
rear edge of the light.
INT2OFFOFFINT1
2004 Expedition(exd)
Owners Guide (post-2002-fmt)
USA English(fus)
Lights
90
Page 92 of 344
Using the right bulbs
Replacement bulbs are specified in the chart below. Headlamp bulbs
must be marked with an authorized“D.O.T.”for North America to ensure
lamp performance, light brightness and pattern and safe visibility. The
correct bulbs will not damage the lamp assembly or void the lamp
assembly warranty and will provide quality bulb burn time.
Function Number of bulbs Trade number
Headlamps (low-beam) 2 9006
Headlamps (high-beam) 2 9005
Front park/turn/sidemarker
lamps2 3457 K
Foglamps 2 899
Dome/map lamps 2 579
Turn/tail/brake/sidemarker
lamps2 3157
Approach/mirror turn
signal lamps (if equipped)2 906
Mirror approach lamps–
non turn signal (if
equipped)2 *See your dealer
Liftgate bulb 2 916
Backup lamp 2 3156
License lamp 2 168
High-mount brake lamp 5 W5W
All replacement bulbs are clear in color except where noted.
To replace all instrument panel lights - see your dealer
* To obtain replacement approach lamp assembly bulbs, see your
dealer and reference Ford part no. 2L1Z–13B374–BB for the passenger
side mirror and 2L1Z–13B375–BB for the driver side mirror.
Replacing the interior bulbs
Check the operation of all bulbs frequently.
2004 Expedition(exd)
Owners Guide (post-2002-fmt)
USA English(fus)
Lights
92
Page 98 of 344
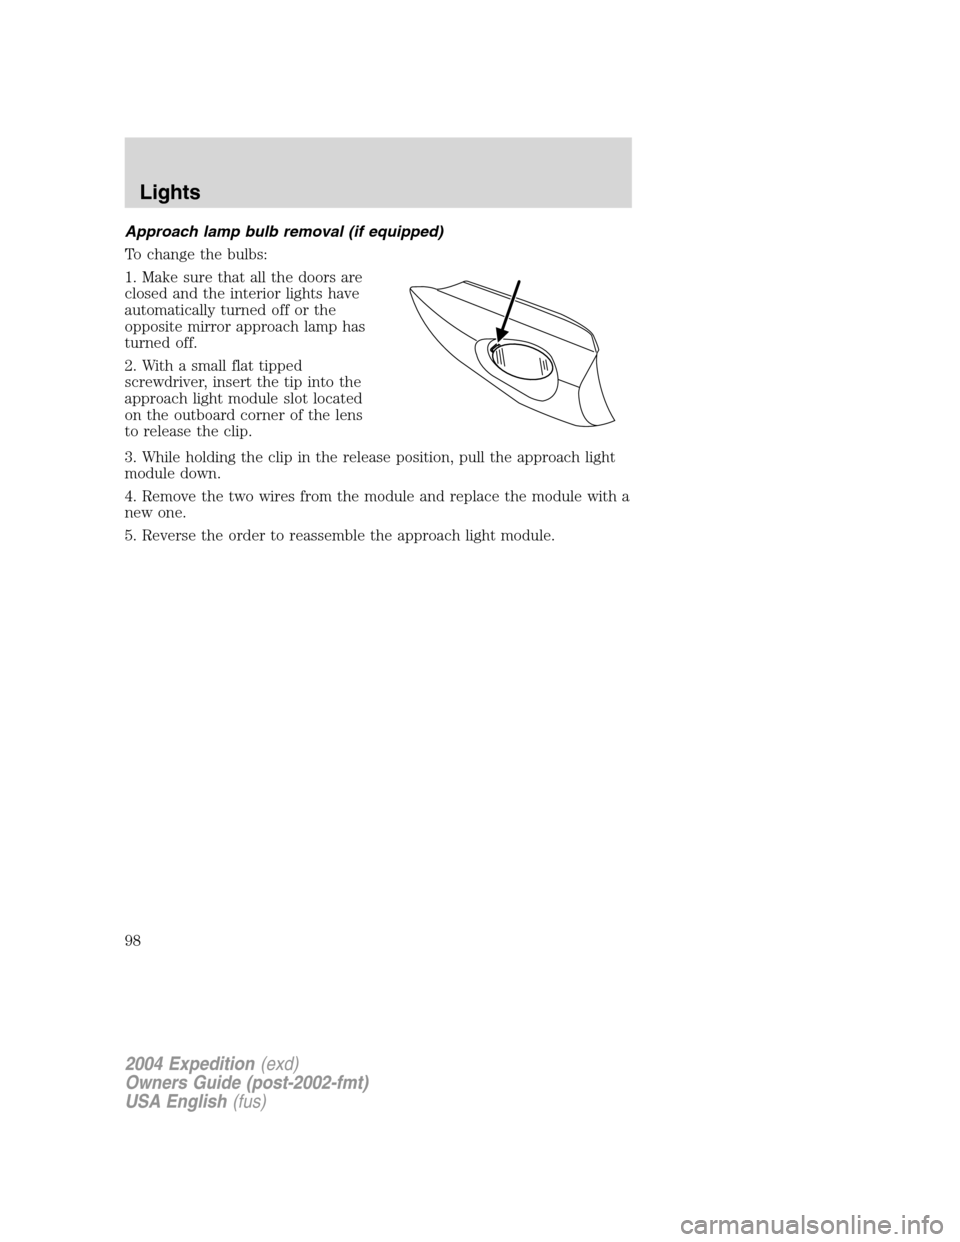
Approach lamp bulb removal (if equipped)
To change the bulbs:
1. Make sure that all the doors are
closed and the interior lights have
automatically turned off or the
opposite mirror approach lamp has
turned off.
2. With a small flat tipped
screwdriver, insert the tip into the
approach light module slot located
on the outboard corner of the lens
to release the clip.
3. While holding the clip in the release position, pull the approach light
module down.
4. Remove the two wires from the module and replace the module with a
new one.
5. Reverse the order to reassemble the approach light module.
2004 Expedition(exd)
Owners Guide (post-2002-fmt)
USA English(fus)
Lights
98
Page 138 of 344
The inside lights will not turn off if:
•they have been turned on with the dimmer control, or
•any door is open.
The battery saver will shut off the interior lamps 30 minutes after the
ignition has been turned to the OFF position.
Smart unlocking feature
The smart unlocking feature prevents you from locking yourself out of
the vehicle by unlocking the doors if the key is in the ignition and the
driver’s door is open/ajar when the vehicle doors were locked using the
power lock/unlock control.
The smart unlocking feature operates independent of the position of the
ignition.
Autolocking feature
The autolocking feature locks all vehicle doors when the following
conditions are met:
•All doors, including the liftgate, are closed.
•The brake is pressed while the ignition is in the RUN position.
•The transmission is in either a forward or reverse gear.
•The vehicle has a speed of 8 km/h (5 mph) or greater.
This feature relocks all doors if any door is opened, the brake is pressed
after all doors are closed again and the vehicle has a speed of 8 km/h
(5 mph) or greater.
Deactivating/activating the autolock feature
For vehicles equipped with a message center, the autolock feature may
be deactivated/activated by selecting the autolock function (accessed by
pressing the SETUP control). Press the RESET control to turn the
autolock function ON or OFF. Refer toMessage centerin theDriver
controlschapter for additional information.
For vehicles not equipped with a message center, the feature may be
deactivated by taking your vehicle to an authorized Ford dealer.
Power door lock disable feature
This feature will help protect your vehicle from unauthorized entry.
The UNLOCK function on the power door control will not operate with
the ignition OFF and twenty seconds after the doors are closed and
2004 Expedition(exd)
Owners Guide (post-2002-fmt)
USA English(fus)
Locks and Security
138
Page 342 of 344

Infant seats
(see Safety seats) .....................186
Inspection/maintenance
(I/M) testing ..............................305
Instrument panel
cleaning ...................................278
cluster ........................................10
lighting up panel and interior...89
J
Jack ............................................253
positioning ...............................253
storage .....................................253
Jump-starting your vehicle ......258
K
Keyless entry system
programming entry code .......140
Keys ...................................141–143
positions of the ignition .........197
L
Lamps
autolamp system .......................87
bulb replacement
specifications chart ..................92
daytime running light ...............88
fog lamps ...................................87
headlamps .................................87
headlamps, flash to pass ..........88
instrument panel, dimming .....89
interior lamps .....................90–93
replacing bulbs .............91, 93–96
Lane change indicator
(see Turn signal) ........................90
Liftgate ..............................130, 134
Lights, warning and indicator ....10anti-lock brakes (ABS) ..........202
Limited-slip axle .......................207
Load limits .................................229
GAWR ......................................229
GVWR ......................................229
trailer towing ..........................229
Loading instructions .................230
Locks
childproof ................................132
doors ........................................132
Lubricant specifications ...328, 331
Lumbar support, seats .............147
M
Message center .........................119
english/metric button .............124
system check button ..............125
warning messages ...................125
Mirrors ...............................101, 106
automatic dimming
rearview mirror .......................106
fold away .................................108
heated ......................................107
programmable memory ..135, 148
side view mirrors (power) .....107
Moon roof ..................................102
Motorcraft parts ................300, 325
N
Navigation system .......................44
quick start .................................48
radio functions ..........................50
setting the clock .......................77
O
Octane rating ............................299
2004 Expedition(exd)
Owners Guide (post-2002-fmt)
USA English(fus)
Index
342