2004 FORD EXPEDITION brake
[x] Cancel search: brakePage 235 of 344
Load equalizing hitch
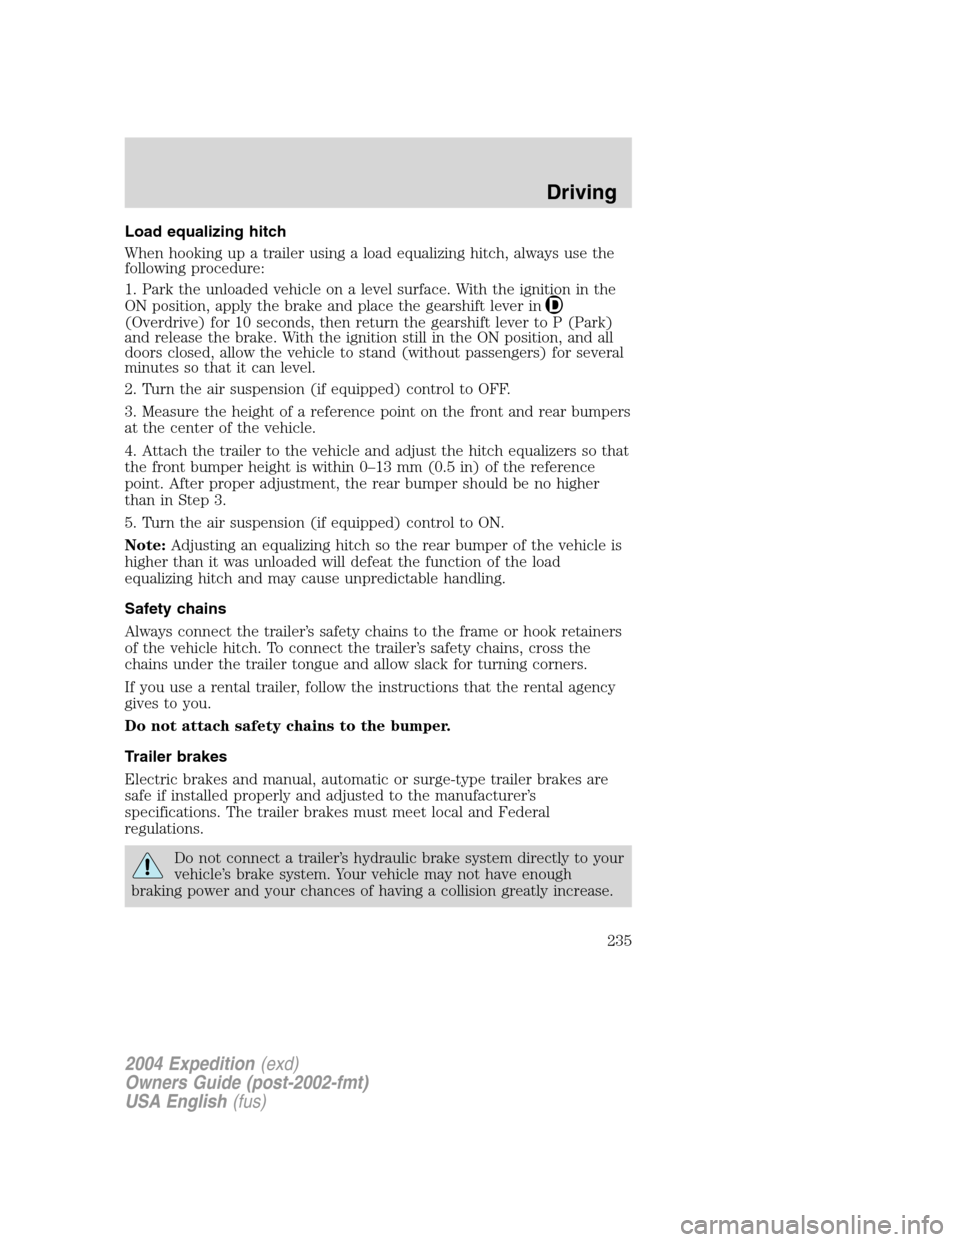
When hooking up a trailer using a load equalizing hitch, always use the
following procedure:
1. Park the unloaded vehicle on a level surface. With the ignition in the
ON position, apply the brake and place the gearshift lever in
(Overdrive) for 10 seconds, then return the gearshift lever to P (Park)
and release the brake. With the ignition still in the ON position, and all
doors closed, allow the vehicle to stand (without passengers) for several
minutes so that it can level.
2. Turn the air suspension (if equipped) control to OFF.
3. Measure the height of a reference point on the front and rear bumpers
at the center of the vehicle.
4. Attach the trailer to the vehicle and adjust the hitch equalizers so that
the front bumper height is within 0–13 mm (0.5 in) of the reference
point. After proper adjustment, the rear bumper should be no higher
than in Step 3.
5. Turn the air suspension (if equipped) control to ON.
Note:Adjusting an equalizing hitch so the rear bumper of the vehicle is
higher than it was unloaded will defeat the function of the load
equalizing hitch and may cause unpredictable handling.
Safety chains
Always connect the trailer’s safety chains to the frame or hook retainers
of the vehicle hitch. To connect the trailer’s safety chains, cross the
chains under the trailer tongue and allow slack for turning corners.
If you use a rental trailer, follow the instructions that the rental agency
gives to you.
Do not attach safety chains to the bumper.
Trailer brakes
Electric brakes and manual, automatic or surge-type trailer brakes are
safe if installed properly and adjusted to the manufacturer’s
specifications. The trailer brakes must meet local and Federal
regulations.
Do not connect a trailer’s hydraulic brake system directly to your
vehicle’s brake system. Your vehicle may not have enough
braking power and your chances of having a collision greatly increase.
2004 Expedition(exd)
Owners Guide (post-2002-fmt)
USA English(fus)
Driving
235
Page 236 of 344
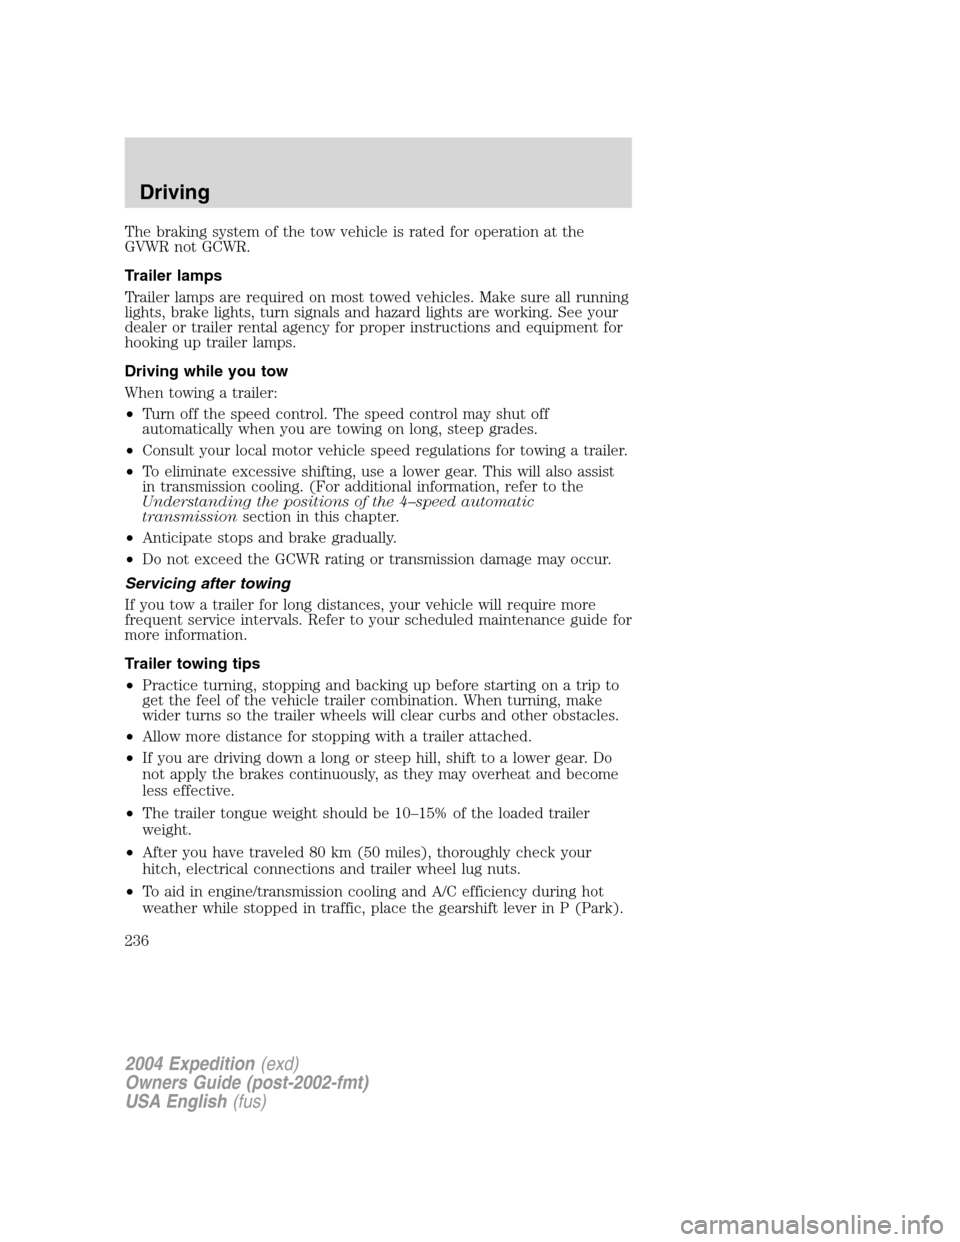
The braking system of the tow vehicle is rated for operation at the
GVWR not GCWR.
Trailer lamps
Trailer lamps are required on most towed vehicles. Make sure all running
lights, brake lights, turn signals and hazard lights are working. See your
dealer or trailer rental agency for proper instructions and equipment for
hooking up trailer lamps.
Driving while you tow
When towing a trailer:
•Turn off the speed control. The speed control may shut off
automatically when you are towing on long, steep grades.
•Consult your local motor vehicle speed regulations for towing a trailer.
•To eliminate excessive shifting, use a lower gear. This will also assist
in transmission cooling. (For additional information, refer to the
Understanding the positions of the 4–speed automatic
transmissionsection in this chapter.
•Anticipate stops and brake gradually.
•Do not exceed the GCWR rating or transmission damage may occur.
Servicing after towing
If you tow a trailer for long distances, your vehicle will require more
frequent service intervals. Refer to your scheduled maintenance guide for
more information.
Trailer towing tips
•Practice turning, stopping and backing up before starting on a trip to
get the feel of the vehicle trailer combination. When turning, make
wider turns so the trailer wheels will clear curbs and other obstacles.
•Allow more distance for stopping with a trailer attached.
•If you are driving down a long or steep hill, shift to a lower gear. Do
not apply the brakes continuously, as they may overheat and become
less effective.
•The trailer tongue weight should be 10–15% of the loaded trailer
weight.
•After you have traveled 80 km (50 miles), thoroughly check your
hitch, electrical connections and trailer wheel lug nuts.
•To aid in engine/transmission cooling and A/C efficiency during hot
weather while stopped in traffic, place the gearshift lever in P (Park).
2004 Expedition(exd)
Owners Guide (post-2002-fmt)
USA English(fus)
Driving
236
Page 246 of 344
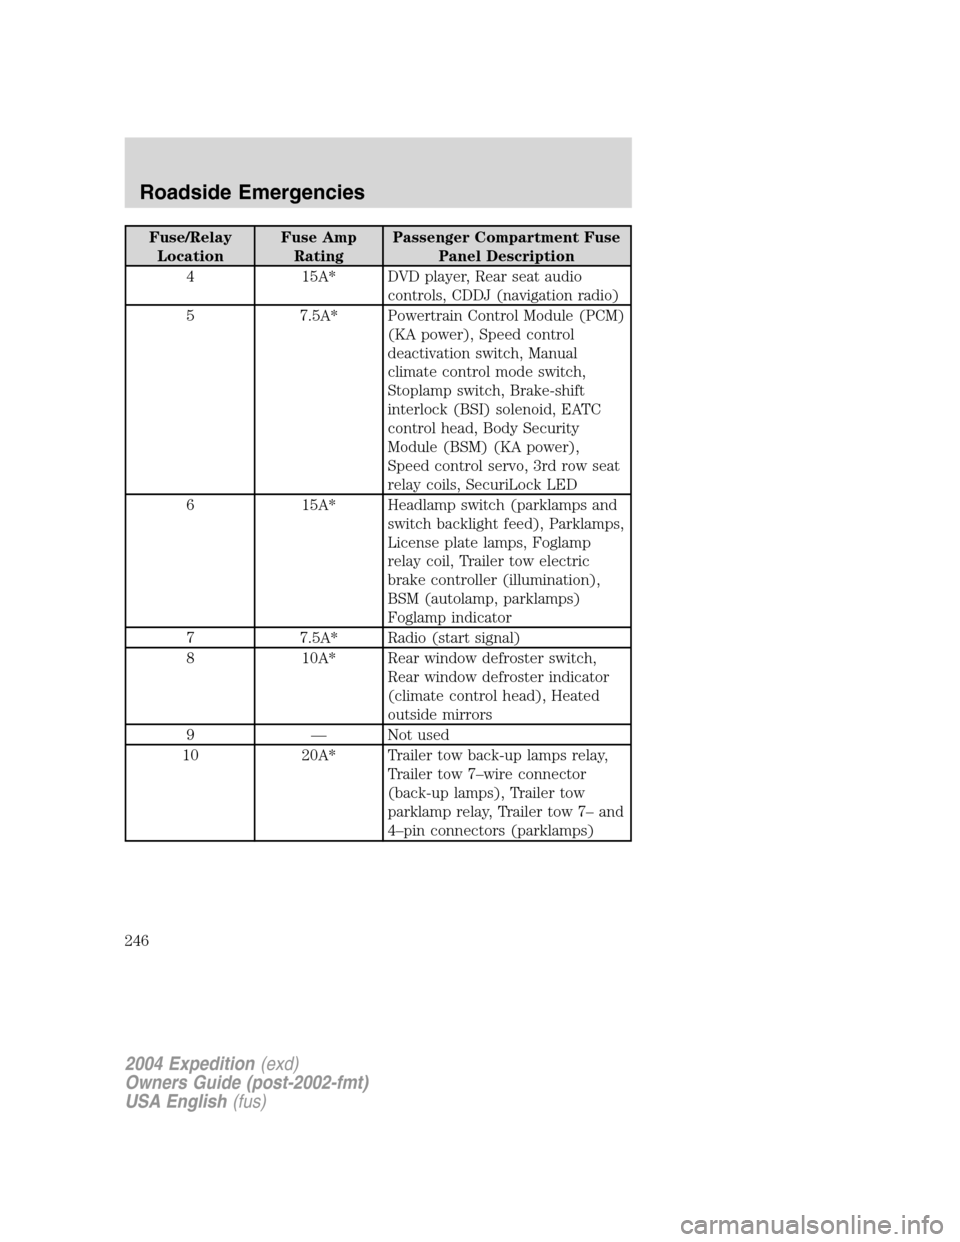
Fuse/Relay
LocationFuse Amp
RatingPassenger Compartment Fuse
Panel Description
4 15A* DVD player, Rear seat audio
controls, CDDJ (navigation radio)
5 7.5A* Powertrain Control Module (PCM)
(KA power), Speed control
deactivation switch, Manual
climate control mode switch,
Stoplamp switch, Brake-shift
interlock (BSI) solenoid, EATC
control head, Body Security
Module (BSM) (KA power),
Speed control servo, 3rd row seat
relay coils, SecuriLock LED
6 15A* Headlamp switch (parklamps and
switch backlight feed), Parklamps,
License plate lamps, Foglamp
relay coil, Trailer tow electric
brake controller (illumination),
BSM (autolamp, parklamps)
Foglamp indicator
7 7.5A* Radio (start signal)
8 10A* Rear window defroster switch,
Rear window defroster indicator
(climate control head), Heated
outside mirrors
9—Not used
10 20A* Trailer tow back-up lamps relay,
Trailer tow 7–wire connector
(back-up lamps), Trailer tow
parklamp relay, Trailer tow 7–and
4–pin connectors (parklamps)
2004 Expedition(exd)
Owners Guide (post-2002-fmt)
USA English(fus)
Roadside Emergencies
246
Page 249 of 344
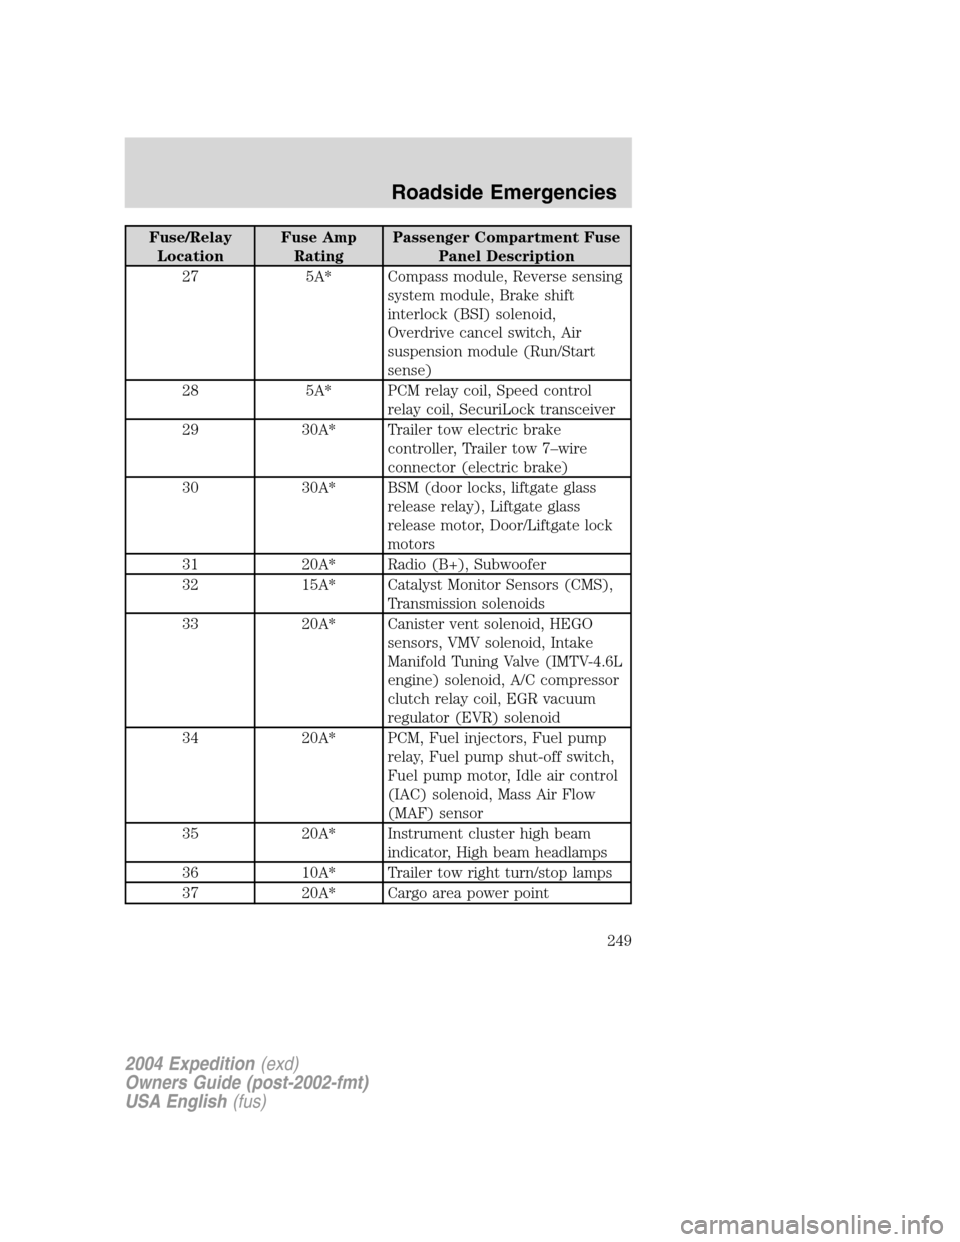
Fuse/Relay
LocationFuse Amp
RatingPassenger Compartment Fuse
Panel Description
27 5A* Compass module, Reverse sensing
system module, Brake shift
interlock (BSI) solenoid,
Overdrive cancel switch, Air
suspension module (Run/Start
sense)
28 5A* PCM relay coil, Speed control
relay coil, SecuriLock transceiver
29 30A* Trailer tow electric brake
controller, Trailer tow 7–wire
connector (electric brake)
30 30A* BSM (door locks, liftgate glass
release relay), Liftgate glass
release motor, Door/Liftgate lock
motors
31 20A* Radio (B+), Subwoofer
32 15A* Catalyst Monitor Sensors (CMS),
Transmission solenoids
33 20A* Canister vent solenoid, HEGO
sensors, VMV solenoid, Intake
Manifold Tuning Valve (IMTV-4.6L
engine) solenoid, A/C compressor
clutch relay coil, EGR vacuum
regulator (EVR) solenoid
34 20A* PCM, Fuel injectors, Fuel pump
relay, Fuel pump shut-off switch,
Fuel pump motor, Idle air control
(IAC) solenoid, Mass Air Flow
(MAF) sensor
35 20A* Instrument cluster high beam
indicator, High beam headlamps
36 10A* Trailer tow right turn/stop lamps
37 20A* Cargo area power point
2004 Expedition(exd)
Owners Guide (post-2002-fmt)
USA English(fus)
Roadside Emergencies
249
Page 253 of 344
CHANGING THE TIRES
If you get a flat tire while driving, do not apply the brake heavily.
Instead, gradually decrease your speed. Hold the steering wheel firmly
and slowly move to a safe place on the side of the road.
The use of tire sealants may damage your tires. The use of tire
sealants may also damage your tire pressure monitoring system
(if equipped).
Your vehicle may be equipped with a conventional spare tire that is
different in one or more of the following: type, brand, size, speed rating
and tread design. If this is the case, this dissimilar spare tire is still rated
for your vehicle loads (GAWR and GVWR). Your vehicle is equipped with
a spare wheel that does not match the road wheels and is not equipped
with a Tire Pressure Monitor System (TPMS) sensor.
Spare tire information
Note:If your vehicle is equipped with the tire pressure monitoring
system (TPMS), the system indicator light will illuminate when the spare
is in use. To restore the full functionality of the monitoring system, all
road wheels equipped with tire pressure monitoring sensors must be
mounted on the vehicle
If your vehicle is equipped with TPMS, have a flat tire serviced by a
dealer or qualified technician in order to prevent damage to the TPMS
sensor. Replace the spare tire with a road tire as soon as possible.
Location of the spare tire and tools
The spare tire and tools for your vehicle are stowed in the following
locations:
Item Location
Spare tire Under the vehicle, just forward of
the rear bumper
Jack tools and jacking instructions Under the access panel located in
the floor compartment behind the
rear seat
Removing the jack and tools
1. Open the liftgate, then locate the access panel on the floor behind the
3rd row seat. Unlatch and remove the panel.
2. Remove the jack and tools assembly tray from the compartment by
turning the wing-nut counterclockwise to relieve tension against the jack
assembly tray.
2004 Expedition(exd)
Owners Guide (post-2002-fmt)
USA English(fus)
Roadside Emergencies
253
Page 254 of 344
3. Unsnap the wheel lug nut wrench, jack extension and handle from the
plastic tray. Remove the jack and instruction sheet from the tray
assembly.
Removing the spare tire
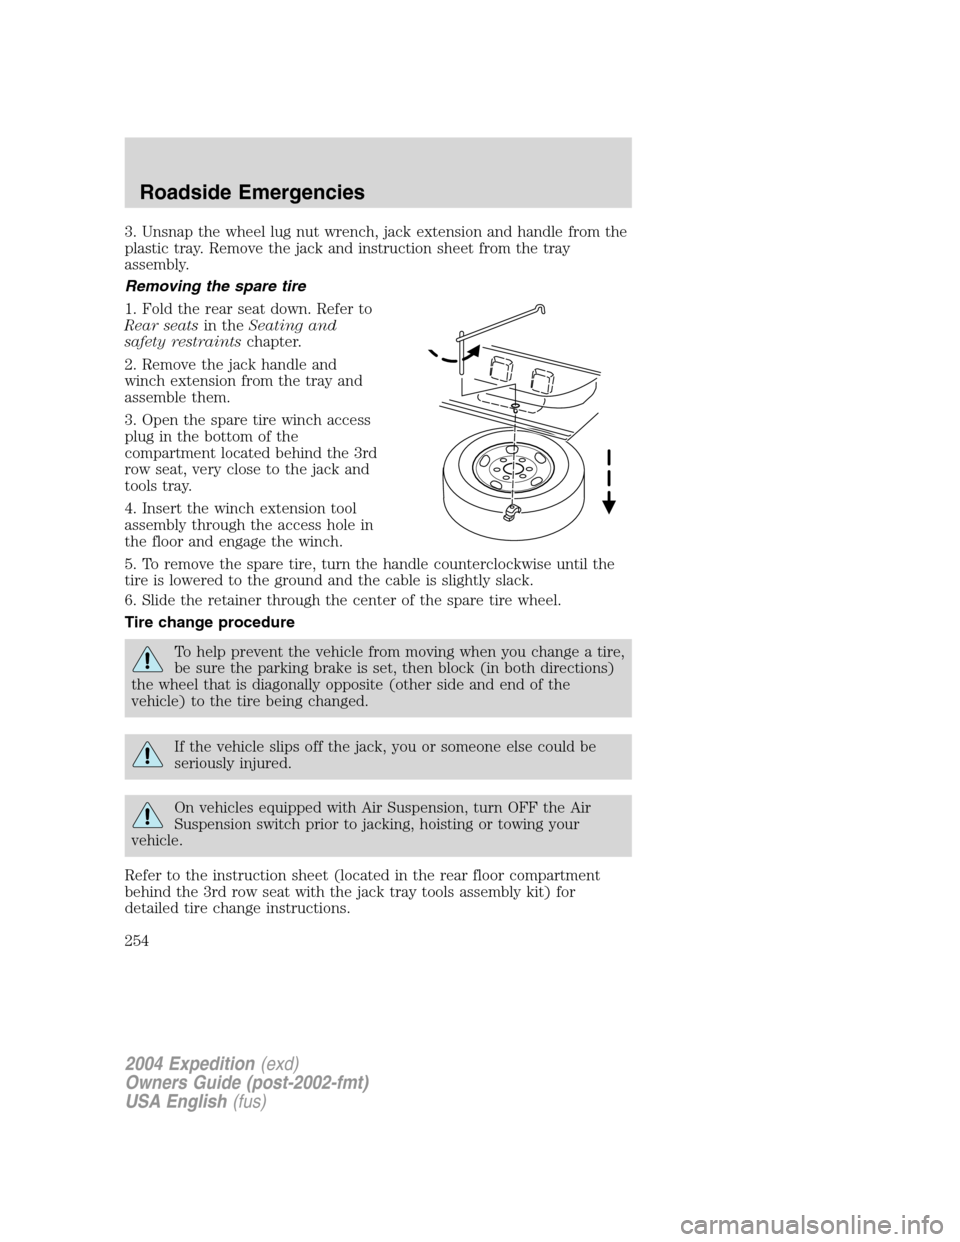
1. Fold the rear seat down. Refer to
Rear seatsin theSeating and
safety restraintschapter.
2. Remove the jack handle and
winch extension from the tray and
assemble them.
3. Open the spare tire winch access
plug in the bottom of the
compartment located behind the 3rd
row seat, very close to the jack and
tools tray.
4. Insert the winch extension tool
assembly through the access hole in
the floor and engage the winch.
5. To remove the spare tire, turn the handle counterclockwise until the
tire is lowered to the ground and the cable is slightly slack.
6. Slide the retainer through the center of the spare tire wheel.
Tire change procedure
To help prevent the vehicle from moving when you change a tire,
be sure the parking brake is set, then block (in both directions)
the wheel that is diagonally opposite (other side and end of the
vehicle) to the tire being changed.
If the vehicle slips off the jack, you or someone else could be
seriously injured.
On vehicles equipped with Air Suspension, turn OFF the Air
Suspension switch prior to jacking, hoisting or towing your
vehicle.
Refer to the instruction sheet (located in the rear floor compartment
behind the 3rd row seat with the jack tray tools assembly kit) for
detailed tire change instructions.
2004 Expedition(exd)
Owners Guide (post-2002-fmt)
USA English(fus)
Roadside Emergencies
254
Page 255 of 344
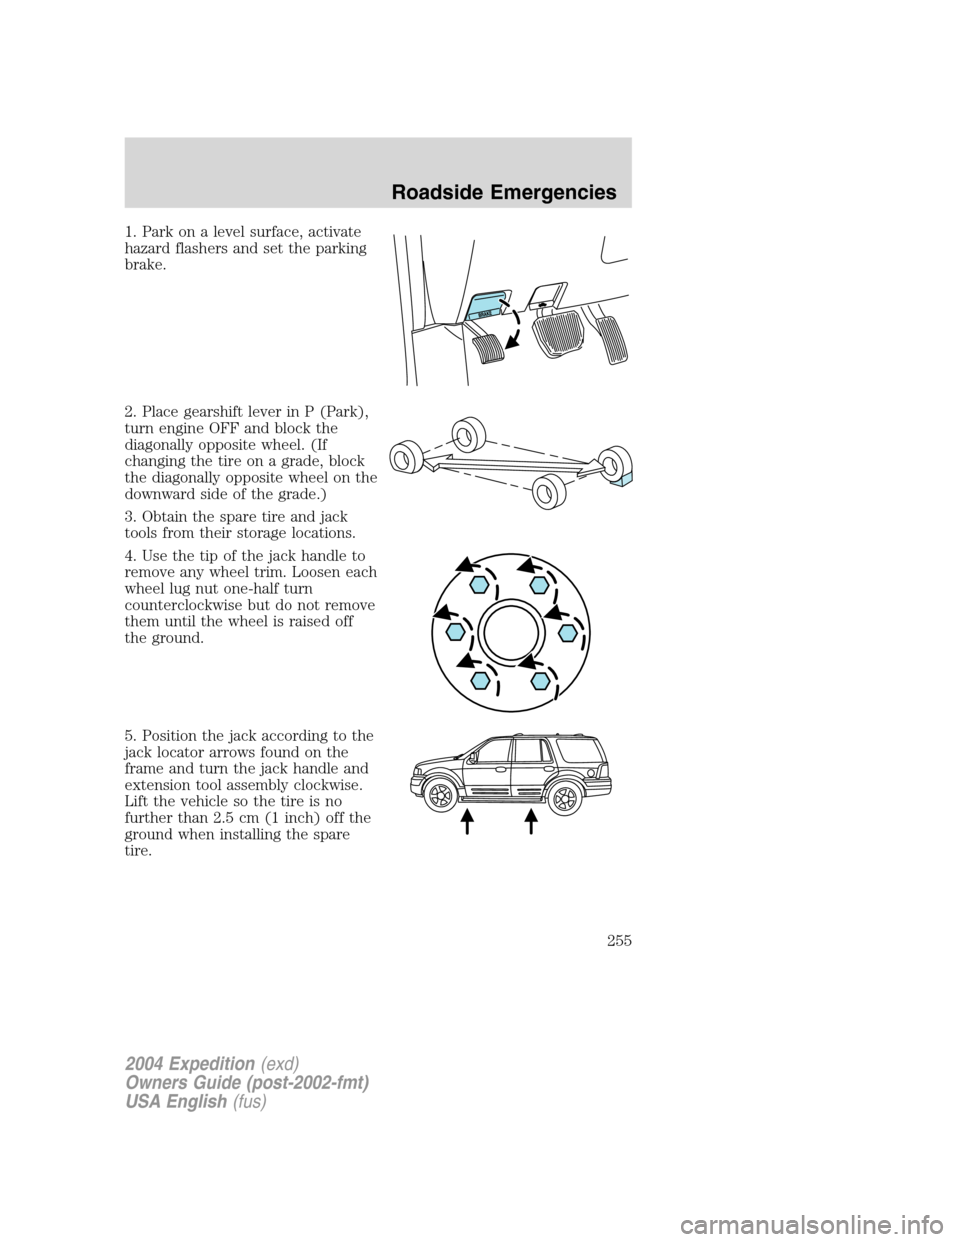
1. Park on a level surface, activate
hazard flashers and set the parking
brake.
2. Place gearshift lever in P (Park),
turn engine OFF and block the
diagonally opposite wheel. (If
changing the tire on a grade, block
the diagonally opposite wheel on the
downward side of the grade.)
3. Obtain the spare tire and jack
tools from their storage locations.
4. Use the tip of the jack handle to
remove any wheel trim. Loosen each
wheel lug nut one-half turn
counterclockwise but do not remove
them until the wheel is raised off
the ground.
5. Position the jack according to the
jack locator arrows found on the
frame and turn the jack handle and
extension tool assembly clockwise.
Lift the vehicle so the tire is no
further than 2.5 cm (1 inch) off the
ground when installing the spare
tire.
2004 Expedition(exd)
Owners Guide (post-2002-fmt)
USA English(fus)
Roadside Emergencies
255
Page 256 of 344
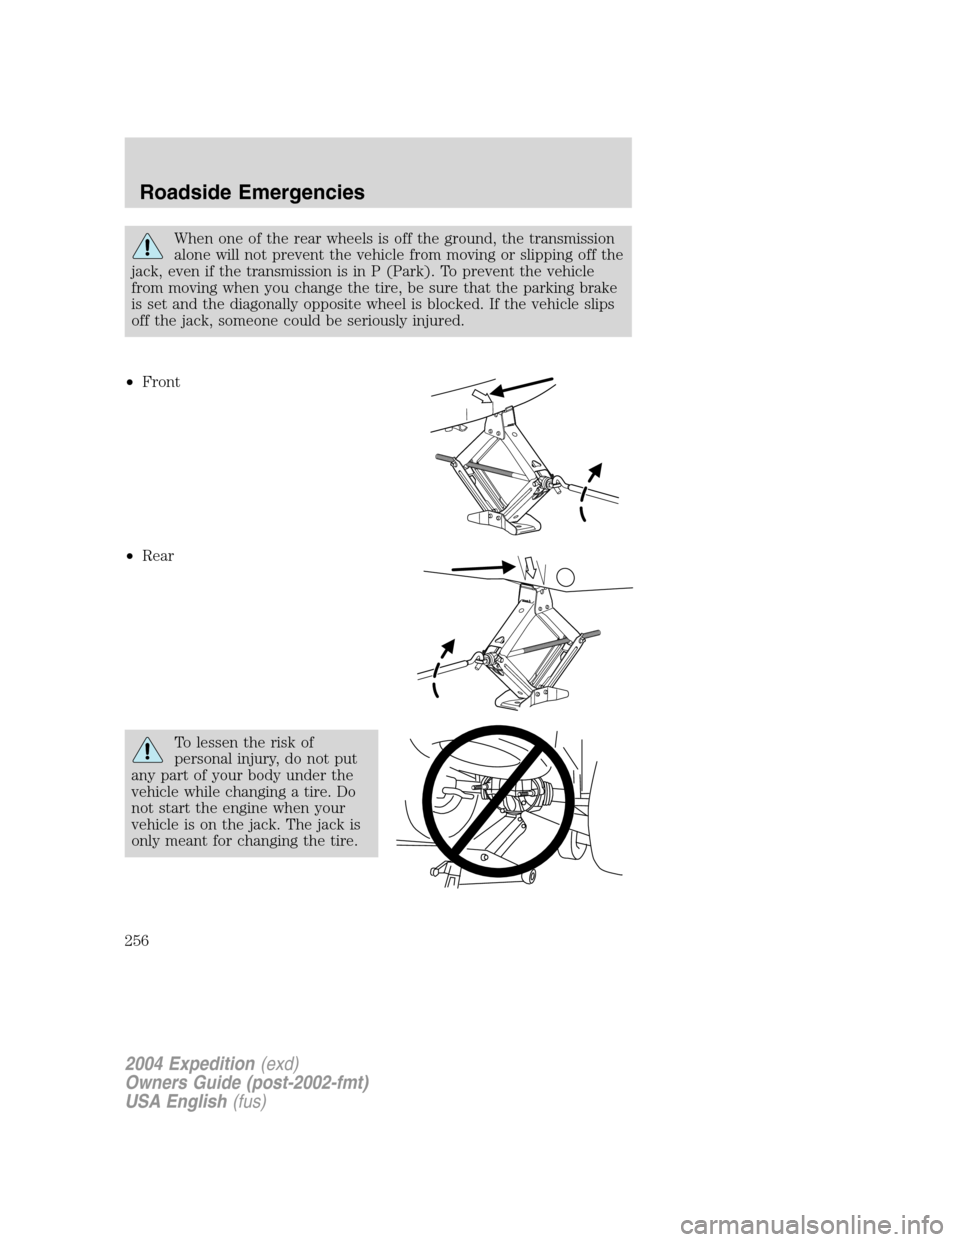
When one of the rear wheels is off the ground, the transmission
alone will not prevent the vehicle from moving or slipping off the
jack, even if the transmission is in P (Park). To prevent the vehicle
from moving when you change the tire, be sure that the parking brake
is set and the diagonally opposite wheel is blocked. If the vehicle slips
off the jack, someone could be seriously injured.
•Front
•Rear
To lessen the risk of
personal injury, do not put
any part of your body under the
vehicle while changing a tire. Do
not start the engine when your
vehicle is on the jack. The jack is
only meant for changing the tire.
2004 Expedition(exd)
Owners Guide (post-2002-fmt)
USA English(fus)
Roadside Emergencies
256