2004 FORD E SERIES service interval
[x] Cancel search: service intervalPage 4 of 56

DIESEL ENGINE INFORMATION
The Diesel engine fuel system consists of:
•a frame-mounted electric fuel supply pump
•an engine mounted fuel filter/water separator
•a fuel restriction sensor
•a unit injector for each cylinder
The combination fuel filter/water separator removes both water and
impurities from the fuel. The filter should be changed at the
recommended service interval. Refer to the scheduled maintenance guide
for more information. The filter bowl should be drained at regular
intervals or when the WATER IN FUEL light illuminates in the
instrument cluster.
The fuel injectors are located in the center of the combustion chambers
in the cylinder head between the rocker arm assemblies. The glow plug
system and fuel injection system are controlled through the Powertrain
Control Module (PCM).
Fuel is drawn from the fuel tank by a frame-mounted electric fuel pump.
The fuel pump provides pressurized fuel to the engine and is
electronically controlled by the fuel pump PCM relay. The fuel pump
contains a pressure relief valve for overpressure protection in the event
of restricted flow.
Lubrication system
It is important to change the engine oil at the recommended service
intervals, because oil viscosity is important in maintaining the oil
pressure required to actuate the fuel injectors. Extended oil change
intervals can negatively affect engine performance and fuel economy.
Pressurized oil from the turbocharger is also used to actuate an exhaust
backpressure warm-up system (if equipped). Pressurized oil from the
turbocharger is routed to the exhaust backpressure actuator. During
exhaust backpressure operation, the engine’s sound will be altered and
you may notice a change in engine performance while it’s engaged. This
function occurs only during cold weather warm-up cycle.
Fast start glow plug system
The glow plug system consists of:
•eight glow plugs
•the glow plug relay
Diesel information
4
Page 29 of 56

7. Remove the fuel filter cap by
turning counterclockwise.
8. Remove and discard old fuel filter
element and fuel filter o-ring.
9. Carefully clean the mating
surfaces.
Installation—F-250/350/450/550 and Excursion
The engine will not run properly if the fuel filter is not installed
in housing.
1. Apply a coating of clean Diesel fuel to the new fuel filter o-ring.
2. Install new fuel filter o-ring onto fuel filter element.
3. Install new fuel filter and o-ring into the fuel filter housing.
4. Tighten cap onto fuel filter housing slowly, allowing fuel to soak into
the fuel filter element. Tighten cap until it contacts the housing.
5. Install engine appearance cover.
After replacing the fuel filter, the engine will purge the trapped
air as it runs. The engine may run roughly and smoke until the air
is completely eliminated.
Using a fuel which has more than average impurities may require
the fuel filter to be replaced more frequently than the service
interval specifies.
Installation—E-Series
The engine will not run properly if the fuel filter is not installed
in housing.
General maintenance information
29
Page 30 of 56

1. Apply a coating of clean Diesel fuel to the new fuel filter o-ring.
2. Install new fuel filter o-ring onto fuel filter element.
3. Install new fuel filter and o-ring into the fuel filter housing.
4. Tighten cap onto fuel filter housing slowly, allowing fuel to soak into
the fuel filter element. Tighten cap until it contacts the housing.
5. Install the resonator and resonator bolt.
6. Install the turbocharger heat shield, then the three bolts on the
turbocharger heat shield.
7. Connect the air inlet tube to the resonator, then tighten the clamp on
the air inlet tube.
8. Install the air cleaner(s), close the air cleaner cover, then close the
four retaining clamps on the air cleaner assembly.
9. Connect the battery ground cable, then all electrical connectors,
vacuum tubes and fasteners as necessary for installation.
10. Install the engine appearance cover.
After replacing the fuel filter, the engine will purge the trapped
air as it runs. The engine may run roughly and smoke until the air
is completely eliminated.
Using a fuel which has more than average impurities may require
the fuel filter to be replaced more frequently than the service
interval specifies.
ENGINE OIL
Checking engine oil level
Because it is normal to add some oil between oil changes, check your
engine oil level each time you stop for fuel. To check the engine oil level
consistently and accurately, the following procedure is recommended:
1. Have engine at normal operating temperature (at least into the
NORMAL range on the engine coolant temperature gauge).
2. Park the vehicle on a level surface, then turn off the engine and open
the hood.
3. Allow at least20 minutesafter engine shutdown to assure that the oil
contained in the upper parts of the engine has returned to the oil pan.
General maintenance information
30
Page 31 of 56

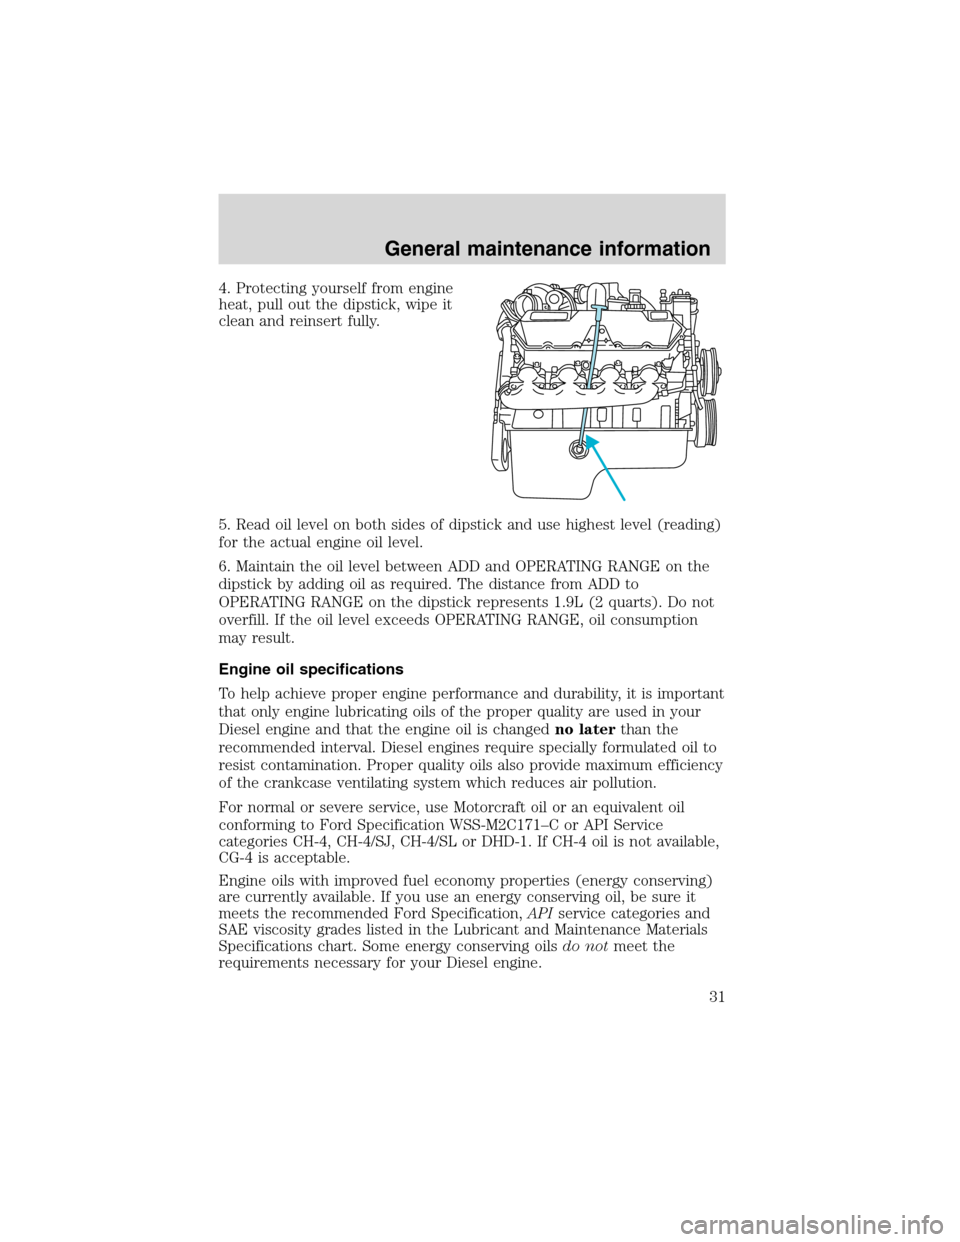
4. Protecting yourself from engine
heat, pull out the dipstick, wipe it
clean and reinsert fully.
5. Read oil level on both sides of dipstick and use highest level (reading)
for the actual engine oil level.
6. Maintain the oil level between ADD and OPERATING RANGE on the
dipstick by adding oil as required. The distance from ADD to
OPERATING RANGE on the dipstick represents 1.9L (2 quarts). Do not
overfill. If the oil level exceeds OPERATING RANGE, oil consumption
may result.
Engine oil specifications
To help achieve proper engine performance and durability, it is important
that only engine lubricating oils of the proper quality are used in your
Diesel engine and that the engine oil is changedno laterthan the
recommended interval. Diesel engines require specially formulated oil to
resist contamination. Proper quality oils also provide maximum efficiency
of the crankcase ventilating system which reduces air pollution.
For normal or severe service, use Motorcraft oil or an equivalent oil
conforming to Ford Specification WSS-M2C171–C or API Service
categories CH-4, CH-4/SJ, CH-4/SL or DHD-1. If CH-4 oil is not available,
CG-4 is acceptable.
Engine oils with improved fuel economy properties (energy conserving)
are currently available. If you use an energy conserving oil, be sure it
meets the recommended Ford Specification,APIservice categories and
SAE viscosity grades listed in the Lubricant and Maintenance Materials
Specifications chart. Some energy conserving oilsdo notmeet the
requirements necessary for your Diesel engine.
General maintenance information
31
Page 32 of 56

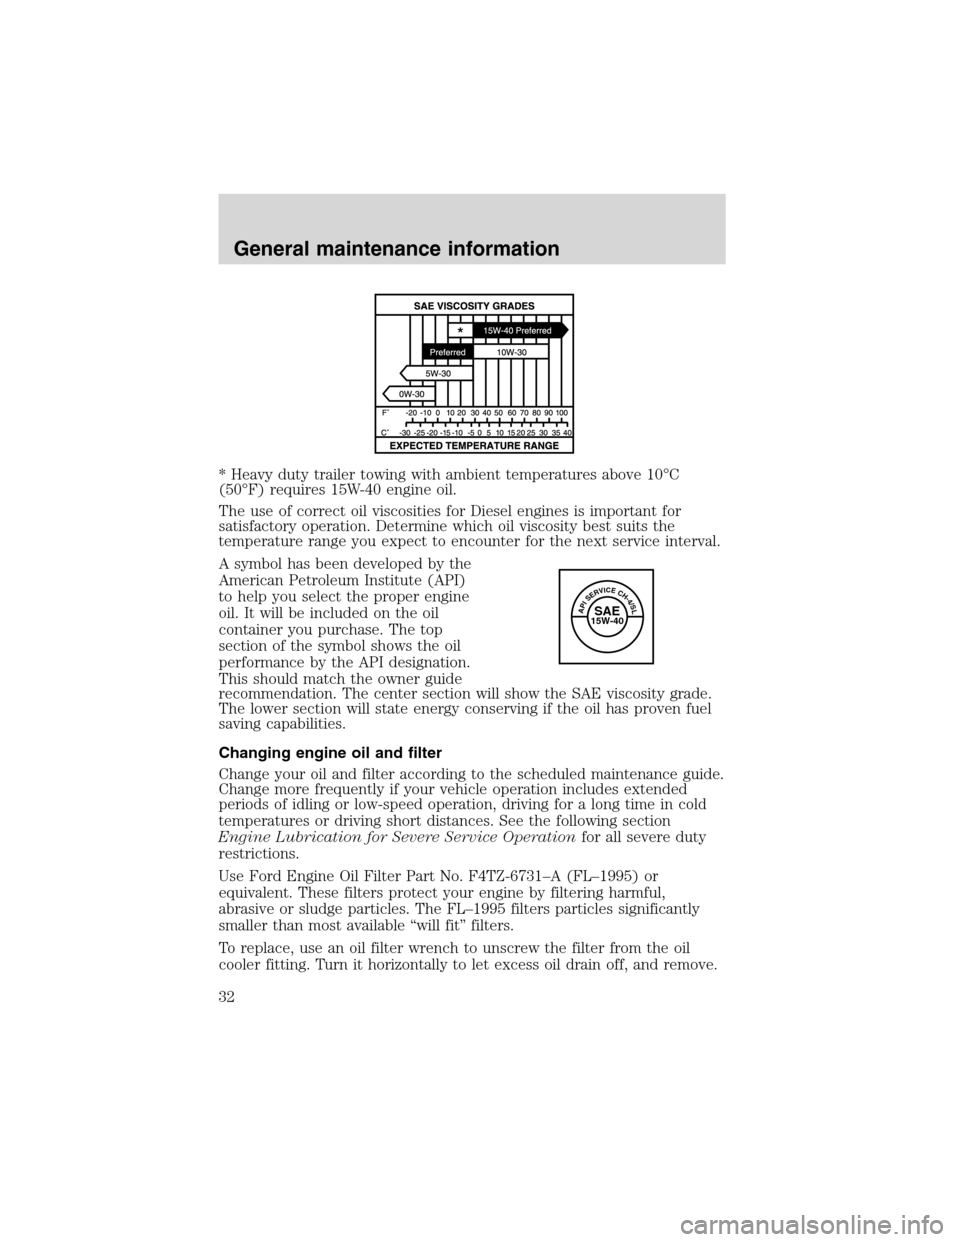
* Heavy duty trailer towing with ambient temperatures above 10°C
(50°F) requires 15W-40 engine oil.
The use of correct oil viscosities for Diesel engines is important for
satisfactory operation. Determine which oil viscosity best suits the
temperature range you expect to encounter for the next service interval.
A symbol has been developed by the
American Petroleum Institute (API)
to help you select the proper engine
oil. It will be included on the oil
container you purchase. The top
section of the symbol shows the oil
performance by the API designation.
This should match the owner guide
recommendation. The center section will show the SAE viscosity grade.
The lower section will state energy conserving if the oil has proven fuel
saving capabilities.
Changing engine oil and filter
Change your oil and filter according to the scheduled maintenance guide.
Change more frequently if your vehicle operation includes extended
periods of idling or low-speed operation, driving for a long time in cold
temperatures or driving short distances. See the following section
Engine Lubrication for Severe Service Operationfor all severe duty
restrictions.
Use Ford Engine Oil Filter Part No. F4TZ-6731–A (FL–1995) or
equivalent. These filters protect your engine by filtering harmful,
abrasive or sludge particles. The FL–1995 filters particles significantly
smaller than most available“will fit”filters.
To replace, use an oil filter wrench to unscrew the filter from the oil
cooler fitting. Turn it horizontally to let excess oil drain off, and remove.
APISERVICECH-4/SLSAE15W-40
General maintenance information
32
Page 37 of 56

Rotunda Battery and Antifreeze Tester, 014–R1060). The level of coolant
should be maintained at the“cold full”of“cold fill range”level in the
coolant reservoir. If the level falls below, add coolant per the instructions
in theAdding Engine Coolantsection.
Your vehicle was factory-filled with a 50/50 engine coolant and water
concentration. If the concentration of coolant falls below 40% or above
60%, the engine parts could become damaged or not work properly.A
50–50 mixture of coolant and water provides the following:
•freeze protection down to -36°C (-34°F).
•boiling protection up to 129°C (265°F).
•protection against rust and other forms of corrosion.
•enables calibrated gauges to work properly.
When the engine is cold, check the level of the engine coolant in the
reservoir.
•The engine coolant should be at the“cold fill level”or within the“cold
fill range”as listed on the engine coolant reservoir (depending upon
application).
•Refer to the scheduled maintenance guide for service interval
schedules.
•Be sure to read and understandPrecautions when servicing your
vehiclein your owner guide.
If the engine coolant has not been checked at the recommended interval,
the engine coolant reservoir may become low or empty. If the reservoir is
low or empty, add engine coolant to the reservoir. Refer toAdding
engine coolantin this chapter.
Note:Automotive fluids are not interchangeable; do not use engine
coolant, antifreeze or windshield washer fluid outside of its specified
function and vehicle location.
Vehicles with Diesel engines typically are used to carry heavy loads and
accumulate mileage rapidly. These two factors cause the additives in the
coolant to“wear out”in a shorter time. For vehicles equipped with green
coolant, Ford recommends an interim service interval performed at 12
months or 24,000 km (15,000 miles), whichever occurs first. Add
237–295 ml (8–10 oz.) of supplemental coolant additive FW-16 to the
cooling system. For vehicles with extensive idling time, add 237–295 ml
(8–10 oz.) of coolant additive FW-16 after every 500 hours of operation.
(see scheduled maintenance guide). For vehicles equipped with yellow
coolant (Extended Life Coolant), the service interval is five years or
General maintenance information
37
Page 40 of 56

Whenever coolant has been added, the coolant level in the coolant
reservoir should be checked the next few times you drive the vehicle. If
necessary, add enough 50/50 concentration of engine coolant and
distilled water to bring the liquid level to the proper level.
If you have to add more than 1.0 liter (1.0 quart) of engine coolant per
month, have your dealer check the engine cooling system. Your cooling
system may have a leak. Operating an engine with a low level of coolant
can result in engine overheating and possible engine damage.
Replacing coolant
A coolant mixture of 50% coolant concentrate and 50% water is
recommended to maintain best overall performance. To avoid damaging
the engine and radiator, the coolant concentrate should not exceed 60%.
When refilling the coolant system either as part of the regular
maintenance (refer to the scheduled maintenance guide), or due to
service performed, adhere to the following instructions:
1. Drain and flush the cooling system to remove dirt deposits, oil, rust
particles.
Note:When filling the system with Motorcraft Premium Engine Coolant
(green-colored) or equivalent meeting Ford specification
ESE-M97B44–A, a supplemental coolant additive is required. Refer to
Adding Coolantsection to determine the coolant type in your vehicle.
Add 1.89L (4 pints) of Motorcraft Heavy Duty Cooling System Additive
FW-16 or equivalent meeting Ford specification ESN-M99B169–A,
directly to the cooling system. An additional 237–295 ml (8–10 oz.) of
supplemental coolant additive FW-16 should be added at 24,000 km
(15,000 mile) intervals to maintain proper concentration.Do not use
this additive with yellow-colored coolant meeting Ford
specification WSS-M97B51–A1.
2. Fill the coolant reservoir with the specified coolant/water mixture until
the level stabilizes at the top hose fitting. Replace and tighten cap. Fill
the coolant bottle to the cold fill mark.
3. Reinstall the coolant bottle cap.
4. Start and idle engine until the radiator upper hose is warm
(approximately 10–15 minutes). If the hose does not get warm then
repeat at a higher engine speed.
5. Immediately shut off engine. Allow engine to cool before removing
coolant bottle cap. Cautiously remove coolant bottle cap and add coolant
to Cold Fill mark.
General maintenance information
40