Page 112 of 240
Four-wheel anti-lock brake system (ABS)
Your vehicle is equipped with an Anti-lock Braking System (ABS). This
system helps you maintain steering control during emergency stops by
keeping the brakes from locking. Noise from the ABS pump motor and
brake pedal pulsation may be observed during ABS braking; this is
normal and should be no reason for concern.
ABS warning lamp
The ABS lamp in the instrument
cluster momentarily illuminates
when the ignition is turned on. If
the light does not illuminate during
start up, remains on or flashes, the
ABS may be disabled and may need to be serviced.
Even when the ABS is disabled,
normal braking is still effective. (If
your BRAKE warning lamp
illuminates with the parking brake
released, have your brake system serviced immediately.)
Using ABS
When hard braking is required, apply continuous force on the brake
pedal; do not pump the brake pedal since this will reduce the
effectiveness of the ABS and will increase your vehicle’s stopping
distance. The ABS will be activated immediately, allowing you to retain
full steering control during hard braking and on slippery surfaces.
However, the ABS does not decrease stopping distance.
Parking brake
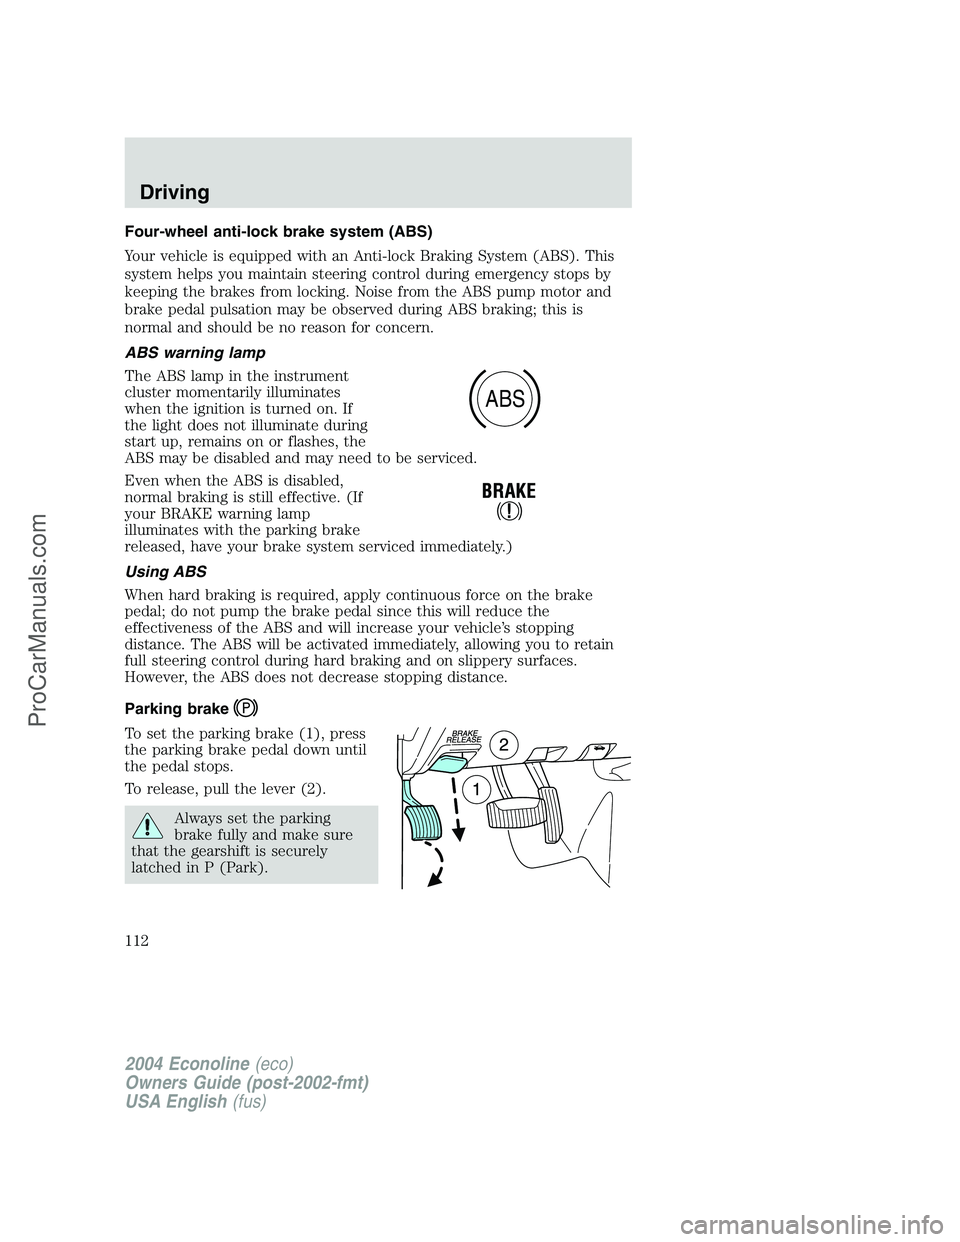
To set the parking brake (1), press
the parking brake pedal down until
the pedal stops.
To release, pull the lever (2).
Always set the parking
brake fully and make sure
that the gearshift is securely
latched in P (Park).
ABS
2004 Econoline(eco)
Owners Guide (post-2002-fmt)
USA English(fus)
Driving
112
ProCarManuals.com
Page 115 of 240
AUTOMATIC TRANSMISSION OPERATION
Brake-shift interlock
This vehicle is equipped with a brake-shift interlock feature that prevents
the gearshift lever from being moved from P (Park) when the ignition is
in the ON position unless brake pedal is depressed.
If you cannot move the gearshift lever out of P (Park) with ignition in
the ON position and the brake pedal depressed:
1. Apply the parking brake, turn ignition key to LOCK, then remove the
key.
2. Insert the key and turn it to OFF.Apply the brake pedal and shift
to N (Neutral).
When the key is in the ignition and in the OFF position, the
automatic transmission shift lever can be moved from the P
(Park) position without the brake pedal depressed. To avoid unwanted
vehicle movement, always set the parking brake.
3. Start the vehicle.
If it is necessary to use the above procedure to move the gearshift lever,
it is possible that a fuse has blown or the vehicle’s brakelamps are not
operating properly. Refer toFuses and relaysin theRoadside
emergencieschapter.
Do not drive your vehicle until you verify that the brakelamps
are working.
Always set the parking brake fully and make sure the gearshift is
latched in P (Park). Turn the ignition to the LOCK position and
remove the key whenever you leave your vehicle.
If the parking brake is fully released, but the brake warning lamp
remains illuminated, the brakes may not be working properly.
See your dealer or a qualified service technician.
2004 Econoline(eco)
Owners Guide (post-2002-fmt)
USA English(fus)
Driving
115
ProCarManuals.com
Page 116 of 240
Understanding the gearshift positions of the 4–speed automatic
transmission
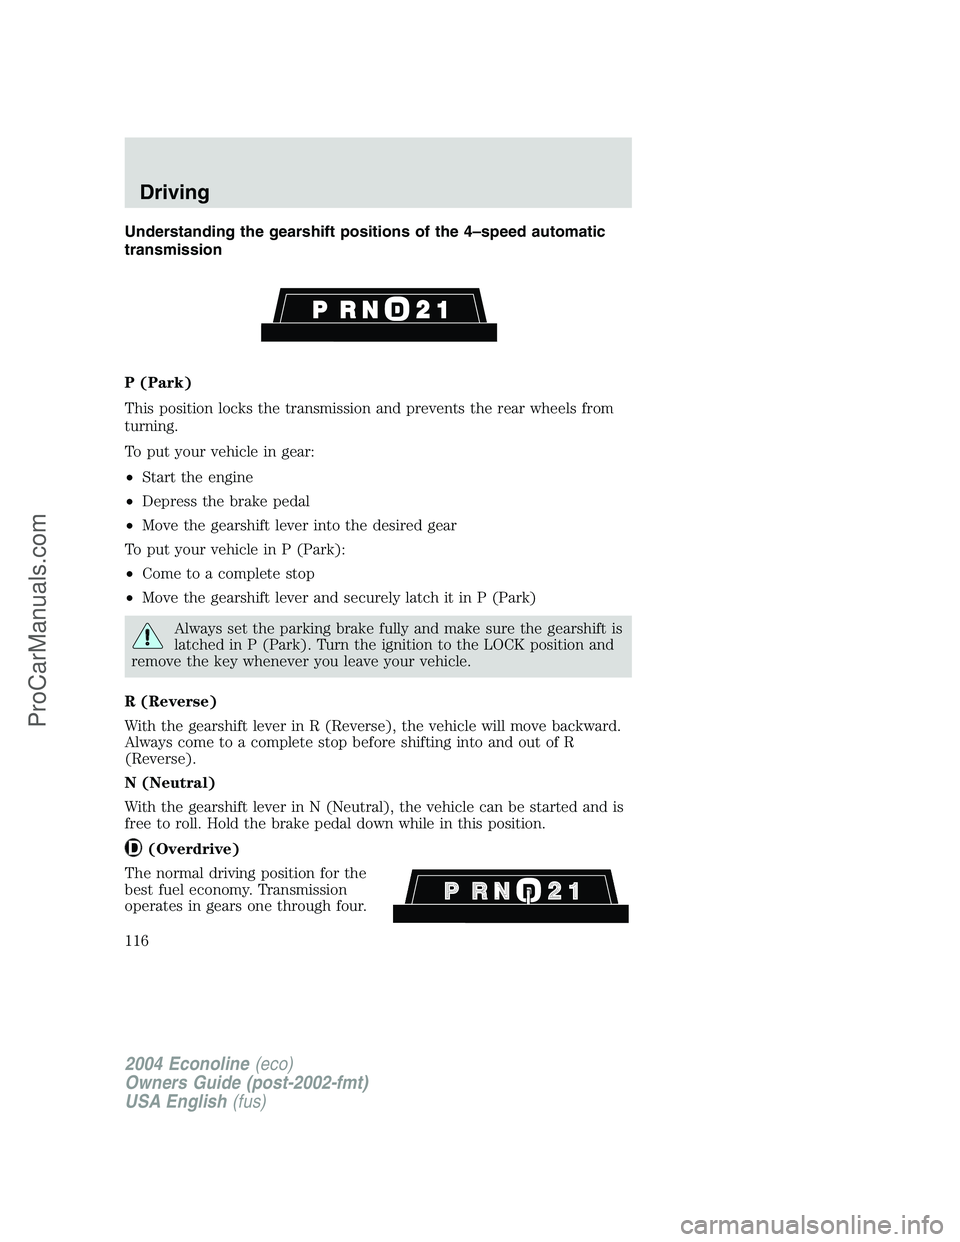
P (Park)
This position locks the transmission and prevents the rear wheels from
turning.
To put your vehicle in gear:
•Start the engine
•Depress the brake pedal
•Move the gearshift lever into the desired gear
To put your vehicle in P (Park):
•Come to a complete stop
•Move the gearshift lever and securely latch it in P (Park)
Always set the parking brake fully and make sure the gearshift is
latched in P (Park). Turn the ignition to the LOCK position and
remove the key whenever you leave your vehicle.
R (Reverse)
With the gearshift lever in R (Reverse), the vehicle will move backward.
Always come to a complete stop before shifting into and out of R
(Reverse).
N (Neutral)
With the gearshift lever in N (Neutral), the vehicle can be started and is
free to roll. Hold the brake pedal down while in this position.
(Overdrive)
The normal driving position for the
best fuel economy. Transmission
operates in gears one through four.
2004 Econoline(eco)
Owners Guide (post-2002-fmt)
USA English(fus)
Driving
116
ProCarManuals.com
Page 132 of 240
GETTING ROADSIDE ASSISTANCE
To fully assist you should you have a vehicle concern, Ford Motor
Company offers a complimentary roadside assistance program. This
program is separate from the New Vehicle Limited Warranty. The service
is available:
•24–hours, seven days a week
•for the New Vehicle Limited Warranty period of three years or 60,000
km (36,000 miles), whichever occurs first on Ford and Mercury
vehicles, and four years or 80,000 km (50,000 miles) on Lincoln
vehicles.
Roadside assistance will cover:
•changing a flat tire
•jump-starts
•lock-out assistance
•limited fuel delivery
•towing of your disabled vehicle to the nearest Ford Motor Company
dealership, or your selling dealer if within 56.3 km (35 miles) of the
nearest Ford Motor Company dealership (one tow per disablement).
Even non-warranty related tows, like accidents or getting stuck in the
mud or snow, are covered (some exclusions apply, such as impound
towing or repossession).
Canadian customers refer to your Owner Information Guide for
information on:
•coverage period
•exact fuel amounts
•towing of your disabled vehicle
•emergency travel expense reimbursement
•travel planning benefits
USING ROADSIDE ASSISTANCE
Complete the roadside assistance identification card and place it in your
wallet for quick reference. In the United States, this card is found in the
Owner Guide portfolio in the glove compartment in Ford vehicles and is
mailed to you if you own a Mercury or Lincoln. In Canada, the card is
found in the Owner Information Guide in the glove compartment.
U.S. Ford or Mercury vehicle customers who require roadside assistance,
call 1–800–241–3673; Lincoln vehicle customers call 1–800–521–4140.
2004 Econoline(eco)
Owners Guide (post-2002-fmt)
USA English(fus)
Roadside Emergencies
132
ProCarManuals.com
Page 136 of 240
To remove a fuse use the fuse puller tool provided on the fuse panel
cover.
The fuses are coded as follows.
Fuse/RelayLocation Fuse Amp
Rating Passenger Compartment Fuse Panel
Description
1 5A 4–Wheel Anti–lock Brake System (4WABS) module
2 10A Remote Keyless Entry (RKE), O/D cancel, Low vacuum (Diesel engine
only)
3 15A RKE module, Trip computer, Radio, Instrument illumination, Video Cassette
Player (VCP) and video screens,
Overhead console
4 15A Modified vehicle, Courtesy lamps
1234 5
7
68910 1142
43
44
13
12 14
15 16 17
19
18
2021 22 23
25
24
26 27 28 29
31
30 32 33 34 35
37
36 38 39
40
41
2004 Econoline (eco)
Owners Guide (post-2002-fmt)
USA English (fus)
Roadside Emergencies
136
ProCarManuals.com
Page 137 of 240
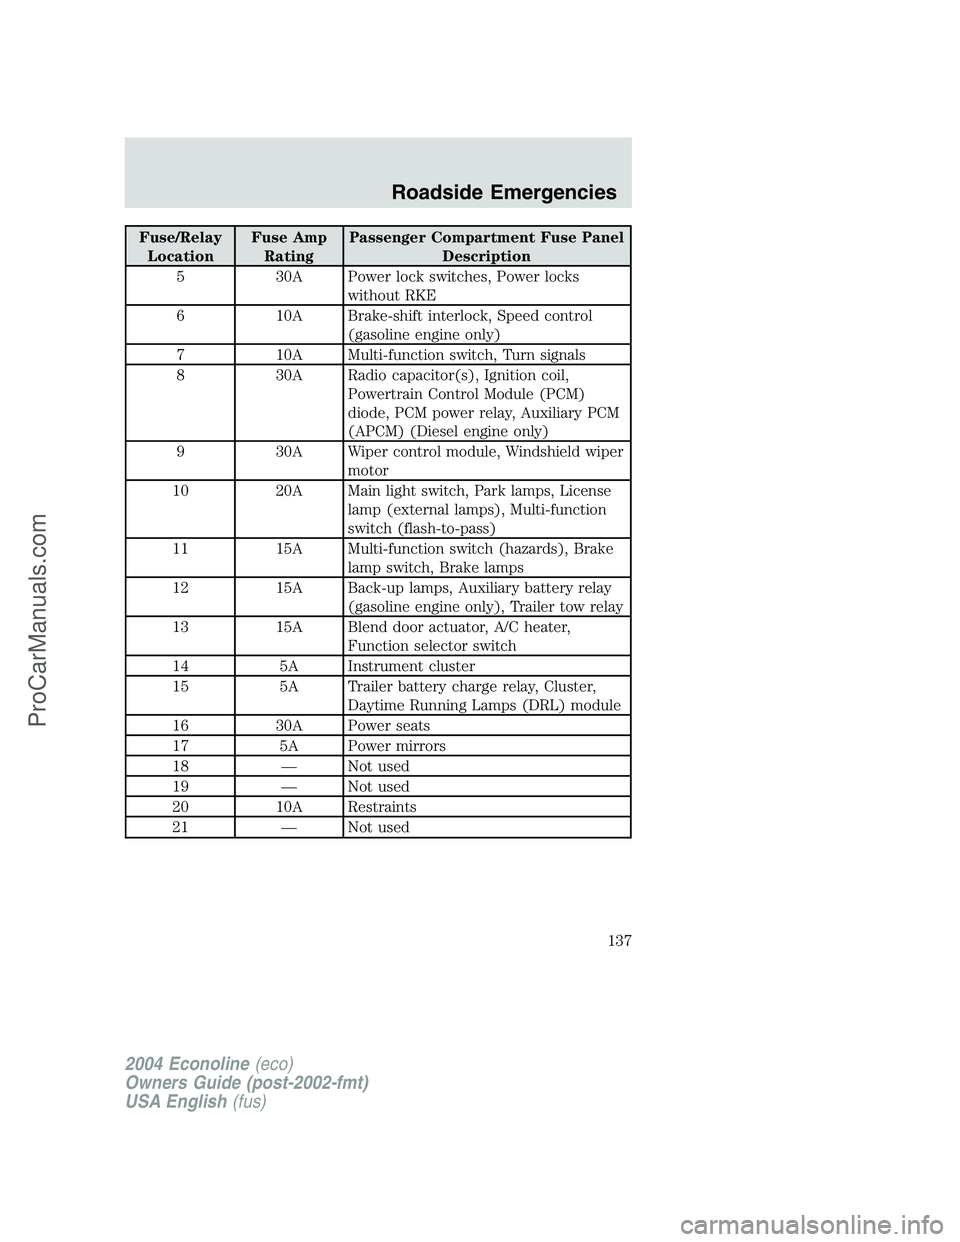
Fuse/RelayLocation Fuse Amp
Rating Passenger Compartment Fuse Panel
Description
5 30A Power lock switches, Power locks without RKE
6 10A Brake-shift interlock, Speed control (gasoline engine only)
7 10A Multi-function switch, Turn signals
8 30A Radio capacitor(s), Ignition coil, Powertrain Control Module (PCM)
diode, PCM power relay, Auxiliary PCM
(APCM) (Diesel engine only)
9 30A Wiper control module, Windshield wiper motor
10 20A Main light switch, Park lamps, License lamp (external lamps), Multi-function
switch (flash-to-pass)
11 15A Multi-function switch (hazards), Brake lamp switch, Brake lamps
12 15A Back-up lamps, Auxiliary battery relay (gasoline engine only), Trailer tow relay
13 15A Blend door actuator, A/C heater, Function selector switch
14 5A Instrument cluster
15 5A Trailer battery charge relay, Cluster, Daytime Running Lamps (DRL) module
16 30A Power seats
17 5A Power mirrors
18 —Not used
19 —Not used
20 10A Restraints
21 —Not used
2004 Econoline (eco)
Owners Guide (post-2002-fmt)
USA English (fus)
Roadside Emergencies
137
ProCarManuals.com
Page 138 of 240
Fuse/RelayLocation Fuse Amp
Rating Passenger Compartment Fuse Panel
Description
22 15A Memory power radio, Rear seat video control unit, Battery saver relay,
Instrument cluster, courtesy lamp relay
23 20A Power locks w/RKE
24 —Not used
25 10A Left headlamp (low beam)
26 20A Cigar lighter
27 5A Radio
28 —Not used
29 20A Power point #4 (console)
30 15A Headlamps (high beam indicator)
31 10A Right headlamp (low beam)
32 20A Power point #1 (instrument panel)
33 10A Starter solenoid
34 20A Power point #3 (console)
35 30A Modified vehicle
36 5A (Cluster, A/C, Illumination, Radio)
37 —Not used
38 10A Roof marker lamps
39 10A Trailer tow electric brake, Center High-Mounted Stop Lamp (CHMSL),
Brake lamps
40 20A Power point #2 (2nd-row seating position-driverside)
41 30A Modified vehicle
42 —Not used
43 20A circuit breakerPower windows
44 —Not used
2004 Econoline (eco)
Owners Guide (post-2002-fmt)
USA English (fus)
Roadside Emergencies
138
ProCarManuals.com
Page 140 of 240
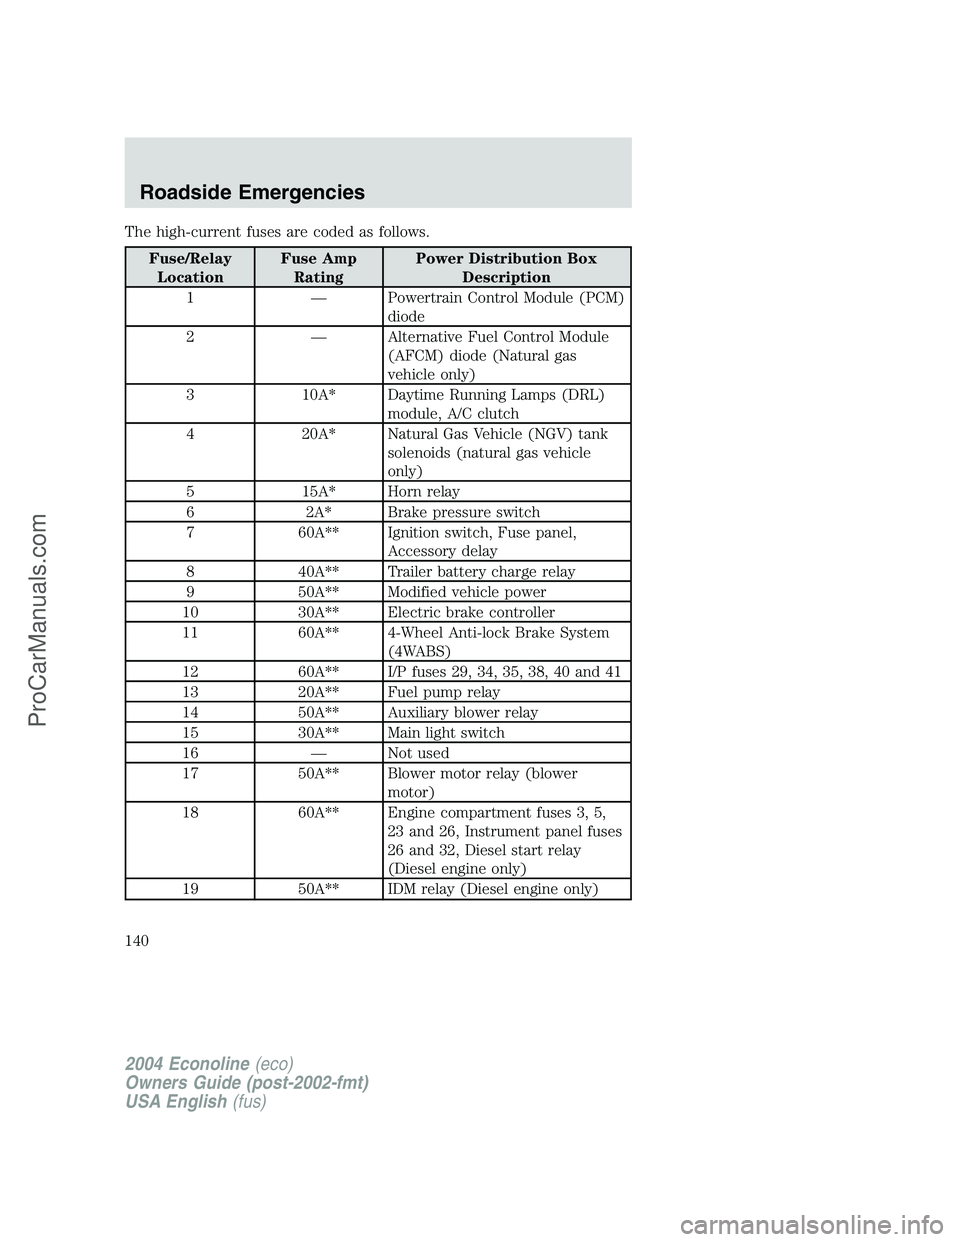
The high-current fuses are coded as follows.
Fuse/RelayLocation Fuse Amp
Rating Power Distribution Box
Description
1 — Powertrain Control Module (PCM) diode
2 — Alternative Fuel Control Module (AFCM) diode (Natural gas
vehicle only)
3 10A* Daytime Running Lamps (DRL) module, A/C clutch
4 20A* Natural Gas Vehicle (NGV) tank solenoids (natural gas vehicle
only)
5 15A* Horn relay
6 2A* Brake pressure switch
7 60A** Ignition switch, Fuse panel, Accessory delay
8 40A** Trailer battery charge relay
9 50A** Modified vehicle power
10 30A** Electric brake controller
11 60A** 4-Wheel Anti-lock Brake System (4WABS)
12 60A** I/P fuses 29, 34, 35, 38, 40 and 41
13 20A** Fuel pump relay
14 50A** Auxiliary blower relay
15 30A** Main light switch
16 — Not used
17 50A** Blower motor relay (blower motor)
18 60A** Engine compartment fuses 3, 5, 23 and 26, Instrument panel fuses
26 and 32, Diesel start relay
(Diesel engine only)
19 50A** IDM relay (Diesel engine only)
2004 Econoline (eco)
Owners Guide (post-2002-fmt)
USA English (fus)
Roadside Emergencies
140
ProCarManuals.com