Page 109 of 256
Because the last row of seats is not equipped with either child
tether or LATCH anchors and is spaced closer to the row of
seats in front,Do notuse forward-facing or rear-facing child seats
(other than belt-positioning boosters) in the last row.
Air bags can kill or injure a child in a child seat.NEVERplace a
rear-facing child seat in front of an active air bag. If you must
use a forward-facing child seat in the front seat, move the seat all the
way back.
Front passenger seating position
The tether can be attached directly
to the rear of the front seat.
1. Position the child safety seat on
the front right-hand passenger seat.
2. Adjust the front right-hand
passenger seat full forward.
2004 Econoline(eco)
Owners Guide (post-2002-fmt)
USA English(fus)
Seating and Safety Restraints
109
ProCarManuals.com
Page 111 of 256
6. Install the child safety seat tightly using the LATCH anchors or safety
belts. Follow the instructions in this chapter.
7. Tighten the child safety seat
tether strap according to the
manufacturer’s instructions.
Second row bucket seats (Chateau Quads)
The tether strap can be attached
directly to the tether bracket under
the back edge of the seat cushion.
1. Position the child safety seat on
the second row left hand or right
hand bucket seat.
2. Route the child safety tether
strap over the back of the left hand
or right hand second row bucket
seat.
2004 Econoline(eco)
Owners Guide (post-2002-fmt)
USA English(fus)
Seating and Safety Restraints
111
ProCarManuals.com
Page 112 of 256
3. Clip the tether strap hook to the
seat pedestal at the location shown.
4. Install the child safety seat tightly using the LATCH anchors or safety
belts. Follow the instructions in this chapter.
5. Tighten the child safety seat tether strap according to the
manufacturer’s instructions.
Second, Third and Fourth row three passenger bench seats
The tether strap can be attached
directly to the tether bracket
provided under the back edge of the
seat cushion.
1. For second row 3–Passenger bench seat, place the child safety seat on
the left hand outboard position, the center position, or the right hand
outboard position as desired.
For third row or fourth row 3–Passenger bench seat, place the child
safety seat on the center position.
2. Route the child safety tether
strap over the back of 3–Passenger
bench seat.
2004 Econoline(eco)
Owners Guide (post-2002-fmt)
USA English(fus)
Seating and Safety Restraints
112
ProCarManuals.com
Page 113 of 256

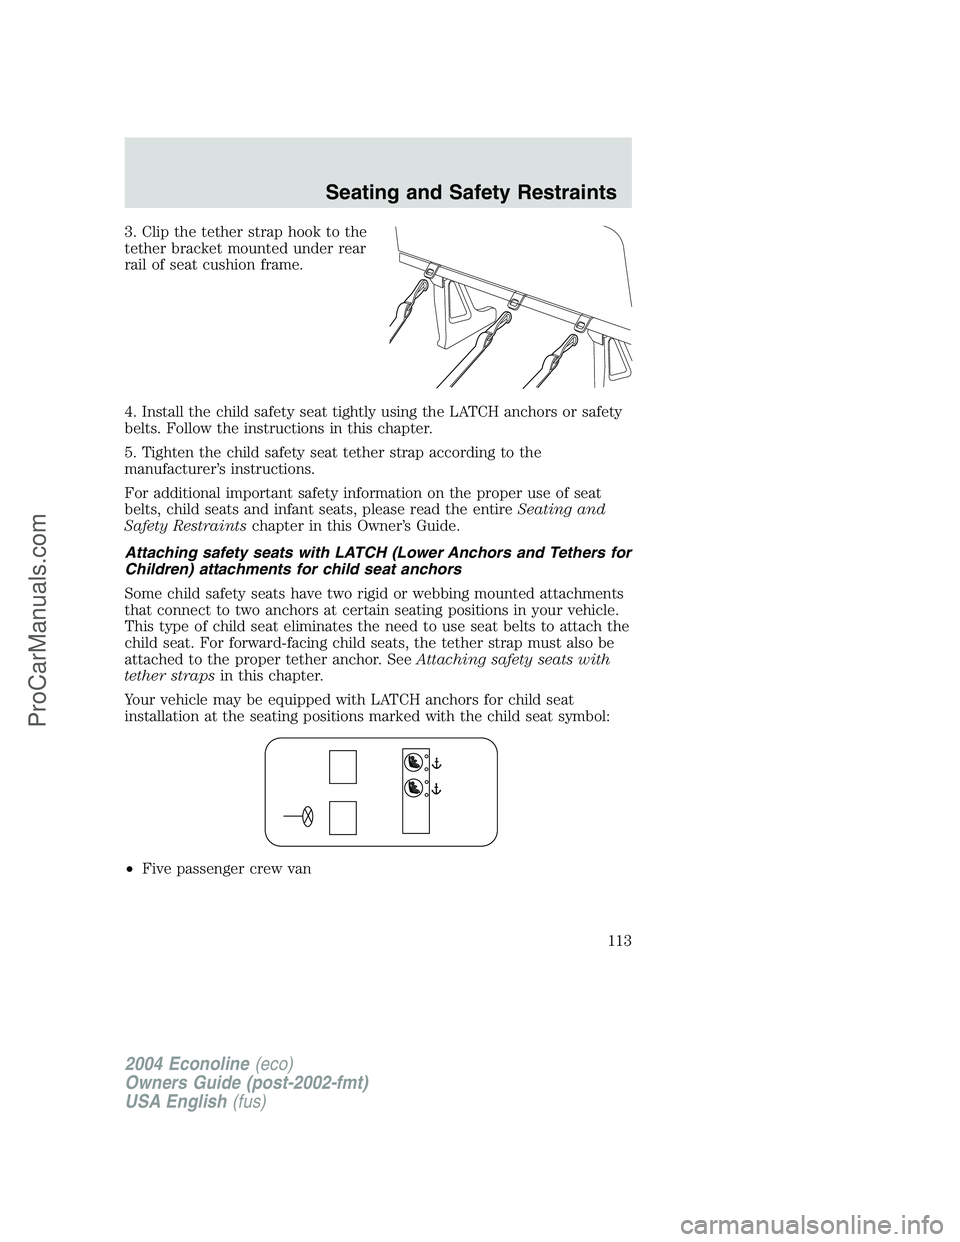
3. Clip the tether strap hook to the
tether bracket mounted under rear
rail of seat cushion frame.
4. Install the child safety seat tightly using the LATCH anchors or safety
belts. Follow the instructions in this chapter.
5. Tighten the child safety seat tether strap according to the
manufacturer’s instructions.
For additional important safety information on the proper use of seat
belts, child seats and infant seats, please read the entireSeating and
Safety Restraintschapter in this Owner’s Guide.
Attaching safety seats with LATCH (Lower Anchors and Tethers for
Children) attachments for child seat anchors
Some child safety seats have two rigid or webbing mounted attachments
that connect to two anchors at certain seating positions in your vehicle.
This type of child seat eliminates the need to use seat belts to attach the
child seat. For forward-facing child seats, the tether strap must also be
attached to the proper tether anchor. SeeAttaching safety seats with
tether strapsin this chapter.
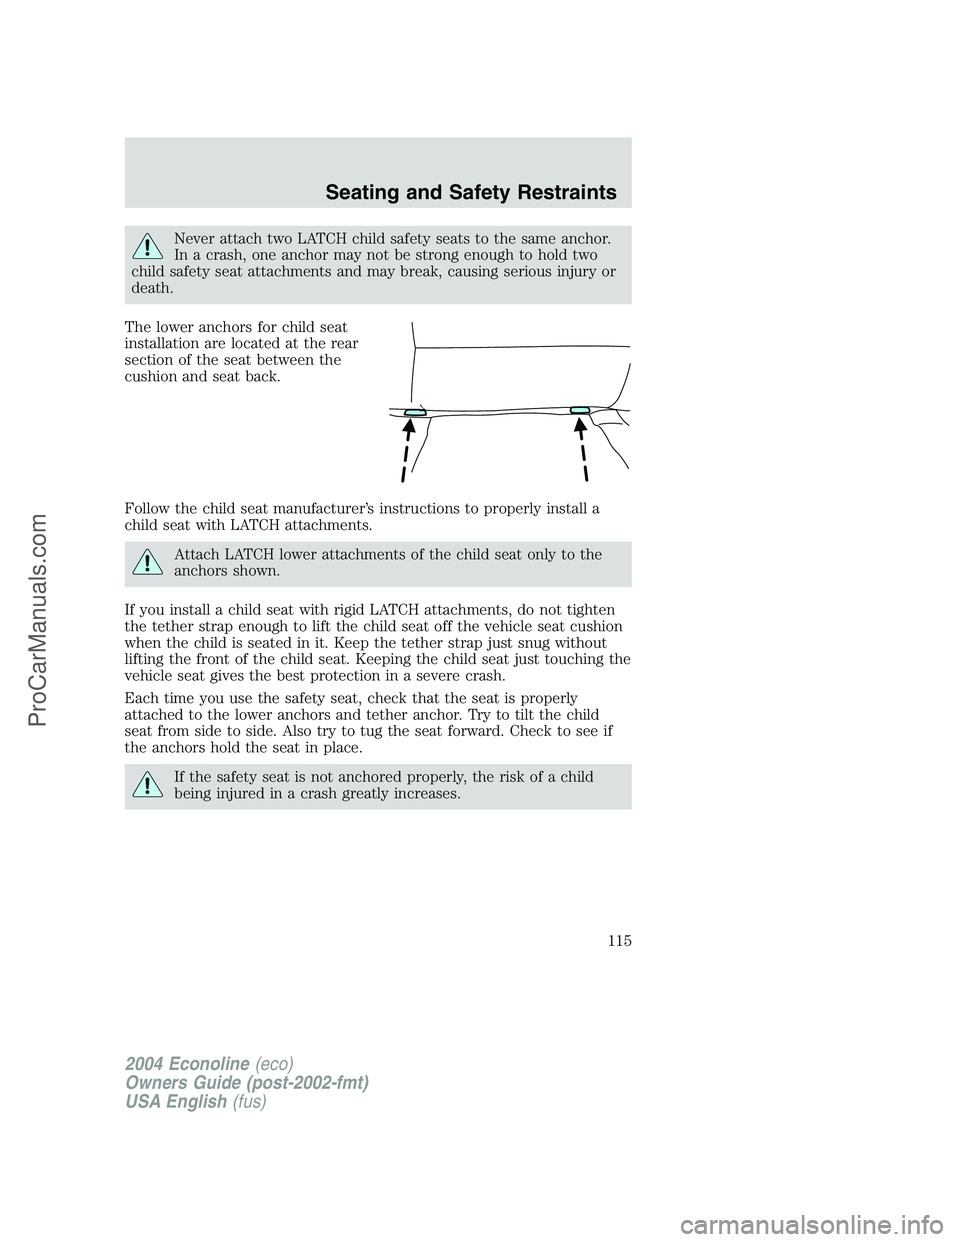
Your vehicle may be equipped with LATCH anchors for child seat
installation at the seating positions marked with the child seat symbol:
•Five passenger crew van
2004 Econoline(eco)
Owners Guide (post-2002-fmt)
USA English(fus)
Seating and Safety Restraints
113
ProCarManuals.com
Page 115 of 256

Never attach two LATCH child safety seats to the same anchor.
In a crash, one anchor may not be strong enough to hold two
child safety seat attachments and may break, causing serious injury or
death.
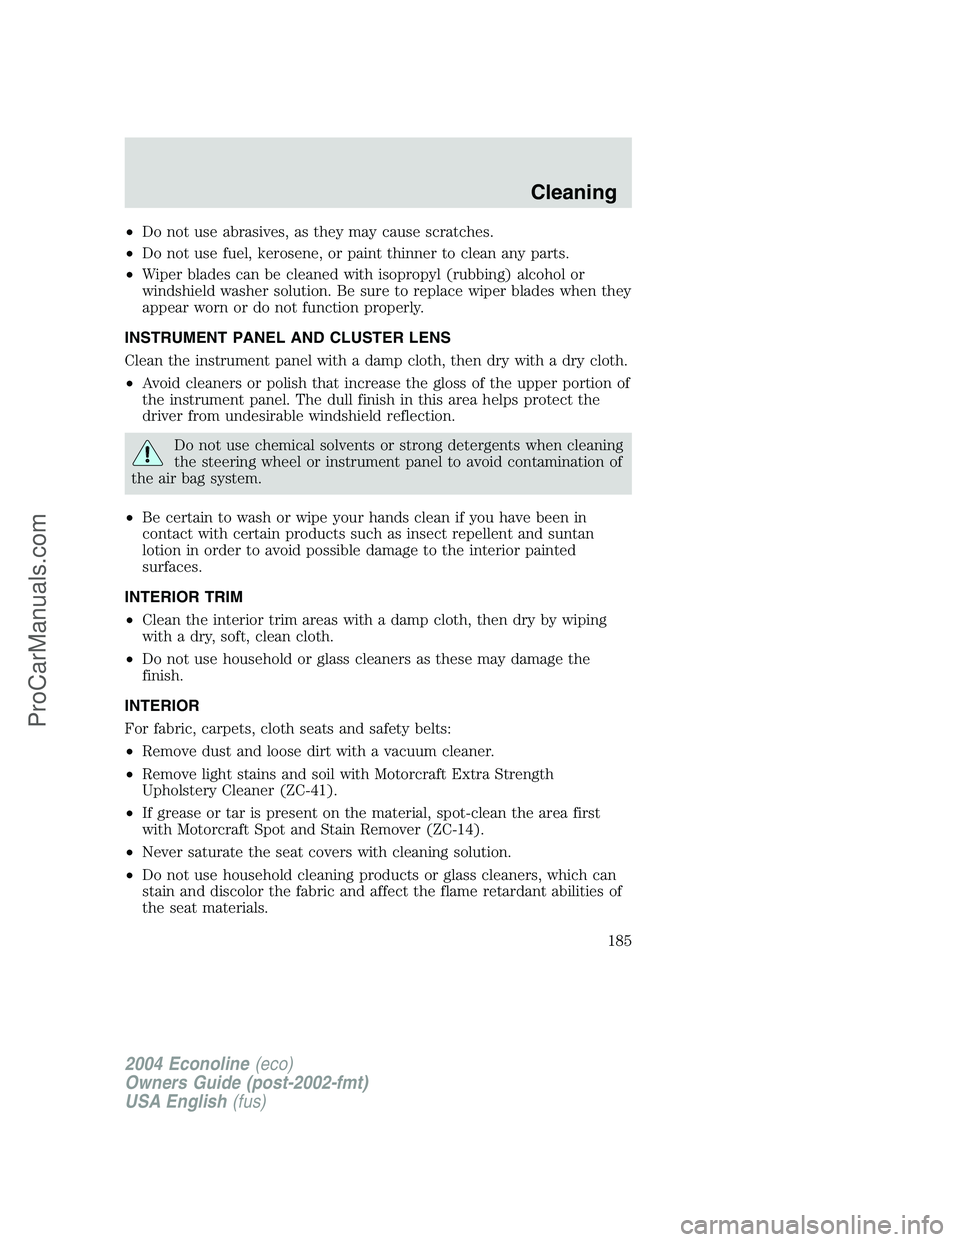
The lower anchors for child seat
installation are located at the rear
section of the seat between the
cushion and seat back.
Follow the child seat manufacturer’s instructions to properly install a
child seat with LATCH attachments.
Attach LATCH lower attachments of the child seat only to the
anchors shown.
If you install a child seat with rigid LATCH attachments, do not tighten
the tether strap enough to lift the child seat off the vehicle seat cushion
when the child is seated in it. Keep the tether strap just snug without
lifting the front of the child seat. Keeping the child seat just touching the
vehicle seat gives the best protection in a severe crash.
Each time you use the safety seat, check that the seat is properly
attached to the lower anchors and tether anchor. Try to tilt the child
seat from side to side. Also try to tug the seat forward. Check to see if
the anchors hold the seat in place.
If the safety seat is not anchored properly, the risk of a child
being injured in a crash greatly increases.
2004 Econoline(eco)
Owners Guide (post-2002-fmt)
USA English(fus)
Seating and Safety Restraints
115
ProCarManuals.com
Page 151 of 256

Fuse/Relay
LocationFuse Amp
RatingPassenger Compartment Fuse
Panel Description
5 30A Power lock switches, Power locks
without RKE
6 10A Brake-shift interlock, Speed
control (gasoline engine only)
7 10A Multi-function switch, Turn signals
8 30A Radio capacitor(s), Ignition coil,
Powertrain Control Module (PCM)
diode, PCM power relay, Auxiliary
PCM (APCM) (Diesel engine
only)
9 30A Wiper control module, Windshield
wiper motor
10 20A Main light switch, Park lamps,
License lamp (external lamps),
Multi-function switch
(flash-to-pass)
11 15A Multi-function switch (hazards),
Brake lamp switch, Brake lamps
12 15A Back-up lamps, Auxiliary battery
relay (gasoline engine only),
Trailer tow relay
13 15A Blend door actuator, A/C heater,
Function selector switch
14 5A Instrument cluster
15 5A Trailer battery charge relay,
Cluster, Daytime Running Lamps
(DRL) module
16 30A Power seats
17 5A Power mirrors
18—Not used
19—Not used
20 10A Restraints
2004 Econoline(eco)
Owners Guide (post-2002-fmt)
USA English(fus)
Roadside Emergencies
151
ProCarManuals.com
Page 185 of 256

•Do not use abrasives, as they may cause scratches.
•Do not use fuel, kerosene, or paint thinner to clean any parts.
•Wiper blades can be cleaned with isopropyl (rubbing) alcohol or
windshield washer solution. Be sure to replace wiper blades when they
appear worn or do not function properly.
INSTRUMENT PANEL AND CLUSTER LENS
Clean the instrument panel with a damp cloth, then dry with a dry cloth.
•Avoid cleaners or polish that increase the gloss of the upper portion of
the instrument panel. The dull finish in this area helps protect the
driver from undesirable windshield reflection.
Do not use chemical solvents or strong detergents when cleaning
the steering wheel or instrument panel to avoid contamination of
the air bag system.
•Be certain to wash or wipe your hands clean if you have been in
contact with certain products such as insect repellent and suntan
lotion in order to avoid possible damage to the interior painted
surfaces.
INTERIOR TRIM
•Clean the interior trim areas with a damp cloth, then dry by wiping
with a dry, soft, clean cloth.
•Do not use household or glass cleaners as these may damage the
finish.
INTERIOR
For fabric, carpets, cloth seats and safety belts:
•Remove dust and loose dirt with a vacuum cleaner.
•Remove light stains and soil with Motorcraft Extra Strength
Upholstery Cleaner (ZC-41).
•If grease or tar is present on the material, spot-clean the area first
with Motorcraft Spot and Stain Remover (ZC-14).
•Never saturate the seat covers with cleaning solution.
•Do not use household cleaning products or glass cleaners, which can
stain and discolor the fabric and affect the flame retardant abilities of
the seat materials.
2004 Econoline(eco)
Owners Guide (post-2002-fmt)
USA English(fus)
Cleaning
185
ProCarManuals.com
Page 186 of 256

Do not use cleaning solvents, bleach or dye on the vehicle’s
seatbelts, as these actions may weaken the belt webbing.
LEATHER SEATS (IF EQUIPPED)
Your leather seating surfaces have a clear, protective coating over the
leather.
•To clean, use a soft cloth with Motorcraft Deluxe Leather and Vinyl
Cleaner (ZC-11–A). Dry the area with a soft cloth.
•To help maintain its resiliency and color, use the Motorcraft Deluxe
Leather Care Kit (ZC-11–D), available from your authorized dealer.
•Do not use household cleaning products, alcohol solutions, solvents or
cleaners intended for rubber, vinyl and plastics, or oil/petroleum-based
leather conditioners. These products may cause premature wearing of
the clear, protective coating.
Note:In some instances, color or dye transfer can occur when wet
clothing comes in contact with leather upholstery. If this occurs, the
leather should be cleaned immediately to avoid permanent staining.
UNDERBODY
Flush the complete underside of your vehicle frequently. Keep body and
door drain holes free from packed dirt.
FORD, LINCOLN AND MERCURY CAR CARE PRODUCTS
Your Ford, Lincoln or Mercury dealer has many quality products available
to clean your vehicle and protect its finishes. These quality products
have been specifically engineered to fulfill your automotive needs; they
are custom designed to complement the style and appearance of your
vehicle. Each product is made from high quality materials that meet or
exceed rigid specifications. For best results, use the following products
or products of equivalent quality:
Motorcraft Custom Clearcoat Polish (ZC–8–A)
Motorcraft Custom Vinyl Protectant (not available in Canada) (ZC-40–A)
Motorcraft Vinyl Cleaner (Canada only) (CXC-93)
Motorcraft Vinyl Conditioner (Canada only) (CXC-94)
Motorcraft Deluxe Leather and Vinyl Cleaner (not available in Canada)
(ZC-11–A)
Motorcraft Bug and Tar Remover (ZC-42)
2004 Econoline(eco)
Owners Guide (post-2002-fmt)
USA English(fus)
Cleaning
186
ProCarManuals.com