2004 DODGE TOWN AND COUNTRY oil capacities
[x] Cancel search: oil capacitiesPage 14 of 2585
LUBRICATION & MAINTENANCE
TABLE OF CONTENTS
page page
INTERNATIONAL SYMBOLS
DESCRIPTION..........................1
FLUID TYPES
DESCRIPTION
DESCRIPTION - ENGINE OIL AND
LUBRICANTS.........................1
DESCRIPTION - ENGINE COOLANT........3
DESCRIPTION - FLEXIBLE FUEL ENGINE
OIL .................................3
DESCRIPTION - AUTOMATIC/MANUAL
TRANSAXLE FLUID.....................4
DESCRIPTION - FUEL REQUIREMENTS.....4
DESCRIPTION - FUEL REQUIREMENTS -
DIESEL ENGINE.......................6
DESCRIPTION - ENGINE OIL - DIESEL
ENGINES............................6
DESCRIPTION - AWD REAR DRIVELINE
MODULE FLUIDS......................6
DESCRIPTION - AWD POWER TRANSFER
UNIT FLUID...........................6FLUID CAPACITIES
SPECIFICATIONS - FLUID CAPACITIES.......6
FLUID FILL/CHECK LOCATIONS
DESCRIPTION..........................7
LUBRICATION POINTS
DESCRIPTION..........................7
MAINTENANCE SCHEDULES
DESCRIPTION
DESCRIPTION........................7
DESCRIPTION - EXPORT...............15
DESCRIPTION ± DIESEL ENGINES ±
EXPORT............................24
HOISTING
STANDARD PROCEDURE - HOISTING.......27
JUMP STARTING
STANDARD PROCEDURE - JUMP STARTING . 27
TOWING
STANDARD PROCEDURE - TOWING........29
INTERNATIONAL SYMBOLS
DESCRIPTION
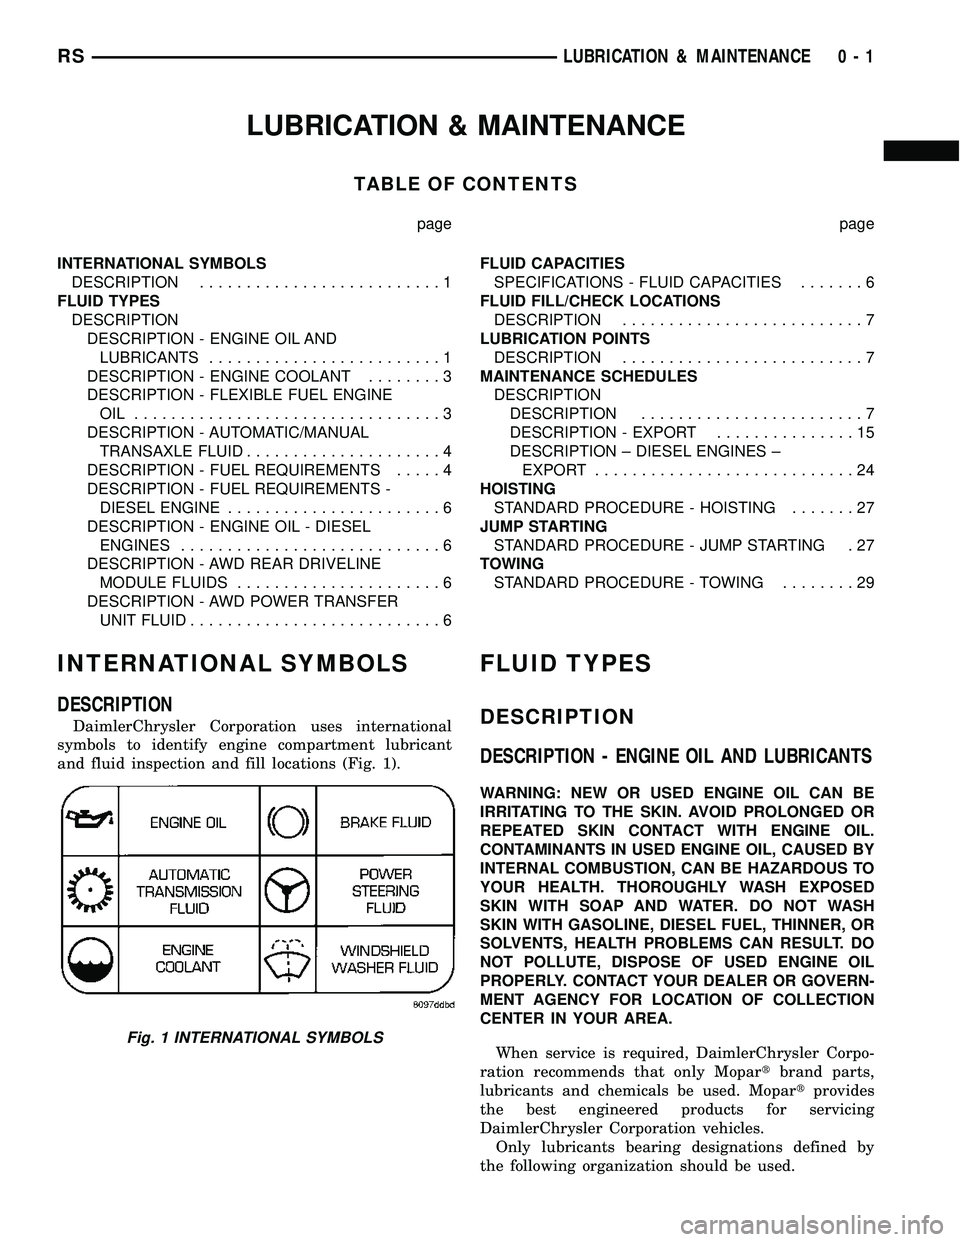
DaimlerChrysler Corporation uses international
symbols to identify engine compartment lubricant
and fluid inspection and fill locations (Fig. 1).
FLUID TYPES
DESCRIPTION
DESCRIPTION - ENGINE OIL AND LUBRICANTS
WARNING: NEW OR USED ENGINE OIL CAN BE
IRRITATING TO THE SKIN. AVOID PROLONGED OR
REPEATED SKIN CONTACT WITH ENGINE OIL.
CONTAMINANTS IN USED ENGINE OIL, CAUSED BY
INTERNAL COMBUSTION, CAN BE HAZARDOUS TO
YOUR HEALTH. THOROUGHLY WASH EXPOSED
SKIN WITH SOAP AND WATER. DO NOT WASH
SKIN WITH GASOLINE, DIESEL FUEL, THINNER, OR
SOLVENTS, HEALTH PROBLEMS CAN RESULT. DO
NOT POLLUTE, DISPOSE OF USED ENGINE OIL
PROPERLY. CONTACT YOUR DEALER OR GOVERN-
MENT AGENCY FOR LOCATION OF COLLECTION
CENTER IN YOUR AREA.
When service is required, DaimlerChrysler Corpo-
ration recommends that only Mopartbrand parts,
lubricants and chemicals be used. Mopartprovides
the best engineered products for servicing
DaimlerChrysler Corporation vehicles.
Only lubricants bearing designations defined by
the following organization should be used.
Fig. 1 INTERNATIONAL SYMBOLS
RSLUBRICATION & MAINTENANCE0-1
Page 19 of 2585
NOTE: Intentional tampering with emissions control
systems can result in civil penalties being assessed
against you.
DESCRIPTION - FUEL REQUIREMENTS -
DIESEL ENGINE
WARNING: DO NOT USE ALCOHOL OR GASOLINE
AS A FUEL BLENDING AGENT. THEY CAN BE
UNSTABLE UNDER CERTAIN CONDITIONS AND
HAZARDOUS OR EXPLOSIVE WHEN MIXED WITH
DIESEL FUEL.
Use good quality diesel fuel from a reputable sup-
plier. For most year-round service, number 2 diesel
fuel meeting DIN EN 590 (Class0-4)will provide
good performance. If the vehicle is exposed to
extreme cold (below -18ÉC/0ÉF) or is required to oper-
ate at colder than normal conditions for prolonged
periods, use climatize No. 2 diesel fuel or dilute the
No. 2 diesel fuel with 50% No. 1 diesel fuel as long as
it meets ASTM D 975: 1D and 2D and the quality of
lubrication behavior is in accordance with DIN EN
590. This will provide better protection from fuel gel-
ling or wax plugging of the fuel filters.
Diesel fuel is seldom completely free of water. To
prevent fuel system trouble, including fuel line freez-
ing in winter, drain the accumulated water from the
fuel/water separator using the fuel/water separator
drain provided. If you buy good quality fuel and fol-
low the cold weather advice above, fuel conditioners
should not be required in your vehicle. If available in
your area, a high cetane ªpremiumº diesel fuel may
offer improved cold starting and warm up perfor-
mance.
DESCRIPTION - ENGINE OIL - DIESEL
ENGINES
Use only Diesel Engine Oil meeting standardMIL-
2104Cor API ClassificationCD or higherorCCML
D4, D5.
SAE VISCOSITY GRADE
CAUTION: Low viscosity oils must have the proper
API quality or the CCMC G5 designation.
To assure of properly formulated engine oils, it is
recommended that SAE Grade 10W-40 engine oils
that meet Chrysler material standard MS-6395, be
used in accordance to ACEA B3, B4 specification.
European Grade 10W-40 oils are also acceptable.
Oils of the SAE 5W-40 grade number are preferred
when minimum temperatures consistently fall below
-15ÉC.
DESCRIPTION - AWD REAR DRIVELINE
MODULE FLUIDS
The AWD Rear Driveline Module Assembly consists
of two subassemblies, the Overrunning Clutch Hous-
ing (front) and the Differential Carrier (rear).
The recommended lubricant for the Overrunning
Clutch Housing is MopartATF+4. The recommended
lubricant for the Differential Carrier is Mopart
80W-90 Gear and Axle Lubricant.
DESCRIPTION - AWD POWER TRANSFER UNIT
FLUID
The recommended lubricant for the AWD Power
Transfer Unit is MopartGear and Axle Lubricant
80W-90.
FLUID CAPACITIES
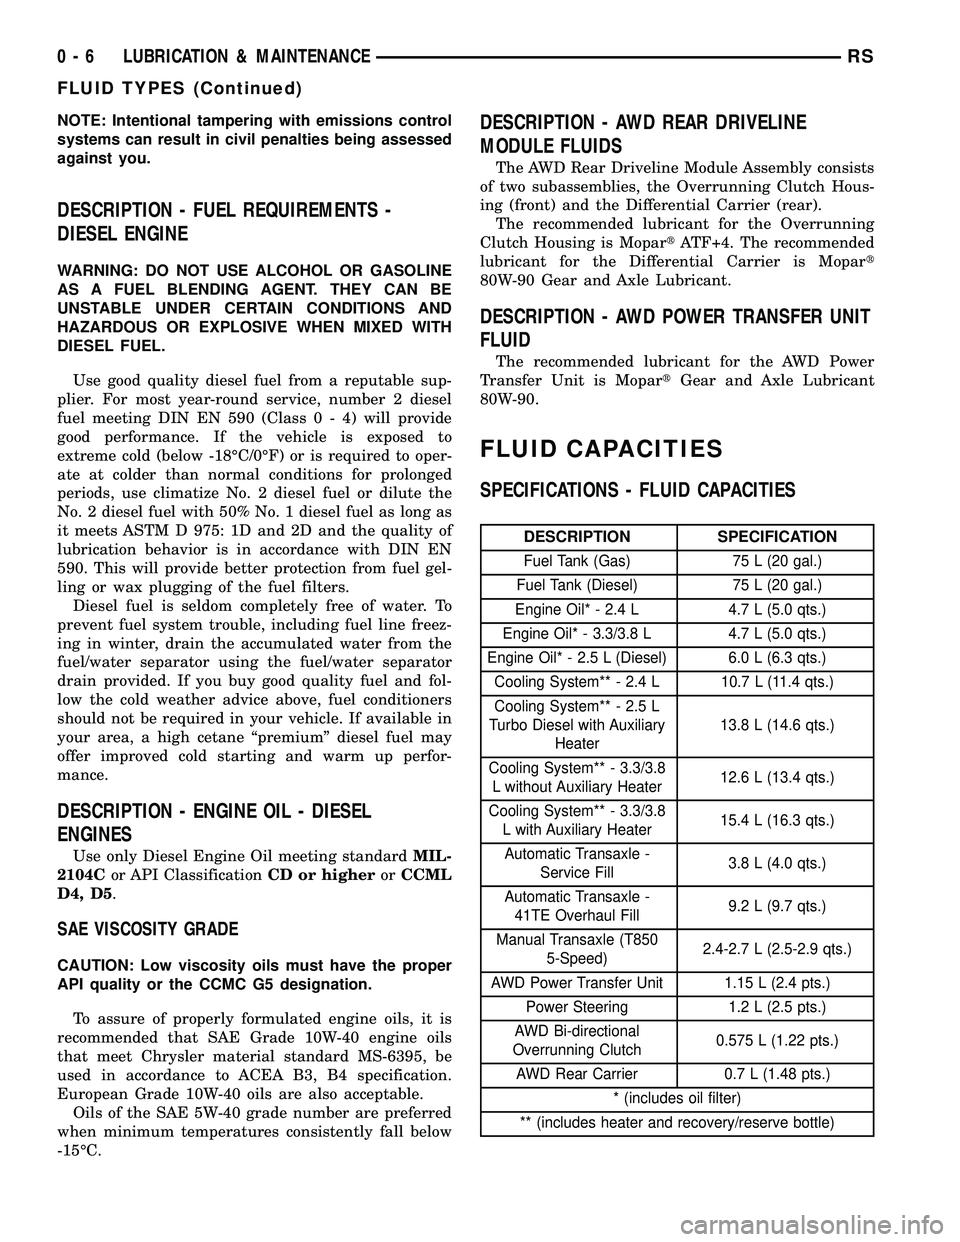
SPECIFICATIONS - FLUID CAPACITIES
DESCRIPTION SPECIFICATION
Fuel Tank (Gas) 75 L (20 gal.)
Fuel Tank (Diesel) 75 L (20 gal.)
Engine Oil* - 2.4 L 4.7 L (5.0 qts.)
Engine Oil* - 3.3/3.8 L 4.7 L (5.0 qts.)
Engine Oil* - 2.5 L (Diesel) 6.0 L (6.3 qts.)
Cooling System** - 2.4 L 10.7 L (11.4 qts.)
Cooling System** - 2.5 L
Turbo Diesel with Auxiliary
Heater13.8 L (14.6 qts.)
Cooling System** - 3.3/3.8
L without Auxiliary Heater12.6 L (13.4 qts.)
Cooling System** - 3.3/3.8
L with Auxiliary Heater15.4 L (16.3 qts.)
Automatic Transaxle -
Service Fill3.8 L (4.0 qts.)
Automatic Transaxle -
41TE Overhaul Fill9.2 L (9.7 qts.)
Manual Transaxle (T850
5-Speed)2.4-2.7 L (2.5-2.9 qts.)
AWD Power Transfer Unit 1.15 L (2.4 pts.)
Power Steering 1.2 L (2.5 pts.)
AWD Bi-directional
Overrunning Clutch0.575 L (1.22 pts.)
AWD Rear Carrier 0.7 L (1.48 pts.)
* (includes oil filter)
** (includes heater and recovery/reserve bottle)
0 - 6 LUBRICATION & MAINTENANCERS
FLUID TYPES (Continued)
Page 498 of 2585
REAR WINDOW DEFOGGER
RELAY
DESCRIPTION
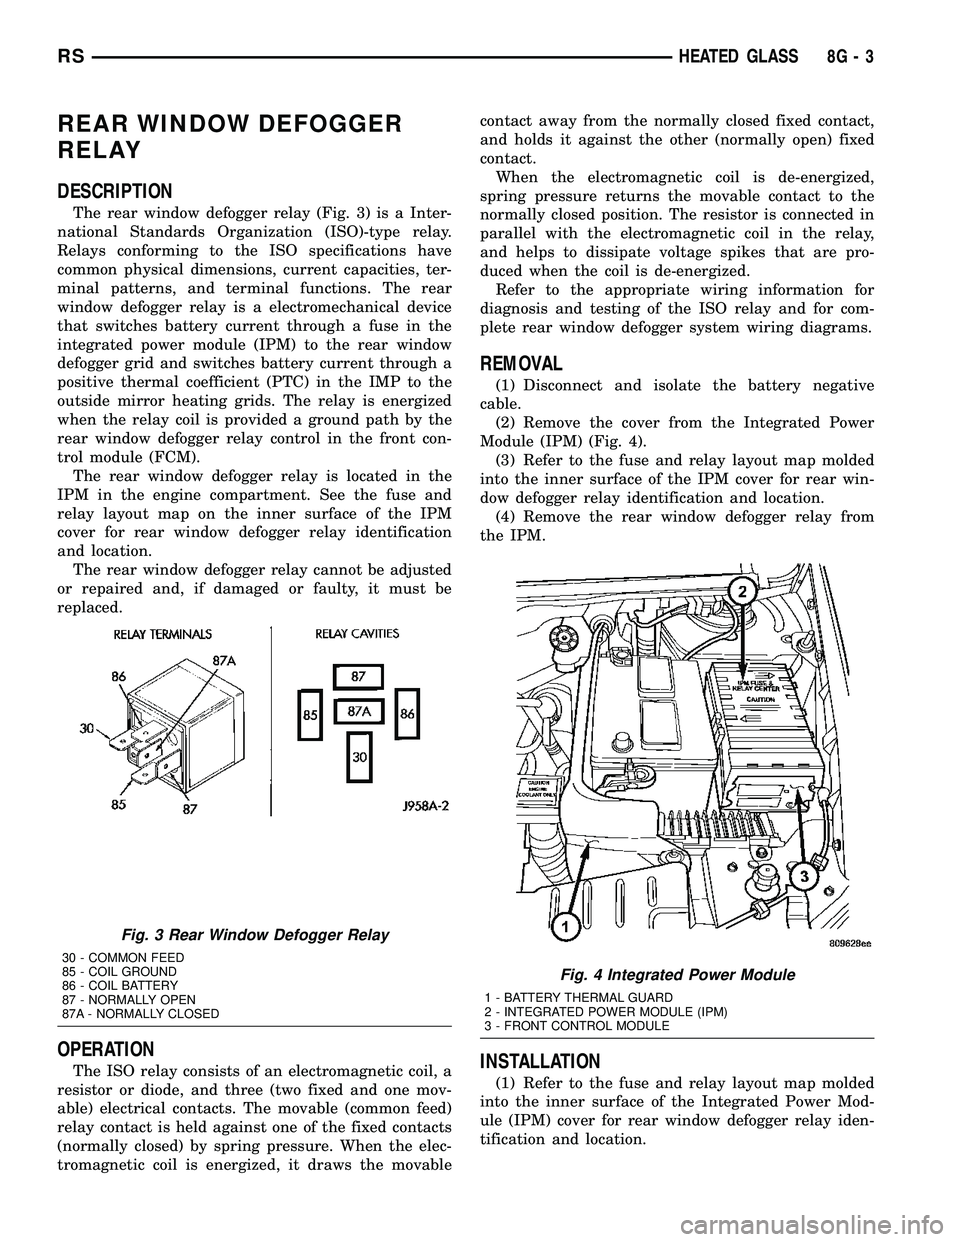
The rear window defogger relay (Fig. 3) is a Inter-
national Standards Organization (ISO)-type relay.
Relays conforming to the ISO specifications have
common physical dimensions, current capacities, ter-
minal patterns, and terminal functions. The rear
window defogger relay is a electromechanical device
that switches battery current through a fuse in the
integrated power module (IPM) to the rear window
defogger grid and switches battery current through a
positive thermal coefficient (PTC) in the IMP to the
outside mirror heating grids. The relay is energized
when the relay coil is provided a ground path by the
rear window defogger relay control in the front con-
trol module (FCM).
The rear window defogger relay is located in the
IPM in the engine compartment. See the fuse and
relay layout map on the inner surface of the IPM
cover for rear window defogger relay identification
and location.
The rear window defogger relay cannot be adjusted
or repaired and, if damaged or faulty, it must be
replaced.
OPERATION
The ISO relay consists of an electromagnetic coil, a
resistor or diode, and three (two fixed and one mov-
able) electrical contacts. The movable (common feed)
relay contact is held against one of the fixed contacts
(normally closed) by spring pressure. When the elec-
tromagnetic coil is energized, it draws the movablecontact away from the normally closed fixed contact,
and holds it against the other (normally open) fixed
contact.
When the electromagnetic coil is de-energized,
spring pressure returns the movable contact to the
normally closed position. The resistor is connected in
parallel with the electromagnetic coil in the relay,
and helps to dissipate voltage spikes that are pro-
duced when the coil is de-energized.
Refer to the appropriate wiring information for
diagnosis and testing of the ISO relay and for com-
plete rear window defogger system wiring diagrams.
REMOVAL
(1) Disconnect and isolate the battery negative
cable.
(2) Remove the cover from the Integrated Power
Module (IPM) (Fig. 4).
(3) Refer to the fuse and relay layout map molded
into the inner surface of the IPM cover for rear win-
dow defogger relay identification and location.
(4) Remove the rear window defogger relay from
the IPM.
INSTALLATION
(1) Refer to the fuse and relay layout map molded
into the inner surface of the Integrated Power Mod-
ule (IPM) cover for rear window defogger relay iden-
tification and location.
Fig. 3 Rear Window Defogger Relay
30 - COMMON FEED
85 - COIL GROUND
86 - COIL BATTERY
87 - NORMALLY OPEN
87A - NORMALLY CLOSED
Fig. 4 Integrated Power Module
1 - BATTERY THERMAL GUARD
2 - INTEGRATED POWER MODULE (IPM)
3 - FRONT CONTROL MODULE
RSHEATED GLASS8G-3
Page 2414 of 2585
COOLING/ACCESSORY DRIVE/DRIVE BELTS -
3.3L/3.8L - INSTALLATION).
(15) Lower the vehicle.
(16) Reconnect the battery negative cable.
CLUTCH BREAK-IN
After a new compressor clutch has been installed,
cycle the compressor clutch approximately twenty
times (five seconds on, then five seconds off). During
this procedure, set the A/C-heater control to the A/C
Recirculation Mode, the blower motor switch in the
highest speed position, and the engine speed at 1500
to 2000 rpm. This procedure (burnishing) will seat
the opposing friction surfaces and provide a higher
compressor clutch torque capability.
A/C COMPRESSOR CLUTCH
RELAY
DESCRIPTION
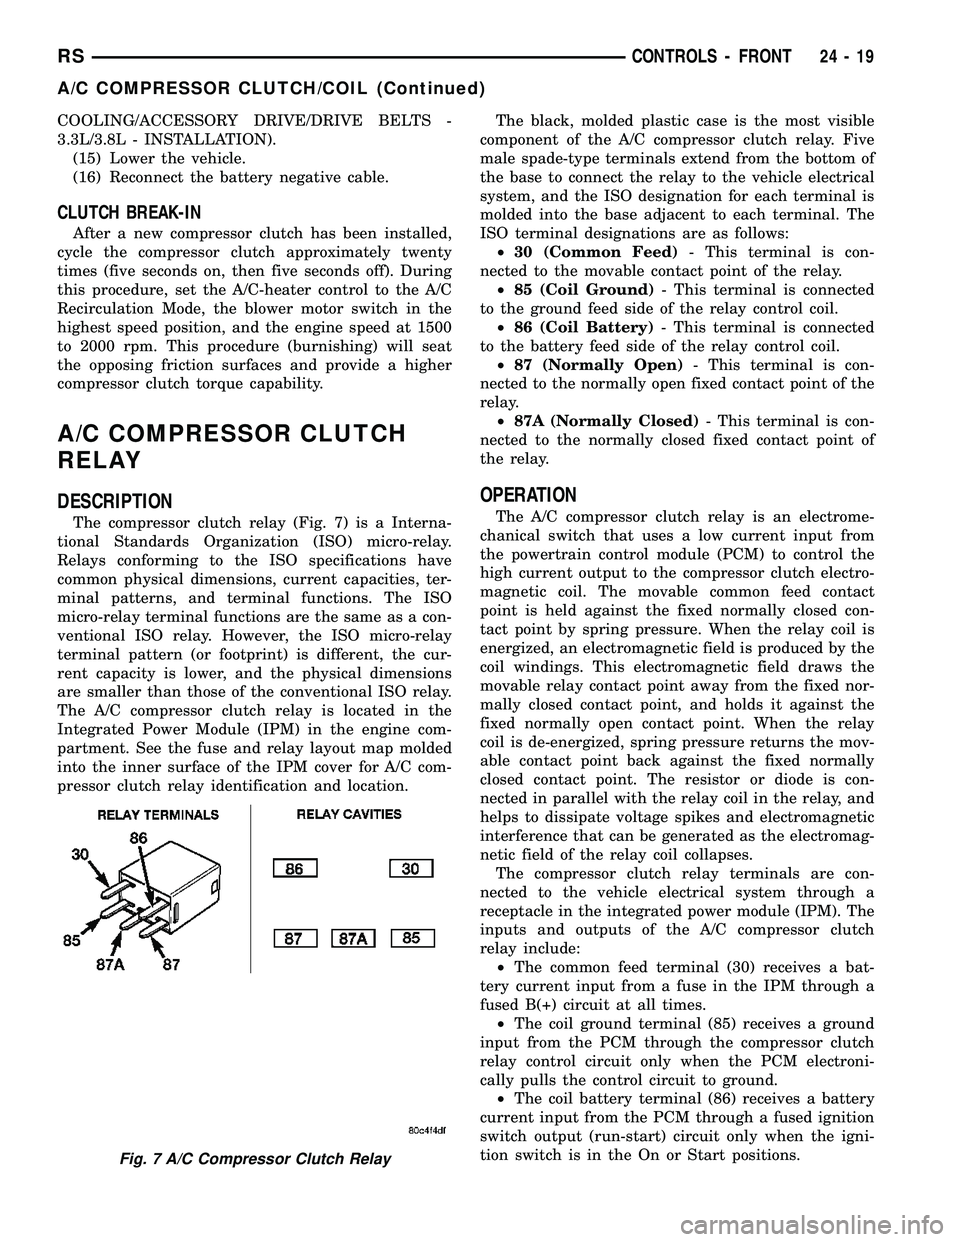
The compressor clutch relay (Fig. 7) is a Interna-
tional Standards Organization (ISO) micro-relay.
Relays conforming to the ISO specifications have
common physical dimensions, current capacities, ter-
minal patterns, and terminal functions. The ISO
micro-relay terminal functions are the same as a con-
ventional ISO relay. However, the ISO micro-relay
terminal pattern (or footprint) is different, the cur-
rent capacity is lower, and the physical dimensions
are smaller than those of the conventional ISO relay.
The A/C compressor clutch relay is located in the
Integrated Power Module (IPM) in the engine com-
partment. See the fuse and relay layout map molded
into the inner surface of the IPM cover for A/C com-
pressor clutch relay identification and location.The black, molded plastic case is the most visible
component of the A/C compressor clutch relay. Five
male spade-type terminals extend from the bottom of
the base to connect the relay to the vehicle electrical
system, and the ISO designation for each terminal is
molded into the base adjacent to each terminal. The
ISO terminal designations are as follows:
²30 (Common Feed)- This terminal is con-
nected to the movable contact point of the relay.
²85 (Coil Ground)- This terminal is connected
to the ground feed side of the relay control coil.
²86 (Coil Battery)- This terminal is connected
to the battery feed side of the relay control coil.
²87 (Normally Open)- This terminal is con-
nected to the normally open fixed contact point of the
relay.
²87A (Normally Closed)- This terminal is con-
nected to the normally closed fixed contact point of
the relay.
OPERATION
The A/C compressor clutch relay is an electrome-
chanical switch that uses a low current input from
the powertrain control module (PCM) to control the
high current output to the compressor clutch electro-
magnetic coil. The movable common feed contact
point is held against the fixed normally closed con-
tact point by spring pressure. When the relay coil is
energized, an electromagnetic field is produced by the
coil windings. This electromagnetic field draws the
movable relay contact point away from the fixed nor-
mally closed contact point, and holds it against the
fixed normally open contact point. When the relay
coil is de-energized, spring pressure returns the mov-
able contact point back against the fixed normally
closed contact point. The resistor or diode is con-
nected in parallel with the relay coil in the relay, and
helps to dissipate voltage spikes and electromagnetic
interference that can be generated as the electromag-
netic field of the relay coil collapses.
The compressor clutch relay terminals are con-
nected to the vehicle electrical system through a
receptacle in the integrated power module (IPM). The
inputs and outputs of the A/C compressor clutch
relay include:
²The common feed terminal (30) receives a bat-
tery current input from a fuse in the IPM through a
fused B(+) circuit at all times.
²The coil ground terminal (85) receives a ground
input from the PCM through the compressor clutch
relay control circuit only when the PCM electroni-
cally pulls the control circuit to ground.
²The coil battery terminal (86) receives a battery
current input from the PCM through a fused ignition
switch output (run-start) circuit only when the igni-
tion switch is in the On or Start positions.
Fig. 7 A/C Compressor Clutch Relay
RSCONTROLS - FRONT24-19
A/C COMPRESSOR CLUTCH/COIL (Continued)
Page 2419 of 2585
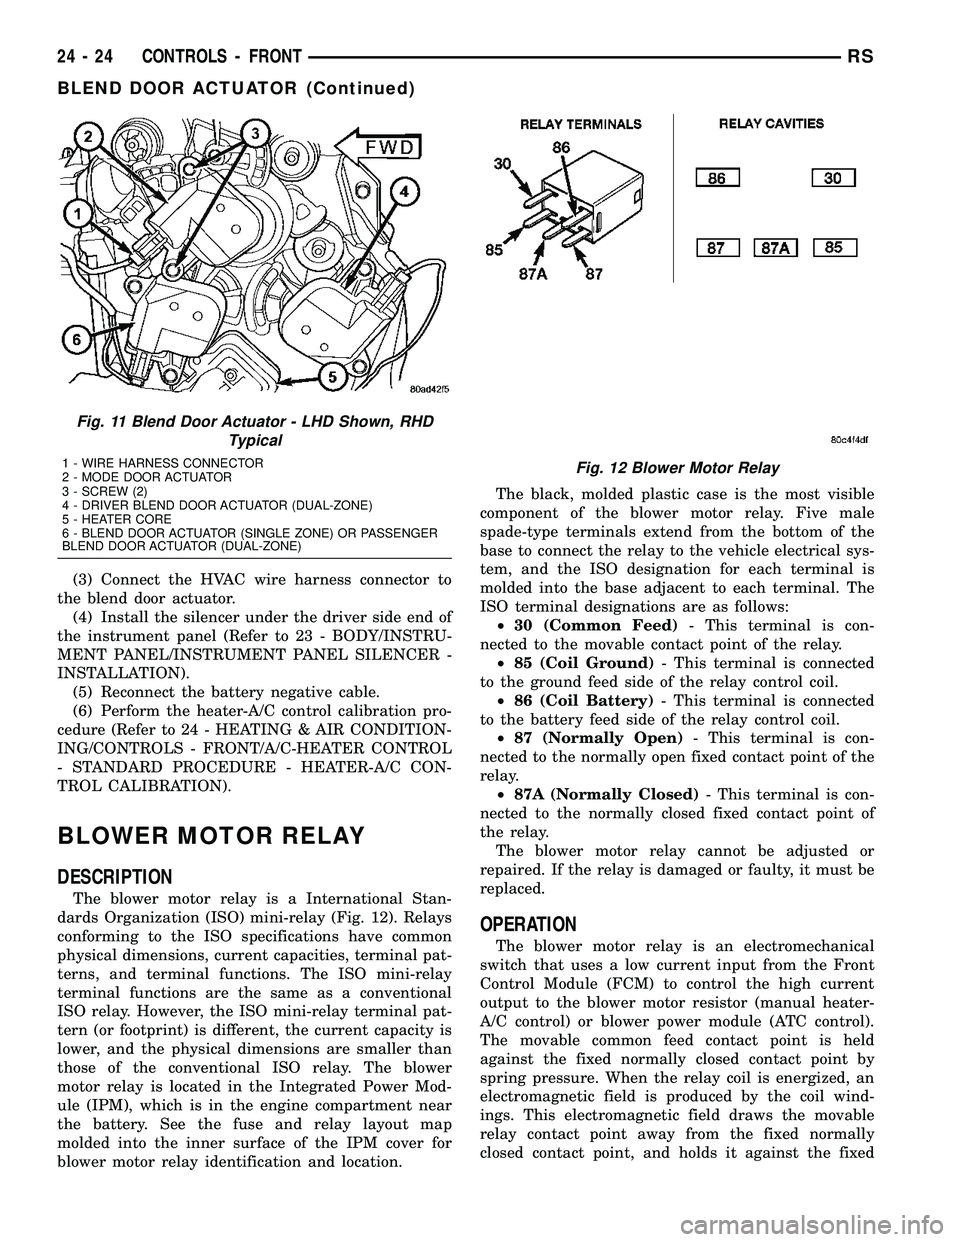
(3) Connect the HVAC wire harness connector to
the blend door actuator.
(4) Install the silencer under the driver side end of
the instrument panel (Refer to 23 - BODY/INSTRU-
MENT PANEL/INSTRUMENT PANEL SILENCER -
INSTALLATION).
(5) Reconnect the battery negative cable.
(6) Perform the heater-A/C control calibration pro-
cedure (Refer to 24 - HEATING & AIR CONDITION-
ING/CONTROLS - FRONT/A/C-HEATER CONTROL
- STANDARD PROCEDURE - HEATER-A/C CON-
TROL CALIBRATION).
BLOWER MOTOR RELAY
DESCRIPTION
The blower motor relay is a International Stan-
dards Organization (ISO) mini-relay (Fig. 12). Relays
conforming to the ISO specifications have common
physical dimensions, current capacities, terminal pat-
terns, and terminal functions. The ISO mini-relay
terminal functions are the same as a conventional
ISO relay. However, the ISO mini-relay terminal pat-
tern (or footprint) is different, the current capacity is
lower, and the physical dimensions are smaller than
those of the conventional ISO relay. The blower
motor relay is located in the Integrated Power Mod-
ule (IPM), which is in the engine compartment near
the battery. See the fuse and relay layout map
molded into the inner surface of the IPM cover for
blower motor relay identification and location.The black, molded plastic case is the most visible
component of the blower motor relay. Five male
spade-type terminals extend from the bottom of the
base to connect the relay to the vehicle electrical sys-
tem, and the ISO designation for each terminal is
molded into the base adjacent to each terminal. The
ISO terminal designations are as follows:
²30 (Common Feed)- This terminal is con-
nected to the movable contact point of the relay.
²85 (Coil Ground)- This terminal is connected
to the ground feed side of the relay control coil.
²86 (Coil Battery)- This terminal is connected
to the battery feed side of the relay control coil.
²87 (Normally Open)- This terminal is con-
nected to the normally open fixed contact point of the
relay.
²87A (Normally Closed)- This terminal is con-
nected to the normally closed fixed contact point of
the relay.
The blower motor relay cannot be adjusted or
repaired. If the relay is damaged or faulty, it must be
replaced.
OPERATION
The blower motor relay is an electromechanical
switch that uses a low current input from the Front
Control Module (FCM) to control the high current
output to the blower motor resistor (manual heater-
A/C control) or blower power module (ATC control).
The movable common feed contact point is held
against the fixed normally closed contact point by
spring pressure. When the relay coil is energized, an
electromagnetic field is produced by the coil wind-
ings. This electromagnetic field draws the movable
relay contact point away from the fixed normally
closed contact point, and holds it against the fixed
Fig. 11 Blend Door Actuator - LHD Shown, RHD
Typical
1 - WIRE HARNESS CONNECTOR
2 - MODE DOOR ACTUATOR
3 - SCREW (2)
4 - DRIVER BLEND DOOR ACTUATOR (DUAL-ZONE)
5 - HEATER CORE
6 - BLEND DOOR ACTUATOR (SINGLE ZONE) OR PASSENGER
BLEND DOOR ACTUATOR (DUAL-ZONE)Fig. 12 Blower Motor Relay
24 - 24 CONTROLS - FRONTRS
BLEND DOOR ACTUATOR (Continued)
Page 2432 of 2585
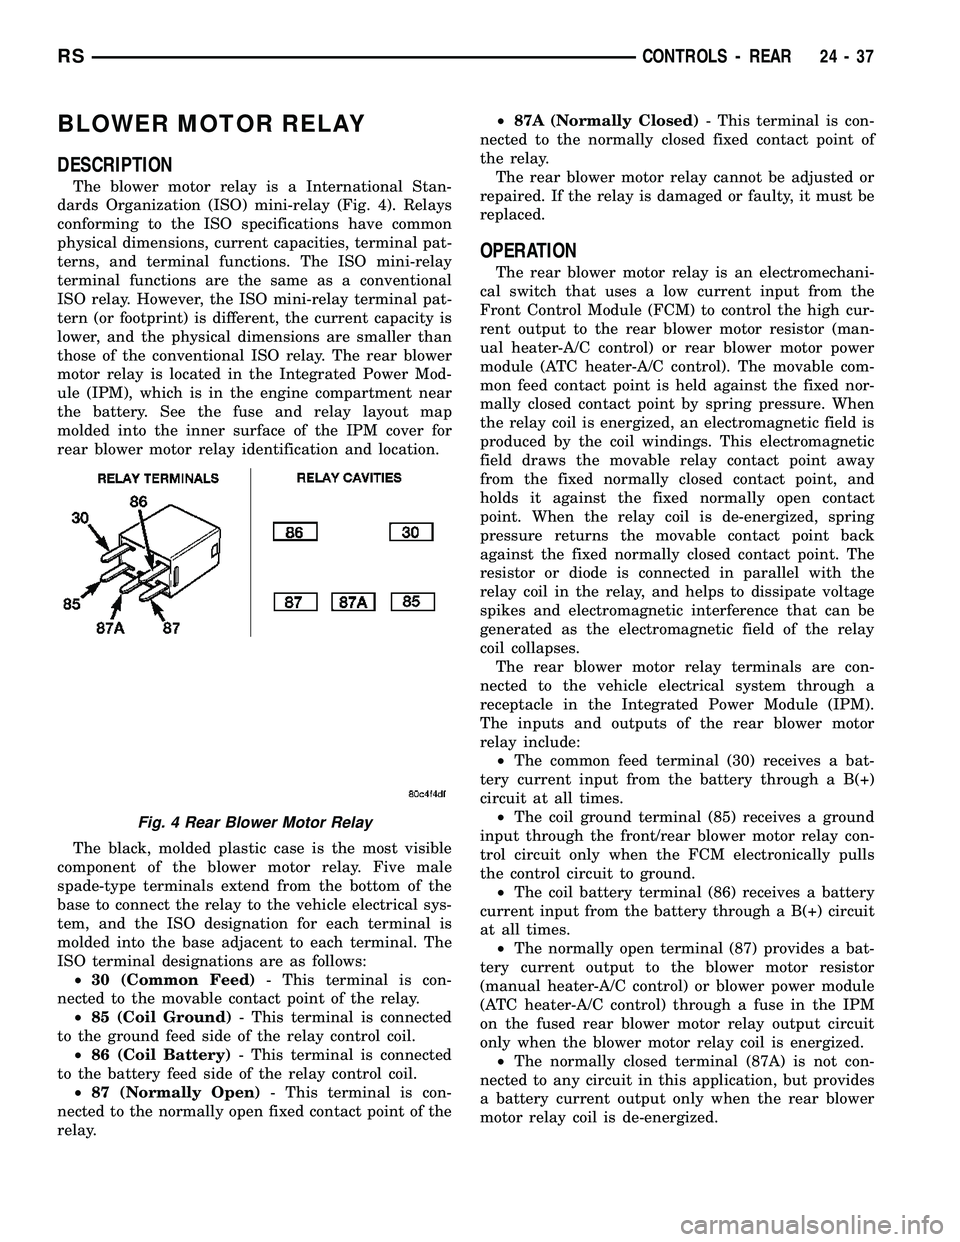
BLOWER MOTOR RELAY
DESCRIPTION
The blower motor relay is a International Stan-
dards Organization (ISO) mini-relay (Fig. 4). Relays
conforming to the ISO specifications have common
physical dimensions, current capacities, terminal pat-
terns, and terminal functions. The ISO mini-relay
terminal functions are the same as a conventional
ISO relay. However, the ISO mini-relay terminal pat-
tern (or footprint) is different, the current capacity is
lower, and the physical dimensions are smaller than
those of the conventional ISO relay. The rear blower
motor relay is located in the Integrated Power Mod-
ule (IPM), which is in the engine compartment near
the battery. See the fuse and relay layout map
molded into the inner surface of the IPM cover for
rear blower motor relay identification and location.
The black, molded plastic case is the most visible
component of the blower motor relay. Five male
spade-type terminals extend from the bottom of the
base to connect the relay to the vehicle electrical sys-
tem, and the ISO designation for each terminal is
molded into the base adjacent to each terminal. The
ISO terminal designations are as follows:
²30 (Common Feed)- This terminal is con-
nected to the movable contact point of the relay.
²85 (Coil Ground)- This terminal is connected
to the ground feed side of the relay control coil.
²86 (Coil Battery)- This terminal is connected
to the battery feed side of the relay control coil.
²87 (Normally Open)- This terminal is con-
nected to the normally open fixed contact point of the
relay.²87A (Normally Closed)- This terminal is con-
nected to the normally closed fixed contact point of
the relay.
The rear blower motor relay cannot be adjusted or
repaired. If the relay is damaged or faulty, it must be
replaced.
OPERATION
The rear blower motor relay is an electromechani-
cal switch that uses a low current input from the
Front Control Module (FCM) to control the high cur-
rent output to the rear blower motor resistor (man-
ual heater-A/C control) or rear blower motor power
module (ATC heater-A/C control). The movable com-
mon feed contact point is held against the fixed nor-
mally closed contact point by spring pressure. When
the relay coil is energized, an electromagnetic field is
produced by the coil windings. This electromagnetic
field draws the movable relay contact point away
from the fixed normally closed contact point, and
holds it against the fixed normally open contact
point. When the relay coil is de-energized, spring
pressure returns the movable contact point back
against the fixed normally closed contact point. The
resistor or diode is connected in parallel with the
relay coil in the relay, and helps to dissipate voltage
spikes and electromagnetic interference that can be
generated as the electromagnetic field of the relay
coil collapses.
The rear blower motor relay terminals are con-
nected to the vehicle electrical system through a
receptacle in the Integrated Power Module (IPM).
The inputs and outputs of the rear blower motor
relay include:
²The common feed terminal (30) receives a bat-
tery current input from the battery through a B(+)
circuit at all times.
²The coil ground terminal (85) receives a ground
input through the front/rear blower motor relay con-
trol circuit only when the FCM electronically pulls
the control circuit to ground.
²The coil battery terminal (86) receives a battery
current input from the battery through a B(+) circuit
at all times.
²The normally open terminal (87) provides a bat-
tery current output to the blower motor resistor
(manual heater-A/C control) or blower power module
(ATC heater-A/C control) through a fuse in the IPM
on the fused rear blower motor relay output circuit
only when the blower motor relay coil is energized.
²The normally closed terminal (87A) is not con-
nected to any circuit in this application, but provides
a battery current output only when the rear blower
motor relay coil is de-energized.
Fig. 4 Rear Blower Motor Relay
RSCONTROLS - REAR24-37
Page 2488 of 2585
STANDARD PROCEDURE - REFRIGERANT OIL
LEVEL
WARNING: REFER TO THE APPLICABLE WARN-
INGS AND CAUTIONS FOR THIS SYSTEM BEFORE
PERFORMING THE FOLLOWING OPERATION (Refer
to 24 - HEATING & AIR CONDITIONING/PLUMBING -
FRONT - WARNING - A/C PLUMBING) and (Refer to
24 - HEATING & AIR CONDITIONING/PLUMBING -
FRONT - CAUTION - A/C PLUMBING).
CAUTION: Use only PAG oils that are designed to
work with R-134a refrigerant and the A/C compres-
sor in the vehicle. Refer to the underhood A/C Sys-
tem Specification Label.
It is important to have the correct amount of lubri-
cant in the A/C refrigerant system to ensure proper
lubrication of the A/C compressor. Too little lubricant
will result in damage to the compressor. Too much
lubricant will reduce the cooling capacity of the A/C
system and consequently result in higher discharge
air temperatures.
The lubricant used in the compressor is polyalka-
lene glycol PAG lubricant. Only the refrigerant lubri-
cant approved for use with this vehicle should be
used to service the system. Do not use any other
lubricant. The lubricant container should be kept
tightly capped until it is ready for use. Refrigerant
lubricant will quickly absorb any moisture it comes
in contact with.
It will not be necessary to check the oil level in the
A/C compressor or to add oil, unless there has been
an oil loss. An oil loss may occur due to a rupture or
leak from a refrigerant line, connector fitting, compo-
nent or component seal. If a leak occurs, add 30 mil-
liliters (1 fluid ounce) of the recommended
refrigerant oil to the refrigerant system after the
repair has been made. Refrigerant oil loss will be evi-
dent at the leak point by the presence of a wet, shiny
surface around the leak.
REFRIGERANT OIL LEVEL CHECK
When an air conditioning system is first assembled
at the factory, all components (except the A/C com-
pressor) are refrigerant oil free. After the refrigerant
system has been charged with (R-134a) refrigerant
and operated, the oil in the A/C compressor is dis-
persed through the lines and components. The A/C
evaporator, A/C condenser, and receiver/drier will
retain a significant amount of oil. Refer to the A/C
Component Refrigerant Oil Capacities table. When a
component is replaced, the specified amount of refrig-
erant oil must be added. When the compressor is
replaced, the amount of oil that is retained in the
rest of the system must be drained from the replace-ment A/C compressor. The oil capacity of the system,
minus the amount of oil still in the remaining com-
ponents (refer to the oil capacity chart below) can be
measured and poured into the suction port of the A/C
compressor. When a line or component has ruptured
and oil has escaped, the receiver/drier must be
replaced along with the ruptured component.
Example: On an A/C system the A/C evaporator
retains 60 ml. (2 oz.). The A/C condenser retains 30
ml. (1 oz.) of oil, and system capacity may be 150 ml.
(5.00 oz.) of oil.
150 ml. minus 90 ml. equals 60 ml. (2.00 oz.).
A/C COMPONENT REFRIGERANT OIL
CAPACITIES
Front A/C Front & Rear
A/C
COMPONENT ml fl oz ml fl oz
Total System Fill 180 6.1 300 10.14
Receiver/Drier 25 0.9 25 0.9
A/C Condenser 50 1.8 50 1.8
Front Evaporator 50 1.8 50 1.8
Rear Evap. (including
underbody lines)N/A N/A 50 1.8
A/C Compressor Drain and measure the oil
from the old compressor -
See text above.
VERIFY REFRIGERANT LUBRICANT LEVEL
(1) Recover the refrigerant from the system.
(2) Disconnect the refrigerant lines from the A/C
compressor. Cap open lines to prevent moisture from
entering the system.
(3) Remove A/C compressor from the vehicle.
(4) From the suction and discharge ports on the
A/C compressor, drain the lubricant from the com-
pressor.
(5) Add the system capacity minus the capacity of
the components that have not been replaced. Refer to
the A/C Component Refrigerant Oil Capacities chart.
Add lubricant through the suction and discharge
ports on the A/C compressor.
(6) Install the A/C compressor and connect the
refrigerant lines. Then evacuate and charge refriger-
ant system.
(7) Most reclaim/recycling equipment will measure
the lubricant being removed. This amount of lubri-
cant should be added back to the system. If a new
A/C compressor is being installed, drain the lubricant
from the used compressor, measure the amount
drained and discard the used lubricant. Drain the
lubricant from the new A/C compressor into a clean
container. Return the amount of lubricant measured
from the used compressor, plus the amount reclaimed
RSPLUMBING - FRONT24-93
REFRIGERANT OIL (Continued)
Page 2549 of 2585
CABLE - DIAGNOSIS AND TESTING,
ANTENNA BODY......................8A-4
CABLE - DIAGNOSIS AND TESTING,
BATTERY...........................8F-16
CABLE - INSTALLATION................8P-4
CABLE - INSTALLATION, ANTENNA BODY . . 8A-6
CABLE - INSTALLATION, FRONT.....5-64,5s-67
CABLE - INSTALLATION, GEAR SHIFT....21-205
CABLE - INSTALLATION, HOLD OPEN
LATCH .............................23-38
CABLE - INSTALLATION, INSIDE HANDLE . . 23-38
CABLE - INSTALLATION, INSTRUMENT
PANEL ANTENNA......................8A-9
CABLE - INSTALLATION, LATCH RELEASE . 23-62
CABLE - INSTALLATION, OUTSIDE
HANDLE............................23-37
CABLE - INSTALLATION, PARKING
BRAKE LEVER AND FRONT.........5-66,5s-69
CABLE - INSTALLATION, THROTTLE
CONTROL..........................14-36
CABLE - OPERATION...................8P-4
CABLE - OPERATION, ANTENNA BODY.....8A-4
CABLE - REMOVAL....................8P-4
CABLE - REMOVAL, ANTENNA BODY......8A-5
CABLE - REMOVAL, FRONT.........5-64,5s-67
CABLE - REMOVAL, GEAR SHIFT.......21-204,
21s-105
CABLE - REMOVAL, HOLD OPEN LATCH . . . 23-38
CABLE - REMOVAL, INSIDE HANDLE.....23-37
CABLE - REMOVAL, INSTRUMENT PANEL
ANTENNA...........................8A-8
CABLE - REMOVAL, LATCH RELEASE.....23-61
CABLE - REMOVAL, OUTSIDE HANDLE....23-37
CABLE - REMOVAL, PARKING BRAKE
LEVER AND FRONT...............5-65,5s-68
CABLE - REMOVAL, THROTTLE
CONTROL..........................14-35
CABLE - SELECTOR - INSTALLATION,
GEARSHIFT.........................21-84
CABLE - SELECTOR - REMOVAL,
GEARSHIFT.........................21-81
CABLE ADJUSTMENT, ADJUSTMENTS -
GEARSHIFT........................21-206
CABLE ADJUSTMENT, INSTALLATION -
SYNCHRONIZING...............23-102,23-88
CABLE (FRONT) - INSTALLATION,
PARKING BRAKE.................5-63,5s-65
CABLE (FRONT) - REMOVAL, PARKING
BRAKE.........................5-59,5s-62
CABLE (INTERMEDIATE) -
INSTALLATION, PARKING BRAKE
....5-63,5s-66
CABLE (INTERMEDIATE) - REMOVAL,
PARKING BRAKE
.................5-60,5s-62
CABLE (LEFT REAR) - INSTALLATION,
PARKING BRAKE
.................5-64,5s-66
CABLE (LEFT REAR) - REMOVAL,
PARKING BRAKE
.................5-62,5s-64
CABLE RESISTANCE, SPECIFICATIONS -
SPARK PLUG
.........................8I-2
CABLE (RIGHT REAR) - INSTALLATION,
PARKING BRAKE
.................5-63,5s-66
CABLE (RIGHT REAR) - REMOVAL,
PARKING BRAKE
.................5-60,5s-63
CABLES - ADJUSTMENT, PARKING
BRAKE
.........................5-64,5s-66
CABLES - DESCRIPTION, BATTERY
.......8F-16
CABLES - INSTALLATION, BATTERY
......8F-18
CABLES - OPERATION, BATTERY
........8F-16
CABLES - REMOVAL, BATTERY
..........8F-18
CALIBRATION - STANDARD PROCEDURE,
A/C-HEATER CONTROL
................24-20
CALIBRATION - STANDARD PROCEDURE,
COMPASS
...........................8M-3
CALIPER - CLEANING
....5-25,5-29,5s-24,5s-28
CALIPER - INSPECTION
. . . 5-25,5-29,5s-24,5s-28
CALIPER - INSTALLATION, REAR DISC
BRAKE
.........................5-30,5s-29
CALIPER - REMOVAL, REAR DISC
BRAKE
.........................5-27,5s-26
CALIPER ADAPTER - INSTALLATION,
FRONT DISC BRAKE
..............5-31,5s-30
CALIPER ADAPTER - REMOVAL, FRONT
DISC BRAKE
....................5-31,5s-30
CALIPER (CONTINENTAL TEVES
BRAKES) - INSTALLATION, FRONT
DISC BRAKE
........................5s-26CALIPER (CONTINENTAL TEVES
BRAKES) - REMOVAL, FRONT DISC
BRAKE.............................5s-23
CALIPER (DISC/DISC BRAKES) -
INSTALLATION, FRONT DISC BRAKE......5-27
CALIPER (DISC/DISC BRAKES) -
REMOVAL, FRONT DISC BRAKE..........5-24
CALIPER (DISC/DRUM BRAKES) -
INSTALLATION, FRONT DISC BRAKE......5-27
CALIPER (DISC/DRUM BRAKES) -
REMOVAL, FRONT DISC BRAKE..........5-24
CALIPER GUIDE PIN BUSHINGS
(CONTINENTAL TEVES BRAKES) -
ASSEMBLY..........................5s-24
CALIPER GUIDE PIN BUSHINGS
(CONTINENTAL TEVES BRAKES) -
DISASSEMBLY.......................5s-23
CALIPER GUIDE PIN BUSHINGS
(DISC/DISC BRAKES) - ASSEMBLY........5-25
CALIPER GUIDE PIN BUSHINGS
(DISC/DISC BRAKES) - DISASSEMBLY.....5-24
CALIPER GUIDE PINS (DISC/DRUM
BRAKES) - INSTALLATION, DISC
BRAKE..............................5-31
CALIPER GUIDE PINS (DISC/DRUM
BRAKES) - REMOVAL, DISC BRAKE.......5-31
CALIPER GUIDE PINS (TRW BRAKES) -
INSTALLATION, DISC BRAKE............5s-30
CALIPER GUIDE PINS (TRW BRAKES) -
REMOVAL, DISC BRAKE...............5s-30
CALIPER PISTON AND SEAL -
ASSEMBLY.............5-26,5-29,5s-25,5s-28
CALIPER PISTON AND SEAL -
DISASSEMBLY..........5-24,5-28,5s-23,5s-27
CALIPER (TRW BRAKES) -
INSTALLATION, FRONT DISC BRAKE......5s-26
CALIPER (TRW BRAKES) - REMOVAL,
FRONT DISC BRAKE..................5s-23
CAMSHAFT & BEARINGS (IN BLOCK) -
DESCRIPTION.......................9-115
CAMSHAFT & BEARINGS (IN BLOCK) -
INSPECTION........................9-115
CAMSHAFT & BEARINGS (IN BLOCK) -
INSTALLATION.......................9-115
CAMSHAFT & BEARINGS (IN BLOCK) -
OPERATION.........................9-115
CAMSHAFT & BEARINGS (IN BLOCK) -
REMOVAL..........................9-115
CAMSHAFT END PLAY - STANDARD
PROCEDURE, MEASURING..............9-29
CAMSHAFT OIL SEAL(S) - INSTALLATION . . 9-28
CAMSHAFT OIL SEAL(S) - REMOVAL......9-27
CAMSHAFT POSITION SENSOR -
DESCRIPTION.........................8I-4
CAMSHAFT POSITION SENSOR -
OPERATION..........................8I-4
CAMSHAFT SPROCKET - INSTALLATION,
TIMING CHAIN.......................9-157
CAMSHAFT SPROCKET - REMOVAL,
TIMING CHAIN.......................9-156
CAMSHAFT SPROCKETS - INSTALLATION . . 9-65
CAMSHAFT SPROCKETS - REMOVAL......9-64
CAMSHAFT(S) - CLEANING..............9-29
CAMSHAFT(S) - DESCRIPTION...........9-28
CAMSHAFT(S) - INSPECTION............9-30
CAMSHAFT(S) - INSTALLATION..........9-30
CAMSHAFT(S) - OPERATION.............9-28
CAMSHAFT(S) - REMOVAL..............9-29
CANISTER - DESCRIPTION, VAPOR......25-18
CANISTER - INSTALLATION, REAR EVAP . . 25-20
CANISTER - OPERATION, VAPOR........25-18
CANISTER - REMOVAL, REAR EVAP......25-19
CAP - DESCRIPTION, FUEL FILLER.......25-12
CAP - DESCRIPTION, RADIATOR
PRESSURE..........................7-26
CAP - INSTALLATION, INSTRUMENT
PANEL END.........................23-68
CAP - OPERATION, FUEL FILLER........25-12
CAP - OPERATION, RADIATOR
PRESSURE
..........................7-27
CAP - REMOVAL, INSTRUMENT PANEL
END
...............................23-68
CAP TESTING - DIAGNOSIS AND
TESTING, COOLING SYSTEM
PRESSURE
..........................7-27
CAP TO FILLER NECK SEAL -
DIAGNOSIS AND TESTING, RADIATOR
.....7-27
CAPACITIES - SPECIFICATIONS, FLUID
......0-6CARE - CLEANING, ALUMINUM WHEEL . . . 22-18
CARGO - INSTALLATION, AWD, HEAVY
DUTY...............................2-36
CARGO - INSTALLATION, SPRING........2-40
CARGO - REMOVAL, AWD, HEAVY DUTY . . . 2-36
CARGO - REMOVAL, SPRING............2-40
CARPETS AND FLOOR MATS -
INSTALLATION.......................23-76
CARPETS AND FLOOR MATS - REMOVAL . 23-75
CARRIER ASSEMBLY - DESCRIPTION,
BALANCE SHAFTS.....................9-69
CARRIER ASSEMBLY - INSTALLATION,
BALANCE SHAFTS.....................9-72
CARRIER ASSEMBLY - OPERATION,
BALANCE SHAFTS.....................9-69
CARRIER ASSEMBLY - REMOVAL,
BALANCE SHAFTS.....................9-69
CARRIER SEAL - INSTALLATION,
DIFFERENTIAL........................21-9
CARRIER SEAL - REMOVAL,
DIFFERENTIAL........................21-9
CATALYTIC CONVERTER - DESCRIPTION . . . 11-4
CATALYTIC CONVERTER - INSPECTION....11-5
CATALYTIC CONVERTER - INSTALLATION . . . 11-6
CATALYTIC CONVERTER - OPERATION.....11-4
CATALYTIC CONVERTER - REMOVAL......11-5
CAUSES - DIAGNOSIS AND TESTING,
COMMON PROBLEM..................21-30
CAUTION - A/C SYSTEM...............24-66
CAUTION - CAUTIONS...................5-78
CAUTION, DESCRIPTION.............5-4,5s-4
CAUTION, DESCRIPTION...............19-37
CAUTION, SENSOR - TPM.........22-10,22s-2
CAUTIONS, CAUTION..................5-78
CAUTIONS, WARNING - WARNINGS . 19-10,19-27
CD CHANGER - DESCRIPTION...........8A-7
CD CHANGER - INSTALLATION...........8A-8
CD CHANGER - OPERATION.............8A-7
CD CHANGER - REMOVAL..............8A-8
CENTER - DESCRIPTION, ELECTRONIC
VEHICLE INFO.......................8M-6
CENTER - DIAGNOSIS AND TESTING,
ELECTRONIC VEHICLE INFORMATION.....8M-7
CENTER - INSTALLATION, ELECTRONIC
VEHICLE INFO.......................8M-9
CENTER - OPERATION, ELECTRONIC
VEHICLE INFO.......................8M-7
CENTER - REMOVAL, ELECTRONIC
VEHICLE INFO.......................8M-9
CENTER BEZEL - INSTALLATION,
INSTRUMENT PANEL..................23-68
CENTER BEZEL - REMOVAL,
INSTRUMENT PANEL..................23-68
CENTER BEZEL OUTLETS -
INSTALLATION.......................24-45
CENTER BEZEL OUTLETS - REMOVAL....24-44
CENTER CONSOLE LAMP -
INSTALLATION.......................8L-21
CENTER CONSOLE LAMP - REMOVAL....8L-21
CENTER CONSOLE LAMP SWITCH -
INSTALLATION.......................8L-21
CENTER CONSOLE LAMP SWITCH -
REMOVAL..........................8L-21
CENTER HIGH MOUNTED STOP LAMP -
INSTALLATION........................8L-6
CENTER HIGH MOUNTED STOP LAMP -
REMOVAL...........................8L-6
CENTER HIGH MOUNTED STOP LAMP
UNIT - INSTALLATION..................8L-6
CENTER HIGH MOUNTED STOP LAMP
UNIT - REMOVAL.....................8L-6
CENTER HINGE - INSTALLATION.........23-24
CENTER HINGE - REMOVAL............23-24
CENTER PROGRAMMING - STANDARD
PROCEDURE, ELECTRONIC VEHICLE
INFORMATION.......................8M-7
CENTER STRIKER - INSTALLATION.......23-28
CENTER STRIKER - REMOVAL..........23-28
CENTERING - STANDARD PROCEDURE,
CLOCK SPRING.......................8O-5
CERTIFICATION LABEL - DESCRIPTION,
VEHICLE
.........................Intro.-11
CHAIN AND CAMSHAFT SPROCKET -
INSTALLATION, TIMING
................9-157
CHAIN AND CAMSHAFT SPROCKET -
REMOVAL, TIMING
...................9-156
CHAIN COVER - INSTALLATION, TIMING
. . 9-155
CHAIN COVER - REMOVAL, TIMING
......9-153
6 INDEXRS
Description Group-Page Description Group-Page Description Group-Page