Page 267 of 388

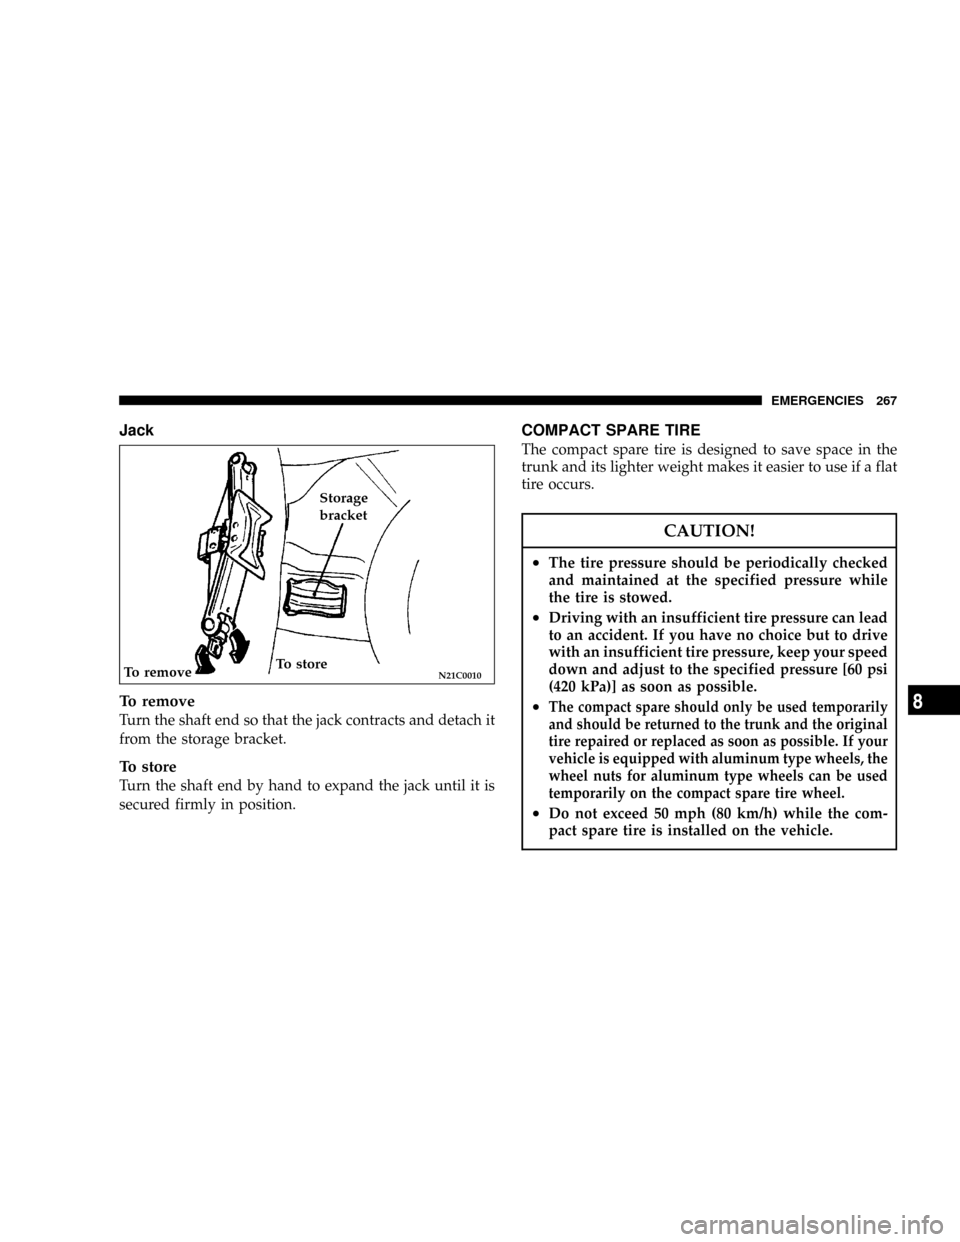
Jack
To remove
Turn the shaft end so that the jack contracts and detach it
from the storage bracket.
To store
Turn the shaft end by hand to expand the jack until it is
secured firmly in position.
COMPACT SPARE TIRE
The compact spare tire is designed to save space in the
trunk and its lighter weight makes it easier to use if a flat
tire occurs.
CAUTION!
²The tire pressure should be periodically checked
and maintained at the specified pressure while
the tire is stowed.
²Driving with an insufficient tire pressure can lead
to an accident. If you have no choice but to drive
with an insufficient tire pressure, keep your speed
down and adjust to the specified pressure [60 psi
(420 kPa)] as soon as possible.
²The compact spare should only be used temporarily
and should be returned to the trunk and the
original
tire repaired or replaced as soon as possible. If your
vehicle is equipped with aluminum type wheels, the
wheel nuts for aluminum type wheels can be used
temporarily on the compact spare tire wheel.
²Do not exceed 50 mph (80 km/h) while the com-
pact spare tire is installed on the vehicle.
N21C0010To removeTo storeStorage
bracket
EMERGENCIES 267
8
Page 270 of 388

Before installing the wheel cover to the wheel, make sure
that the opening with the symbol mark is correctly
aligned with the air valve.
JACKING AND TIRE CHANGING
If a tire must be changed, do so only after making sure
the vehicle is stopped in a safe, flat location.
Jacking up the vehicle
1. Park the vehicle on level and stable ground.
2. Switch on the hazard warning flashers, set up a
warning triangle, flashing signal light, etc., at an ad-
equate distance from the vehicle, and have all passengers
leave the vehicle. Turn the ignition key to the ªLOCKº
position.
3. Set the parking brake firmly, and move the gearshift
lever (manual transaxle) to the ªNº (Neutral) position or
move the selector lever (automatic transaxle) to the ªPº
(PARK) position.4. Apply a chock or block (A) at the tire diagonally
opposite the tire (B) to be changed.
NOTE: The chock shown is not supplied with the ve-
hicle. It is recommended that you keep one in the vehicle
for use if required.
N24A0100
A
B
270 EMERGENCIES
Page 271 of 388
5. Place the jack under one of the jacking points shown in
the illustration. Use the jacking point closest to the tire
being changed.
C = Jacking point
WARNING!
²Do not set the jack at any other position on the
vehicle than those specified. If the jack is set at a
wrong position, the body of the vehicle could be
dented or the jack might fall over and cause
personal injury.
²Avoid using the jack on tilted or soft surfaces.
Otherwise, the jack might slip and cause personal
injury. Always use the jack on a flat, hard surface.
Before setting the jack, check to ensure that there
is no sand or pebbles on the underside of the jack
base.
N22A1280
EMERGENCIES 271
8
Page 275 of 388
9. Remove the wheel nuts with the wheel nut wrench,
then take the wheel off.
CAUTION!
Handle the wheel cover carefully when replacing the
flat tire, to avoid the wheel surface becoming
scratched and causing premature corrosion.
NOTE:Clear out any mud, etc. on the hub surface, hub
bolts or in the installation holes in the wheel.
10. Install the spare wheel with the nut's tapered end
facing inward, then tighten by hand until the wheel is no
longer loose.
N24A0210N24A1410
Tapered nut
Flange nut
EMERGENCIES 275
8
Page 277 of 388
CAUTION!
Never use extra force with your foot on the wheel
nut wrench or a pipe extension as you can over-
tighten the nut.
12. Lower and remove the jack, and store the jack, flat
tire and chock. Have the damaged tire repaired as soon as
possible.
13. Check tire inflation pressure. Tire inflation pressure
specifications are shown on a placard located on the
driver 's side ``B''-Pillar.
N24A1420
EMERGENCIES 277
8
Page 310 of 388

NDisconnection and connection.............325
mAutomatic transaxle.....................327
NTo check the fluid level..................328
NProcedure for checking the fluid level.......328
mManual transaxle.......................329
mDisc brake pads, rear drum brake linings
and rear wheel cylinders.................329
mBrake hoses...........................329
mBall joint, steering linkage seal and drive
shaft boots...........................329
mSupplemental Restraint System (SRS)........329
mDoor hinges, rear hatch hinges, hood lock
release mechanism and safety catch
.........330
mExhaust system........................330
mWindshield wiper blades.................331
NWindshield washers....................331
mParking brake.........................332
mDrive belt (for generator, water pump, power
steering pump)
........................333
mTiming belt...........................334
mTi re s................................334
NTire inflation pressures..................334
NRadial ply tires.......................336
N
Tire pressure for sustained high-speed driving...336
NOversize tires........................336
NTire maintenance......................337
NCargo loads..........................337
NTread wear indicators...................337
NTire rotation.........................338
NTire chains...........................339
NSnow tires...........................339
mRegular Maintenance Schedule.............340
mSevere Maintenance Schedule..............349
310 MAINTENANCE
Page 334 of 388

Amount of belt deflection
in (mm)
Standard value Used belt New belt
A .26 to .35
(6.7 to 9.0).28 to .33
(7.2 to 8.4).17 to .21
(4.4 to 5.3)
B .46 to .60
(11.7 to 15.3).49 to .56
(12.5 to 14.3).34 to .43
(8.8 to 11.0)
C .43 to .56
(11.0 to 14.3).46 to .52
(11.7 to 13.3).33 to .41
(8.4 to 10.4)
D .33 to .43
(8.5 to 10.9).35 to .40
(9.0 to 10.1).24 to .30
(6.2 to 7.6)
WARNING!
Do not check or touch the drive belt with the engine
running, or serious injury may result.
TIMING BELT
The timing belt should be replaced with a new one at the
mileage specified on the scheduled maintenance chart.
TIRES
WARNING!
Driving with tires that are worn or improperly inflated
can result in a collision, and serious or fatal injury.
Tire inflation pressures
Proper tire inflation pressure is essential to the safe and
satisfactory operation of your vehicle. Three primary
areas are affected by improper tire pressure:
1. Safety
Under-inflation increases tire flexing and can result in tire
failure. Over-inflation results in a tire losing its ability to
cushion shock. Objects on the road and potholes could
cause tire damage that may result in tire failure.
2. Economy
Improper inflation pressures can cause uneven wear
patterns to develop across the tire tread. These abnormal
wear patterns will reduce tread life, resulting in a need
for earlier tire replacement.
Under-inflation also increases tire rolling resistance and
results in higher fuel consumption.
334 MAINTENANCE
Page 335 of 388

3. Ride comfort and vehicle stability
Proper tire inflation pressures contribute to the excellent
ride quality built into your vehicle. Over-inflation pro-
duces an uncomfortable and jarring ride.
Under-inflation can produce a feeling of sluggish re-
sponse.
Unequal inflation pressures can produce erratic and
unpredictable vehicle response to steering maneuvers.
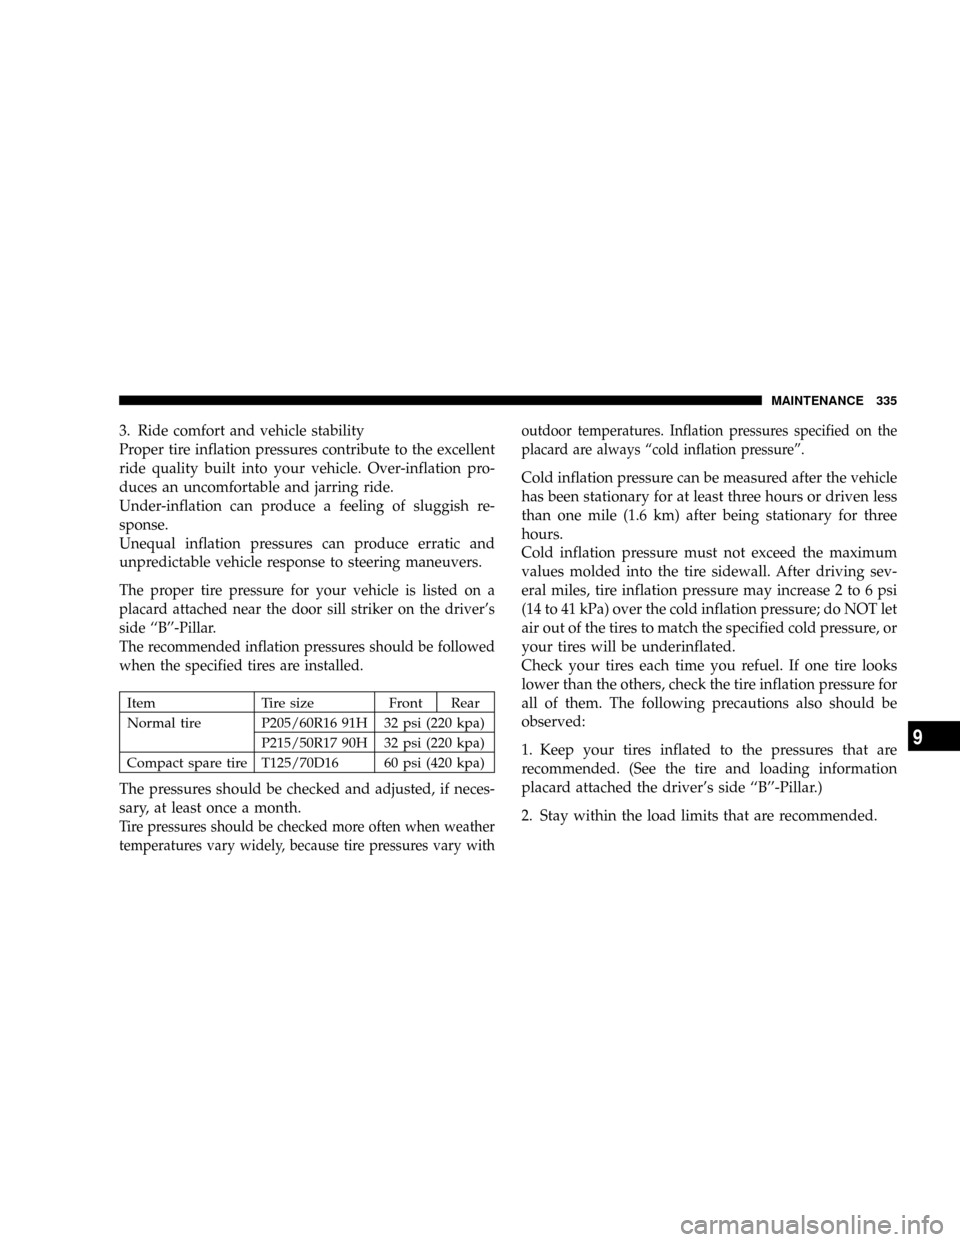
The proper tire pressure for your vehicle is listed on a
placard attached near the door sill striker on the driver's
side ``B''-Pillar.
The recommended inflation pressures should be followed
when the specified tires are installed.
Item Tire size Front Rear
Normal tire P205/60R16 91H 32 psi (220 kpa)
P215/50R17 90H 32 psi (220 kpa)
Compact spare tire T125/70D16 60 psi (420 kpa)
The pressures should be checked and adjusted, if neces-
sary, at least once a month.
Tire pressures should be checked more often when weather
temperatures vary widely, because tire pressures vary withoutdoor temperatures. Inflation pressures specified on the
placard are always ªcold inflation pressureº.
Cold inflation pressure can be measured after the vehicle
has been stationary for at least three hours or driven less
than one mile (1.6 km) after being stationary for three
hours.
Cold inflation pressure must not exceed the maximum
values molded into the tire sidewall. After driving sev-
eral miles, tire inflation pressure may increase 2 to 6 psi
(14 to 41 kPa) over the cold inflation pressure; do NOT let
air out of the tires to match the specified cold pressure, or
your tires will be underinflated.
Check your tires each time you refuel. If one tire looks
lower than the others, check the tire inflation pressure for
all of them. The following precautions also should be
observed:
1. Keep your tires inflated to the pressures that are
recommended. (See the tire and loading information
placard attached the driver's side ``B''-Pillar.)
2. Stay within the load limits that are recommended.
MAINTENANCE 335
9