Page 97 of 429
Each heated seat switch has two settings (HI and LOW).
Press the switch once to obtain the desired heating
position and press a second time in the same direction to
turn the heated seats OFF. If you do not purposefully
turn the switch OFF, the heating element in the seat will
remain activated until the ignition is turned off. The
indicators on the switch will illuminate when the heated
seats are in the (HI or LOW) position. Flashing telltale
lights on the switch indicate that the Heated Seat system
needs servicing.TO OPEN AND CLOSE THE HOOD
To open the hood, two latches must be released. First pull
the hood release lever located below the steering wheel at
the base of the instrument panel. Once the hood is
released you must reach into the opening beneath the
center of the grille and push up the latch to release the
safety catch before raising the hood.
UNDERSTANDING THE FEATURES OF YOUR VEHICLE 97
3
Page 100 of 429

turn on the cargo light located on the back of the cab.
When a door is open and the interior lights are on,
rotating the dimmer control all the way down to the OFF
detent will cause all the interior lights to go out. This is
also known as the9Party9mode because it allows the
doors to stay open for extended periods of time without
discharging the vehicle's battery.
The brightness of the instrument panel lighting can be
regulated by rotating the dimmer control up (brighter) or
down (dimmer). When the headlights are ON you can
supplement the brightness of the odometer, trip odom-
eter, radio and overhead console by rotating the control
up until you hear a click. This feature is termed the
ªParadeº mode and is useful when headlights are re-
quired during the day.Battery Saver
To protect the life of your vehicle's battery, Load Shed-
ding is provided for both the interior and exterior lights.
If the ignition is off and any door is left ajar for 15
minutes or the dimmer control is rotated upwards for 15
minutes, the interior lights will automatically turn off.
If the headlamps remain on while the ignition is cycled
off, the exterior lights will automatically turn off after 5
minutes. After 5 minutes timeout, if the headlamp switch
is turned off and then turned on, the exterior lights will
automatically turn off after 15 minutes.
If the dimmer control is rotated to the cargo lamp
position with the ignition off, the cargo lamps will
automatically turn off after 15 minutes.
NOTE:Battery Saver mode is cancelled if the ignition is
ON.
100 UNDERSTANDING THE FEATURES OF YOUR VEHICLE
Page 101 of 429

Headlamp Delay Ð If Equipped
To aid in your exit, your vehicle, if equipped, can be
programmed by your dealer with a headlamp delay that
will leave the headlamps on for 0, 30, 60, or 90 seconds.
This delay is initiated when the ignition is turned OFF
while the headlamp switch is on, and then the headlamp
switch is cycled off. The headlamps will remain on for 60
seconds. Headlamp delay can be cancelled by either
turning the headlamp switch ON then OFF or by turning
the ignition ON.
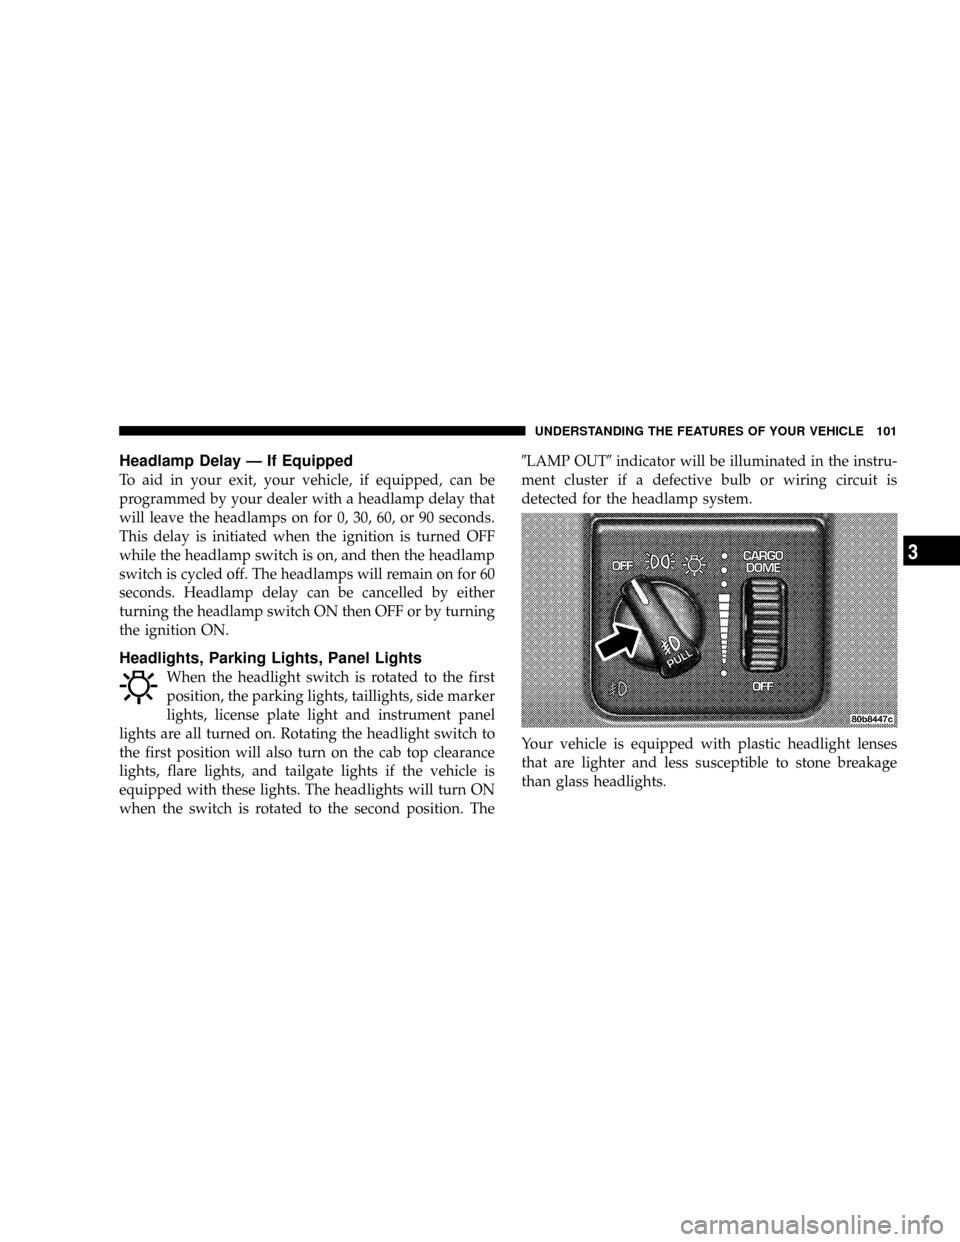
Headlights, Parking Lights, Panel Lights
When the headlight switch is rotated to the first
position, the parking lights, taillights, side marker
lights, license plate light and instrument panel
lights are all turned on. Rotating the headlight switch to
the first position will also turn on the cab top clearance
lights, flare lights, and tailgate lights if the vehicle is
equipped with these lights. The headlights will turn ON
when the switch is rotated to the second position. The9LAMP OUT9indicator will be illuminated in the instru-
ment cluster if a defective bulb or wiring circuit is
detected for the headlamp system.
Your vehicle is equipped with plastic headlight lenses
that are lighter and less susceptible to stone breakage
than glass headlights.
UNDERSTANDING THE FEATURES OF YOUR VEHICLE 101
3
Page 126 of 429

ELECTRICAL POWER OUTLETS
The auxiliary electrical outlet can provide power for in
cab accessories designed for use with the standard ªcigar
lighterº plug. The outlet is located in the instrument
panel below the ash receiver. A cap is attached to the
outlet base indicating ªPower Outletº 12V-20A.
There is an additional Power Outlet in the center console
of a 40/20/40 seat (if equipped).
The outlet(s) has/have a fused direct feed from the
battery so it/they receive power whether the ignition is
ON or OFF.
All accessories connected to this/these outlet(s) should
be removed or turned OFF when the vehicle is not in use
to protect the battery against discharge.CAUTION!
Electrical Outlet Use With Engine Off
²Many accessories that can be plugged in draw
power from the vehicle's battery, even when not
in use (i.e. cellular phones, etc.). Eventually, if
plugged in long enough, the vehicle's battery will
discharge sufficiently to degrade battery life
and/or prevent engine starting.
²Accessories that draw higher power (i.e. coolers,
vacuum cleaners, lights, etc.), will discharge the
battery even more quickly. Only use these inter-
mittently and with greater caution.
²After the use of high power draw accessories, or
long periods of the vehicle not being started (with
accessories still plugged in), the vehicle must be
driven a sufficient length of time to allow the
generator to recharge the vehicle's battery.
126 UNDERSTANDING THE FEATURES OF YOUR VEHICLE
Page 128 of 429
CUPHOLDERS
Front Instrument Panel Cupholders Ð Automatic
Transmission Only
Your new Ram truck is equipped with dual-opening
adjustable cupholders. The cupholder is opened and
closed by pushing on the front surface. Each opening in
the cupholder is adjustable and will hold cups and mugs
of various sizes.
To secure the cup, place the cup to be held into one of the
cup wells and then push the cupholder arm toward the
cup until it is held stable.
Rear Cupholder Ð Quad Cab Ð If Equipped
Quad Cab vehicles may be equipped with a rear cup-
holder that consists of two cupwells for rear passenger
convenience.
Cupholders with Automatic
128 UNDERSTANDING THE FEATURES OF YOUR VEHICLE
Page 137 of 429
UNDERSTANDING YOUR INSTRUMENT PANEL
CONTENTS
mInstruments And Controls.................141
mInstrument Cluster......................142
mInstrument Cluster Description.............143
mElectronic Digital Clock..................151
NClock Setting Procedure.................151
mSales Code RBBÐAM/FM Stereo Radio With
Cassette Tape Player And CD Changer
Capability............................151
NOperating Instructions..................151
NPower Button........................152NElectronic Volume Control...............152
NSeek..............................152
NTune ..............................152
NTo Set The Push-Button Memory..........153
NBalance............................153
NFade..............................153
NBass And Treble Tone Control............153
NAM/FM Selection.....................154
NMode Button........................1544
Page 138 of 429

NCassette Player Features................154
NCD Changer Control Capability Ð If
Equipped...........................155
NRadio Display Messages................157
mSales Code RAZÐAM/ FM Stereo Radio With
Cassette Tape Player, CD Player And CD
Changer Controls Ð If Equipped...........158
NOperating Instructions Ð Radio...........158
NPower Switch, Volume Control............158
NSeek Button (Radio Mode)...............158
NTuning.............................158
NPTY (Program Type) Button..............159
NBalance............................160
NFade..............................160NTone Control........................160
NAM/FM Selection.....................161
NScan Button.........................161
NTo Set The Radio Push-Button Memory......161
NTo Change From Clock To Radio Mode......162
NOperating Instructions Ð Tape Player.......162
NSeek Button.........................162
NFast Forward (FF).....................162
NRewind (RW)........................162
NTape Eject...........................163
NScan Button.........................163
NChanging Tape Direction................163
NMetal Tape Selection...................163
138 UNDERSTANDING YOUR INSTRUMENT PANEL
Page 139 of 429

NPinch Roller Release...................163
NNoise Reduction......................163
NOperating Instructions Ð CD Player........164
NInserting The Compact Disc..............164
NSeek Button.........................165
NEJT CD (Eject) Button..................165
NFF/Tune/RW........................165
NProgram Button 4 (Random Play)..........165
NMode..............................166
NTape CD Button......................166
NTime Button.........................166
NScan Button.........................166NCD Changer Control Capability Ð If
Equipped...........................166
mSales Code RBKÐAM/ FM Stereo Radio With
CD Player And CD Changer Controls........168
NRadio Operation......................168
NCD Player Operation...................171
NCD Changer Control Capability Ð If
Equipped...........................173
NRadio Display Messages................174
mSales Code RBQÐAM/FM Stereo Radio With
6 - Disc CD Changer....................175
NRadio Operation......................175
NCD Player Operation...................177
UNDERSTANDING YOUR INSTRUMENT PANEL 139
4