2004 DODGE RAM 1500 GAS manual transmission
[x] Cancel search: manual transmissionPage 215 of 429
Manual Transmission Shift Speeds in MPH (KPH)
Engine Model Axle Mode 1 to 2 2 to 3 3 to 4 4 to 5
3.7L 1500 3.55
&
3.92
ACCEL
&
CRUISE15 (24) 25 (40) 40 (65) 45 (72)
4.7L 1500 All
ACCEL
&
CRUISE15 (24) 25 (40) 40 (65) 45 (72)
Manual Transmission ± 5±Speed (NV4500)
2500 and 3500 models are equipped with the NV4500
manual transmission. This transmission has a ªcreeperº
1st gear which should be used to start from a standing
position when carrying a payload or towing a trailer.
Damage to the clutch can result from starting in 2nd or
3rd gear with a loaded vehicle. An unloaded vehicle may
be launched in 2nd gear. Use each gear in numerical
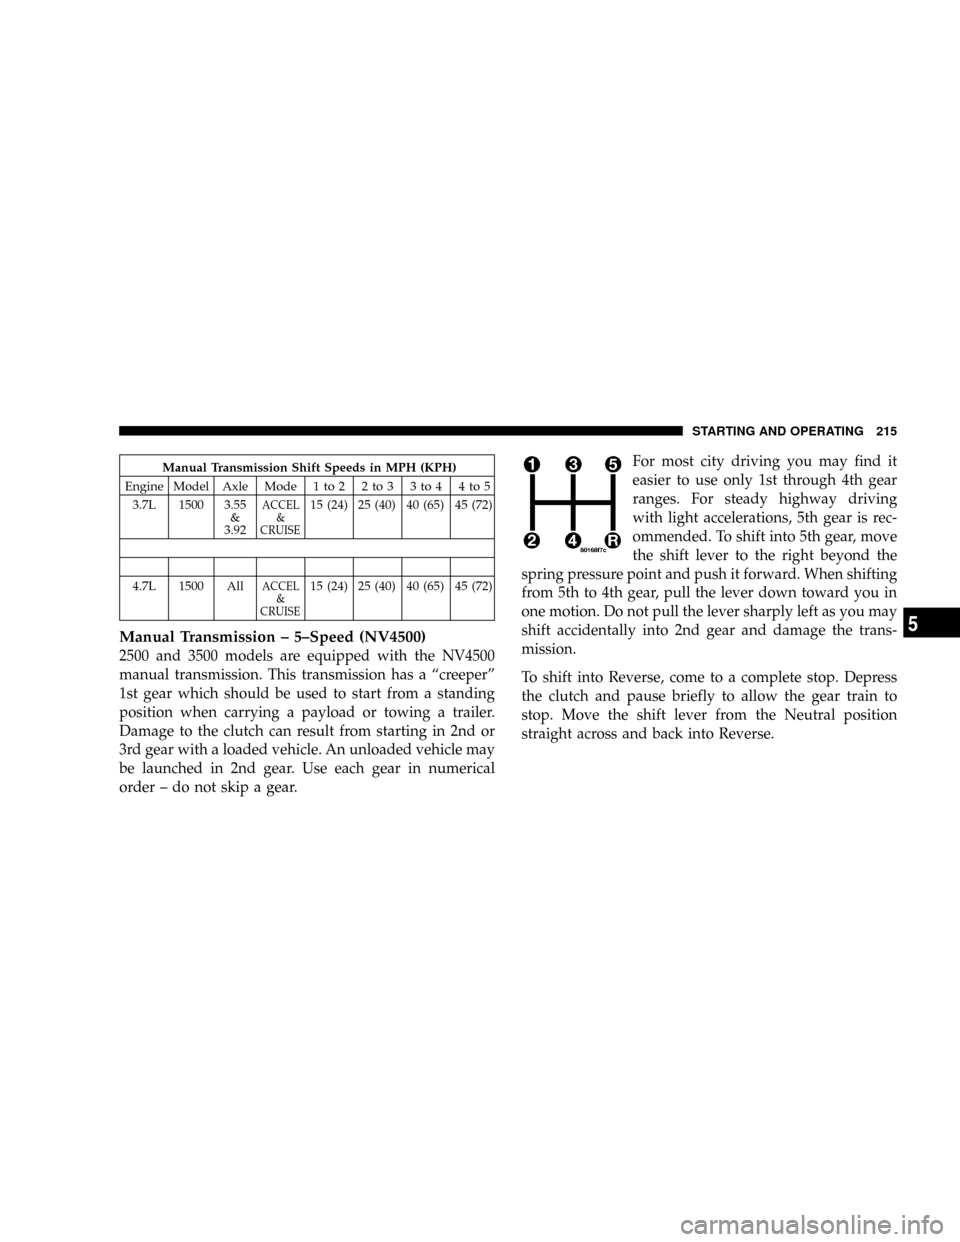
order ± do not skip a gear.For most city driving you may find it
easier to use only 1st through 4th gear
ranges. For steady highway driving
with light accelerations, 5th gear is rec-
ommended. To shift into 5th gear, move
the shift lever to the right beyond the
spring pressure point and push it forward. When shifting
from 5th to 4th gear, pull the lever down toward you in
one motion. Do not pull the lever sharply left as you may
shift accidentally into 2nd gear and damage the trans-
mission.
To shift into Reverse, come to a complete stop. Depress
the clutch and pause briefly to allow the gear train to
stop. Move the shift lever from the Neutral position
straight across and back into Reverse.
STARTING AND OPERATING 215
5
Page 216 of 429

Never drive with your foot resting on the clutch pedal, or
attempt to hold the vehicle on a hill with the clutch pedal
partially engaged, as this will cause abnormal wear on
the clutch.
Manual Transmission Shift Speeds
To utilize your manual transmission efficiently for both
fuel economy and performance, it should be upshifted as
listed in the following chart. Shift at the vehicle speeds
listed for acceleration. Earlier upshifts during cruise
conditions (steady speeds) will result in increased fuel
economy, and may be used as indicated.
Manual Transmission Shift Speed in mph (km/h)
EngineModel Axle Model 1 to 2 2 to 3 3 to 4 5 to 6
5.7L2500/
3500ALL
ACCEL
&
CRUISE15 (24) 25 (40) 40 (65) 45 (72)
Downshifting
Moving from a high gear down to a lower gear is
recommended to preserve brakes when driving down
steep hills. In addition, downshifting at the right time
provides better acceleration when you desire to resume
speed. For acceleration at speeds less than 20 mph (30
km/h), 2nd gear is recommended.
FOUR-WHEEL- DRIVE OPERATION Ð IF
EQUIPPED
²
Four-Wheel-Drive Dodge Ram Trucks are equipped
with either a Manually Shifted transfer case or an
Electronically Shifted transfer case. See the operating
instructions for your transfer case, located within this
section.
216 STARTING AND OPERATING
Page 220 of 429

vehicle in motion, the transfer case will engage / disen-
gage faster if you momentarily release the accelerator
pedal after completing the shift. Apply a constant force
when shifting the transfer case lever.
2H or 4H,4L
With the vehicle rolling at 2 to 3 mph (3 to 5 km/h), shift
an automatic transmission to N (Neutral) or depress the
clutch on a manual transmission. While the vehicle is
coasting at 2 to 3 mph (3 to 5 km/h), shift the transfer
case lever firmly to the desired position. Do not pause in
transfer case N (Neutral).
NOTE:Pausing in transfer case N (Neutral) in vehicles
equipped with an automatic transmission may require
shutting the engine OFF to avoid gear clash while
completing the shift. If difficulty occurs, shift automatic
transmission to N (Neutral), hold foot on brake, and turn
engine OFF. Make shift to the desired mode.NOTE:Shifting into or out of 4L is possible with the
vehicle completely stopped, however difficulty may oc-
cur due to the mating clutch teeth not being properly
aligned. Several attempts may be required for clutch
teeth alignment and shift completion to occur. The pre-
ferred method is with the vehicle rolling 2 to 3 mph (3 to
5 km/h). Avoid attempting to engage or disengage 4L
with the vehicle moving faster than 2 to 3 mph (3 to 5
km/h).
NOTE:Do not attempt to shift to or from 4L while the
transmission is in gear or clutch is engaged.
Transfer Case Reminder Light
The four-wheel-drive operating light (4WD), located in
the instrument cluster, is used to alert the driver that the
front axle is fully engaged and all four wheels are
driving.
220 STARTING AND OPERATING
Page 227 of 429

Preferred Procedure
1. With engine RUNNING, slow vehicle to 2 to 3 mph (3
to 5 km/h).
2. Shift the transmission into NEUTRAL (depress clutch
on manual transmissions).
3. While still rolling, rotate the transfer case control
switch to the desired position.
4. After the desired position indicator light is ON (not
flashing), shift transmission back into gear (release clutch
on manual transmissions).
Alternate Procedure
1. Bring the vehicle to complete stop.
2. With the key ON and the engine either OFF or
RUNNING, shift the transmission into NEUTRAL (de-
press clutch on manual transmissions).3. Rotate the transfer case control switch to the desired
position.
4. After the desired position indicator light is ON (not
flashing), shift transmission back into gear (release clutch
on manual transmissions).
NOTE:If steps 1 or 2 of either the Preferred or Alternate
Procedure are not satisfied prior to attempting the shift or
if they no longer are being met while the shift attempt is
in process then the desired position indicator light will
flash continuously while the original position indicator
light is ON, until all requirements have been met.
NOTE:The ignition key must be ON for a shift to take
place and for the position indicator lights to be operable.
If the key is not ON then the shift will not take place and
no position indicator lights will be on or flashing.
NOTE:If your are leaving your vehicle stored for longer
than 21 days, refer to the section on ªVehicle Storage.º
STARTING AND OPERATING 227
5
Page 230 of 429

WARNING!
²Always fully apply the parking brake when leav-
ing your vehicle, or it may roll and cause damage
or injury. Also be certain to leave an automatic
transmission in Park, a manual transmission in
Reverse or first gear. Failure to do so may allow
the vehicle to roll and cause damage or injury.
²Leaving children in a vehicle unattended is dan-
gerous for a number of reasons. A child or others
could be injured. Children should be warned not
to touch the parking brake or the gear selector
lever. Don't leave the keys in the ignition. A child
could operate power windows, other controls, or
move the vehicle.
²Be sure the parking brake is fully disengaged before
driving, failure to do so can lead to brake problems
due to excessive heating of the rear brakes.
When parking on a hill, turn the front wheels toward the
curb on a downhill grade and away from the curb on an
uphill grade.
The parking brake should always be applied whenever
the driver is not in the vehicle.
BRAKE SYSTEM
If power assist is lost for any reason (for example,
repeated brake applications with the engine off), the
brakes will still function. However, you will experience a
substantial increase in braking effort to stop the vehicle.
If either the front or rear hydraulic systems lose normal
capability, the remaining system will still function with
some loss of overall braking effectiveness. This will be
evident by increased pedal travel during application,
greater pedal force required to slow or stop, and activa-
tion of the BRAKE warning lamp and the ABS lamp (if
equipped) during brake use.
230 STARTING AND OPERATING
Page 272 of 429

NOTE:Remember that everything put into or on the
trailer adds to the load on your vehicle. Also, additional
factory-installed options, or dealer-installed options,
must be considered as part of the total load on your
vehicle. Refer to the Certification label located at the
driver's door for the Gross Vehicle Weight Rating.
WARNING!
Improper towing can lead to an injury accident.
Follow these guidelines to make your trailer towing
as safe as possible:
Perform the maintenance listed in the ªMaintenance
Schedulesº section of this manual (Section 8). When
towing a trailer, never exceed the Gross Axle Weight
Rating (GAWR), or Gross Combined Vehicle Weight
(GCVW).
CAUTION!
When hauling cargo or towing a trailer, do not
overload your vehicle or trailer. Overloading can
cause a loss of control, poor performance or damage
to brakes, axle, engine, transmission, steering, sus-
pension, body structure or tires.
Axle Lubricant and Trailer Towing
1500 Models
²
1500 Modelrear axles are trailer tow ready. Limited
slip rear axles on 1500 models require the use of a
limited slip additive (refer to the ªRecommended
Fluids, Lubricants, and Genuine Partsº section.)
²The limited slip additive is included with the factory
fill.
²If the axle fluid is changed, 4 oz. (118 ml) of limited slip
additive must be added.
272 STARTING AND OPERATING
Page 279 of 429

²Air ConditioningÐturn it off temporarily.
²Hilly TerrainÐTurn overdrive off.
See Cooling System Operating information in the Service
and Maintenance section of this manual for more infor-
mation.
Automatic Transmission Oil Temperature Warning
Light
All vehicles with automatic transmissions are equipped
with a transmission sump oil temperature sensor and
warning light. If elevated transmission temperatures are
encountered, the engine controller will select the most
desirable gear until the transmission temperatures are
reduced. If transmission oil temperatures continue to
rise, a warning light located in the instrument cluster will
illuminate. If this should occur, stop the vehicle, shift to
Neutral, and run the engine at idle or faster until the light
goes off.
Towing With An Automatic Transmission
Vehicles equipped with an automatic transmission may
shift into and out of Overdrive, or a lower gear, when
driving in hilly areas, when heavily loaded, or when
towing into heavy winds.
When this condition occurs, select TOW/HAUL mode or
shift into a lower gear to prevent excessive transmission
wear and/or overheating, and to provide better engine
braking.
NOTE:Do not exceed the following RPM while manu-
ally downshifting:
²5800 rpm with 3.7L engines.
²5800 rpm with 4.7L engines.
²5600 rpm with 5.7L engines.
STARTING AND OPERATING 279
5
Page 284 of 429

General Maintenance
Snowplows should be maintained in accordance with the
plow manufacturer's instructions. Whenever the plow is
disconnected from the vehicle, coat the exposed angling
cylinder rods with chassis lubricant. The lift cylinder
should be extended upward and chassis lubricant ap-
plied to the lift rod. The hydraulic hoses interconnect to
keep the couplers clean.
Keep all snowplow electrical connections and battery
terminals clean and free of corrosion.
When plowing snow, to avoid transmission and driv-
etrain damage, the following precautions should be ob-
served.
²Operate with transfer case in 4L when plowing small
or congested areas where speeds are not likely to
exceed 15 mph (24 km/h). At higher speeds operate in
4H.
²Do not shift the transmission unless the engine has
returned to idle and wheels have stopped. Make a
practice of stepping on the brake pedal before shifting
the transmission.
RECREATIONAL TOWING Ð 4±WHEEL DRIVE
VEHICLES (BEHIND MOTORHOME, ETC.)
CAUTION!
Internal damage to the transfer case will occur if a
front or rear wheel lift is used when recreational
towing.
NOTE:Both the Manual Shift and Electronic Shift
transfer cases must be shifted into Neutral (N) for
recreational towing. Automatic transmissions must be
placed in P (Park) position for recreational towing.
Manual transmissions must be left in gear (not in neutral)
284 STARTING AND OPERATING