2004 CHRYSLER VOYAGER water pump
[x] Cancel search: water pumpPage 1435 of 2585
OIL COOLER & LINES
DESCRIPTION
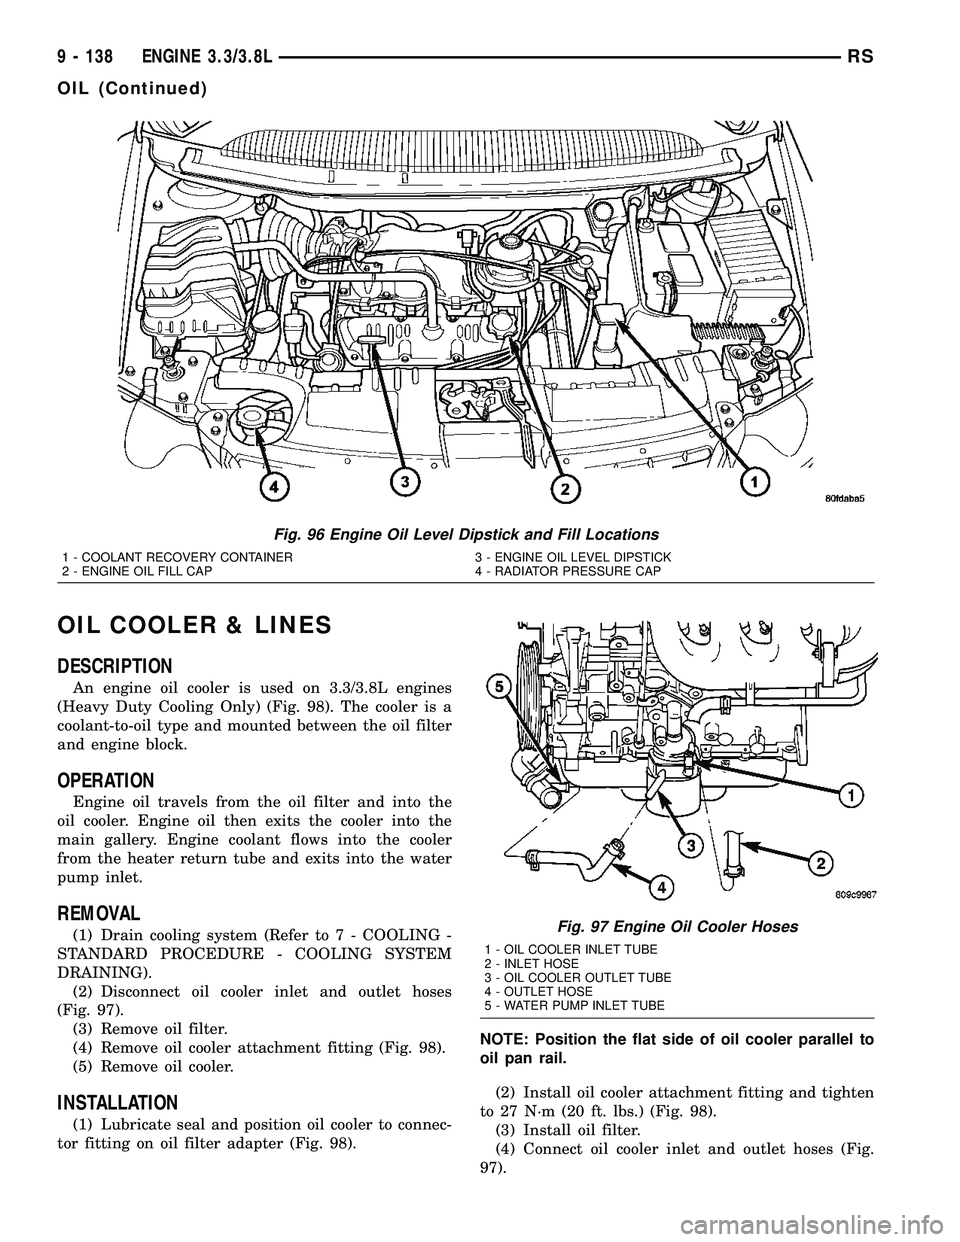
An engine oil cooler is used on 3.3/3.8L engines
(Heavy Duty Cooling Only) (Fig. 98). The cooler is a
coolant-to-oil type and mounted between the oil filter
and engine block.
OPERATION
Engine oil travels from the oil filter and into the
oil cooler. Engine oil then exits the cooler into the
main gallery. Engine coolant flows into the cooler
from the heater return tube and exits into the water
pump inlet.
REMOVAL
(1) Drain cooling system (Refer to 7 - COOLING -
STANDARD PROCEDURE - COOLING SYSTEM
DRAINING).
(2) Disconnect oil cooler inlet and outlet hoses
(Fig. 97).
(3) Remove oil filter.
(4) Remove oil cooler attachment fitting (Fig. 98).
(5) Remove oil cooler.
INSTALLATION
(1) Lubricate seal and position oil cooler to connec-
tor fitting on oil filter adapter (Fig. 98).NOTE: Position the flat side of oil cooler parallel to
oil pan rail.
(2) Install oil cooler attachment fitting and tighten
to 27 N´m (20 ft. lbs.) (Fig. 98).
(3) Install oil filter.
(4) Connect oil cooler inlet and outlet hoses (Fig.
97).
Fig. 96 Engine Oil Level Dipstick and Fill Locations
1 - COOLANT RECOVERY CONTAINER 3 - ENGINE OIL LEVEL DIPSTICK
2 - ENGINE OIL FILL CAP 4 - RADIATOR PRESSURE CAP
Fig. 97 Engine Oil Cooler Hoses
1 - OIL COOLER INLET TUBE
2 - INLET HOSE
3 - OIL COOLER OUTLET TUBE
4 - OUTLET HOSE
5 - WATER PUMP INLET TUBE
9 - 138 ENGINE 3.3/3.8LRS
OIL (Continued)
Page 1450 of 2585
VALVE TIMING
STANDARD PROCEDURE
STANDARD PROCEDURE - VALVE TIMING
VERIFICATION
(1) Remove front cylinder head cover and all 6
spark plugs.
(2) Rotate engine until the #2 piston is at TDC of
the compression stroke.
(3) Install a degree wheel on the crankshaft pulley.
(4) With proper adaptor, install a dial indicator
into #2 spark plug hole. Using the indicator find TDC
on the compression stroke.
(5) Position the degree wheel to zero.
(6) Remove dial indicator from spark plug hole.
(7) Place a 5.08 mm (0.200 in.) spacer between the
valve stem tip of #2 intake valve and rocker arm pad.
Allow tappet to bleed down to give a solid tappet
effect.
(8) Install a dial indicator so plunger contacts the
#2 intake valve spring retainer as nearly perpendic-
ular as possible. Zero the indicator.
(9) Rotate the engine clockwise until the intake
valve has lifted .254 mm (0.010 in.).
CAUTION: Do not turn crankshaft any further clock-
wise as intake valve might bottom and result in
serious damage.
(10) Degree wheel should read 6 degrees BTDC to
6 degrees ATDC.
STANDARD PROCEDURE - MEASURING
TIMING CHAIN WEAR
NOTE: This procedure must be performed with the
timing chain cover removed (Refer to 9 - ENGINE/
VALVE TIMING/TIMING CHAIN COVER - REMOVAL).
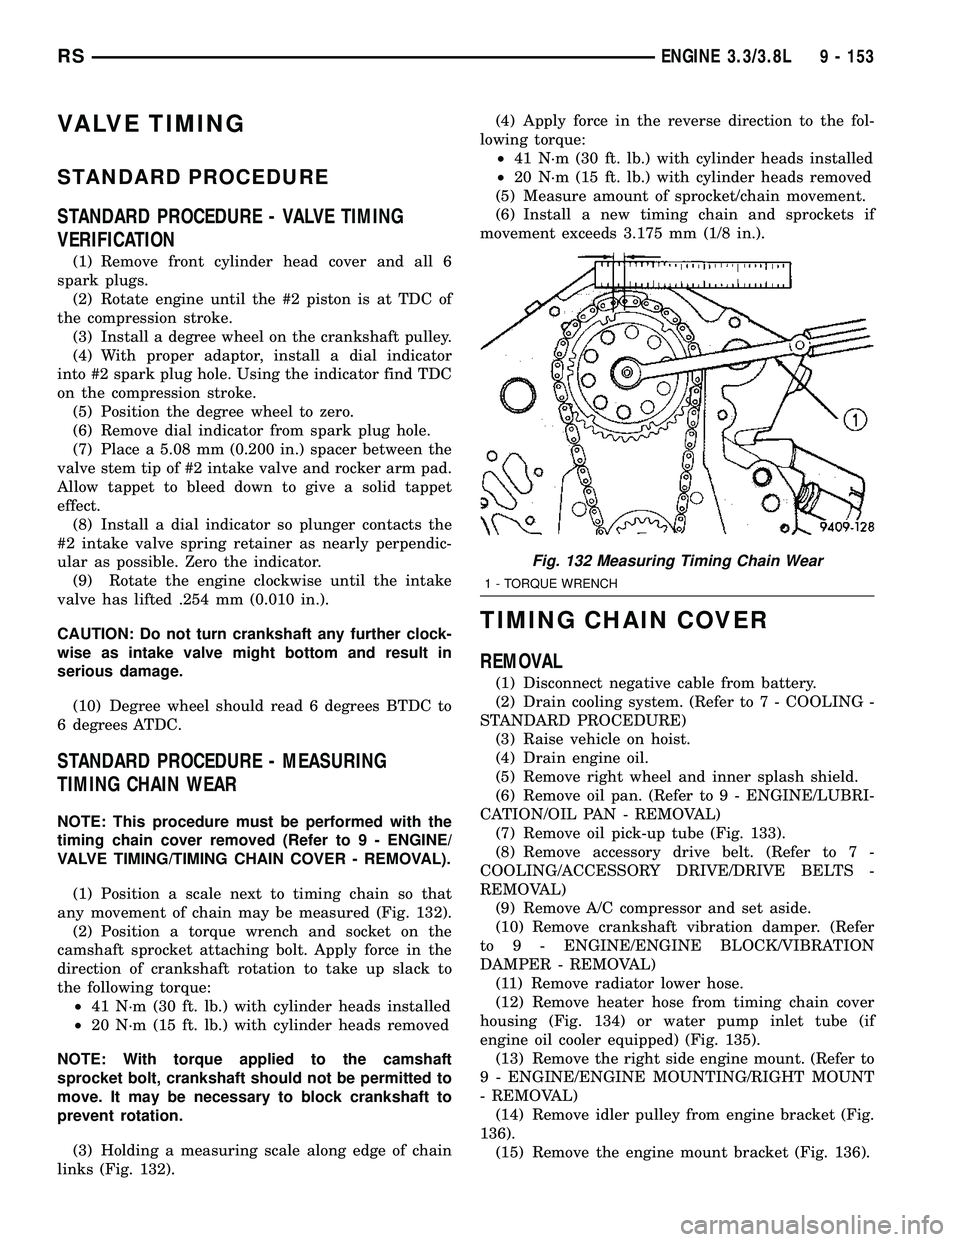
(1) Position a scale next to timing chain so that
any movement of chain may be measured (Fig. 132).
(2) Position a torque wrench and socket on the
camshaft sprocket attaching bolt. Apply force in the
direction of crankshaft rotation to take up slack to
the following torque:
²41 N´m (30 ft. lb.) with cylinder heads installed
²20 N´m (15 ft. lb.) with cylinder heads removed
NOTE: With torque applied to the camshaft
sprocket bolt, crankshaft should not be permitted to
move. It may be necessary to block crankshaft to
prevent rotation.
(3) Holding a measuring scale along edge of chain
links (Fig. 132).(4) Apply force in the reverse direction to the fol-
lowing torque:
²41 N´m (30 ft. lb.) with cylinder heads installed
²20 N´m (15 ft. lb.) with cylinder heads removed
(5) Measure amount of sprocket/chain movement.
(6) Install a new timing chain and sprockets if
movement exceeds 3.175 mm (1/8 in.).
TIMING CHAIN COVER
REMOVAL
(1) Disconnect negative cable from battery.
(2) Drain cooling system. (Refer to 7 - COOLING -
STANDARD PROCEDURE)
(3) Raise vehicle on hoist.
(4) Drain engine oil.
(5) Remove right wheel and inner splash shield.
(6) Remove oil pan. (Refer to 9 - ENGINE/LUBRI-
CATION/OIL PAN - REMOVAL)
(7) Remove oil pick-up tube (Fig. 133).
(8) Remove accessory drive belt. (Refer to 7 -
COOLING/ACCESSORY DRIVE/DRIVE BELTS -
REMOVAL)
(9) Remove A/C compressor and set aside.
(10) Remove crankshaft vibration damper. (Refer
to 9 - ENGINE/ENGINE BLOCK/VIBRATION
DAMPER - REMOVAL)
(11) Remove radiator lower hose.
(12) Remove heater hose from timing chain cover
housing (Fig. 134) or water pump inlet tube (if
engine oil cooler equipped) (Fig. 135).
(13) Remove the right side engine mount. (Refer to
9 - ENGINE/ENGINE MOUNTING/RIGHT MOUNT
- REMOVAL)
(14) Remove idler pulley from engine bracket (Fig.
136).
(15) Remove the engine mount bracket (Fig. 136).
Fig. 132 Measuring Timing Chain Wear
1 - TORQUE WRENCH
RSENGINE 3.3/3.8L9 - 153
Page 1452 of 2585
(17) Remove the water pump for cover removal
clearance. (Refer to 7 - COOLING/ENGINE/WATER
PUMP - REMOVAL)
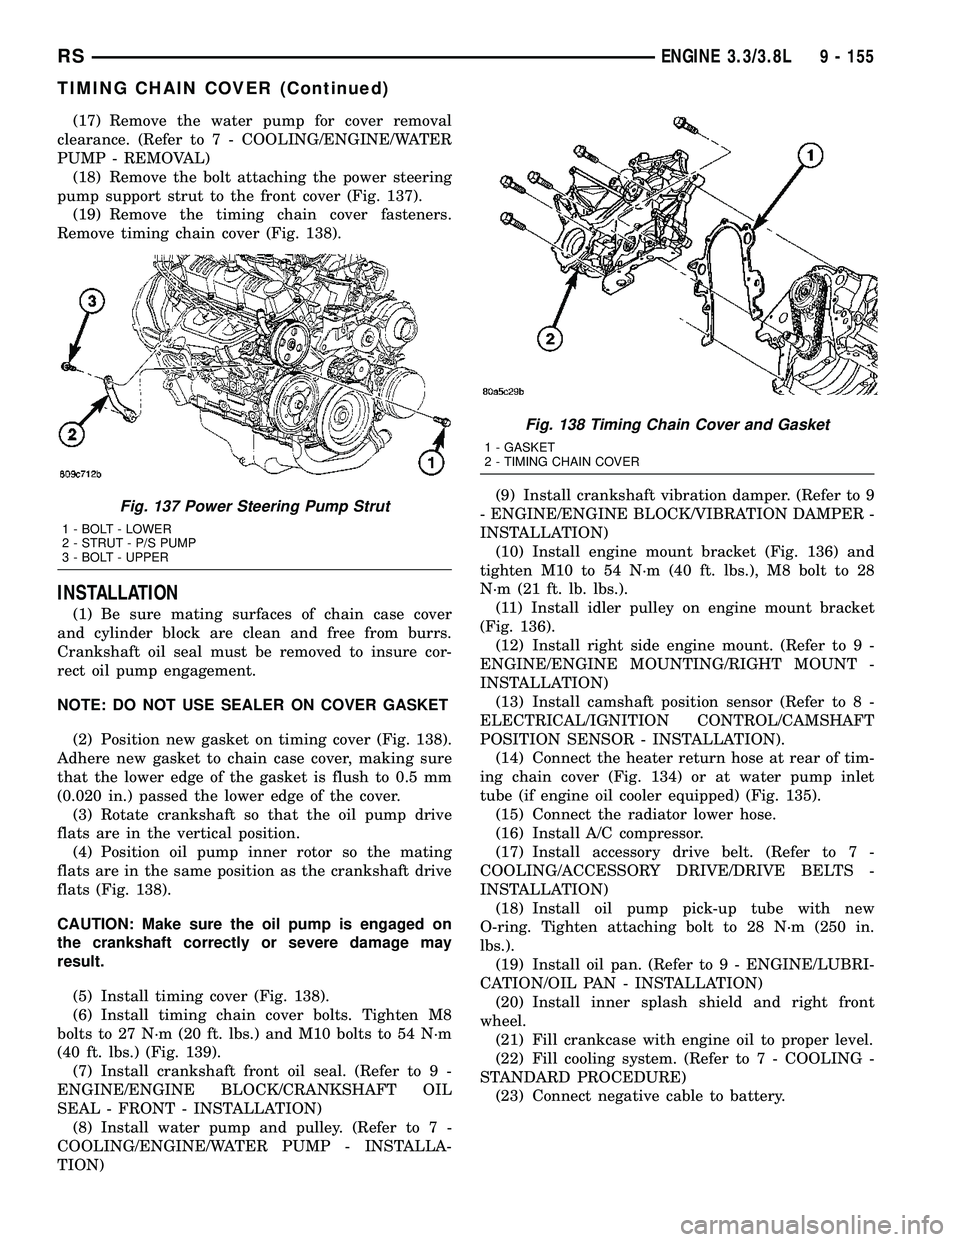
(18) Remove the bolt attaching the power steering
pump support strut to the front cover (Fig. 137).
(19) Remove the timing chain cover fasteners.
Remove timing chain cover (Fig. 138).
INSTALLATION
(1) Be sure mating surfaces of chain case cover
and cylinder block are clean and free from burrs.
Crankshaft oil seal must be removed to insure cor-
rect oil pump engagement.
NOTE: DO NOT USE SEALER ON COVER GASKET
(2) Position new gasket on timing cover (Fig. 138).
Adhere new gasket to chain case cover, making sure
that the lower edge of the gasket is flush to 0.5 mm
(0.020 in.) passed the lower edge of the cover.
(3) Rotate crankshaft so that the oil pump drive
flats are in the vertical position.
(4) Position oil pump inner rotor so the mating
flats are in the same position as the crankshaft drive
flats (Fig. 138).
CAUTION: Make sure the oil pump is engaged on
the crankshaft correctly or severe damage may
result.
(5) Install timing cover (Fig. 138).
(6) Install timing chain cover bolts. Tighten M8
bolts to 27 N´m (20 ft. lbs.) and M10 bolts to 54 N´m
(40 ft. lbs.) (Fig. 139).
(7) Install crankshaft front oil seal. (Refer to 9 -
ENGINE/ENGINE BLOCK/CRANKSHAFT OIL
SEAL - FRONT - INSTALLATION)
(8) Install water pump and pulley. (Refer to 7 -
COOLING/ENGINE/WATER PUMP - INSTALLA-
TION)(9) Install crankshaft vibration damper. (Refer to 9
- ENGINE/ENGINE BLOCK/VIBRATION DAMPER -
INSTALLATION)
(10) Install engine mount bracket (Fig. 136) and
tighten M10 to 54 N´m (40 ft. lbs.), M8 bolt to 28
N´m (21 ft. lb. lbs.).
(11) Install idler pulley on engine mount bracket
(Fig. 136).
(12) Install right side engine mount. (Refer to 9 -
ENGINE/ENGINE MOUNTING/RIGHT MOUNT -
INSTALLATION)
(13) Install camshaft position sensor (Refer to 8 -
ELECTRICAL/IGNITION CONTROL/CAMSHAFT
POSITION SENSOR - INSTALLATION).
(14) Connect the heater return hose at rear of tim-
ing chain cover (Fig. 134) or at water pump inlet
tube (if engine oil cooler equipped) (Fig. 135).
(15) Connect the radiator lower hose.
(16) Install A/C compressor.
(17) Install accessory drive belt. (Refer to 7 -
COOLING/ACCESSORY DRIVE/DRIVE BELTS -
INSTALLATION)
(18) Install oil pump pick-up tube with new
O-ring. Tighten attaching bolt to 28 N´m (250 in.
lbs.).
(19) Install oil pan. (Refer to 9 - ENGINE/LUBRI-
CATION/OIL PAN - INSTALLATION)
(20) Install inner splash shield and right front
wheel.
(21) Fill crankcase with engine oil to proper level.
(22) Fill cooling system. (Refer to 7 - COOLING -
STANDARD PROCEDURE)
(23) Connect negative cable to battery.
Fig. 137 Power Steering Pump Strut
1 - BOLT - LOWER
2 - STRUT - P/S PUMP
3 - BOLT - UPPER
Fig. 138 Timing Chain Cover and Gasket
1 - GASKET
2 - TIMING CHAIN COVER
RSENGINE 3.3/3.8L9 - 155
TIMING CHAIN COVER (Continued)
Page 1550 of 2585
CONDITION POSSIBLE CAUSES CORRECTION
SQUEAK OR RUBBING
SOUND1. Steering column shroud rubbing. 1. Realign shrouds as necessary.
2. Steering column shaft rubbing. 2. Move or realign item rubbing shaft.
3. Clockspring noisy. 3. Remove clockspring. Reinstall wheel.
If noise is gone, replace clockspring.
4. Seal lubrication inadequate. 4. Lube seal (if external).
5. Steering gear internally noisy. 5. Replace steering gear (if no other
cause can be found).
SCRUBBING OR
KNOCKING NOISE.1. Incorrect tire or wheel size. 1. Replace incorrect size tire or wheel
with size used as original equipment.
2. Interference between steering
gear and other vehicle components.2. Check for bent or misaligned
components and correct as necessary.
3. Steering gear internal stops worn
excessively allowing tires to be
steered excessively far.3. Replace steering gear.
NOTE: * There is some noise in all power steering
systems. One of the most common is a hissing
sound evident when turning the steering wheel
when at a standstill or when parking and the steer-
ing wheel is at the end of its travel. Hiss is a very
high frequency noise similar to that experienced
while slowly closing a water tap. The noise is
present in every valve and results when high veloc-
ity fluid passes valve orifice edges. There is no
relationship between this noise and the perfor-
mance of the steering system.NOTE: ** A light clunk may be felt or heard during
steering wheel reversal while vehicle is stationary.
This results from internal steering gear rack move-
ment at the bushings and in no way affects the per-
formance of the steering system. This movement
may be felt in the steering components during
steering wheel reversal.
NOTE: *** Power steering pump growl/moan/groan
results from the development of high pressure fluid
flow. Normally this noise level should not be high
enough to be objectionable.
STEERING WHEEL FEEL
CONDITION POSSIBLE CAUSES CORRECTION
STEERING WHEEL/
COLUMN CLICKING,
CLUNKING OR RATTLING.1. Loose steering coupling pinch
bolt.1. Replace pinch bolt and torque to
specifications.
2. Steering column bearings. 2. Replace steering column.
3. Excessive intermediate shaft
coupling free-play.3. Replace intermediate shaft.
STEERING WHEEL HAS
FORE AND AFT
LOOSENESS.1. Steering wheel retaining nut not
properly tightened and torqued.1. Tighten the steering wheel retaining nut
to its specified torque.
2. Steering column lower bearing
spring retainer slipped on steering
column shaft.2. Replace steering column.
3. Loose steering column to
instrument panel fasteners.3. Tighten fasteners to specified torque.
RSSTEERING19-5
STEERING (Continued)
Page 1553 of 2585
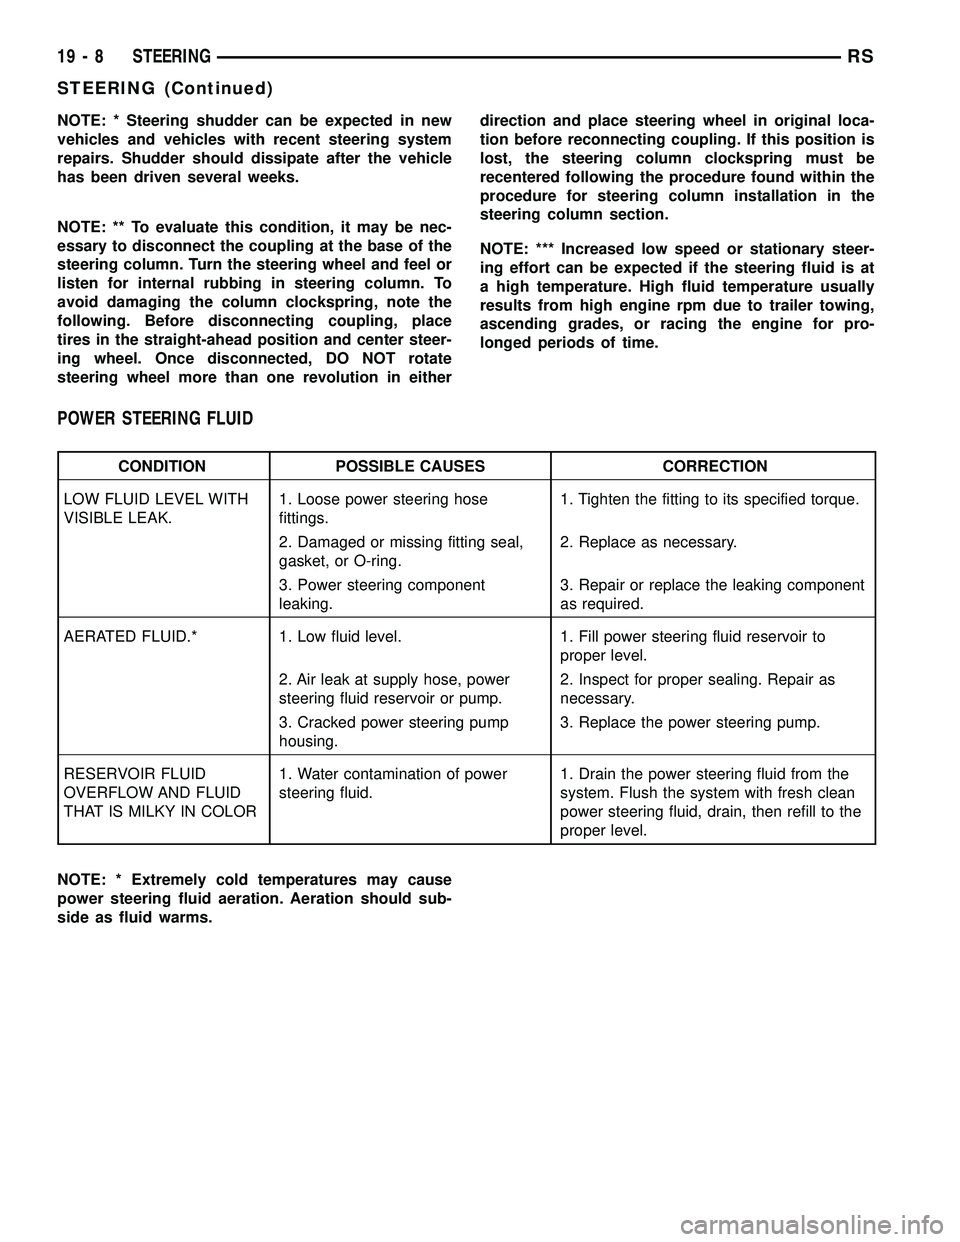
NOTE: * Steering shudder can be expected in new
vehicles and vehicles with recent steering system
repairs. Shudder should dissipate after the vehicle
has been driven several weeks.
NOTE: ** To evaluate this condition, it may be nec-
essary to disconnect the coupling at the base of the
steering column. Turn the steering wheel and feel or
listen for internal rubbing in steering column. To
avoid damaging the column clockspring, note the
following. Before disconnecting coupling, place
tires in the straight-ahead position and center steer-
ing wheel. Once disconnected, DO NOT rotate
steering wheel more than one revolution in eitherdirection and place steering wheel in original loca-
tion before reconnecting coupling. If this position is
lost, the steering column clockspring must be
recentered following the procedure found within the
procedure for steering column installation in the
steering column section.
NOTE: *** Increased low speed or stationary steer-
ing effort can be expected if the steering fluid is at
a high temperature. High fluid temperature usually
results from high engine rpm due to trailer towing,
ascending grades, or racing the engine for pro-
longed periods of time.
POWER STEERING FLUID
CONDITION POSSIBLE CAUSES CORRECTION
LOW FLUID LEVEL WITH
VISIBLE LEAK.1. Loose power steering hose
fittings.1. Tighten the fitting to its specified torque.
2. Damaged or missing fitting seal,
gasket, or O-ring.2. Replace as necessary.
3. Power steering component
leaking.3. Repair or replace the leaking component
as required.
AERATED FLUID.* 1. Low fluid level. 1. Fill power steering fluid reservoir to
proper level.
2. Air leak at supply hose, power
steering fluid reservoir or pump.2. Inspect for proper sealing. Repair as
necessary.
3. Cracked power steering pump
housing.3. Replace the power steering pump.
RESERVOIR FLUID
OVERFLOW AND FLUID
THAT IS MILKY IN COLOR1. Water contamination of power
steering fluid.1. Drain the power steering fluid from the
system. Flush the system with fresh clean
power steering fluid, drain, then refill to the
proper level.
NOTE: * Extremely cold temperatures may cause
power steering fluid aeration. Aeration should sub-
side as fluid warms.
19 - 8 STEERINGRS
STEERING (Continued)
Page 1799 of 2585
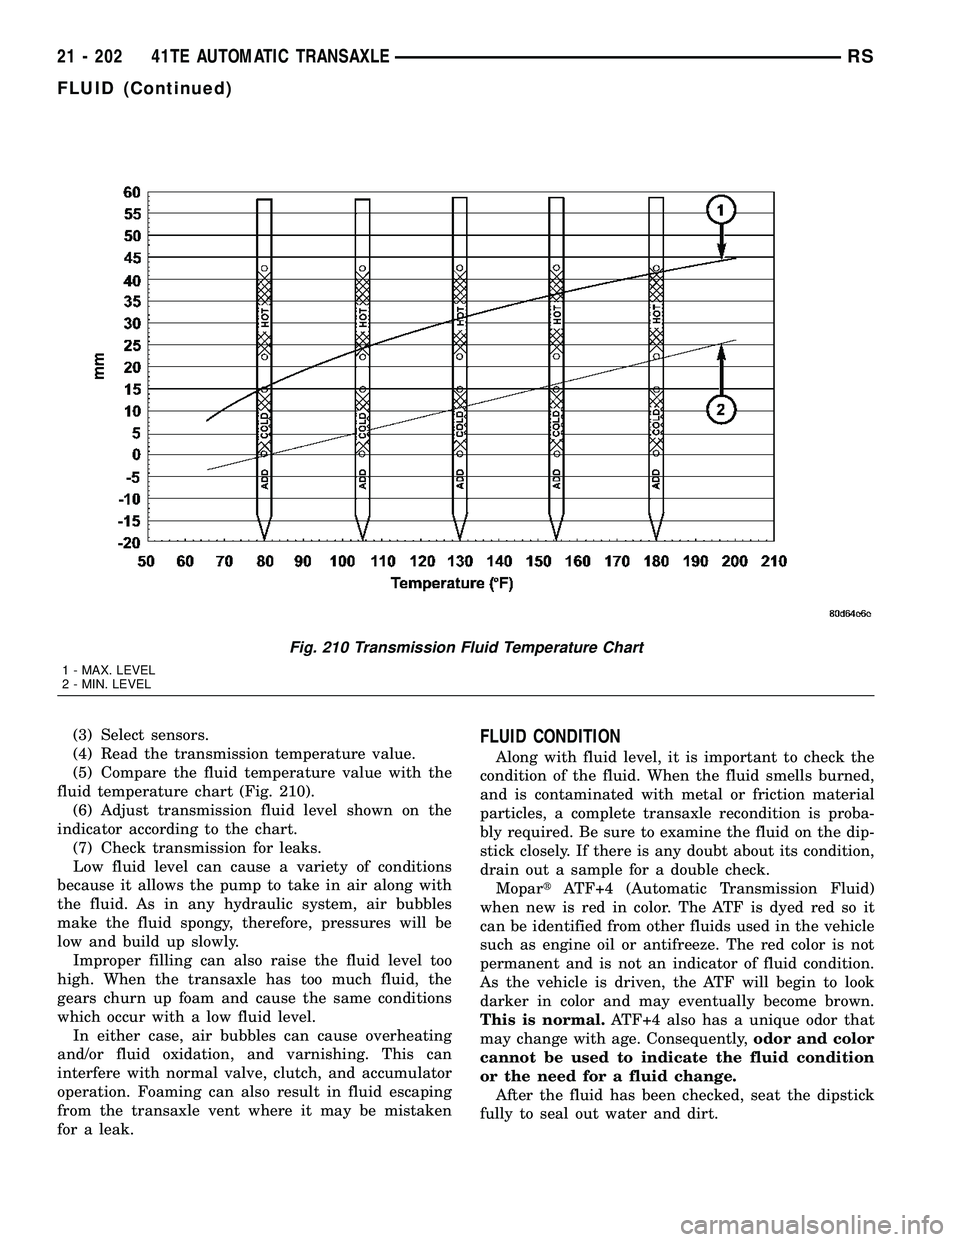
(3) Select sensors.
(4) Read the transmission temperature value.
(5) Compare the fluid temperature value with the
fluid temperature chart (Fig. 210).
(6) Adjust transmission fluid level shown on the
indicator according to the chart.
(7) Check transmission for leaks.
Low fluid level can cause a variety of conditions
because it allows the pump to take in air along with
the fluid. As in any hydraulic system, air bubbles
make the fluid spongy, therefore, pressures will be
low and build up slowly.
Improper filling can also raise the fluid level too
high. When the transaxle has too much fluid, the
gears churn up foam and cause the same conditions
which occur with a low fluid level.
In either case, air bubbles can cause overheating
and/or fluid oxidation, and varnishing. This can
interfere with normal valve, clutch, and accumulator
operation. Foaming can also result in fluid escaping
from the transaxle vent where it may be mistaken
for a leak.FLUID CONDITION
Along with fluid level, it is important to check the
condition of the fluid. When the fluid smells burned,
and is contaminated with metal or friction material
particles, a complete transaxle recondition is proba-
bly required. Be sure to examine the fluid on the dip-
stick closely. If there is any doubt about its condition,
drain out a sample for a double check.
MopartATF+4 (Automatic Transmission Fluid)
when new is red in color. The ATF is dyed red so it
can be identified from other fluids used in the vehicle
such as engine oil or antifreeze. The red color is not
permanent and is not an indicator of fluid condition.
As the vehicle is driven, the ATF will begin to look
darker in color and may eventually become brown.
This is normal.ATF+4 also has a unique odor that
may change with age. Consequently,odor and color
cannot be used to indicate the fluid condition
or the need for a fluid change.
After the fluid has been checked, seat the dipstick
fully to seal out water and dirt.
Fig. 210 Transmission Fluid Temperature Chart
1 - MAX. LEVEL
2 - MIN. LEVEL
21 - 202 41TE AUTOMATIC TRANSAXLERS
FLUID (Continued)
Page 1964 of 2585
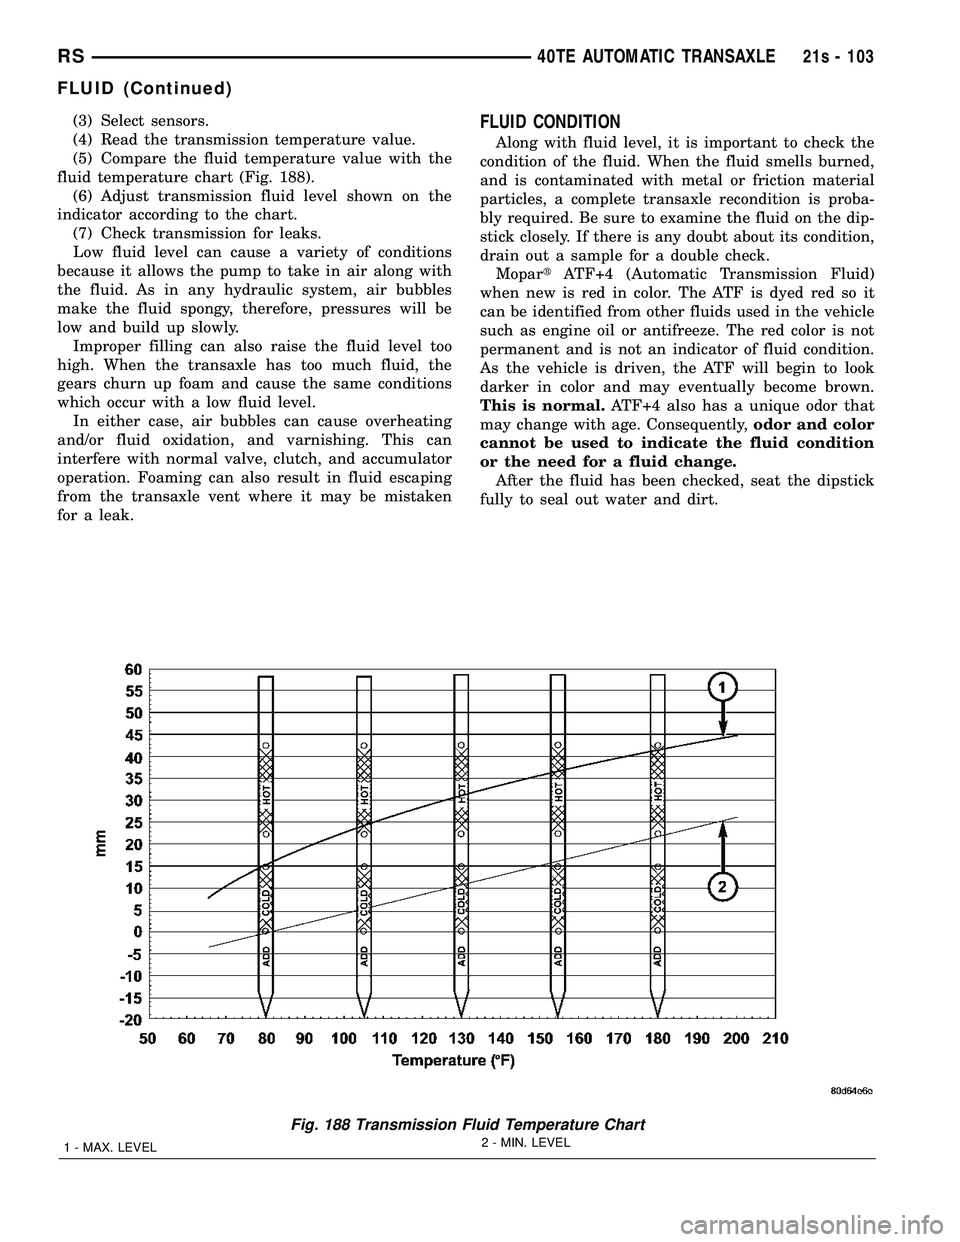
(3) Select sensors.
(4) Read the transmission temperature value.
(5) Compare the fluid temperature value with the
fluid temperature chart (Fig. 188). (6) Adjust transmission fluid level shown on the
indicator according to the chart. (7) Check transmission for leaks.
Low fluid level can cause a variety of conditions
because it allows the pump to take in air along with
the fluid. As in any hydraulic system, air bubbles
make the fluid spongy, therefore, pressures will be
low and build up slowly. Improper filling can also raise the fluid level too
high. When the transaxle has too much fluid, the
gears churn up foam and cause the same conditions
which occur with a low fluid level. In either case, air bubbles can cause overheating
and/or fluid oxidation, and varnishing. This can
interfere with normal valve, clutch, and accumulator
operation. Foaming can also result in fluid escaping
from the transaxle vent where it may be mistaken
for a leak.FLUID CONDITION
Along with fluid level, it is important to check the
condition of the fluid. When the fluid smells burned,
and is contaminated with metal or friction material
particles, a complete transaxle recondition is proba-
bly required. Be sure to examine the fluid on the dip-
stick closely. If there is any doubt about its condition,
drain out a sample for a double check. Mopar tATF+4 (Automatic Transmission Fluid)
when new is red in color. The ATF is dyed red so it
can be identified from other fluids used in the vehicle
such as engine oil or antifreeze. The red color is not
permanent and is not an indicator of fluid condition.
As the vehicle is driven, the ATF will begin to look
darker in color and may eventually become brown.
This is normal. ATF+4 also has a unique odor that
may change with age. Consequently, odor and color
cannot be used to indicate the fluid condition
or the need for a fluid change. After the fluid has been checked, seat the dipstick
fully to seal out water and dirt.
Fig. 188 Transmission Fluid Temperature Chart
1 - MAX. LEVEL 2 - MIN. LEVEL
RS
40TE AUTOMATIC TRANSAXLE21s - 103
FLUID (Continued)
Page 2561 of 2585
INBOARD - 50/50 BENCH - REMOVAL,
SEAT BELT BUCKLE - SECOND ROW.....8O-13
INBOARD - INSTALLATION, SEAT BELT
BUCKLE - FRONT....................8O-12
INBOARD - QUAD BUCKET -
INSTALLATION, SEAT BELT BUCKLE -
FIRST ROW.........................8O-12
INBOARD - QUAD BUCKET - REMOVAL,
SEAT BELT BUCKLE - FIRST ROW.......8O-12
INBOARD - REMOVAL, SEAT BELT
BUCKLE - FRONT....................8O-12
INDICATOR LAMP - DESCRIPTION,
VTSS/SKIS..........................8Q-7
INDICATOR LAMP - OPERATION,
VTSS/SKIS..........................8Q-8
INDICATORS - DIAGNOSIS AND
TESTING, TREAD WEAR..........22-16,22s-8
INFLATION PRESSURES - STANDARD
PROCEDURE, TIRE..............22-16,22s-8
INFO CENTER - DESCRIPTION,
ELECTRONIC VEHICLE.................8M-6
INFO CENTER - INSTALLATION,
ELECTRONIC VEHICLE.................8M-9
INFO CENTER - OPERATION,
ELECTRONIC VEHICLE.................8M-7
INFO CENTER - REMOVAL, ELECTRONIC
VEHICLE............................8M-9
INFRARED TEMPERATURE SENSOR -
DESCRIPTION.......................24-29
INFRARED TEMPERATURE SENSOR -
OPERATION.........................24-29
INITIAL OPERATION - STANDARD
PROCEDURE, POWER STEERING
PUMP.............................19-37
INJECTION SYSTEM - OPERATION.......14-18
INJECTOR - DESCRIPTION, FUEL........14-26
INJECTOR - OPERATION, FUEL..........14-26
INLET AIR TEMPERATURE SENSOR -
DESCRIPTION.......................14-30
INLET FILTER - INSTALLATION..........14-13
INLET FILTER - REMOVAL..............14-13
INLET HOSE - INSTALLATION, HEATER....24-86
INLET HOSE - REMOVAL, HEATER.......24-85
INLET TUBE - 2.4L - DESCRIPTION,
WATER PUMP........................7-35
INLET TUBE - 2.4L - INSTALLATION,
WATER PUMP........................7-35
INLET TUBE - 2.4L - REMOVAL, WATER
PUMP..............................7-35
INLET TUBE - 3.3/3.8L - INSTALLATION,
WATER PUMP........................7-36
INLET TUBE - 3.3/3.8L - REMOVAL,
WATER PUMP........................7-36
INNER - INSTALLATION, CV BOOT.........3-6
INNER - REMOVAL, CV BOOT.............3-6
INNER BELT MOLDING - INSTALLATION,
FRONT DOOR......................23-115
INNER BELT MOLDING - REMOVAL,
FRONT DOOR......................23-115
INNER SEAL - INSTALLATION, HALF
SHAFT.............................21-12
INNER SEAL - REMOVAL, HALF SHAFT . . . 21-12
INNER/OUTER - INSTALLATION, CV
BOOT...............................3-17
INNER/OUTER - REMOVAL, CV BOOT......3-15
INPUT - DESCRIPTION, SPEED SENSOR . 21-239,
21s-140
INPUT - INSTALLATION, SPEED
SENSOR....................21-240,21s-141
INPUT - OPERATION, DATA BUS
COMMUNICATION RECEIVE - PCM.......8E-15
INPUT - OPERATION, IGNITION SENSE -
PCM...............................8E-15
INPUT - OPERATION, SENSOR RETURN -
PCM...............................8E-15
INPUT - OPERATION, SPEED SENSOR . . . 21-240,
21s-140
INPUT - REMOVAL, SPEED SENSOR....21-240,
21s-141
INPUT CLUTCH ASSEMBLY - ASSEMBLY . 21-216,
21s-116
INPUT CLUTCH ASSEMBLY -
DISASSEMBLY...............21-208,21s-107
INPUT FLANGE SEAL - INSTALLATION
.....3-45
INPUT FLANGE SEAL - REMOVAL
.........3-44
INPUT SHAFT - ASSEMBLY
........21-96,21s-5
INPUT SHAFT - DESCRIPTION
.....21-93,21s-1
INPUT SHAFT - DISASSEMBLY
.....21-93,21s-1INPUT SHAFT COVER SEAL -
INSTALLATION.......................21-14
INPUT SHAFT COVER SEAL - REMOVAL . . . 21-13
INPUT SHAFT END SEAL -
INSTALLATION.......................21-16
INPUT SHAFT END SEAL - REMOVAL.....21-15
INPUT SHAFT SEAL - INSTALLATION.....21-18
INPUT SHAFT SEAL - REMOVAL.........21-17
INSIDE HANDLE ACTUATOR -
INSTALLATION.......................23-27
INSIDE HANDLE ACTUATOR - REMOVAL . . 23-27
INSIDE HANDLE CABLE - INSTALLATION . . 23-38
INSIDE HANDLE CABLE - REMOVAL......23-37
INSIDE LATCH HANDLE - INSTALLATION . . 23-34
INSIDE LATCH HANDLE - REMOVAL......23-34
INSPECT, INSPECTION...............21-114
INSTRUMENT CLUSTER - DESCRIPTION . . . 8J-1
INSTRUMENT CLUSTER - OPERATION.....8J-1
INSTRUMENT PANEL - INSTALLATION,
LOWER............................23-69
INSTRUMENT PANEL - REMOVAL,
LOWER............................23-69
INSTRUMENT PANEL ANTENNA CABLE -
INSTALLATION.......................8A-9
INSTRUMENT PANEL ANTENNA CABLE -
REMOVAL...........................8A-8
INSTRUMENT PANEL ASSEMBLY -
INSTALLATION.......................23-66
INSTRUMENT PANEL ASSEMBLY -
REMOVAL............................23-65
INSTRUMENT PANEL CENTER BEZEL -
INSTALLATION.......................23-68
INSTRUMENT PANEL CENTER BEZEL -
REMOVAL..........................23-68
INSTRUMENT PANEL DEMISTER DUCTS
- INSTALLATION.....................24-55
INSTRUMENT PANEL DEMISTER DUCTS
- REMOVAL.........................24-55
INSTRUMENT PANEL DUCTS -
INSTALLATION.......................24-55
INSTRUMENT PANEL DUCTS - REMOVAL . 24-55
INSTRUMENT PANEL END CAP -
INSTALLATION.......................23-68
INSTRUMENT PANEL END CAP -
REMOVAL..........................23-68
INSTRUMENT PANEL OUTLET -
INSTALLATION.......................24-46
INSTRUMENT PANEL OUTLET -
REMOVAL..........................24-45
INSTRUMENT PANEL TOP COVER -
INSTALLATION.......................23-69
INSTRUMENT PANEL TOP COVER -
REMOVAL..........................23-68
INSTRUMENT PANEL TOP PAD
ASSEMBLY - INSTALLATION............23-72
INSTRUMENT PANEL TOP PAD
ASSEMBLY - REMOVAL................23-71
INTAKE MANIFOLD - DESCRIPTION . . 9-144,9-58
INTAKE MANIFOLD - INSTALLATION,
LOWER............................9-149
INTAKE MANIFOLD - INSTALLATION,
UPPER.............................9-147
INTAKE MANIFOLD - LOWER -
CLEANING..........................9-148
INTAKE MANIFOLD - LOWER -
INSPECTION....................9-148,9-60
INTAKE MANIFOLD - LOWER -
INSTALLATION........................9-60
INTAKE MANIFOLD - LOWER - REMOVAL . . 9-60
INTAKE MANIFOLD - REMOVAL, LOWER . . 9-148
INTAKE MANIFOLD - REMOVAL, UPPER . . . 9-145
INTAKE MANIFOLD - UPPER -
INSPECTION.........................9-59
INTAKE MANIFOLD - UPPER -
INSTALLATION........................9-59
INTAKE MANIFOLD - UPPER - REMOVAL . . . 9-58
INTAKE MANIFOLD LEAKS - DIAGNOSIS
AND TESTING...................9-145,9-58
INTAKE MANIFOLD VACUUM PORT
REPAIR - STANDARD PROCEDURE.......9-145
INTAKE PIPE - INSTALLATION, AIR
......24-114
INTAKE PIPE - REMOVAL, AIR
.........24-113
INTAKE/EXHAUST VALVES & SEATS -
CLEANING
.................9-105,9-32,9s-22
INTAKE/EXHAUST VALVES & SEATS -
DESCRIPTION
..............9-104,9-32,9s-21
INTAKE/EXHAUST VALVES & SEATS -
INSPECTION
...................9-105,9s-22INTAKE/EXHAUST VALVES & SEATS -
INSTALLATION..................9-106,9s-23
INTAKE/EXHAUST VALVES & SEATS -
OPERATION....................9-104,9s-21
INTAKE/EXHAUST VALVES & SEATS -
REMOVAL.....................9-105,9s-22
INTEGRAL ANTENNA - EXPORT -
DESCRIPTION, QUARTER GLASS.........8A-9
INTEGRAL ANTENNA - EXPORT -
DIAGNOSIS AND TESTING, QUARTER
GLASS..............................8A-9
INTEGRAL ANTENNA - EXPORT -
OPERATION, QUARTER GLASS...........8A-9
INTEGRATED POWER MODULE -
DESCRIPTION.....................8W-97-2
INTEGRATED POWER MODULE -
INSTALLATION....................8W-97-3
INTEGRATED POWER MODULE -
OPERATION.......................8W-97-2
INTEGRATED POWER MODULE -
REMOVAL........................8W-97-2
INTERACTIVE SPEED CONTROL (4
SPEED EATX ONLY) - OPERATION........8P-2
INTERFACE (PCI) BUS, OPERATION -
PROGRAMMABLE COMMUNICATIONS....14-21
INTERIOR LAMPS, SPECIFICATIONS......8L-20
INTERLOCK - DESCRIPTION, IGNITION....19-17
INTERLOCK SOLENOID - DESCRIPTION,
SHIFT......................21-233,21s-133
INTERLOCK SOLENOID - DIAGNOSIS
AND TESTING, BRAKE/TRANSMISSION
SHIFT......................21-235,21s-135
INTERLOCK SOLENOID - INSTALLATION,
SHIFT.......................21-236,21s-136
INTERLOCK SOLENOID - OPERATION,
SHIFT......................21-233,21s-134
INTERLOCK SOLENOID - REMOVAL,
SHIFT......................21-235,21s-135
INTERLOCK SWITCH - INSTALLATION,
CLUTCH PEDAL.......................6-14
INTERLOCK SWITCH - REMOVAL,
CLUTCH PEDAL.......................6-13
INTERMEDIATE SHAFT - ASSEMBLY....21-107,
21s-17
INTERMEDIATE SHAFT - DESCRIPTION . . 21-100,
21s-9
INTERMEDIATE SHAFT - DISASSEMBLY . 21-100,
21s-10
INTERNATIONAL SYMBOLS -
DESCRIPTION......................Intro.-5
INTERNATIONAL SYMBOLS -
DESCRIPTION.........................0-1
INTRODUCTION - DIAGNOSIS AND
TESTING, ENGINE DIAGNOSIS........9-3,9-76
IOD FUSE - DESCRIPTION...........8W-97-3
IOD FUSE - OPERATION.............8W-97-3
JOINT - DESCRIPTION, LOWER BALL......2-10
JOINT - DIAGNOSIS AND TESTING,
LOWER BALL........................2-10
JOINT - OPERATION, LOWER BALL.......2-10
JOINT MOLDING - INSTALLATION, ROOF . . 23-58
JOINT MOLDING - REMOVAL, ROOF......23-58
JOUNCE BUMPER - DESCRIPTION........2-36
JOUNCE BUMPER - OPERATION..........2-36
JUMP STARTING - STANDARD
PROCEDURE.........................0-27
JUNCTION BLOCK - DESCRIPTION,
NON-ABS.......................5-33,5s-32
JUNCTION BLOCK - INSTALLATION,
NON-ABS.......................5-33,5s-32
JUNCTION BLOCK - OPERATION,
NON-ABS.......................5-33,5s-32
JUNCTION BLOCK - REMOVAL, NON-ABS . . 5-33,
5s-32
KEY - DESCRIPTION, TRANSPONDER.....8Q-6
KEY - OPERATION, TRANSPONDER.......8Q-6
KEY IMMOBILIZER MODULE -
DESCRIPTION, SENTRY................8E-18
KEY IMMOBILIZER MODULE -
INSTALLATION, SENTRY
...............8E-19
KEY IMMOBILIZER MODULE -
OPERATION, SENTRY
.................8E-18
KEY IMMOBILIZER MODULE - REMOVAL,
SENTRY
............................8E-18
KEY REMOTE ENTRY MODULE -
DESCRIPTION, SENTRY
................8Q-3
KEY REMOTE ENTRY MODULE -
DIAGNOSIS AND TESTING, SENTRY
.......8Q-5
18 INDEXRS
Description Group-Page Description Group-Page Description Group-Page