2004 CHRYSLER VOYAGER open hood
[x] Cancel search: open hoodPage 792 of 2585

8W-15 GROUND DISTRIBUTION
Component Page
A/C Compressor Clutch......................8W-15-2, 9
A/C-Heater Control......................8W-15-10, 12
Adjustable Pedals Module.....................8W-15-18
Adjustable Pedals Switch.....................8W-15-11
Airbag Control Module.......................8W-15-13
Auto Temp Control.........................8W-15-10
Automatic Day/Night Mirror...................8W-15-22
Back-Up Lamp Switch......................8W-15-2, 4
Battery.............................8W-15-2, 3, 4
Body Control Module.......................8W-15-23
Brake Fluid Level Switch.....................8W-15-18
Brake Lamp Switch........................8W-15-18
Cabin Heater Assist.........................8W-15-9
Cd Changer.............................8W-15-13
Center High Mounted Stop Lamp.................8W-15-28
Clutch Pedal Interlock Switch...................8W-15-18
Clutch Pedal Upstop Switch....................8W-15-19
Controller Antilock Brake....................8W-15-2, 4
Crank Case Ventilation Heater...................8W-15-9
Crankshaft Position Sensor.....................8W-15-4
Data Link Connector.....................8W-15-3, 4, 18
Dosing Pump............................8W-15-9
Driver Door Courtesy Lamp..................8W-15-15, 21
Driver Door Lock Switch....................8W-15-15, 21
Driver Heated Seat Cushion....................8W-15-17
Driver Heated Seat Module....................8W-15-17
Driver Power Seat Switch.....................8W-15-17
Driver Power Window Switch.................8W-15-15, 21
Dvd/Cd Changer..........................8W-15-11
EGR Solenoid............................8W-15-3
Engine Control Module.......................8W-15-4
Floor Console Lamp........................8W-15-26
Floor Console Power Outlet....................8W-15-26
Front Blower Module.......................8W-15-12
Front Cigar Lighter........................8W-15-10
Front Control Module...................8W-15-2, 8, 9, 19
Front Reading Lamps/Switch...................8W-15-22
Fuel Heater............................8W-15-26
Fuel Heater Relay..........................8W-15-4
Fuel Pump Module.........................8W-15-26
G100...............................8W-15-2, 4
G101...............................8W-15-2, 4
G102..............................8W-15-5, 6, 7
G103.................................8W-15-9
G200............................8W-15-10, 11, 12
G201................................8W-15-13
G202................................8W-15-13
G300......................8W-15-12, 14, 16, 17, 18, 19
G301..........................8W-15-20, 21, 22, 23
G302............................8W-15-24, 25, 26
G303............................8W-15-26, 27, 28
Generator..............................8W-15-2
Headlamp Switch.........................8W-15-10
Headlamp Washer Pump Motor..................8W-15-7
High Note Horn...........................8W-15-6
Hood Ajar Switch.........................8W-15-19
Horn Switch............................8W-15-12
Instrument Cluster........................8W-15-10
Instrument Panel Switch Bank..................8W-15-11
Integrated Power Module..............8W-15-2, 3, 4, 8, 9, 19
Left B-Pillar Switch........................8W-15-18
Left Cinch/Release Motor.....................8W-15-14
Left Cylinder Lock Switch...................8W-15-15, 16
Left Door Speaker.........................8W-15-13
Left Fog Lamp............................8W-15-6
Left Front Door Ajar Switch....................8W-15-16
Left Front Door Lock Motor/Ajar Switch...........8W-15-15, 16
Left Front Park/Turn Signal Lamp.................8W-15-6
Left Full Open Switch.......................8W-15-14
Left Headlamp...........................8W-15-19
Left Headlamp Leveling Motor...................8W-15-7
Left High Beam Lamp.....................8W-15-8, 19
Left Liftgate Flood Lamp.....................8W-15-27
Left Low Beam Lamp......................8W-15-8, 19
Left Mid Reading Lamp......................8W-15-22
Left Park Lamp.........................8W-15-8, 19
Left Power Mirror.........................8W-15-11
Left Rear Lamp Assembly.....................8W-15-26
Left Rear Reading Lamp......................8W-15-22
Left Rear Speaker.........................8W-15-13
Left Sliding Door Control Module.................8W-15-14Component Page
Left Sliding Door Latch Sensing Switch.............8W-15-14
Left Sliding Door Lock Motor...................8W-15-14
Left Sliding Door Lock Motor/Ajar Switch............8W-15-14
Left Sliding Door Motor......................8W-15-14
Left Turn Signal Lamp......................8W-15-19
Left Visor/Vanity Lamp......................8W-15-22
License Lamp.........................8W-15-24, 27
Lift Pump Motor..........................8W-15-26
Liftgate Ajar Switch........................8W-15-28
Liftgate Cinch/Release Motor.................8W-15-24, 28
Liftgate Right Pinch Sensor....................8W-15-24
Low Note Horn...........................8W-15-6
Memory Seat/Mirror Module...................8W-15-17
Natural Vacuum Leak Detection Assembly...........8W-15-2, 3
Overhead Console.........................8W-15-22
Oxygen Sensor 1/1 Upstream....................8W-15-3
Oxygen Sensor 1/2 Downstream..................8W-15-3
Passenger Door Courtesy Lamp................8W-15-16, 21
Passenger Door Lock Switch.................8W-15-16, 21
Passenger Heated Seat Cushion..................8W-15-23
Passenger Heated Seat Module..................8W-15-23
Passenger Power Seat Switch...................8W-15-23
Power Folding Mirror Switch...................8W-15-12
Power Liftgate Module.......................8W-15-24
Power Liftgate Motor.......................8W-15-24
Power Mirror Switch........................8W-15-12
Power Outlet............................8W-15-10
Power Window Switch.......................8W-15-15
Powertrain Control Module.....................8W-15-3
Radiator Fan No. 1.........................8W-15-5
Radiator Fan No. 2.........................8W-15-5
Radiator Fan Relay.........................8W-15-5
Radiator Fan Relay No. 3......................8W-15-5
Radio................................8W-15-13
Rear Auto Temp Control Switch..................8W-15-18
Rear Blower Front Control Switch................8W-15-12
Rear Blower Motor Power Module................8W-15-26
Rear Blower Rear Control Switch.................8W-15-18
Rear Dome Lamp.........................8W-15-22
Rear Power Outlet.........................8W-15-26
Rear Window Defogger Grid....................8W-15-28
Rear Wiper Motor.........................8W-15-27
Right B-Pillar Switch.......................8W-15-23
Right Cinch/Release Motor....................8W-15-20
Right Cylinder Lock Switch....................8W-15-21
Right Door Speaker........................8W-15-13
Right Fog Lamp...........................8W-15-6
Right Front Door Ajar Switch...................8W-15-21
Right Front Door Lock Motor/Ajar Switch............8W-15-21
Right Front Park/Turn Signal Lamp................8W-15-6
Right Full Open Switch......................8W-15-20
Right Headlamp..........................8W-15-19
Right Headlamp Leveling Motor..................8W-15-7
Right High Beam Lamp.....................8W-15-8, 19
Right Liftgate Flood Lamp....................8W-15-27
Right Low Beam Lamp.....................8W-15-8, 19
Right Mid Reading Lamp.....................8W-15-22
Right Park Lamp........................8W-15-8, 19
Right Power Mirror........................8W-15-11
Right Rear Lamp Assembly..................8W-15-25, 26
Right Rear Reading Lamp.....................8W-15-22
Right Rear Speaker........................8W-15-13
Right Sliding Door Control Module................8W-15-20
Right Sliding Door Latch Sensing Switch.............8W-15-20
Right Sliding Door Lock Motor..................8W-15-20
Right Sliding Door Lock Motor/Ajar Switch...........8W-15-20
Right Sliding Door Motor.....................8W-15-20
Right Turn Signal Lamp......................8W-15-19
Right Visor/Vanity Lamp.....................8W-15-22
Sentry Key Remote Entry Module.................8W-15-11
Siren................................8W-15-11
Speed Control Servo.........................8W-15-2
Sunroof Module..........................8W-15-25
Sunroof Switch...........................8W-15-22
Thatcham Alarm Module.....................8W-15-11
Traction Control Switch......................8W-15-11
Trailer Tow Connector.......................8W-15-25
Transmission Control Relay.....................8W-15-3
Washer Fluid Level Switch.....................8W-15-5
Wiper Module...........................8W-15-18
RS8W-15 GROUND DISTRIBUTION8W-15-1
Page 1098 of 2585

Component Page
Floor Console Lamp................. 8W-80-72
Floor Console Power Outlet........... 8W-80-72
Front Blower Module C1 (ATC)........ 8W-80-73
Front Blower Module C2 (ATC)........ 8W-80-73
Front Cigar Lighter................. 8W-80-73
Front Control Module................ 8W-80-74
Front Intrusion Sensor (United
Kingdom)....................... 8W-80-75
Front Reading Lamps/Switch.......... 8W-80-75
Fuel Heater (Diesel)................. 8W-80-75
Fuel Injector No. 1 (2.4L/3.3L/3.8L)..... 8W-80-75
Fuel Injector No. 1 (Diesel)............ 8W-80-75
Fuel Injector No. 2 (2.4L/3.3L/3.8L)..... 8W-80-76
Fuel Injector No. 2 (Diesel)............ 8W-80-76
Fuel Injector No. 3 (2.4L/3.3L/3.8L)..... 8W-80-76
Fuel Injector No. 3 (Diesel)............ 8W-80-76
Fuel Injector No. 4 (2.4L/3.3L/3.8L)..... 8W-80-77
Fuel Injector No. 4 (Diesel)............ 8W-80-77
Fuel Injector No. 5 (3.3L/3.8L)......... 8W-80-77
Fuel Injector No. 6 (3.3L/3.8L)......... 8W-80-77
Fuel Pressure Sensor (Diesel).......... 8W-80-78
Fuel Pressure Solenoid (Diesel)........ 8W-80-78
Fuel Pump Module.................. 8W-80-78
Generator......................... 8W-80-78
Glow Plug Relay (Diesel)............. 8W-80-79
Headlamp Switch................... 8W-80-79
Headlamp Washer Pump Motor (Export) . 8W-80-79
High Note Horn.................... 8W-80-79
Hood Ajar Switch (Export)............ 8W-80-80
Idle Air Control Motor (Gas)........... 8W-80-80
Ignition Coil (2.4L).................. 8W-80-80
Ignition Coil (3.3L/3.8L).............. 8W-80-80
Ignition Switch..................... 8W-80-80
Inlet Air Temperature Sensor.......... 8W-80-81
Input Speed Sensor................. 8W-80-81
Instrument Cluster.................. 8W-80-81
Instrument Panel Switch Bank (Heated
Seats).......................... 8W-80-81
Instrument Panel Switch Bank (Except Heated
Seats).......................... 8W-80-82
Integrated Power Module C1.......... 8W-80-82
Integrated Power Module C2.......... 8W-80-83
Integrated Power Module C3.......... 8W-80-83
Integrated Power Module C4.......... 8W-80-84
Integrated Power Module C5.......... 8W-80-84
Integrated Power Module C6.......... 8W-80-84
Integrated Power Module C7.......... 8W-80-85
Integrated Power Module C8.......... 8W-80-85
Integrated Power Module C9.......... 8W-80-86
Knock Sensor (2.4L)................. 8W-80-86
Knock Sensor (3.3L/3.8L ABS Except
Export)......................... 8W-80-86
Left B-Pillar Switch (Power Sliding
Door).......................... 8W-80-86Component Page
Left Cinch/Release Motor (Power Sliding
Door).......................... 8W-80-87
Left Cylinder Lock Switch............ 8W-80-87
Left Door Speaker (Highline).......... 8W-80-87
Left Door Speaker (Lowline)........... 8W-80-87
Left Fog Lamp (Except Export)........ 8W-80-87
Left Fog Lamp (Export).............. 8W-80-88
Left Front Door Ajar Switch (Base)..... 8W-80-88
Left Front Door Lock Motor/Ajar Switch (Except
Base).......................... 8W-80-88
Left Front Impact Sensor (Except
Export)......................... 8W-80-88
Left Front Park/Turn Signal Lamp (Except
Export)......................... 8W-80-89
Left Front Wheel Speed Sensor........ 8W-80-89
Left Full Open Switch (Power Sliding
Door).......................... 8W-80-89
Left Headlamp (Except Export)........ 8W-80-89
Left Headlamp Leveling Motor (Export) . . 8W-80-90
Left High Beam Lamp (Export)........ 8W-80-90
Left Instrument Panel Speaker........ 8W-80-90
Left Liftgate Flood Lamp (Power
Liftgate)........................ 8W-80-90
Left Low Beam Lamp (Export)......... 8W-80-90
Left Mid Reading Lamp (Premium/
Luxury)........................ 8W-80-91
Left Park Lamp (Export)............. 8W-80-91
Left Power Mirror................... 8W-80-91
Left Rear Lamp Assembly............ 8W-80-91
Left Rear Pillar Speaker.............. 8W-80-92
Left Rear Reading Lamp (Luxury)...... 8W-80-92
Left Rear Speaker (Lowline)........... 8W-80-92
Left Rear Speaker (Highline).......... 8W-80-92
Left Rear Vent Motor................ 8W-80-92
Left Rear Wheel Speed Sensor......... 8W-80-93
Left Remote Radio Switch............ 8W-80-93
Left Repeater Lamp (Export).......... 8W-80-93
Left Seat Airbag.................... 8W-80-93
Left Side Impact Sensor 1 (Premium
ORC).......................... 8W-80-94
Left Sliding Door Control Module C1 (Power Sliding
Door).......................... 8W-80-94
Left Sliding Door Control Module C2 (Power Sliding
Door).......................... 8W-80-94
Left Sliding Door Latch Sensing Switch (Power
Sliding Door).................... 8W-80-95
Left Sliding Door Lock Motor (Power Sliding
Door).......................... 8W-80-95
Left Sliding Door Lock Motor/Ajar Switch (Manual
Sliding Door).................... 8W-80-95
Left Sliding Door Motor (Power Sliding
Door).......................... 8W-80-95
Left Speed Control Switch............ 8W-80-96
Left Turn Signal Lamp (Export)........ 8W-80-96
RS8W-80 CONNECTOR PIN-OUTS8W-80-3
Page 1434 of 2585
OIL
STANDARD PROCEDURE
STANDARD PROCEDURE - ENGINE OIL AND
FILTER CHANGE
Change engine oil at mileage and time intervals
described in the Maintenance Schedule. (Refer to
LUBRICATION & MAINTENANCE/MAINTE-
NANCE SCHEDULES - DESCRIPTION)
WARNING: NEW OR USED ENGINE OIL CAN BE
IRRITATING TO THE SKIN. AVOID PROLONGED OR
REPEATED SKIN CONTACT WITH ENGINE OIL.
CONTAMINANTS IN USED ENGINE OIL, CAUSED BY
INTERNAL COMBUSTION, CAN BE HAZARDOUS TO
YOUR HEALTH. THOROUGHLY WASH EXPOSED
SKIN WITH SOAP AND WATER. DO NOT WASH
SKIN WITH GASOLINE, DIESEL FUEL, THINNER, OR
SOLVENTS, HEALTH PROBLEMS CAN RESULT. DO
NOT POLLUTE, DISPOSE OF USED ENGINE OIL
PROPERLY. CONTACT YOUR DEALER OR GOVERN-
MENT AGENCY FOR LOCATION OF COLLECTION
CENTER IN YOUR AREA.
Run engine until achieving normal operating tem-
perature.
(1) Position the vehicle on a level surface and turn
engine off.
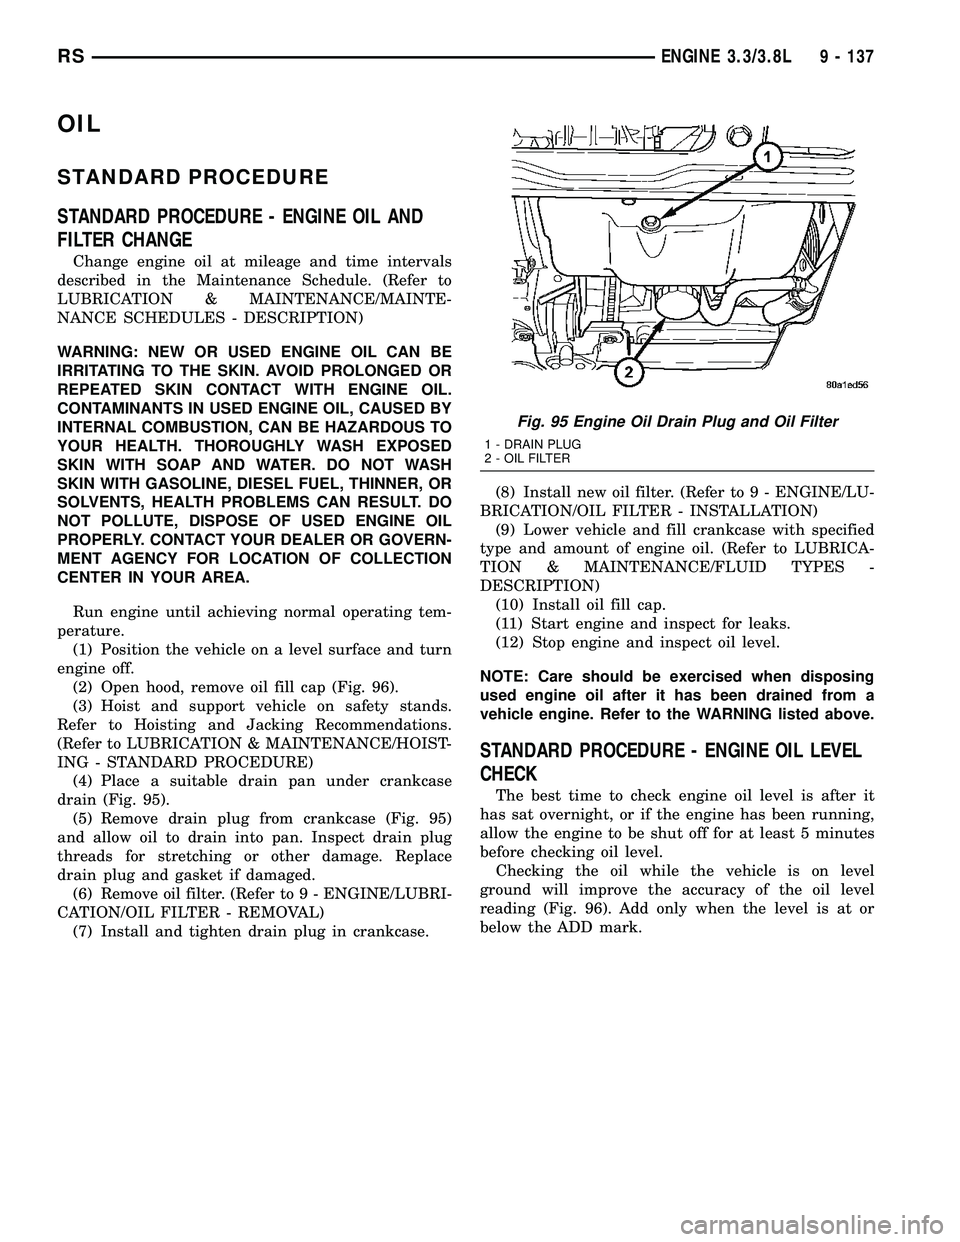
(2) Open hood, remove oil fill cap (Fig. 96).
(3) Hoist and support vehicle on safety stands.
Refer to Hoisting and Jacking Recommendations.
(Refer to LUBRICATION & MAINTENANCE/HOIST-
ING - STANDARD PROCEDURE)
(4) Place a suitable drain pan under crankcase
drain (Fig. 95).
(5) Remove drain plug from crankcase (Fig. 95)
and allow oil to drain into pan. Inspect drain plug
threads for stretching or other damage. Replace
drain plug and gasket if damaged.
(6) Remove oil filter. (Refer to 9 - ENGINE/LUBRI-
CATION/OIL FILTER - REMOVAL)
(7) Install and tighten drain plug in crankcase.(8) Install new oil filter. (Refer to 9 - ENGINE/LU-
BRICATION/OIL FILTER - INSTALLATION)
(9) Lower vehicle and fill crankcase with specified
type and amount of engine oil. (Refer to LUBRICA-
TION & MAINTENANCE/FLUID TYPES -
DESCRIPTION)
(10) Install oil fill cap.
(11) Start engine and inspect for leaks.
(12) Stop engine and inspect oil level.
NOTE: Care should be exercised when disposing
used engine oil after it has been drained from a
vehicle engine. Refer to the WARNING listed above.
STANDARD PROCEDURE - ENGINE OIL LEVEL
CHECK
The best time to check engine oil level is after it
has sat overnight, or if the engine has been running,
allow the engine to be shut off for at least 5 minutes
before checking oil level.
Checking the oil while the vehicle is on level
ground will improve the accuracy of the oil level
reading (Fig. 96). Add only when the level is at or
below the ADD mark.
Fig. 95 Engine Oil Drain Plug and Oil Filter
1 - DRAIN PLUG
2 - OIL FILTER
RSENGINE 3.3/3.8L9 - 137
Page 1496 of 2585
FRAME & BUMPERS
TABLE OF CONTENTS
page page
BUMPERS
SPECIFICATIONS - TORQUE...............1
FRONT FASCIA
REMOVAL.............................1
INSTALLATION..........................1
FRONT BUMPER REINFORCEMENT
REMOVAL.............................2
INSTALLATION..........................2
REAR FASCIA
REMOVAL.............................2
INSTALLATION..........................2
REAR BUMPER REINFORCEMENT
REMOVAL.............................3
INSTALLATION..........................3
REAR FASCIA - SCUFF PAD
REMOVAL.............................3INSTALLATION..........................4
FRAME
SPECIFICATIONS
FRAME DIMENSIONS...................4
SPECIFICATIONS - TORQUE.............9
FRONT CRADLE CROSSMEMBER
DESCRIPTION
DESCRIPTION - FRONT CRADLE
CROSSMEMBER.......................9
DESCRIPTION - FRONT CRADLE
CROSSMEMBER THREAD REPAIR.........9
REMOVAL.............................10
INSTALLATION.........................11
FRONT CROSSMEMBER MOUNT BUSHINGS
REMOVAL.............................12
INSTALLATION.........................12
BUMPERS
SPECIFICATIONS - TORQUE
DESCRIPTION N´m Ft. Lbs. In. Lbs.
Front bumper reinforcement attaching nut 54 40 Ð
Rear bumper reinforcement attaching nut 27 20 Ð
FRONT FASCIA
REMOVAL
(1) Release hood latch and open hood.
(2) Remove the headlamp assemblies (Refer to 8 -
ELECTRICAL/LAMPS/LIGHTING - EXTERIOR/
HEADLAMP - REMOVAL).
(3) Hoist vehicle and support with safety stands.
(4) Remove the five bolts attaching bottom of fas-
cia/air dam to radiator closure panel.
(5) Remove front wheels.
(6) Remove front wheelhouse splash shields fasten-
ers as necessary to gain access to bolts attaching
front fascia to fender. (Refer to 23 - BODY/EXTERI-
OR/ WHEELHOUSE SPLASH SHIELD -
REMOVAL).
(7) Remove the two bolts and two nuts attaching
fascia to the front fenders (Fig. 1).
(8) Disconnect fog lamp wire connectors, if neces-
sary.
(9) Lower vehicle.(10) Remove two bolts attaching the upper grille
support to the headlamp mounting panel at each side
of the grille.
(11) Remove bumper fascia from vehicle.
INSTALLATION
(1) Position front bumper fascia on vehicle.
(2) Install the two bolts attaching fascia to head-
lamp mounting panel at each side of grille.
(3) Hoist vehicle and support with safety stands.
(4) Install the two bolts and two nuts attaching
fascia to the front fenders (Fig. 1). The fascia should
be flush to fender.
(5) Install front wheelhouse splash shields fasten-
ers. (Refer to 23 - BODY/EXTERIOR/ WHEEL-
HOUSE SPLASH SHIELD - INSTALLATION).
(6) Install front wheels.
(7) Connect fog lamp wire connectors, if necessary.
(8) Install the five bolts attaching bottom of fascia
to radiator closure panel.
(9) Lower the vehicle.
RSFRAME & BUMPERS13-1
Page 1596 of 2585
(2) Align routing clip located toward center of sup-
ply hose with hole in bracket on cylinder head cover
and push into place (Fig. 21).
(3) Install supply hose onto reservoir (Fig. 21).
Slide the hose clamp into position on fluid reservoir
and attach it.Be sure hose clamp in installed
past bead on fluid reservoir fitting.
(4) Fill and bleed power steering system using
Power Steering Pump Initial Operation Procedure.
(Refer to 19 - STEERING/PUMP - STANDARD PRO-
CEDURE)
(5) Inspect system for leaks.
RESERVOIR - POWER
STEERING FLUID
DESCRIPTION
DESCRIPTION - 2.4L/3.3L/3.8L ENGINE
All vehicles use a remote mounted power steering
fluid reservoir. The power steering fluid reservoir is
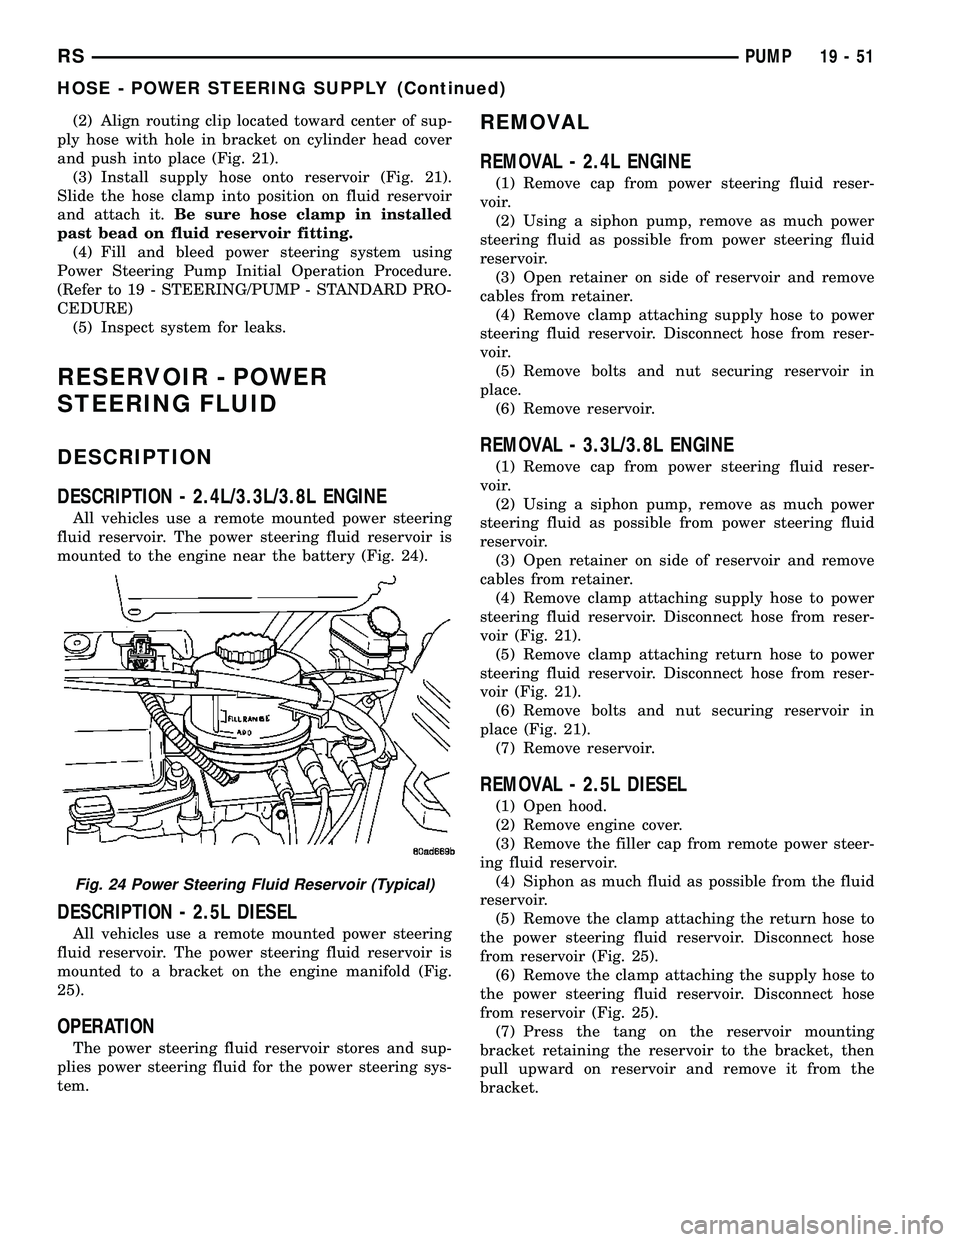
mounted to the engine near the battery (Fig. 24).
DESCRIPTION - 2.5L DIESEL
All vehicles use a remote mounted power steering
fluid reservoir. The power steering fluid reservoir is
mounted to a bracket on the engine manifold (Fig.
25).
OPERATION
The power steering fluid reservoir stores and sup-
plies power steering fluid for the power steering sys-
tem.
REMOVAL
REMOVAL - 2.4L ENGINE
(1) Remove cap from power steering fluid reser-
voir.
(2) Using a siphon pump, remove as much power
steering fluid as possible from power steering fluid
reservoir.
(3) Open retainer on side of reservoir and remove
cables from retainer.
(4) Remove clamp attaching supply hose to power
steering fluid reservoir. Disconnect hose from reser-
voir.
(5) Remove bolts and nut securing reservoir in
place.
(6) Remove reservoir.
REMOVAL - 3.3L/3.8L ENGINE
(1) Remove cap from power steering fluid reser-
voir.
(2) Using a siphon pump, remove as much power
steering fluid as possible from power steering fluid
reservoir.
(3) Open retainer on side of reservoir and remove
cables from retainer.
(4) Remove clamp attaching supply hose to power
steering fluid reservoir. Disconnect hose from reser-
voir (Fig. 21).
(5) Remove clamp attaching return hose to power
steering fluid reservoir. Disconnect hose from reser-
voir (Fig. 21).
(6) Remove bolts and nut securing reservoir in
place (Fig. 21).
(7) Remove reservoir.
REMOVAL - 2.5L DIESEL
(1) Open hood.
(2) Remove engine cover.
(3) Remove the filler cap from remote power steer-
ing fluid reservoir.
(4) Siphon as much fluid as possible from the fluid
reservoir.
(5) Remove the clamp attaching the return hose to
the power steering fluid reservoir. Disconnect hose
from reservoir (Fig. 25).
(6) Remove the clamp attaching the supply hose to
the power steering fluid reservoir. Disconnect hose
from reservoir (Fig. 25).
(7) Press the tang on the reservoir mounting
bracket retaining the reservoir to the bracket, then
pull upward on reservoir and remove it from the
bracket.
Fig. 24 Power Steering Fluid Reservoir (Typical)
RSPUMP19-51
HOSE - POWER STEERING SUPPLY (Continued)
Page 2123 of 2585
DESCRIPTION N´m Ft. Lbs. In. Lbs.
Lifgate stabilizer wedge striker to D-pillar bolts 3 Ð 30
Luggage rack crossbar fasteners 4 Ð 35
Lumbar support handle screw 1 Ð 9
Pivot bolt to the body half of hood hinge 28 21 Ð
Prop assembly to lifgate bolts 28 21 Ð
Rear door glass to regulator bolt 11 8 Ð
Rear door hinge to B-pillar bolt 28 20 Ð
Rear door hinge to door bolt 28 20 Ð
Rear door latch striker 28 20 Ð
Rear latch to sliding door end frame 28 20 Ð
Rear seat back to seat cushion bolt 27 19 Ð
Recliner to seat back frame 12 9 Ð
Seatback frame upper rail 8 Ð 71
Seatback hinge bolt 48 35 Ð
Seatback hinge cover screws 2.3 Ð 20
Shoulder belt turning loop onto height adjuster 39 29 Ð
Side view mirror bolts 10 Ð 85
Sliding door center hinge adjusting bolt 15 Ð 130
Sliding door glass nuts 3.4 Ð 30
Sliding door latch striker 28 21 Ð
Sliding door to roller arm bracket 12 9 Ð
Storage bin track guide to seat riser 3.5 Ð 31
Sunroof opening panel to lifter arm screws 5 44
Sunroof opening panel motor screws 4 35
Sunroof trough bracket to roof bolts 6 53
Sunroof trough to trough bracket bolts 6 53
Sunroof trough bracket bolts 6 53
Support cylinders to liftgate 28 21 Ð
BODY LUBRICATION
LUBRICATION REQUIREMENTS
Body mechanisms and linkages should be
inspected, cleaned, and lubricated, as required, to
maintain ease of operation and to provide protection
against rust and wear. When performing other under
hood services, the hood latch release mechanism and
safety catch should be inspected, cleaned, and lubri-
cated. During the winter season, external door lock
cylinders should be lubricated to assure proper oper-
ation when exposed to water and ice.
Prior to the application of any lubricant, the parts
concerned should be wiped clean to remove dust and
grit. If necessary, a suitable solvent can be used to
clean the item to be lubricated. After lubricating acomponent, any excess oil or grease should be
removed.LUBRICANT APPLICATION
DOOR LOCK CYLINDERS
(1) Apply a small amount of lubricant directly into
the lock cylinder.
(2) Apply a small amount of lubricant to the key.
(3) Insert key into lock cylinder and cycle the
mechanism from the locked to the unlocked position.
NOTE: Do not add more lubricant.
(4) Cycle the lock cylinder mechanism several
times to allow the lubricant to flow throughout the
cylinder.
23 - 12 BODYRS
BODY (Continued)
Page 2161 of 2585
COWL GRILLE
REMOVAL
(1) Remove wiper arms. (Refer to 8 - ELECTRI-
CAL/WIPERS/WASHERS/WIPER ARMS -
REMOVAL)
(2) Remove four (4) screws securing cowl cover to
wiper module (Fig. 6).
(3) Disengage quarter turn fasteners at outboard
ends of cowl grill from body.
(4) Release hood latch and open hood.
CAUTION: To prevent hood scratching of cowl grille
before removal, cover outboard exterior ends of
cowl grille with masking tape or equivalent method.
NOTE: Do not over bend cowl grille during removal.
Bend cowl grille just enough to clear top of wiper
pivot shaft and bottom rear corner of hood.
(5) Remove cowl grill by raising above driver side
wiper pivot shaft and swinging away towards engine
compartment. The cowl grille will need to be bent onoutboard end to clear simultaneously top of wiper
pivot shaft and bottom corner of hood.
(6) Close hood. Do not latch. Remove outboard
screws. (Fig. 7).
(7) Disconnect washer hose in line connector.
(8) Disconnect washer hose and grommet from
hole in wiper module and pull out.
(9) Remove cowl grille by raising over opposite
wiper pivot shaft and removing away from vehicle.
(10) Remove cowl cover from vehicle.
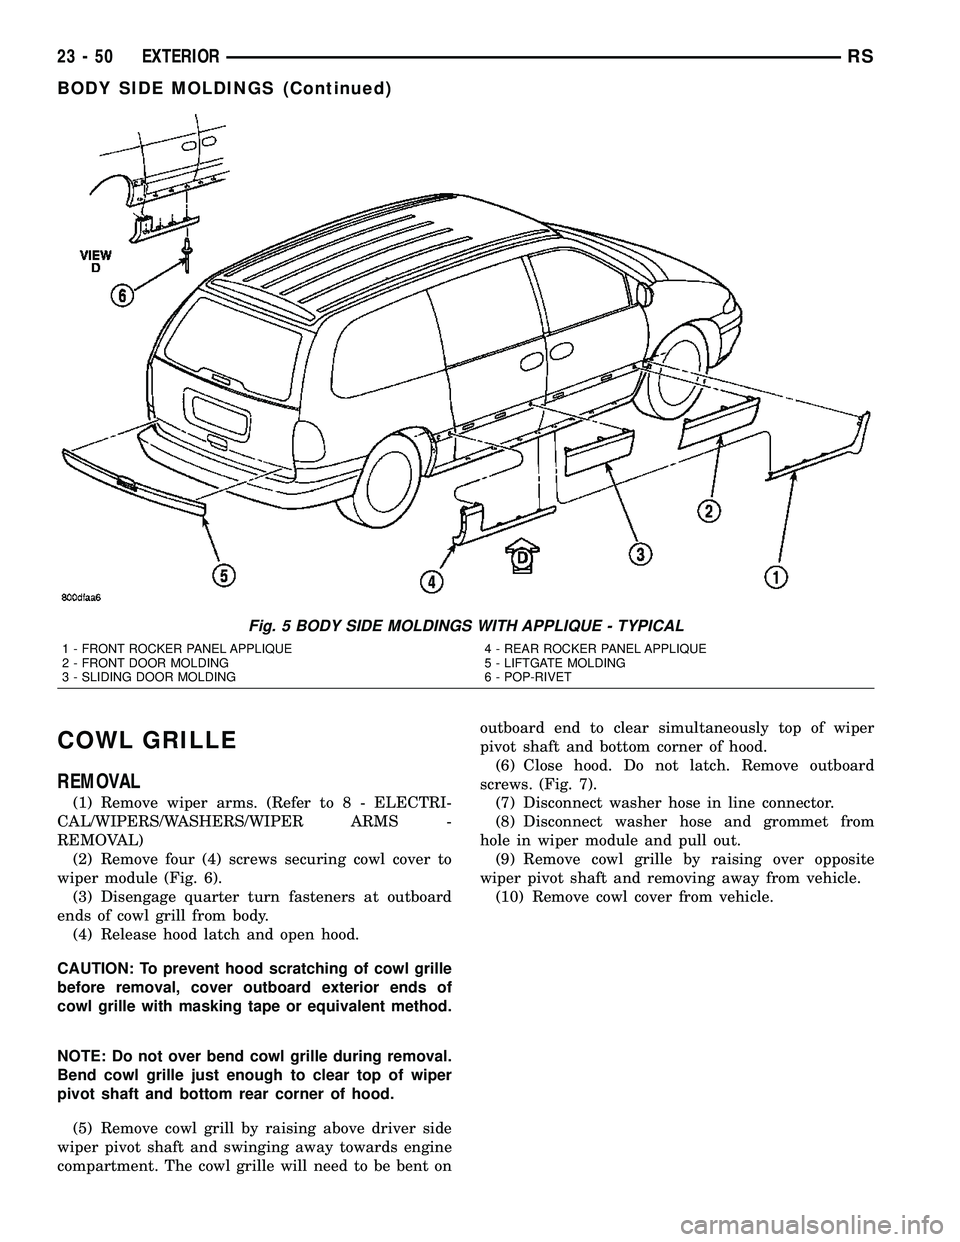
Fig. 5 BODY SIDE MOLDINGS WITH APPLIQUE - TYPICAL
1 - FRONT ROCKER PANEL APPLIQUE
2 - FRONT DOOR MOLDING
3 - SLIDING DOOR MOLDING4 - REAR ROCKER PANEL APPLIQUE
5 - LIFTGATE MOLDING
6 - POP-RIVET
23 - 50 EXTERIORRS
BODY SIDE MOLDINGS (Continued)
Page 2165 of 2585
(7) Remove fuel filler housing and lockout link
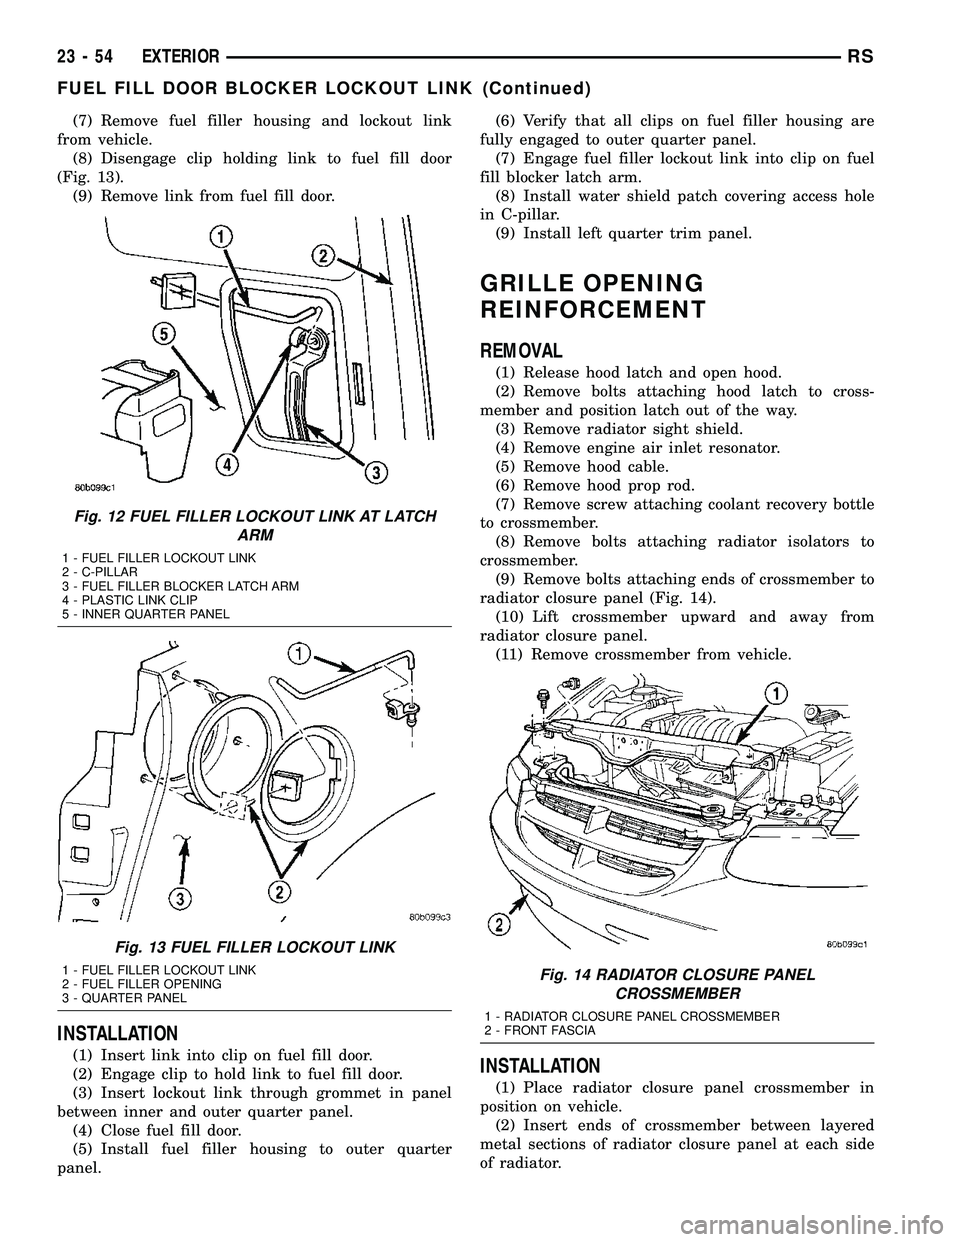
from vehicle.
(8) Disengage clip holding link to fuel fill door
(Fig. 13).
(9) Remove link from fuel fill door.
INSTALLATION
(1) Insert link into clip on fuel fill door.
(2) Engage clip to hold link to fuel fill door.
(3) Insert lockout link through grommet in panel
between inner and outer quarter panel.
(4) Close fuel fill door.
(5) Install fuel filler housing to outer quarter
panel.(6) Verify that all clips on fuel filler housing are
fully engaged to outer quarter panel.
(7) Engage fuel filler lockout link into clip on fuel
fill blocker latch arm.
(8) Install water shield patch covering access hole
in C-pillar.
(9) Install left quarter trim panel.
GRILLE OPENING
REINFORCEMENT
REMOVAL
(1) Release hood latch and open hood.
(2) Remove bolts attaching hood latch to cross-
member and position latch out of the way.
(3) Remove radiator sight shield.
(4) Remove engine air inlet resonator.
(5) Remove hood cable.
(6) Remove hood prop rod.
(7) Remove screw attaching coolant recovery bottle
to crossmember.
(8) Remove bolts attaching radiator isolators to
crossmember.
(9) Remove bolts attaching ends of crossmember to
radiator closure panel (Fig. 14).
(10) Lift crossmember upward and away from
radiator closure panel.
(11) Remove crossmember from vehicle.
INSTALLATION
(1) Place radiator closure panel crossmember in
position on vehicle.
(2) Insert ends of crossmember between layered
metal sections of radiator closure panel at each side
of radiator.
Fig. 12 FUEL FILLER LOCKOUT LINK AT LATCH
ARM
1 - FUEL FILLER LOCKOUT LINK
2 - C-PILLAR
3 - FUEL FILLER BLOCKER LATCH ARM
4 - PLASTIC LINK CLIP
5 - INNER QUARTER PANEL
Fig. 13 FUEL FILLER LOCKOUT LINK
1 - FUEL FILLER LOCKOUT LINK
2 - FUEL FILLER OPENING
3 - QUARTER PANELFig. 14 RADIATOR CLOSURE PANEL
CROSSMEMBER
1 - RADIATOR CLOSURE PANEL CROSSMEMBER
2 - FRONT FASCIA
23 - 54 EXTERIORRS
FUEL FILL DOOR BLOCKER LOCKOUT LINK (Continued)