2004 CHRYSLER VOYAGER brakes
[x] Cancel search: brakesPage 1966 of 2585
(5) Remove the suction line from the dipstick tube.
(6) Pour four quarts of MopartATF+4 through the
dipstick opening. (7) Start engine and allow to idle for at least one
minute. Then, with parking and service brakes
applied, move selector lever momentarily to each
position, ending in the park or neutral position. (8) Check the transaxle fluid level and add an
appropriate amount to bring the transaxle fluid level
to 3mm (1/8 in.) below the lowest mark on the dip-
stick (Fig. 190). (9) Recheck the fluid level after the transaxle has
reached normal operating temperature (180ÉF.).
(Refer to 21 - TRANSMISSION/TRANSAXLE/AUTO-
MATIC - 41TE/FLUID - STANDARD PROCEDURE) (10) To prevent dirt from entering transaxle, make
certain that dipstick is fully seated into the dipstick
opening.
GEAR SHIFT CABLE
REMOVAL
(1) Disconnect battery cables.
(2) Remove battery shield.
(3) Remove battery.
(4) Remove speed control servo and position out of
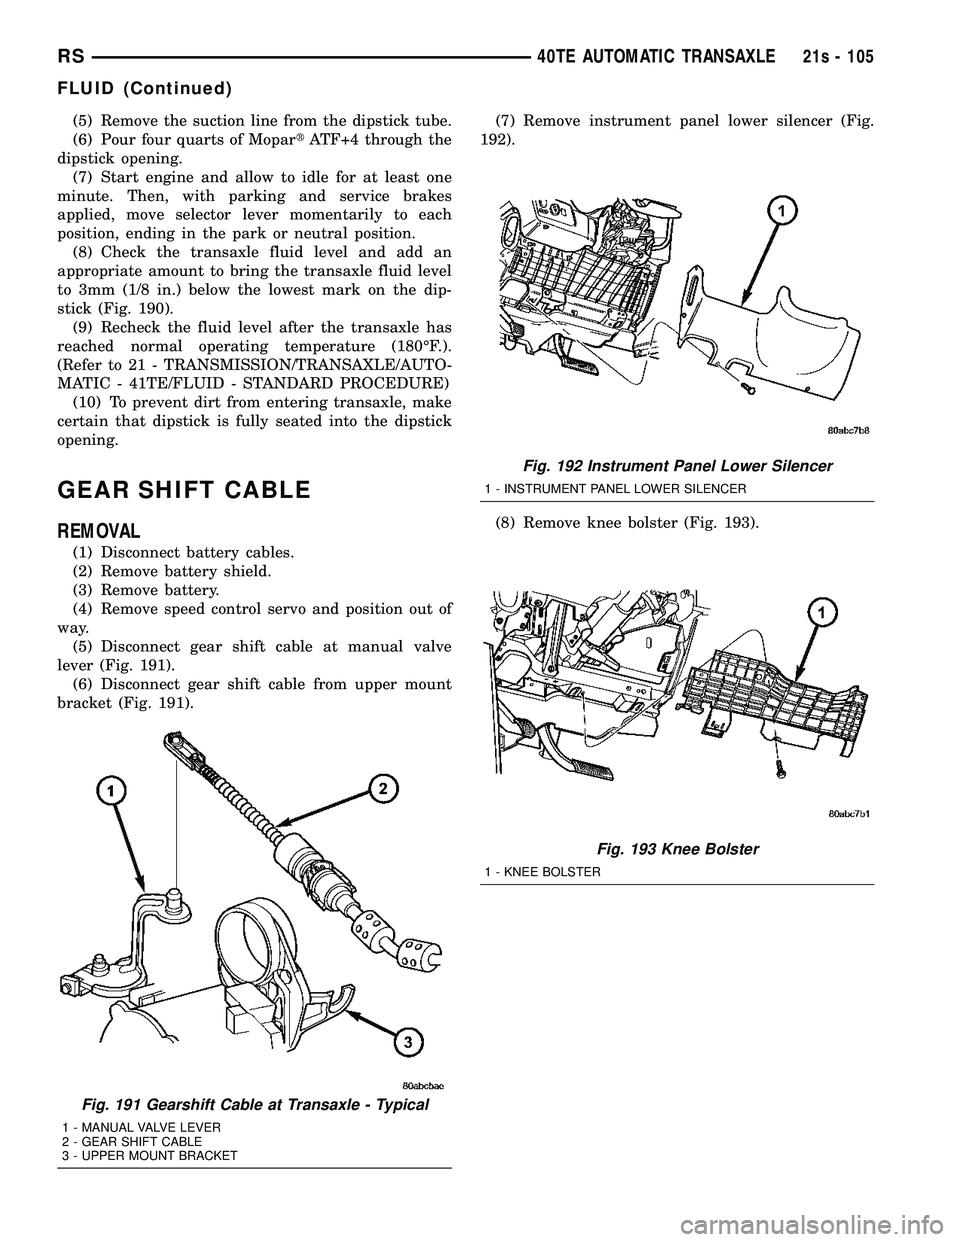
way. (5) Disconnect gear shift cable at manual valve
lever (Fig. 191). (6) Disconnect gear shift cable from upper mount
bracket (Fig. 191). (7) Remove instrument panel lower silencer (Fig.
192).
(8) Remove knee bolster (Fig. 193).
Fig. 191 Gearshift Cable at Transaxle - Typical
1 - MANUAL VALVE LEVER
2 - GEAR SHIFT CABLE
3 - UPPER MOUNT BRACKET
Fig. 192 Instrument Panel Lower Silencer
1 - INSTRUMENT PANEL LOWER SILENCER
Fig. 193 Knee Bolster
1 - KNEE BOLSTER
RS 40TE AUTOMATIC TRANSAXLE21s - 105
FLUID (Continued)
Page 2081 of 2585
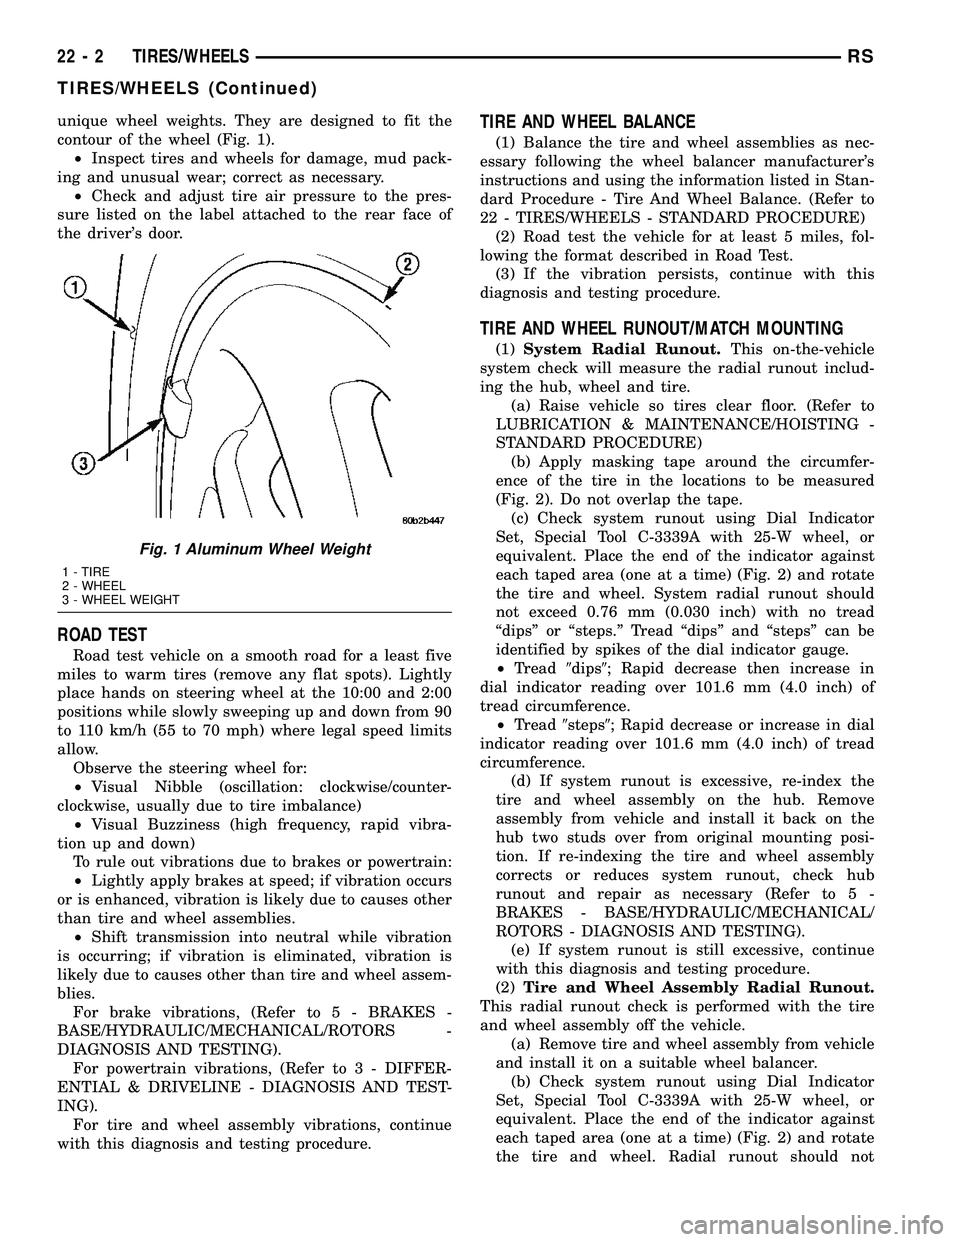
unique wheel weights. They are designed to fit the
contour of the wheel (Fig. 1).
²Inspect tires and wheels for damage, mud pack-
ing and unusual wear; correct as necessary.
²Check and adjust tire air pressure to the pres-
sure listed on the label attached to the rear face of
the driver's door.
ROAD TEST
Road test vehicle on a smooth road for a least five
miles to warm tires (remove any flat spots). Lightly
place hands on steering wheel at the 10:00 and 2:00
positions while slowly sweeping up and down from 90
to 110 km/h (55 to 70 mph) where legal speed limits
allow.
Observe the steering wheel for:
²Visual Nibble (oscillation: clockwise/counter-
clockwise, usually due to tire imbalance)
²Visual Buzziness (high frequency, rapid vibra-
tion up and down)
To rule out vibrations due to brakes or powertrain:
²Lightly apply brakes at speed; if vibration occurs
or is enhanced, vibration is likely due to causes other
than tire and wheel assemblies.
²Shift transmission into neutral while vibration
is occurring; if vibration is eliminated, vibration is
likely due to causes other than tire and wheel assem-
blies.
For brake vibrations, (Refer to 5 - BRAKES -
BASE/HYDRAULIC/MECHANICAL/ROTORS -
DIAGNOSIS AND TESTING).
For powertrain vibrations, (Refer to 3 - DIFFER-
ENTIAL & DRIVELINE - DIAGNOSIS AND TEST-
ING).
For tire and wheel assembly vibrations, continue
with this diagnosis and testing procedure.
TIRE AND WHEEL BALANCE
(1) Balance the tire and wheel assemblies as nec-
essary following the wheel balancer manufacturer's
instructions and using the information listed in Stan-
dard Procedure - Tire And Wheel Balance. (Refer to
22 - TIRES/WHEELS - STANDARD PROCEDURE)
(2) Road test the vehicle for at least 5 miles, fol-
lowing the format described in Road Test.
(3) If the vibration persists, continue with this
diagnosis and testing procedure.
TIRE AND WHEEL RUNOUT/MATCH MOUNTING
(1)System Radial Runout.This on-the-vehicle
system check will measure the radial runout includ-
ing the hub, wheel and tire.
(a) Raise vehicle so tires clear floor. (Refer to
LUBRICATION & MAINTENANCE/HOISTING -
STANDARD PROCEDURE)
(b) Apply masking tape around the circumfer-
ence of the tire in the locations to be measured
(Fig. 2). Do not overlap the tape.
(c) Check system runout using Dial Indicator
Set, Special Tool C-3339A with 25-W wheel, or
equivalent. Place the end of the indicator against
each taped area (one at a time) (Fig. 2) and rotate
the tire and wheel. System radial runout should
not exceed 0.76 mm (0.030 inch) with no tread
ªdipsº or ªsteps.º Tread ªdipsº and ªstepsº can be
identified by spikes of the dial indicator gauge.
²Tread9dips9; Rapid decrease then increase in
dial indicator reading over 101.6 mm (4.0 inch) of
tread circumference.
²Tread9steps9; Rapid decrease or increase in dial
indicator reading over 101.6 mm (4.0 inch) of tread
circumference.
(d) If system runout is excessive, re-index the
tire and wheel assembly on the hub. Remove
assembly from vehicle and install it back on the
hub two studs over from original mounting posi-
tion. If re-indexing the tire and wheel assembly
corrects or reduces system runout, check hub
runout and repair as necessary (Refer to 5 -
BRAKES - BASE/HYDRAULIC/MECHANICAL/
ROTORS - DIAGNOSIS AND TESTING).
(e) If system runout is still excessive, continue
with this diagnosis and testing procedure.
(2)Tire and Wheel Assembly Radial Runout.
This radial runout check is performed with the tire
and wheel assembly off the vehicle.
(a) Remove tire and wheel assembly from vehicle
and install it on a suitable wheel balancer.
(b) Check system runout using Dial Indicator
Set, Special Tool C-3339A with 25-W wheel, or
equivalent. Place the end of the indicator against
each taped area (one at a time) (Fig. 2) and rotate
the tire and wheel. Radial runout should not
Fig. 1 Aluminum Wheel Weight
1 - TIRE
2 - WHEEL
3 - WHEEL WEIGHT
22 - 2 TIRES/WHEELSRS
TIRES/WHEELS (Continued)
Page 2092 of 2585
TIRES
DESCRIPTION
DESCRIPTION - TIRE
Tires are designed and engineered for each specific
vehicle. They provide the best overall performance
for normal operation. The ride and handling charac-
teristics match the vehicle's requirements. With
proper care they will give excellent reliability, trac-
tion, skid resistance, and tread life.
Driving habits have more effect on tire life than
any other factor. Careful drivers will obtain, in most
cases, much greater mileage than severe use or care-
less drivers. A few of the driving habits which will
shorten the life of any tire are:
²Rapid acceleration
²Severe application of brakes
²High-speed driving
²Taking turns at excessive speeds
²Striking curbs and other obstacles
²Operating vehicle with over or under inflated
tire pressures
Radial ply tires are more prone to irregular tread
wear. It is important to follow the tire rotation inter-
val shown in the section on Tire Rotation. This will
help to achieve a greater tread-life potential.
TIRE IDENTIFICATION
Tire type, size, load index and speed rating are
encoded in the letters and numbers imprinted on the
side wall of the tire. Refer to the Tire Identification
chart to decipher the code. For example purposes, the
tire size P225/60 R 16 97 T is used in the chart. An
All Season type tire will also have eitherM+S,M&
SorM-S(indicating mud and snow traction)
imprinted on the side wall. An Extra or Light Load
marking ªXLº or ªLLº may also be listed on the side-
wall. The absence of an ªXLº or ªLLº marking infers
a standard load tire.
TIRE IDENTIFICATION
PTIRE TYPE (Not
present on all tires)P - Passenger
T - Temporary
C - Commercial
LT - Light Truck
225SECTIONAL WIDTHSHOWN IN
MILLIMETERS
60ASPECT RATIOSECTIONAL HEIGHT
÷ SECTIONAL WIDTH
(Refer to Aspect Ratio
Figure 22 )
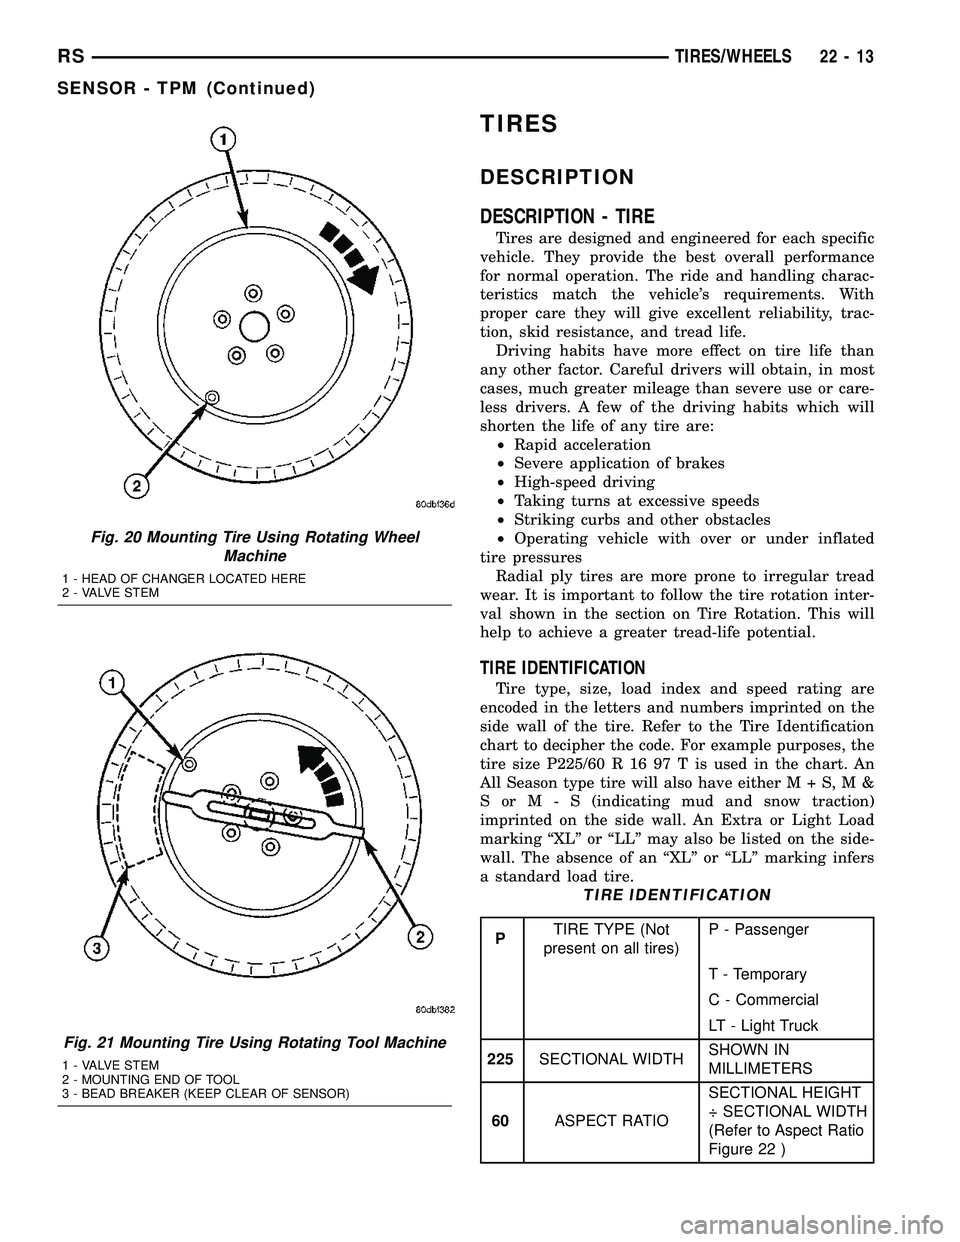
Fig. 20 Mounting Tire Using Rotating Wheel
Machine
1 - HEAD OF CHANGER LOCATED HERE
2 - VALVE STEM
Fig. 21 Mounting Tire Using Rotating Tool Machine
1 - VALVE STEM
2 - MOUNTING END OF TOOL
3 - BEAD BREAKER (KEEP CLEAR OF SENSOR)
RSTIRES/WHEELS22-13
SENSOR - TPM (Continued)
Page 2100 of 2585
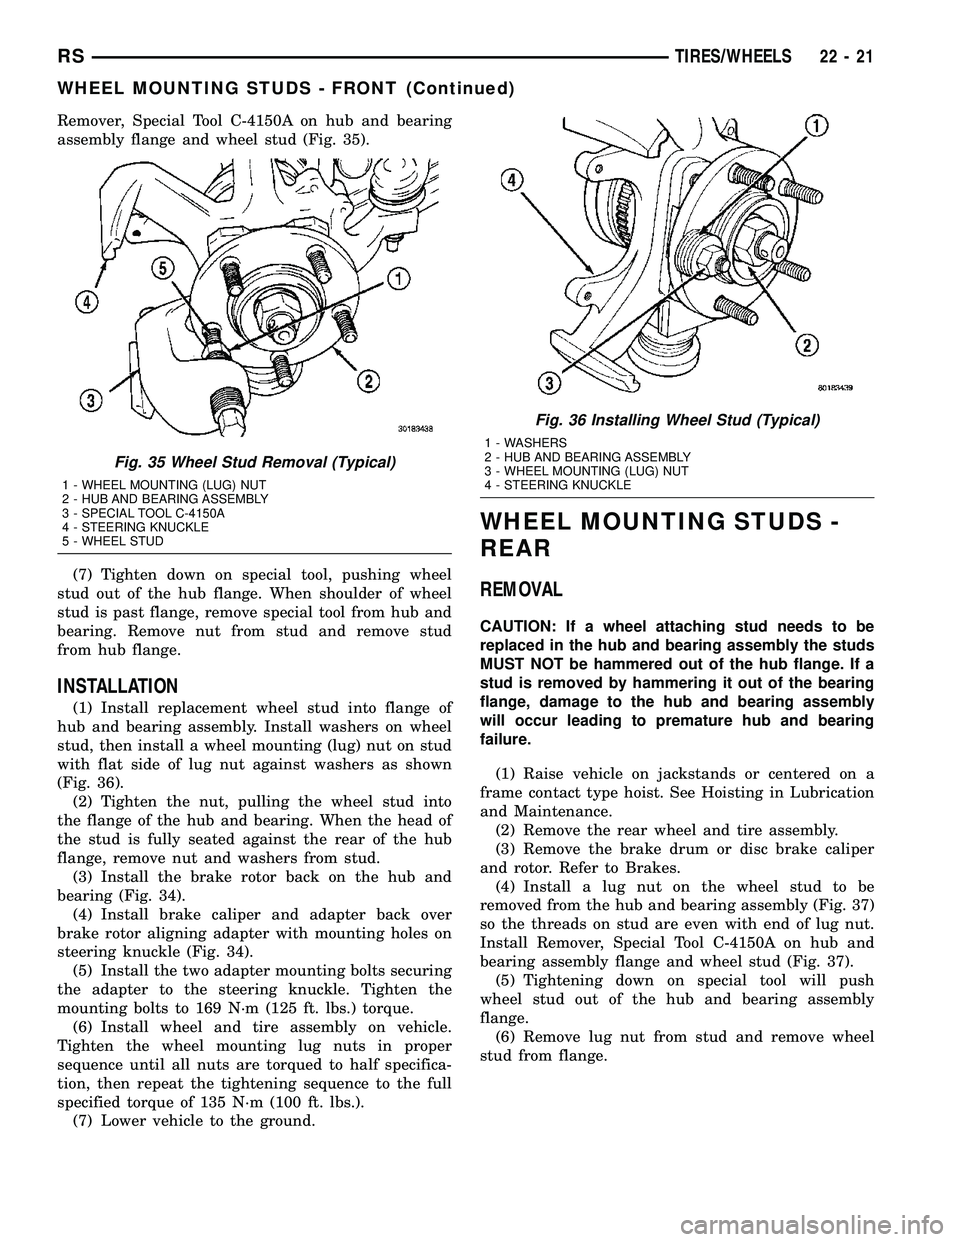
Remover, Special Tool C-4150A on hub and bearing
assembly flange and wheel stud (Fig. 35).
(7) Tighten down on special tool, pushing wheel
stud out of the hub flange. When shoulder of wheel
stud is past flange, remove special tool from hub and
bearing. Remove nut from stud and remove stud
from hub flange.
INSTALLATION
(1) Install replacement wheel stud into flange of
hub and bearing assembly. Install washers on wheel
stud, then install a wheel mounting (lug) nut on stud
with flat side of lug nut against washers as shown
(Fig. 36).
(2) Tighten the nut, pulling the wheel stud into
the flange of the hub and bearing. When the head of
the stud is fully seated against the rear of the hub
flange, remove nut and washers from stud.
(3) Install the brake rotor back on the hub and
bearing (Fig. 34).
(4) Install brake caliper and adapter back over
brake rotor aligning adapter with mounting holes on
steering knuckle (Fig. 34).
(5) Install the two adapter mounting bolts securing
the adapter to the steering knuckle. Tighten the
mounting bolts to 169 N´m (125 ft. lbs.) torque.
(6) Install wheel and tire assembly on vehicle.
Tighten the wheel mounting lug nuts in proper
sequence until all nuts are torqued to half specifica-
tion, then repeat the tightening sequence to the full
specified torque of 135 N´m (100 ft. lbs.).
(7) Lower vehicle to the ground.
WHEEL MOUNTING STUDS -
REAR
REMOVAL
CAUTION: If a wheel attaching stud needs to be
replaced in the hub and bearing assembly the studs
MUST NOT be hammered out of the hub flange. If a
stud is removed by hammering it out of the bearing
flange, damage to the hub and bearing assembly
will occur leading to premature hub and bearing
failure.
(1) Raise vehicle on jackstands or centered on a
frame contact type hoist. See Hoisting in Lubrication
and Maintenance.
(2) Remove the rear wheel and tire assembly.
(3) Remove the brake drum or disc brake caliper
and rotor. Refer to Brakes.
(4) Install a lug nut on the wheel stud to be
removed from the hub and bearing assembly (Fig. 37)
so the threads on stud are even with end of lug nut.
Install Remover, Special Tool C-4150A on hub and
bearing assembly flange and wheel stud (Fig. 37).
(5) Tightening down on special tool will push
wheel stud out of the hub and bearing assembly
flange.
(6) Remove lug nut from stud and remove wheel
stud from flange.
Fig. 35 Wheel Stud Removal (Typical)
1 - WHEEL MOUNTING (LUG) NUT
2 - HUB AND BEARING ASSEMBLY
3 - SPECIAL TOOL C-4150A
4 - STEERING KNUCKLE
5 - WHEEL STUD
Fig. 36 Installing Wheel Stud (Typical)
1 - WASHERS
2 - HUB AND BEARING ASSEMBLY
3 - WHEEL MOUNTING (LUG) NUT
4 - STEERING KNUCKLE
RSTIRES/WHEELS22-21
WHEEL MOUNTING STUDS - FRONT (Continued)
Page 2106 of 2585
TIRES
TABLE OF CONTENTS
page page
TIRES DESCRIPTION DESCRIPTION - TIRE ...................5
DESCRIPTION - RADIAL-PLY TIRES ........6
DESCRIPTION - REPLACEMENT TIRES .....6
DESCRIPTION - SPARE TIRE (TEMPORARY) ........................6
DIAGNOSIS AND TESTING DIAGNOSIS AND TESTING - TIRE NOISE ....6
DIAGNOSIS AND TESTING - TIRE/VEHICLE LEAD ................................6
DIAGNOSIS AND TESTING - TIRE WEAR PATTERNS ...........................8 DIAGNOSIS AND TESTING - TREAD WEAR
INDICATORS ..........................8
STANDARD PROCEDURE STANDARD PROCEDURE - TIRE INFLATIONPRESSURES ..........................8
STANDARD PROCEDURE - TIRE PRESSURE FOR HIGH SPEED
OPERATION ..........................9
STANDARD PROCEDURE - TIRE LEAK REPAIRING ...........................9
CLEANING - TIRES .....................10
TIRES
DESCRIPTION
DESCRIPTION - TIRE
Tires are designed and engineered for each specific
vehicle. They provide the best overall performance
for normal operation. The ride and handling charac-
teristics match the vehicle's requirements. With
proper care they will give excellent reliability, trac-
tion, skid resistance, and tread life. Driving habits have more effect on tire life than
any other factor. Careful drivers will obtain, in most
cases, much greater mileage than severe use or care-
less drivers. A few of the driving habits which will
shorten the life of any tire are: ² Rapid acceleration
² Severe application of brakes
² High-speed driving
² Taking turns at excessive speeds
² Striking curbs and other obstacles
² Operating vehicle with over or under inflated
tire pressures Radial ply tires are more prone to irregular tread
wear. It is important to follow the tire rotation inter-
val shown in the section on Tire Rotation. This will
help to achieve a greater tread-life potential.
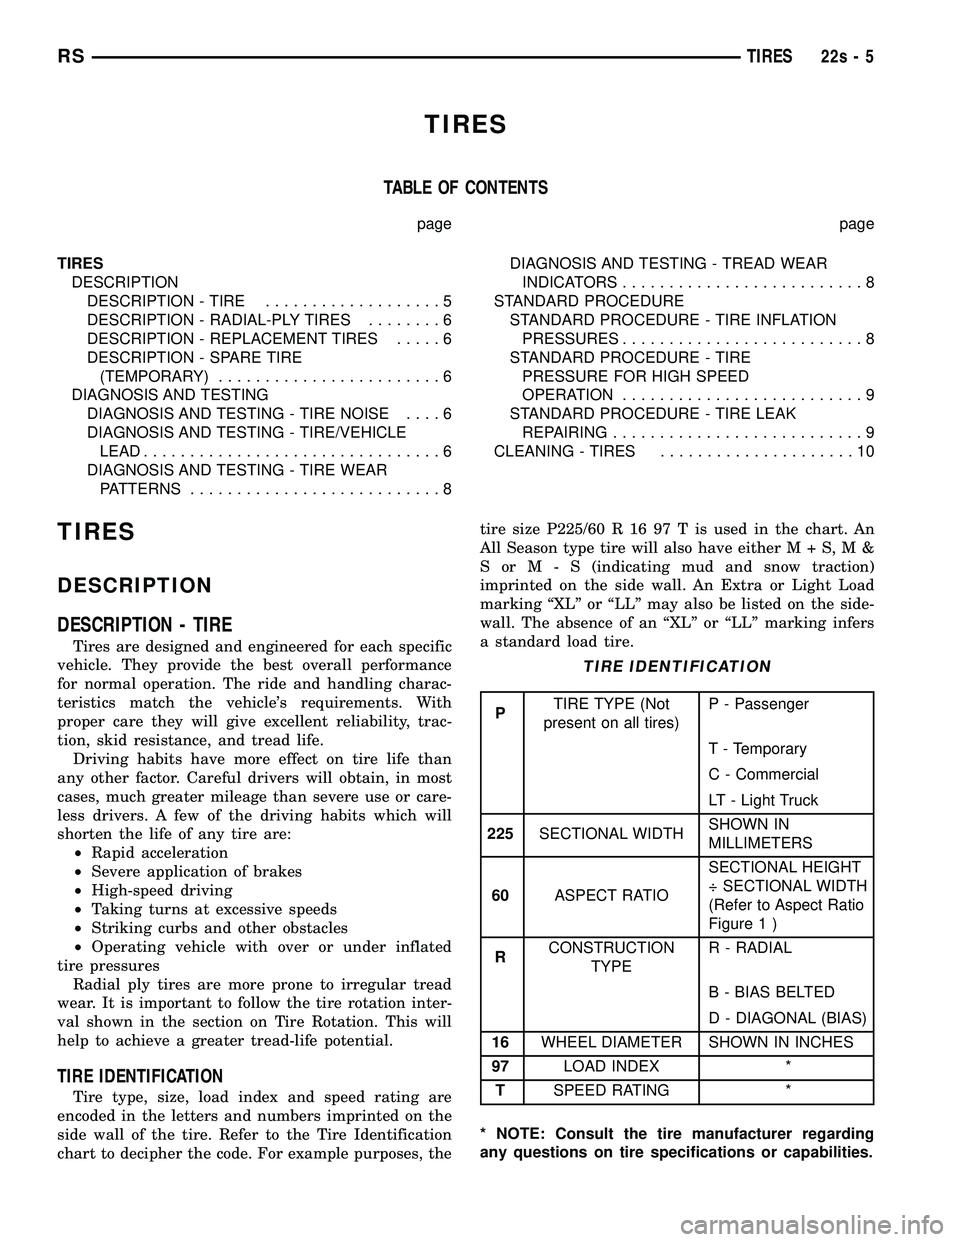
TIRE IDENTIFICATION
Tire type, size, load index and speed rating are
encoded in the letters and numbers imprinted on the
side wall of the tire. Refer to the Tire Identification
chart to decipher the code. For example purposes, the tire size P225/60 R 16 97 T is used in the chart. An
All Season type tire will also have eithe
rM+S,M&
SorM-S (indicating mud and snow traction)
imprinted on the side wall. An Extra or Light Load
marking ªXLº or ªLLº may also be listed on the side-
wall. The absence of an ªXLº or ªLLº marking infers
a standard load tire.
TIRE IDENTIFICATION
P TIRE TYPE (Not
present on all tires) P - Passenger
T - Temporary
C - Commercial
LT - Light Truck
225 SECTIONAL WIDTH SHOWN IN
MILLIMETERS
60 ASPECT RATIO SECTIONAL HEIGHT
÷ SECTIONAL WIDTH
(Refer to Aspect Ratio
Figure 1 )
R CONSTRUCTION
TYPE R - RADIAL
B - BIAS BELTED
D - DIAGONAL (BIAS)
16 WHEEL DIAMETER SHOWN IN INCHES
97 LOAD INDEX *
T SPEED RATING *
* NOTE: Consult the tire manufacturer regarding
any questions on tire specifications or capabilities.
RS TIRES22s-5
Page 2479 of 2585
(9) Remove the heater core tubes and sealing plate
as a unit from beneath the instrument panel.
(10) Use absorbent toweling to clean up any
engine coolant spills from the preceding operation.
REMOVAL - HEATER CORE
WARNING: ON VEHICLES EQUIPPED WITH AIR-
BAGS, DISABLE THE AIRBAG SYSTEM BEFORE
ATTEMPTING ANY STEERING WHEEL, STEERING
COLUMN, OR INSTRUMENT PANEL COMPONENT
DIAGNOSIS OR SERVICE. DISCONNECT AND ISO-
LATE THE BATTERY NEGATIVE (GROUND) CABLE,
THEN WAIT TWO MINUTES FOR THE AIRBAG SYS-
TEM CAPACITOR TO DISCHARGE BEFORE PER-
FORMING FURTHER DIAGNOSIS OR SERVICE. THIS
IS THE ONLY SURE WAY TO DISABLE THE AIRBAG
SYSTEM. FAILURE TO TAKE THE PROPER PRE-
CAUTIONS COULD RESULT IN ACCIDENTAL AIR-
BAG DEPLOYMENT AND POSSIBLE PERSONAL
INJURY.
(1) Remove the silencer boot fasteners located
around the base of the lower steering shaft from the
dash panel so that it may be pushed aside.
(2) Remove the brake lamp switch from its mount-
ing bracket (Refer to 8 - ELECTRICAL/LAMPS/
LIGHTING - EXTERIOR/BRAKE LAMP SWITCH -
REMOVAL).
(3) Disconnect the power brake booster input rod
(push rod) from the pin on the brake pedal arm
(Refer to 5 - BRAKES - ABS/HYDRAULIC/ME-CHANICAL/POWER BRAKE BOOSTER -
REMOVAL).
(4) Remove the heater core tubes (Refer to 24 -
HEATING & AIR CONDITIONING/PLUMBING/
HEATER CORE - REMOVAL).
(5) Remove the two screws that secure the heater
core mounting plate to the distribution housing.
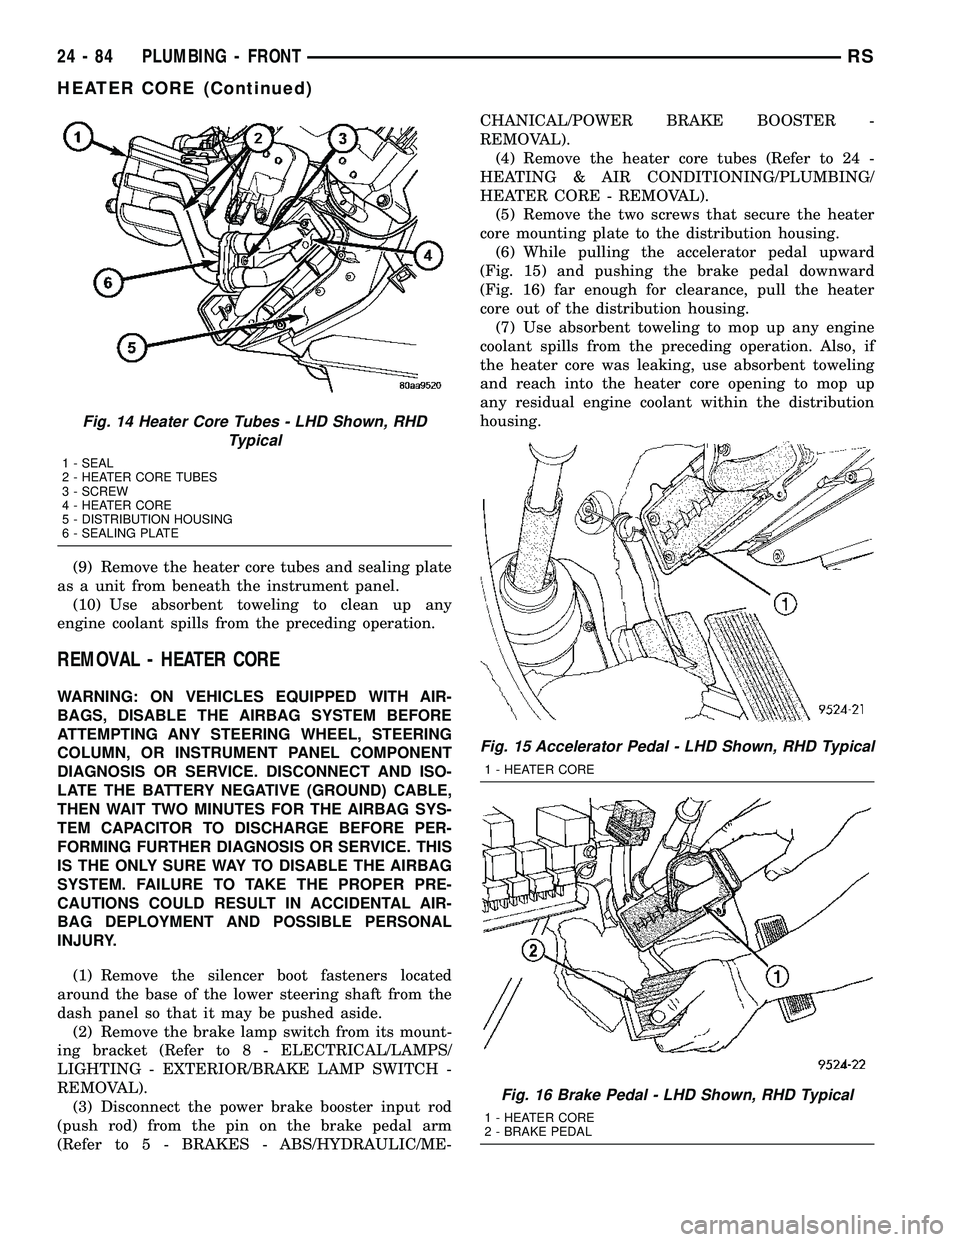
(6) While pulling the accelerator pedal upward
(Fig. 15) and pushing the brake pedal downward
(Fig. 16) far enough for clearance, pull the heater
core out of the distribution housing.
(7) Use absorbent toweling to mop up any engine
coolant spills from the preceding operation. Also, if
the heater core was leaking, use absorbent toweling
and reach into the heater core opening to mop up
any residual engine coolant within the distribution
housing.
Fig. 14 Heater Core Tubes - LHD Shown, RHD
Typical
1 - SEAL
2 - HEATER CORE TUBES
3 - SCREW
4 - HEATER CORE
5 - DISTRIBUTION HOUSING
6 - SEALING PLATE
Fig. 15 Accelerator Pedal - LHD Shown, RHD Typical
1 - HEATER CORE
Fig. 16 Brake Pedal - LHD Shown, RHD Typical
1 - HEATER CORE
2 - BRAKE PEDAL
24 - 84 PLUMBING - FRONTRS
HEATER CORE (Continued)
Page 2480 of 2585
INSTALLATION
INSTALLATION - HEATER CORE TUBES
(1) Remove the plugs or tape from both heater core
tube fittings and both heater core ports.
(2) Position the heater core tubes and sealing plate
as a unit beneath the instrument panel.
(3) Align the engine compartment ends of both
heater core tubes with the openings in the dash
panel seal and push them simultaneously forward
through the seal far enough to engage the heater
core ends of the tubes with the heater core supply
and return ports.
(4) Position both heater core tubes and the sealing
plate simultaneously to the heater core supply and
return ports.
NOTE: The heater core tubes each have a slot that
must be indexed to a location tab within each of the
heater core ports. Adjust the position of the tubes
as required so that the sealing plate fits flush
against the heater core supply and return ports,
which indicates that the tubes are properly indexed.
(5) Index both heater core tubes to the heater core
ports.
(6) Install the screw that secures the heater core
tube sealing plate to the heater core supply and
return ports. Tighten the screw to 3 N´m (27 in. lbs.).
(7) Install the silencer under the driver side end of
the instrument panel.
(8) Connect the heater hoses to the heater hose
tubes (Refer to 24 - HEATING & AIR CONDITION-
ING/PLUMBING/HEATER INLET HOSE - INSTAL-
LATION) and(Refer to 24 - HEATING & AIR
CONDITIONING/PLUMBING/HEATER RETURN
HOSE - INSTALLATION).
(9) Reconnect the battery negative cable.
(10) Refill the engine cooling system (Refer to 7 -
COOLING - STANDARD PROCEDURE - COOLING
SYSTEM REFILL).
INSTALLATION - HEATER CORE
(1) While pushing the brake pedal downward and
pulling the accelerator pedal upward far enough for
clearance, slide the heater core into the distribution
housing.
(2) Install the two screws that secure the heater
core mounting plate to the distribution housing.
Tighten the screws to 2 N´m (17 in. lbs.).
(3) Install the heater core tubes (Refer to 24 -
HEATING & AIR CONDITIONING/PLUMBING/
HEATER CORE - INSTALLATION).
(4) Reconnect the power brake booster input rod
(push rod) to the pin on the brake pedal arm (Referto 5 - BRAKES/HYDRAULIC/MECHANICAL/
POWER BRAKE BOOSTER - INSTALLATION).
(5) Reinstall the brake lamp switch into its mount-
ing bracket (Refer to 8 - ELECTRICAL/LAMPS/
LIGHTING - EXTERIOR/BRAKE LAMP SWITCH -
INSTALLATION).
(6) Reinstall the silencer boot around the base of
the lower steering shaft on the dash panel.
(7) Reconnect the battery negative cable.
(8) Refill the engine cooling system (Refer to 7 -
COOLING - STANDARD PROCEDURE - COOLING
SYSTEM REFILL).
(9) Operate system for two thermostat cycles to
assure the elimination of any air that may be
trapped within the cooling system.
HEATER INLET HOSE
REMOVAL
WARNING: REFER TO THE APPLICABLE WARN-
INGS AND CAUTIONS FOR THIS SYSTEM BEFORE
PERFORMING THE FOLLOWING OPERATION (Refer
to 24 - HEATING & AIR CONDITIONING/PLUMBING -
WARNING).
NOTE: The heater inlet hose is constructed from
formed steel tubing and rubber hoses. Depending
on application, the ends are secured to the heater
core, engine oil cooler or the engine by spring ten-
sion clamps.
(1) Drain the engine cooling system (Refer to 7 -
COOLING - STANDARD PROCEDURE - COOLING
SYSTEM DRAIN).
(2) Using spring tension clamp pliers, compress
and slide the clamps off of each end of the hose being
removed (Fig. 17), (Fig. 18) or (Fig. 19).
CAUTION:
DO NOT apply excessive pressure on heater tubes
or connections when removing heater hoses.
Excessive pressure may damage or deform the
tubes/heater core, causing an engine coolant leak.
(3) Disconnect each hose end by carefully twisting
the hose back and forth on the tube or nipple, while
gently pulling it away from the end of the tube or
nipple.
NOTE:
Replacement of the heater inlet hoses will be
required if the hose ends are cut for removal.
(4) If necessary, carefully cut the hose end and
peel the hose off of the tube or nipple.
RSPLUMBING - FRONT24-85
HEATER CORE (Continued)
Page 2545 of 2585
ALIGNMENT - STANDARD PROCEDURE,
FRONT WIPER ARM...................8R-8
ALIGNMENT - STANDARD PROCEDURE,
HEADLAMP UNIT.....................8L-13
ALIGNMENT - STANDARD PROCEDURE,
WHEEL.............................2-52
ALIGNMENT, SPECIFICATIONS - WHEEL....2-56
ALUMINUM WHEEL CARE - CLEANING . . . 22-18
AMBIENT TEMP SENSOR - DESCRIPTION . 8M-11
AMBIENT TEMP SENSOR - OPERATION . . 8M-11
AMBIENT TEMPERATURE SENSOR -
DIAGNOSIS AND TESTING.............8M-12
AMBIENT TEMPERATURE SENSOR
CIRCUIT - DIAGNOSIS AND TESTING....8M-12
AN AIRBAG DEPLOYMENT - STANDARD
PROCEDURE, SERVICE AFTER...........8O-3
ANCHOR - DESCRIPTION, CHILD
RESTRAINT..........................8O-4
ANCHOR - OPERATION, CHILD
RESTRAINT..........................8O-4
ANTENNA - EXPORT - DESCRIPTION,
QUARTER GLASS INTEGRAL............8A-9
ANTENNA - EXPORT - DIAGNOSIS AND
TESTING, QUARTER GLASS INTEGRAL....8A-9
ANTENNA - EXPORT - OPERATION,
QUARTER GLASS INTEGRAL............8A-9
ANTENNA BODY AND CABLE -
DESCRIPTION........................8A-4
ANTENNA BODY AND CABLE -
DIAGNOSIS AND TESTING..............8A-4
ANTENNA BODY AND CABLE -
INSTALLATION.......................8A-6
ANTENNA BODY AND CABLE -
OPERATION..........................8A-4
ANTENNA BODY AND CABLE - REMOVAL . . 8A-5
ANTENNA CABLE - INSTALLATION,
INSTRUMENT PANEL..................8A-9
ANTENNA CABLE - REMOVAL,
INSTRUMENT PANEL..................8A-8
ANTENNA MODULE - EXPORT -
DESCRIPTION........................8A-6
ANTENNA MODULE - EXPORT -
DIAGNOSIS AND TESTING..............8A-7
ANTENNA MODULE - EXPORT -
INSTALLATION.......................8A-7
ANTENNA MODULE - EXPORT -
OPERATION..........................8A-6
ANTENNA MODULE - EXPORT -
REMOVAL...........................8A-7
ANTILOCK BRAKE - DESCRIPTION,
CONTROLLER........................8E-5
ANTILOCK BRAKE - INSTALLATION,
CONTROLLER........................8E-6
ANTILOCK BRAKE - OPERATION,
CONTROLLER........................8E-5
ANTILOCK BRAKE - REMOVAL,
CONTROLLER........................8E-6
ANTILOCK BRAKE SYSTEM -
DESCRIPTION........................5-75
ANTILOCK BRAKE SYSTEM - OPERATION . . 5-76
ANTILOCK BRAKE SYSTEM BLEEDING -
STANDARD PROCEDURE................5-78
ANTILOCK BRAKE SYSTEM (EXPORT) -
DESCRIPTION........................5-75
A-PILLAR LOWER EXTENSION TRIM -
INSTALLATION.......................23-74
A-PILLAR LOWER EXTENSION TRIM -
REMOVAL..........................23-74
A-PILLAR TRIM - INSTALLATION........23-74
A-PILLAR TRIM - REMOVAL............23-74
A-PILLAR-HEADER, OR B-PILLAR -
INSTALLATION.......................23-17
A-PILLAR-HEADER, OR B-PILLAR -
REMOVAL
..........................23-17
APPLIQUE - INSTALLATION
.............23-14
APPLIQUE - REMOVAL
................23-14
ARM - DESCRIPTION, LOWER CONTROL
. . . 2-12
ARM - INSPECTION, LOWER CONTROL
....2-14
ARM - INSTALLATION, LOWER CONTROL
. . 2-16
ARM - INSTALLATION, REAR WIPER
.....8R-10
ARM - INSTALLATION, TORQUE
..........3-44
ARM - OPERATION, LOWER CONTROL
.....2-12
ARM - REMOVAL, LOWER CONTROL
......2-12
ARM - REMOVAL, REAR WIPER
.........8R-10
ARM - REMOVAL, TORQUE
..............3-44
ARM ALIGNMENT - STANDARD
PROCEDURE, FRONT WIPER
............8R-8ARM (REAR BUSHING - HYDRO) -
ASSEMBLY, LOWER CONTROL...........2-14
ARM (REAR BUSHING - HYDRO) -
DISASSEMBLY, LOWER CONTROL........2-14
ARM (REAR BUSHING - STANDARD) -
ASSEMBLY, LOWER CONTROL...........2-14
ARM (REAR BUSHING - STANDARD) -
DISASSEMBLY, LOWER CONTROL........2-13
ARMREST - INSTALLATION.............23-91
ARMREST - REMOVAL................23-91
ARMS - DESCRIPTION, ROCKER....9-109,9s-26
ARMS - INSPECTION, ROCKER...........9-35
ARMS - INSTALLATION, FRONT WIPER....8R-9
ARMS - INSTALLATION, ROCKER.........9-35
ARMS - OPERATION, ROCKER.....9-109,9s-26
ARMS - REMOVAL, FRONT WIPER........8R-9
ARMS - REMOVAL, ROCKER.............9-34
ARMS AND SHAFT - ASSEMBLY,
ROCKER.......................9-109,9s-27
ARMS AND SHAFT - DISASSEMBLY,
ROCKER.......................9-109,9s-27
ARMS AND SHAFT - INSTALLATION,
ROCKER.......................9-110,9s-28
ARMS AND SHAFT - REMOVAL, ROCKER . 9-109,
9s-27
ASSIST HANDLE - INSTALLATION........23-74
ASSIST HANDLE - REMOVAL...........23-74
ASSIST STRAP - INSTALLATION, FRONT
SEATBACK..........................23-92
ASSIST STRAP - REMOVAL, FRONT
SEATBACK..........................23-92
ATC - OPERATION, THREE ZONE.........24-5
ATTACHED - INSTALLATION, EXTERIOR
NAME PLATES - ADHESIVE.............23-51
ATTACHED - INSTALLATION, EXTERIOR
NAME PLATES - TAPE.................23-51
ATTACHED - REMOVAL, EXTERIOR NAME
PLATES - ADHESIVE..................23-51
ATTACHED - REMOVAL, EXTERIOR NAME
PLATES - TAPE ......................23-51
AUDIO - DIAGNOSIS AND TESTING.......8A-2
AUDIO/VIDEO - DESCRIPTION...........8A-1
AUDIO/VIDEO - OPERATION.............8A-2
AUTO SHUT DOWN RELAY -
DESCRIPTION.........................8I-3
AUTO SHUT DOWN RELAY - OPERATION . . . 8I-3
AUTOMATIC ADJUSTER - DIAGNOSIS
AND TESTING, DRUM BRAKE.......5-13,5s-13
AUTOMATIC ADJUSTER TENSION
RELEASE - STANDARD PROCEDURE,
PARKING BRAKE.................5-58,5s-61
AUTOMATIC ADJUSTER TENSION RESET
- STANDARD PROCEDURE, PARKING
BRAKE.........................5-59,5s-61
AUTOMATIC DAY / NIGHT MIRROR -
DESCRIPTION.......................8N-47
AUTOMATIC DAY / NIGHT MIRROR -
DIAGNOSIS AND TESTING.............8N-47
AUTOMATIC DAY / NIGHT MIRROR -
OPERATION.........................8N-47
AUTOMATIC TEMPERATURE CONTROL
(ATC) - INSTALLATION................24-29
AUTOMATIC TEMPERATURE CONTROL
(ATC) - REMOVAL....................24-28
AUTOMATIC TEMPERATURE CONTROL
SYSTEM - OPERATION
...............24-112
AUTOMATIC THREE ZONE -
DESCRIPTION
........................24-3
AUTOMATIC TRANSAXLE - ASSEMBLY,
41TE
............................21s-184
AUTOMATIC TRANSAXLE -
DESCRIPTION, 40TE
.................21s-25
AUTOMATIC TRANSAXLE -
DESCRIPTION, 41TE
.................21-117
AUTOMATIC TRANSAXLE -
DISASSEMBLY, 41TE
................21s-166
AUTOMATIC TRANSAXLE - OPERATION,
40TE
.............................21s-27
AUTOMATIC TRANSAXLE - OPERATION,
41TE
.............................21-119
AUTOMATIC TRANSAXLE, SPECIAL
TOOLS - 41TE
......................21-183
AUTOMATIC/MANUAL TRANSAXLE FLUID
- DESCRIPTION
........................0-4
AUTOSTICK SWITCH - DESCRIPTION
....21-189
AUTOSTICK SWITCH - OPERATION
......21-189
AWD - INSTALLATION
..................2-45AWD - INSTALLATION, REAR WHEEL
SPEED SENSOR.......................5-80
AWD - INSTALLATION, SPRING..........2-39
AWD - REMOVAL.....................2-45
AWD - REMOVAL, REAR WHEEL SPEED
SENSOR............................5-80
AWD - REMOVAL, SPRING..............2-38
AWD, HEAVY DUTY, CARGO -
INSTALLATION........................2-36
AWD, HEAVY DUTY, CARGO - REMOVAL . . . 2-36
AWD POWER TRANSFER UNIT FLUID -
DESCRIPTION.........................0-6
AWD REAR DRIVELINE MODULE FLUIDS
- DESCRIPTION........................0-6
AXLE SEALS - INSTALLATION...........21-61
AXLE SEALS - REMOVAL..............21-61
B OR C-PILLAR - INSTALLATION, SEAT
BELT HEIGHT ADJUSTER..............8O-13
B OR C-PILLAR - REMOVAL, SEAT BELT
HEIGHT ADJUSTER...................8O-13
BACK - INSTALLATION, BENCH SEAT....23-103
BACK - INSTALLATION, FRONT SEAT.....23-92
BACK - QUAD BUCKET - INSTALLATION,
BUCKET SEAT.......................23-99
BACK - QUAD BUCKET - REMOVAL,
BUCKET SEAT.......................23-98
BACK - REMOVAL, BENCH SEAT........23-103
BACK - REMOVAL, FRONT SEAT.........23-92
BACK COVER - INSTALLATION, BENCH
SEAT .............................23-103
BACK COVER - REMOVAL, BENCH SEAT . . 23-103
BACK HINGE - REMOVAL, BENCH SEAT . . 23-102
BACK HINGE COVERS - QUAD BUCKET,
50/50 SPLIT, BENCH - INSTALLATION,
SEAT .............................23-101
BACK HINGE COVERS - QUAD BUCKET,
50/50 SPLIT, BENCH - REMOVAL, SEAT . . 23-101
BACKING PLATE - INSTALLATION,
STEERING COLUMN COVER............23-70
BACKING PLATE - REMOVAL, STEERING
COLUMN COVER.....................23-70
BACK-UP LAMP SWITCH -
INSTALLATION.......................21-62
BACK-UP LAMP SWITCH - REMOVAL.....21-62
BAG RETAINER - INSTALLATION,
PLASTIC GROCERY..................23-105
BAG RETAINER - REMOVAL, PLASTIC
GROCERY.........................23-104
BALANCE - STANDARD PROCEDURE,
TIRE AND WHEEL.....................22-5
BALANCE SHAFTS AND CARRIER
ASSEMBLY - DESCRIPTION.............9-69
BALANCE SHAFTS AND CARRIER
ASSEMBLY - INSTALLATION.............9-72
BALANCE SHAFTS AND CARRIER
ASSEMBLY - OPERATION...............9-69
BALANCE SHAFTS AND CARRIER
ASSEMBLY - REMOVAL.................9-69
BALL BEARING - INSTALLATION, END
COVER.............................21-10
BALL BEARING - REMOVAL, END COVER . . . 21-9
BALL JOINT - DESCRIPTION, LOWER......2-10
BALL JOINT - DIAGNOSIS AND TESTING,
LOWER.............................2-10
BALL JOINT - OPERATION, LOWER.......2-10
BAR - DESCRIPTION, STABILIZER....2-16,2-45
BAR - DESCRIPTION, TRACK............2-46
BAR - INSPECTION, STABILIZER..........2-18
BAR - INSTALLATION, STABILIZER........2-18
BAR - INSTALLATION, TRACK
............2-46
BAR - OPERATION, STABILIZER
......2-17,2-45
BAR - OPERATION, TRACK
..............2-46
BAR - REMOVAL, STABILIZER
...........2-17
BAR - REMOVAL, TRACK
...............2-46
BAR CUSHION - INSTALLATION,
STABILIZER
...........................2-4
BAR CUSHION - REMOVAL, STABILIZER
....2-4
BASE BRAKE BLEEDING - STANDARD
PROCEDURE
......................5-7,5s-7
BASE BRAKE SYSTEM - DIAGNOSIS AND
TESTING
.........................5-4,5s-4
BASE BRAKE SYSTEM, SPECIAL TOOLS
. . . 5-10,
5s-9
BASE BRAKES - DESCRIPTION
........5-3,5s-3
BASE BRAKES - OPERATION
..........5-3,5s-3
BASE BRAKES (EXPORT) - DESCRIPTION
. . . 5-3,
5s-3
2 INDEXRS
Description Group-Page Description Group-Page Description Group-Page