2004 CHRYSLER VOYAGER air conditioning
[x] Cancel search: air conditioningPage 2501 of 2585
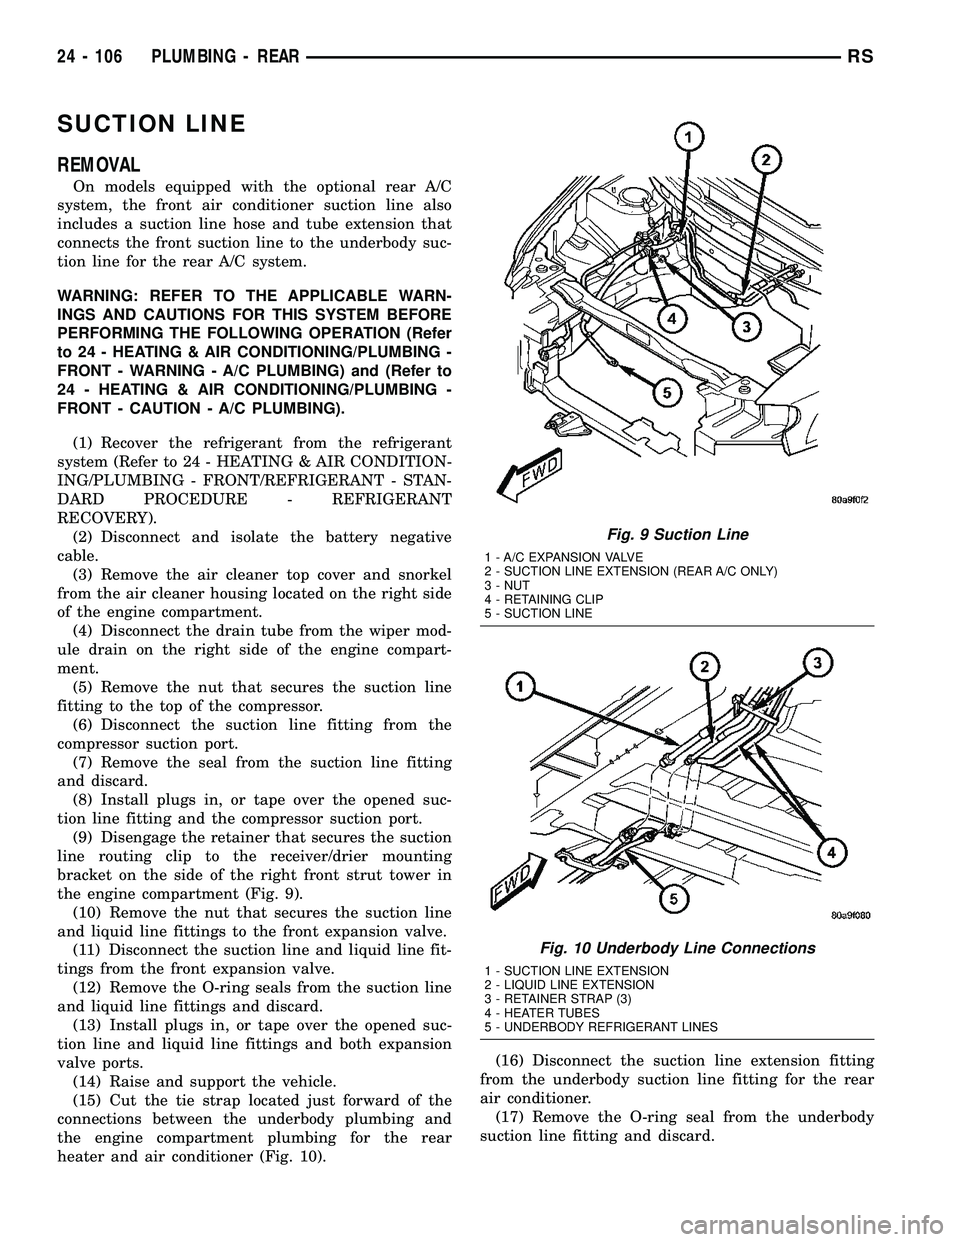
SUCTION LINE
REMOVAL
On models equipped with the optional rear A/C
system, the front air conditioner suction line also
includes a suction line hose and tube extension that
connects the front suction line to the underbody suc-
tion line for the rear A/C system.
WARNING: REFER TO THE APPLICABLE WARN-
INGS AND CAUTIONS FOR THIS SYSTEM BEFORE
PERFORMING THE FOLLOWING OPERATION (Refer
to 24 - HEATING & AIR CONDITIONING/PLUMBING -
FRONT - WARNING - A/C PLUMBING) and (Refer to
24 - HEATING & AIR CONDITIONING/PLUMBING -
FRONT - CAUTION - A/C PLUMBING).
(1) Recover the refrigerant from the refrigerant
system (Refer to 24 - HEATING & AIR CONDITION-
ING/PLUMBING - FRONT/REFRIGERANT - STAN-
DARD PROCEDURE - REFRIGERANT
RECOVERY).
(2) Disconnect and isolate the battery negative
cable.
(3) Remove the air cleaner top cover and snorkel
from the air cleaner housing located on the right side
of the engine compartment.
(4) Disconnect the drain tube from the wiper mod-
ule drain on the right side of the engine compart-
ment.
(5) Remove the nut that secures the suction line
fitting to the top of the compressor.
(6) Disconnect the suction line fitting from the
compressor suction port.
(7) Remove the seal from the suction line fitting
and discard.
(8) Install plugs in, or tape over the opened suc-
tion line fitting and the compressor suction port.
(9) Disengage the retainer that secures the suction
line routing clip to the receiver/drier mounting
bracket on the side of the right front strut tower in
the engine compartment (Fig. 9).
(10) Remove the nut that secures the suction line
and liquid line fittings to the front expansion valve.
(11) Disconnect the suction line and liquid line fit-
tings from the front expansion valve.
(12) Remove the O-ring seals from the suction line
and liquid line fittings and discard.
(13) Install plugs in, or tape over the opened suc-
tion line and liquid line fittings and both expansion
valve ports.
(14) Raise and support the vehicle.
(15) Cut the tie strap located just forward of the
connections between the underbody plumbing and
the engine compartment plumbing for the rear
heater and air conditioner (Fig. 10).(16) Disconnect the suction line extension fitting
from the underbody suction line fitting for the rear
air conditioner.
(17) Remove the O-ring seal from the underbody
suction line fitting and discard.
Fig. 9 Suction Line
1 - A/C EXPANSION VALVE
2 - SUCTION LINE EXTENSION (REAR A/C ONLY)
3 - NUT
4 - RETAINING CLIP
5 - SUCTION LINE
Fig. 10 Underbody Line Connections
1 - SUCTION LINE EXTENSION
2 - LIQUID LINE EXTENSION
3 - RETAINER STRAP (3)
4 - HEATER TUBES
5 - UNDERBODY REFRIGERANT LINES
24 - 106 PLUMBING - REARRS
Page 2502 of 2585
(18) Install plugs in, or tape over the opened suc-
tion line fittings.
(19) Lower the vehicle.
(20) Remove the suction line from the engine com-
partment.
INSTALLATION
(1) Position the suction line into the engine com-
partment.
(2) Remove the tape or plugs from the suction line
and liquid line fittings and both expansion valve
ports.
(3) Lubricate new rubber O-ring seals with clean
refrigerant oil and install them on the suction line
and liquid line fittings.
(4) Reconnect the liquid line and suction line fit-
tings to the expansion valve.
(5) Install the nut that secures the suction line
and liquid line fittings to the front expansion valve.
Tighten the nut to 23 N´m (17 ft. lbs.).
(6) Engage the retainer that secures the suction
line routing clip to the receiver/drier mounting
bracket on the side of the right front strut tower in
the engine compartment.
(7) Remove the tape or plugs from the compressor
suction port and the suction line fitting.
(8) Lubricate a new rubber O-ring seal with clean
refrigerant oil and install it on the suction line fit-
ting.
(9) Reconnect the suction line fitting to the com-
pressor suction port.
(10) Install the nut that secures the suction line
fitting to the A/C compressor. Tighten the nut to 23
N´m (17 ft. lbs.).
(11) Reconnect the drain tube to the wiper module
drain on the right side of the engine compartment.
(12) Reinstall the air cleaner top cover and snorkel
onto the air cleaner housing located on the right side
of the engine compartment.
(13) Reconnect the battery negative cable.
(14) Raise and support the vehicle.
(15) Remove the tape or plugs from the suction
line extension fitting and the underbody suction line
fitting.(16) Lubricate a new rubber O-ring seal with clean
refrigerant oil and install it on the underbody suction
line fitting.
(17) Reconnect the suction line extension fitting to
the underbody suction line fitting. Tighten the fitting
to 23 N´m (17 ft. lbs.).
(18) Install a new tie strap just forward of the con-
nections between the underbody plumbing and the
engine compartment plumbing for the rear heater
and air conditioner.
(19) Lower the vehicle.
(20) Evacuate the refrigerant system (Refer to 24 -
HEATING & AIR CONDITIONING/PLUMBING -
FRONT/REFRIGERANT - STANDARD PROCE-
DURE - REFRIGERANT SYSTEM EVACUATE).
(21) Charge the refrigerant system (Refer to 24 -
HEATING & AIR CONDITIONING/PLUMBING -
FRONT/REFRIGERANT - STANDARD PROCE-
DURE - REFRIGERANT SYSTEM CHARGE).
UNDERBODY LINES
DESCRIPTION
The underbody heater-A/C plumbing is used only
on models with the optional rear heater-A/C system
(Fig. 11). The underbody suction line, liquid line, and
heater tubes can each be serviced separately.
OPERATION
The rear heater and A/C lines are all serviced as
individual pieces. When disconnecting any line or
block ensure that the area around it is clean of any
contaminations that can get in to the system (Fig.
12), (Fig. 13), (Fig. 15), (Fig. 14) and (Fig. 16).
Any kinks or sharp bends in the rear heater-A/C
unit plumbing will reduce the capacity of the entire
heating and air conditioning system. Kinks and
sharp bends reduce the system flow. High pressures
are produced in the refrigerant system when the air
conditioning compressor is operating. High tempera-
ture coolant is present in the heater plumbing when
the engine is operating. Extreme care must be exer-
cised o make sure that each of the plumbing connec-
tions is pressure-tight and leak free.
RSPLUMBING - REAR24 - 107
SUCTION LINE (Continued)
Page 2504 of 2585
REMOVAL
REMOVAL - UNDERBODY HEATER TUBES
WARNING: REFER TO THE APPLICABLE WARN-
INGS AND CAUTIONS FOR THIS SYSTEM BEFORE
PERFORMING THE FOLLOWING OPERATION (Refer
to 24 - HEATING & AIR CONDITIONING/PLUMBING -
WARNING).
(1) Drain the engine cooling system (Refer to 7 -
COOLING - STANDARD PROCEDURE - COOLING
SYSTEM DRAIN).
(2) Raise and support vehicle.
(3) Disconnect the underbody heater tubes at the
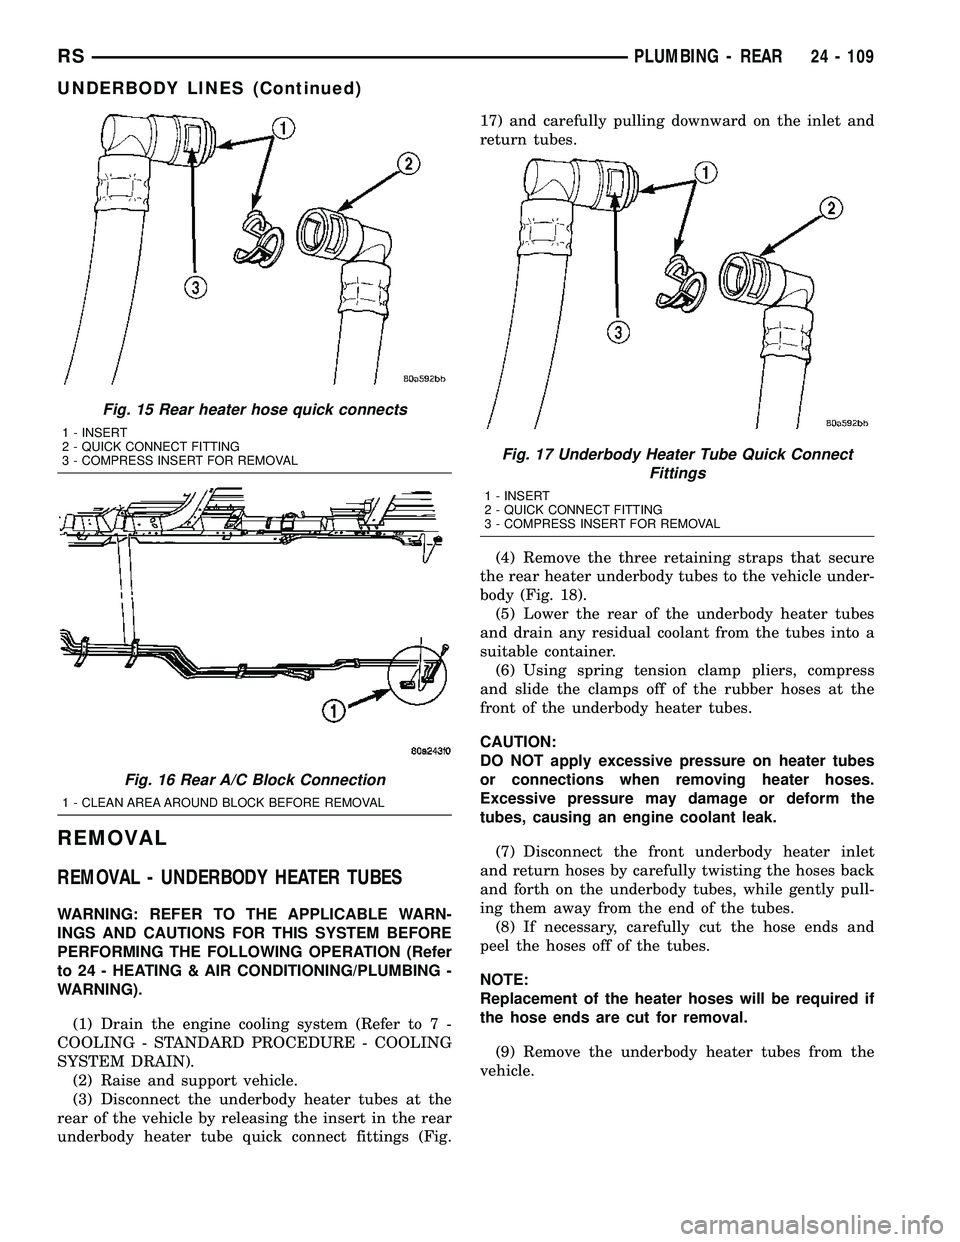
rear of the vehicle by releasing the insert in the rear
underbody heater tube quick connect fittings (Fig.17) and carefully pulling downward on the inlet and
return tubes.
(4) Remove the three retaining straps that secure
the rear heater underbody tubes to the vehicle under-
body (Fig. 18).
(5) Lower the rear of the underbody heater tubes
and drain any residual coolant from the tubes into a
suitable container.
(6) Using spring tension clamp pliers, compress
and slide the clamps off of the rubber hoses at the
front of the underbody heater tubes.
CAUTION:
DO NOT apply excessive pressure on heater tubes
or connections when removing heater hoses.
Excessive pressure may damage or deform the
tubes, causing an engine coolant leak.
(7) Disconnect the front underbody heater inlet
and return hoses by carefully twisting the hoses back
and forth on the underbody tubes, while gently pull-
ing them away from the end of the tubes.
(8) If necessary, carefully cut the hose ends and
peel the hoses off of the tubes.
NOTE:
Replacement of the heater hoses will be required if
the hose ends are cut for removal.
(9) Remove the underbody heater tubes from the
vehicle.
Fig. 15 Rear heater hose quick connects
1 - INSERT
2 - QUICK CONNECT FITTING
3 - COMPRESS INSERT FOR REMOVAL
Fig. 16 Rear A/C Block Connection
1 - CLEAN AREA AROUND BLOCK BEFORE REMOVAL
Fig. 17 Underbody Heater Tube Quick Connect
Fittings
1 - INSERT
2 - QUICK CONNECT FITTING
3 - COMPRESS INSERT FOR REMOVAL
RSPLUMBING - REAR24 - 109
UNDERBODY LINES (Continued)
Page 2505 of 2585
REMOVAL - UNDERBODY REFRIGERANT LINES
WARNING: REFER TO THE APPLICABLE WARN-
INGS AND CAUTIONS FOR THIS SYSTEM BEFORE
PERFORMING THE FOLLOWING OPERATION (Refer
to 24 - HEATING & AIR CONDITIONING/PLUMBING -
FRONT - WARNING - A/C PLUMBING) and (Refer to
24 - HEATING & AIR CONDITIONING/PLUMBING -
FRONT - CAUTION - A/C PLUMBING).
(1) Recover the refrigerant from the refrigerant
system (Refer to 24 - HEATING & AIR CONDITION-
ING/PLUMBING - FRONT/REFRIGERANT - STAN-
DARD PROCEDURE - REFRIGERANT
RECOVERY).
(2) Hoist and support vehicle.
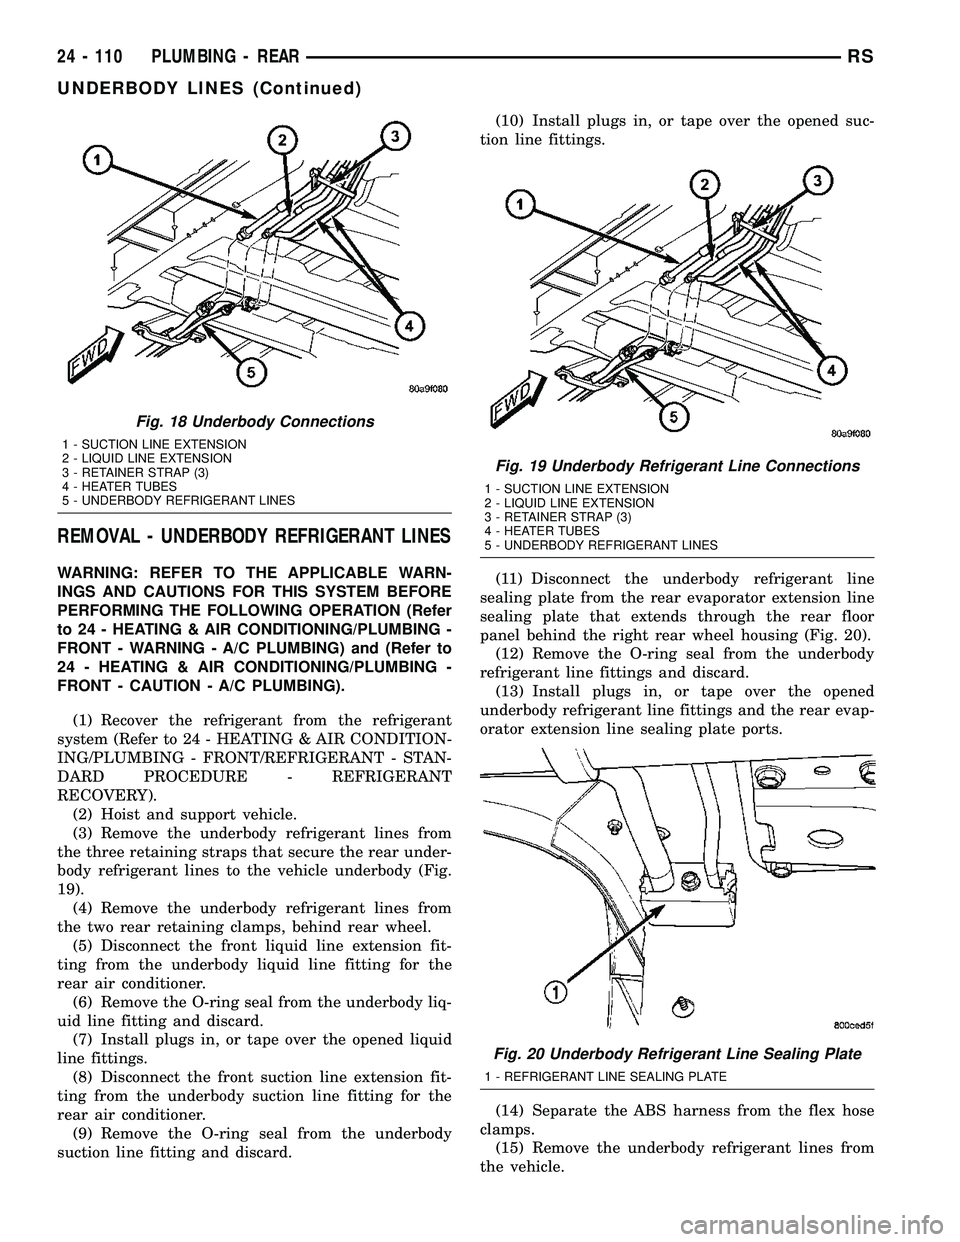
(3) Remove the underbody refrigerant lines from
the three retaining straps that secure the rear under-
body refrigerant lines to the vehicle underbody (Fig.
19).
(4) Remove the underbody refrigerant lines from
the two rear retaining clamps, behind rear wheel.
(5) Disconnect the front liquid line extension fit-
ting from the underbody liquid line fitting for the
rear air conditioner.
(6) Remove the O-ring seal from the underbody liq-
uid line fitting and discard.
(7) Install plugs in, or tape over the opened liquid
line fittings.
(8) Disconnect the front suction line extension fit-
ting from the underbody suction line fitting for the
rear air conditioner.
(9) Remove the O-ring seal from the underbody
suction line fitting and discard.(10) Install plugs in, or tape over the opened suc-
tion line fittings.
(11) Disconnect the underbody refrigerant line
sealing plate from the rear evaporator extension line
sealing plate that extends through the rear floor
panel behind the right rear wheel housing (Fig. 20).
(12) Remove the O-ring seal from the underbody
refrigerant line fittings and discard.
(13) Install plugs in, or tape over the opened
underbody refrigerant line fittings and the rear evap-
orator extension line sealing plate ports.
(14) Separate the ABS harness from the flex hose
clamps.
(15) Remove the underbody refrigerant lines from
the vehicle.
Fig. 18 Underbody Connections
1 - SUCTION LINE EXTENSION
2 - LIQUID LINE EXTENSION
3 - RETAINER STRAP (3)
4 - HEATER TUBES
5 - UNDERBODY REFRIGERANT LINES
Fig. 19 Underbody Refrigerant Line Connections
1 - SUCTION LINE EXTENSION
2 - LIQUID LINE EXTENSION
3 - RETAINER STRAP (3)
4 - HEATER TUBES
5 - UNDERBODY REFRIGERANT LINES
Fig. 20 Underbody Refrigerant Line Sealing Plate
1 - REFRIGERANT LINE SEALING PLATE
24 - 110 PLUMBING - REARRS
UNDERBODY LINES (Continued)
Page 2506 of 2585
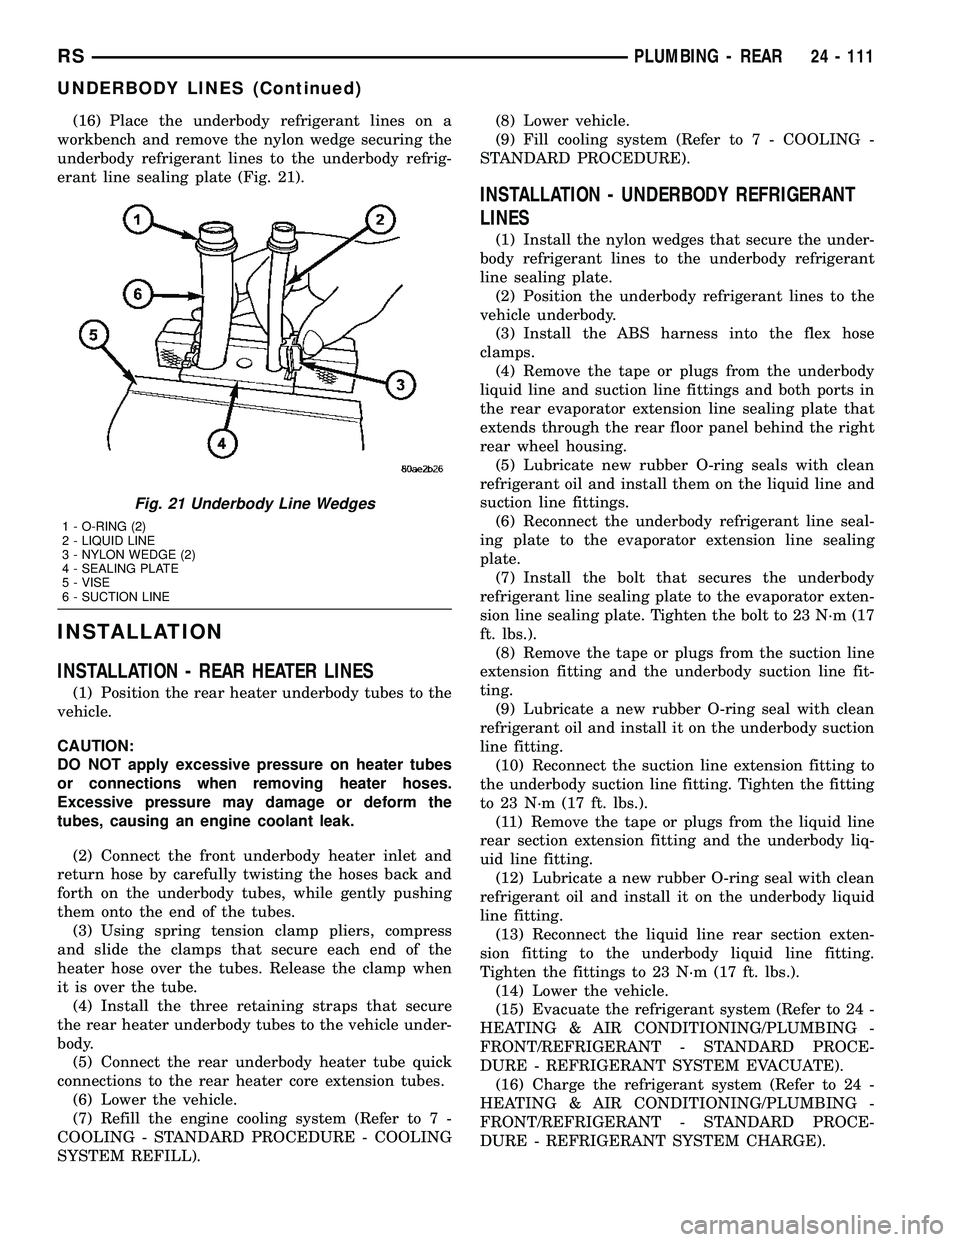
(16) Place the underbody refrigerant lines on a
workbench and remove the nylon wedge securing the
underbody refrigerant lines to the underbody refrig-
erant line sealing plate (Fig. 21).
INSTALLATION
INSTALLATION - REAR HEATER LINES
(1) Position the rear heater underbody tubes to the
vehicle.
CAUTION:
DO NOT apply excessive pressure on heater tubes
or connections when removing heater hoses.
Excessive pressure may damage or deform the
tubes, causing an engine coolant leak.
(2) Connect the front underbody heater inlet and
return hose by carefully twisting the hoses back and
forth on the underbody tubes, while gently pushing
them onto the end of the tubes.
(3) Using spring tension clamp pliers, compress
and slide the clamps that secure each end of the
heater hose over the tubes. Release the clamp when
it is over the tube.
(4) Install the three retaining straps that secure
the rear heater underbody tubes to the vehicle under-
body.
(5) Connect the rear underbody heater tube quick
connections to the rear heater core extension tubes.
(6) Lower the vehicle.
(7) Refill the engine cooling system (Refer to 7 -
COOLING - STANDARD PROCEDURE - COOLING
SYSTEM REFILL).(8) Lower vehicle.
(9) Fill cooling system (Refer to 7 - COOLING -
STANDARD PROCEDURE).
INSTALLATION - UNDERBODY REFRIGERANT
LINES
(1) Install the nylon wedges that secure the under-
body refrigerant lines to the underbody refrigerant
line sealing plate.
(2) Position the underbody refrigerant lines to the
vehicle underbody.
(3) Install the ABS harness into the flex hose
clamps.
(4) Remove the tape or plugs from the underbody
liquid line and suction line fittings and both ports in
the rear evaporator extension line sealing plate that
extends through the rear floor panel behind the right
rear wheel housing.
(5) Lubricate new rubber O-ring seals with clean
refrigerant oil and install them on the liquid line and
suction line fittings.
(6) Reconnect the underbody refrigerant line seal-
ing plate to the evaporator extension line sealing
plate.
(7) Install the bolt that secures the underbody
refrigerant line sealing plate to the evaporator exten-
sion line sealing plate. Tighten the bolt to 23 N´m (17
ft. lbs.).
(8) Remove the tape or plugs from the suction line
extension fitting and the underbody suction line fit-
ting.
(9) Lubricate a new rubber O-ring seal with clean
refrigerant oil and install it on the underbody suction
line fitting.
(10) Reconnect the suction line extension fitting to
the underbody suction line fitting. Tighten the fitting
to 23 N´m (17 ft. lbs.).
(11) Remove the tape or plugs from the liquid line
rear section extension fitting and the underbody liq-
uid line fitting.
(12) Lubricate a new rubber O-ring seal with clean
refrigerant oil and install it on the underbody liquid
line fitting.
(13) Reconnect the liquid line rear section exten-
sion fitting to the underbody liquid line fitting.
Tighten the fittings to 23 N´m (17 ft. lbs.).
(14) Lower the vehicle.
(15) Evacuate the refrigerant system (Refer to 24 -
HEATING & AIR CONDITIONING/PLUMBING -
FRONT/REFRIGERANT - STANDARD PROCE-
DURE - REFRIGERANT SYSTEM EVACUATE).
(16) Charge the refrigerant system (Refer to 24 -
HEATING & AIR CONDITIONING/PLUMBING -
FRONT/REFRIGERANT - STANDARD PROCE-
DURE - REFRIGERANT SYSTEM CHARGE).
Fig. 21 Underbody Line Wedges
1 - O-RING (2)
2 - LIQUID LINE
3 - NYLON WEDGE (2)
4 - SEALING PLATE
5 - VISE
6 - SUCTION LINE
RSPLUMBING - REAR24 - 111
UNDERBODY LINES (Continued)
Page 2508 of 2585
point. The cabin heater can take up to three minutes
to completely shut down when either the heater tem-
perature is set below the lower set point or the vehi-
cle ignition is shut down.
NOTE: Do not apply a strong vacuum source such
as a garage ventilation system directly on the sup-
plemental cabin heater exhaust line. Too strong of a
vacuum can prevent the supplemental cabin heater
from starting. If required, place the vacuum source
at least 75 mm (3 in.) away from the exhaust line.
The supplemental cabin heater only operates when
the engine is running, the mileage exceeds 8 kilome-ter (5 mph) and the fuel tank volume exceeds 1/8 of a
tank. The supplemental heater control module moni-
tors blower speed and combustion during its start-up.
The cabin heater should operate if the coolant tem-
perature is below 40É C (104É F).
DIAGNOSIS AND TESTING - DIESEL
SUPPLEMENTAL CABIN HEATER
Refer to the Symptoms Diagnosis table for basic
checks of the diesel fueled supplemental cabin heater.
SYMPTOMS DIAGNOSIS
Symptom Possible Causes
Smell of diesel fuel. Check cabin heater system integration in vehicle's fuel system. Check
fuel lines for leakage, kinks or obstructions. If OK, Inspect the inlet
muffler, drain as necessary. Re-test the cabin heater and re-inspect.
Inspect the exhaust tube and cabin heater for the presence of external
fuel. If presence of external fuel is observed on the heater unit or in the
exhaust tube or after draining and testing. Remove the cabin heater
from vehicle and repair or replace components as required.
Heater does not achieve full load
operation.Check cabin heater operation with DRBIIITscan tool and replace
components as required.
Continuous white smoke from heater
exhaust during combustion operation.Check cabin heater operation with DRBIIITscan tool and replace
components as required. White smoke is typical in extreme weather
conditions.
Heater can not be switched off. Check cabin heater operation with DRBIIITscan tool and replace
components as required.
Heater does not operate. Diagnosis cabin heater control module using the DRBIIITscan tool and
the procedures listed in Vehicle Performance under Cabin Heater
Diagnosis in Group 18.
Loss of coolant (Leakage) or heater
develops smoke during combustion
operation and exhaust has an
extremely sweet smell.Inspect coolant hoses for leakage, kinks or loose hose connection.
Inspect the exhaust tube assembly for continuous flow, if OK there is an
internal heater leak and cabin heater should be inspected and
components should be replaced as required.
Loss of fuel (dripping). Check cabin heater system integration in vehicles fuel system. Check
fuel line connection for leakage. If OK there is an internal leak and
cabin heater should be inspected and replaced as required.
AIR INTAKE PIPE
REMOVAL
NOTE: The air intake tube for the supplemental
cabin heater is part of an assembly that includes
the heater cooling intake and return pipes. If the
cabin heater air intake tube requires removal or
replacement the entire cabin heater assembly will
require removal or replacement.(1) Drain the engine cooling system (Refer to 7 -
COOLING - STANDARD PROCEDURE).
(2) Remove clamps from the cabin heater tubes at
the lower heater port and the lower EGR connector
which are located under the hood.
(3) Remove the retaining clamp at the cabin
heater air intake muffler connection (Refer to 24 -
HEATING & AIR CONDITIONING/CABIN HEAT-
ER/INLET MUFFLER - REMOVAL).
(4) Remove the clamp at the flexible tube to steel
tube connection (Fig. 1).
RSCABIN HEATER24 - 113
CABIN HEATER (Continued)
Page 2511 of 2585
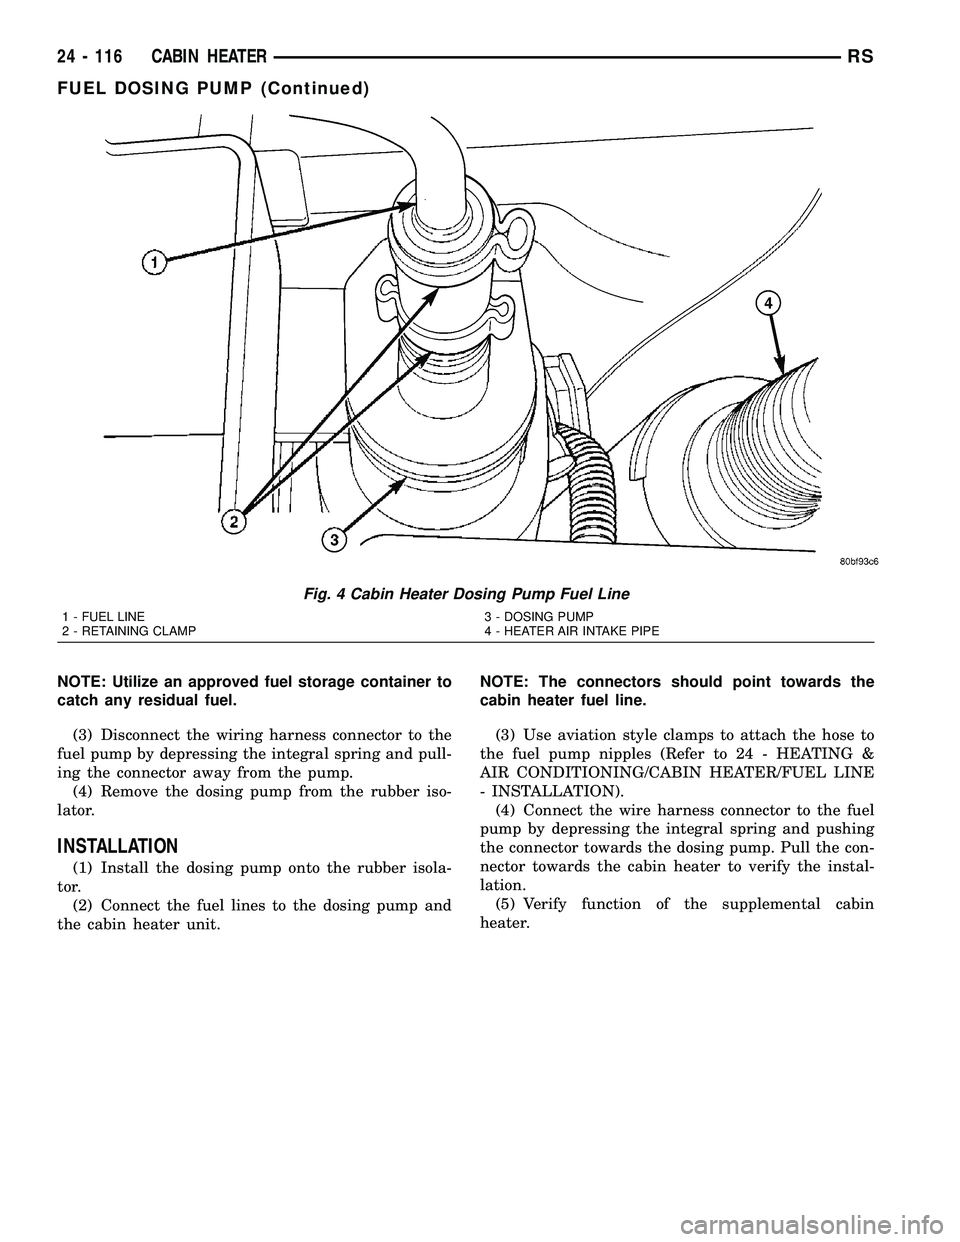
NOTE: Utilize an approved fuel storage container to
catch any residual fuel.
(3) Disconnect the wiring harness connector to the
fuel pump by depressing the integral spring and pull-
ing the connector away from the pump.
(4) Remove the dosing pump from the rubber iso-
lator.
INSTALLATION
(1) Install the dosing pump onto the rubber isola-
tor.
(2) Connect the fuel lines to the dosing pump and
the cabin heater unit.NOTE: The connectors should point towards the
cabin heater fuel line.
(3) Use aviation style clamps to attach the hose to
the fuel pump nipples (Refer to 24 - HEATING &
AIR CONDITIONING/CABIN HEATER/FUEL LINE
- INSTALLATION).
(4) Connect the wire harness connector to the fuel
pump by depressing the integral spring and pushing
the connector towards the dosing pump. Pull the con-
nector towards the cabin heater to verify the instal-
lation.
(5) Verify function of the supplemental cabin
heater.
Fig. 4 Cabin Heater Dosing Pump Fuel Line
1 - FUEL LINE
2 - RETAINING CLAMP3 - DOSING PUMP
4 - HEATER AIR INTAKE PIPE
24 - 116 CABIN HEATERRS
FUEL DOSING PUMP (Continued)
Page 2512 of 2585
FUEL LINE
STANDARD PROCEDURE - CLEANING
(1) Remove the cabin heater fuel line (Refer to 24 -
HEATING & AIR CONDITIONING/CABIN HEAT-
ER/FUEL LINE - REMOVAL).
(2) With the cabin heater fuel line removed from
the vehicle, place a shop cloth on the fuel tank end of
the fuel line to catch any residue, then apply a small
amount of air pressure to the other end of the fuel
line.
(3) Check to see if air pressure is coming from the
tank end of the line. If pressure is flowing unre-
stricted the line is clean.
(4) If the fuel line shows any signs of being
restricted after air pressure is applied, the fuel line
should be replaced.
(5) Install the cabin heater fuel line (Refer to 24 -
HEATING & AIR CONDITIONING/CABIN HEAT-
ER/FUEL LINE - INSTALLATION).
(6) Verify function of the cabin heater.
REMOVAL
(1) Raise and support the vehicle. Take note of the
location of the flexible section of the cabin heater
exhaust tube.NOTE: Have an approved fuel holding device ready
to capture any diesel fuel that drains from the fuel
line or cabin heater unit.
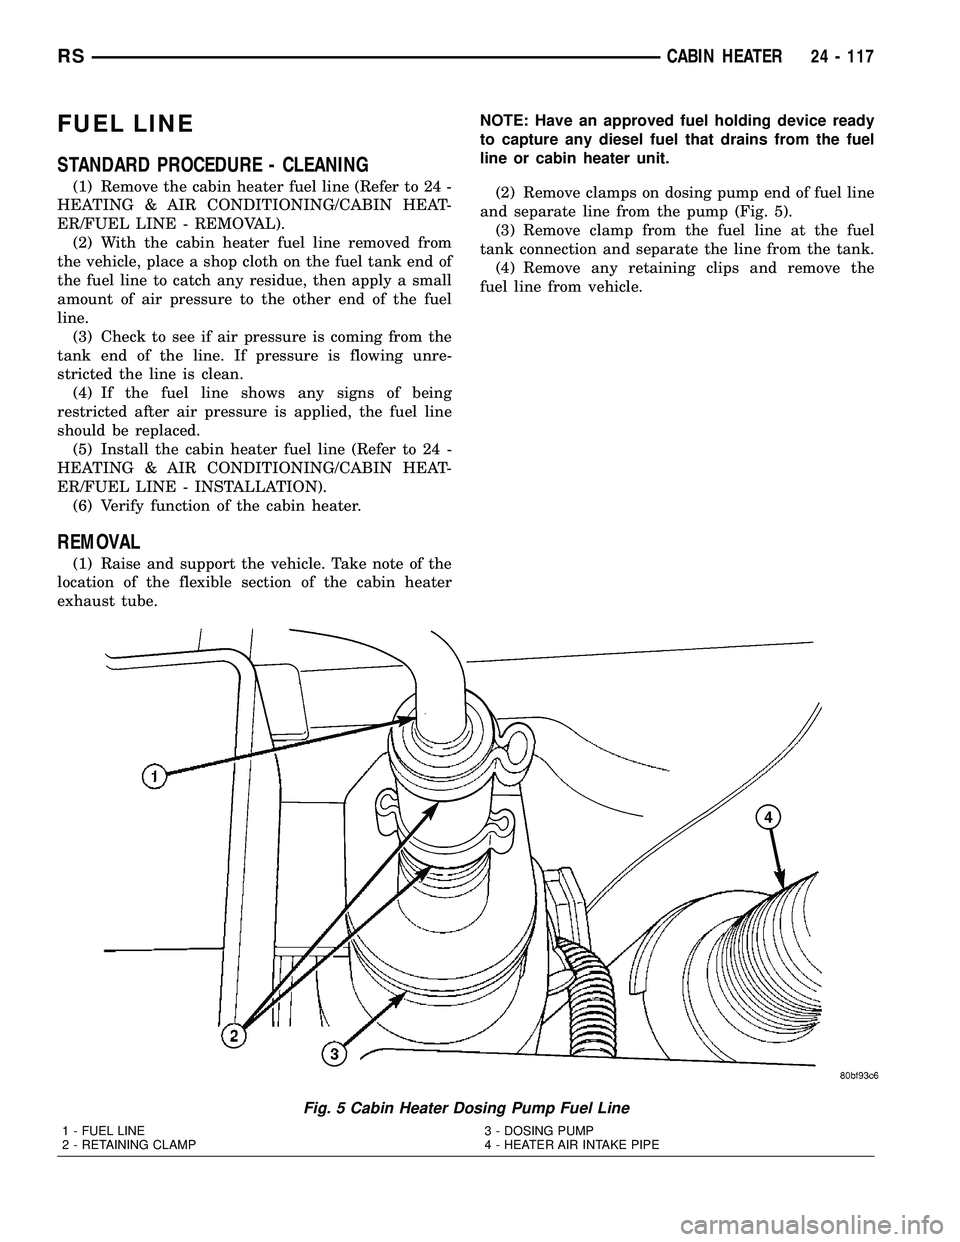
(2) Remove clamps on dosing pump end of fuel line
and separate line from the pump (Fig. 5).
(3) Remove clamp from the fuel line at the fuel
tank connection and separate the line from the tank.
(4) Remove any retaining clips and remove the
fuel line from vehicle.
Fig. 5 Cabin Heater Dosing Pump Fuel Line
1 - FUEL LINE
2 - RETAINING CLAMP3 - DOSING PUMP
4 - HEATER AIR INTAKE PIPE
RSCABIN HEATER24 - 117