2004 CHRYSLER SEBRING SEDAN oil change
[x] Cancel search: oil changePage 47 of 273
3. Attach the tether strap hook (A) of the child restraint
to the anchor (B) and remove slack in the tether strap
according to the child restraint manufacturer's instruc-
tions.
WARNING!
An incorrectly anchored tether strap could lead to
increased head motion and possible injury to the
child. Use only the anchor positions directly behind
the child seat to secure a child restraint top tether
strap.
Transporting Pets
Airbags deploying in the front seat could harm your pet.
An unrestrained pet will be thrown about and possibly
injured, or injure a passenger during panic braking or in
a collision.
Pets should be restrained in the rear seat in pet harnesses
or pet carriers that are secured by seat belts.
ENGINE BREAK-IN RECOMMENDATIONS
The engine in your new vehicle does not require a long
break-in period.
Drive moderately during the first 300 miles (500 km).
After the initial 60 miles (100 km), speeds up to 50 or 55
mph (80 or 90 km/h) are desirable.
While cruising, brief full-throttle acceleration, within the
limits of local traffic laws, contributes to a good break-in.
Wide open throttle acceleration in low gear can be
detrimental and should be avoided.
The crankcase oil installed in the engine at the factory is
a high quality energy conserving type lubricant. Oil
changes should be consistent with expected climate con-
ditions under which vehicle operations will occur. The
recommended viscosity and quality grades are in Section
7 of this manual.
Do not use non-detergent or straight mineral oils.
A new engine may consume some oil during its first few
thousand miles of operation. This is a normal part of the
break-in and not an indication of a problem.
THINGS TO KNOW BEFORE STARTING YOUR VEHICLE 47
2
Page 89 of 273

U.S. federal regulations require that upon transfer of
vehicle ownership, the seller certify to the purchaser the
correct mileage that the vehicle has been driven. There-
fore, if the odometer reading is changed, during repair or
replacement, be sure to keep a record of the reading
before and after the service so that the correct mileage can
be determined.
The trip odometer shows individual trip mileage. To
switch from odometer to trip odometer, press and release
the Trip Odometer button. Press and release the Trip
button a second time to return to the odometer. While in
trip mode, press and hold the button for at least
1¤2second
to reset the trip odometer.
Door, Deck or Trunk Ajar Warnings
If you move the vehicle and a door is not completely
closed, the word DOOR will replace the odometer dis-
play and a chime will sound once. The odometer display
will reappear when the door is closed. If the trunk is not
completely closed, the work DECK will replace the
odometer display. The odometer display will reappear
when the trunk is closed.
16. Anti-Lock Warning Light Ð If Equipped
This light monitors the Anti-Lock Brake System
described elsewhere in this manual. This light
will come on when the ignition key is turned to the
RUN position and may stay on for several seconds. If
the light does not come on, have the system checked
by an authorized dealer. The warning light should be
checked frequently to assure that it is operating prop-
erly.
If the ABS light remains on or comes on during driving,
it indicates that the Anti-Lock portion of the brake system
is not functioning and that service is required, however,
the conventional brake system will continue to operate
normally provided that the BRAKE warning light is not
on.
17. Oil Pressure Light
Shows low engine oil pressure. The light will
come on and remain on briefly when the igni-
tion is turned on as a bulb check. If the bulb does not
come on during starting, have the bulb repaired
promptly.
UNDERSTANDING YOUR INSTRUMENT PANEL 89
4
Page 193 of 273
CAUTION!
Overfilling or underfilling will cause aeration or
loss of oil pressure. This could damage your engine.
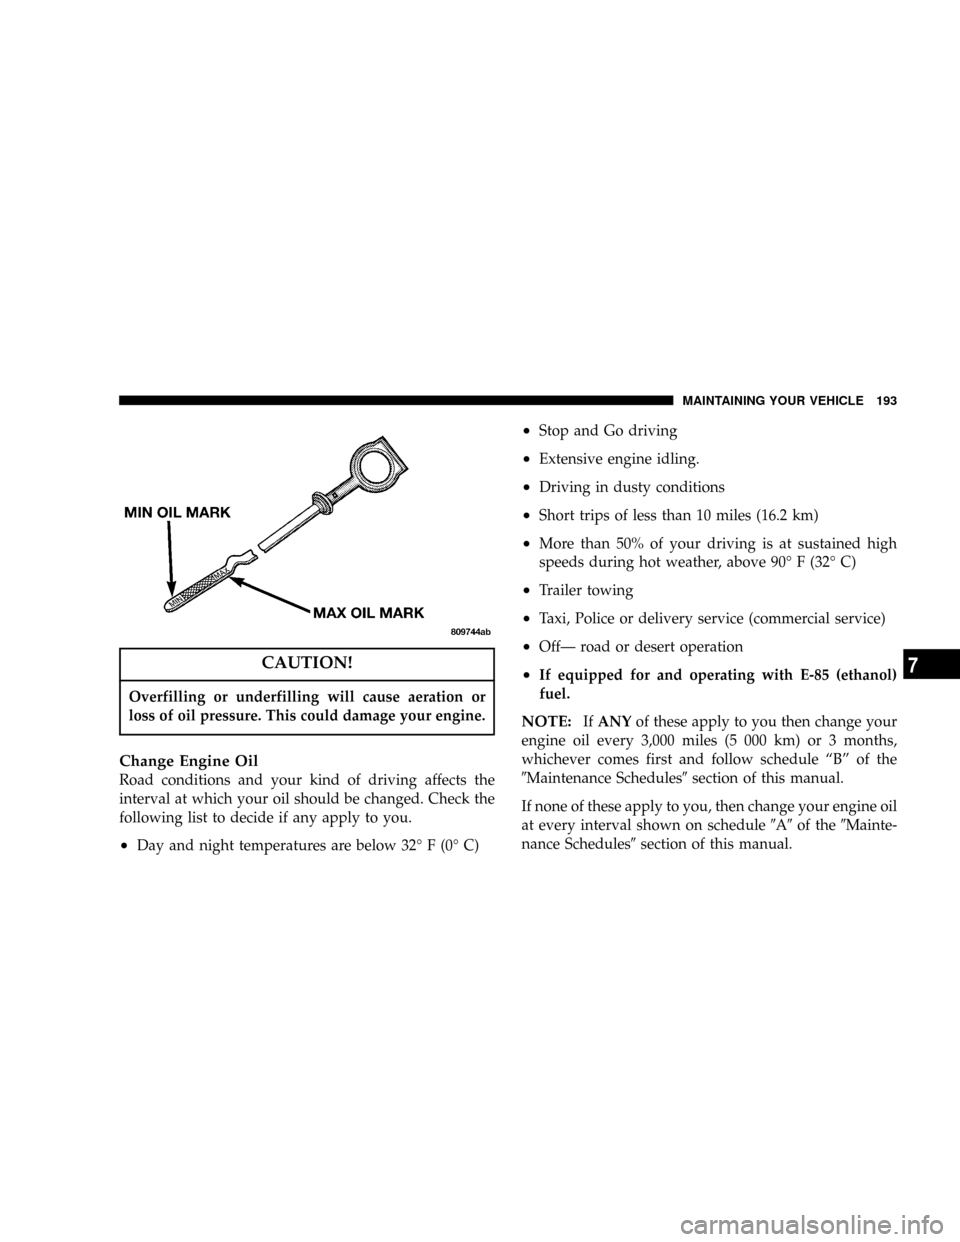
Change Engine Oil
Road conditions and your kind of driving affects the
interval at which your oil should be changed. Check the
following list to decide if any apply to you.
²Day and night temperatures are below 32É F (0É C)
²Stop and Go driving
²Extensive engine idling.
²Driving in dusty conditions
²Short trips of less than 10 miles (16.2 km)
²More than 50% of your driving is at sustained high
speeds during hot weather, above 90É F (32É C)
²Trailer towing
²Taxi, Police or delivery service (commercial service)
²OffÐ road or desert operation
²If equipped for and operating with E-85 (ethanol)
fuel.
NOTE:IfANYof these apply to you then change your
engine oil every 3,000 miles (5 000 km) or 3 months,
whichever comes first and follow schedule ªBº of the
9Maintenance Schedules9section of this manual.
If none of these apply to you, then change your engine oil
at every interval shown on schedule9A9of the9Mainte-
nance Schedules9section of this manual.
MAINTAINING YOUR VEHICLE 193
7
Page 194 of 273

NOTE:Under no circumstances should oil change
intervals exceed 6,000 miles (10 000 km) or 6 months
whichever comes first.
Engine Oil Selection
For best performance and maximum protection under all
types of operating conditions,we recommend engine oils
that are API Certified and meet the requirements of
DaimlerChrysler's Material Standard MS-6395. Use Mo-
par or an equivalent oil meeting the specification MS-
6395.
American Petroleum Institute (API) Engine Oil
Identification Symbol
This symbol means that the oil has
been certified by the American
Petroleum Institute (API). We
only recommend API Certified en-
gine oils that meet the require-
ments of DaimlerChrysler's Mate-
rial Standard MS-6395. Use Mopar
or an equivalent oil meeting the
specification MS-6395.
Engine Oil Viscosity Chart
The proper SAE viscosity grade of engine oil should be
selected based on the following recommendation and be
within the operating temperature shown in the engine oil
viscosity chart.
Flexible Fuel Engine Oil
If you operate the vehicle on E-85 fuel either full or
part-time, use only Mopar Flexible Fuel 5W-30 engine oil
or an equivalent that meets the manufacturers Standard
MS-9214. Equivalent commercial Flexible Fuel engine oils
194 MAINTAINING YOUR VEHICLE
Page 195 of 273
may be labeled as Flexible Fuel (FFV) or Alternate Fuel
(AFV). These engine oils may be satisfactory if they meet
the manufacturer's standard.
CAUTION!
If Flexible Fuel engine oil is not used when using
E-85, engine wear may be increased significantly.
This may void your warranty.
Synthetic Engine Oils
There are a growing number of engine oils being pro-
moted as either synthetic or semi-synthetic. If you choose
to use such a product, useonlythose oils that meet the
American Petroleum Institute (API) and SAE viscosity
standard. Follow the service schedule that describes your
driving type.
Materials Added To Engine Oils
The manufacturer strongly recommends against the ad-
dition of any additives (other than leak detection dyes) toengine oil. Engine oil is an engineered product and it's
performance may be impaired by supplemental addi-
tives.
Disposing of Used Engine Oil and Oil Filters
Care should be taken in disposing of used engine oil from
your vehicle. Used oil, indiscriminately discarded, can
present a problem to the environment. Contact your
dealer, service station, or governmental agency for advice
on how and where used oil can be safely discarded in
your area.
Engine Oil Filter
The engine oil filter should be replaced at every engine
oil change.
Engine Oil Filter Selection
All manufacturer's engines have a full-flow type dispos-
able oil filter. Use a filter of this type for replacement. The
quality of replacement filters varies considerably. Only
high quality filters should be used to assure most efficient
service. Mopar Engine Oil Filters are high quality oil
filters and are recommended.
MAINTAINING YOUR VEHICLE 195
7
Page 204 of 273
WARNING!
Commercially available windshield washer solvents
are flammable. They could ignite and burn you. Care
must be exercised when filling or working around
the washer solution.
Exhaust System
The best protection against carbon monoxide entry into
the vehicle body is a properly maintained engine exhaust
system.
If you notice a change in the sound of the exhaust system;
or if exhaust fumes can be detected inside the vehicle; or
when the underside or rear of the vehicle is damaged;
have a competent mechanic inspect the complete exhaust
system and adjacent body areas for broken, damaged,
deteriorated, or mispositioned parts. Open seams or
loose connections could permit exhaust fumes to seep
into the passenger compartment. In addition, inspect the
exhaust system each time the vehicle is raised for lubri-
cation or oil change. Replace as required.
WARNING!
Exhaust gases can injure or kill. They contain carbon
monoxide (CO) which is colorless and odorless.
Breathing it can make you unconscious and can
eventually poison you. To avoid breathing CO, fol-
low the preceding safety tips.
204 MAINTAINING YOUR VEHICLE
Page 210 of 273
Inspect all hose clamps and couplings to make sure they
are secure and no leaks are present.
Insure nylon tubing in these areas has not melted or
collapsed.
NOTE:Often, fluids such as oil, power steering fluid,
and brake fluid are used during assembly plant opera-
tions to ease the assembly of hoses to couplings. There-
fore, oil wetness at the hose-coupling area is not neces-
sarily an indication of leakage. Actual dripping of hot
fluid when systems are under pressure (during vehicle
operation) should be noted before hose is replaced based
on leakage.
NOTE:Inspection of brake hoses should be done
whenever the brake system is serviced and every engine
oil change.
WARNING!
Worn brake hoses can burst and cause brake failure.
You could have an accident. If you see any signs of
cracking, scuffing, or worn spots, have the brake
hoses replaced immediately.
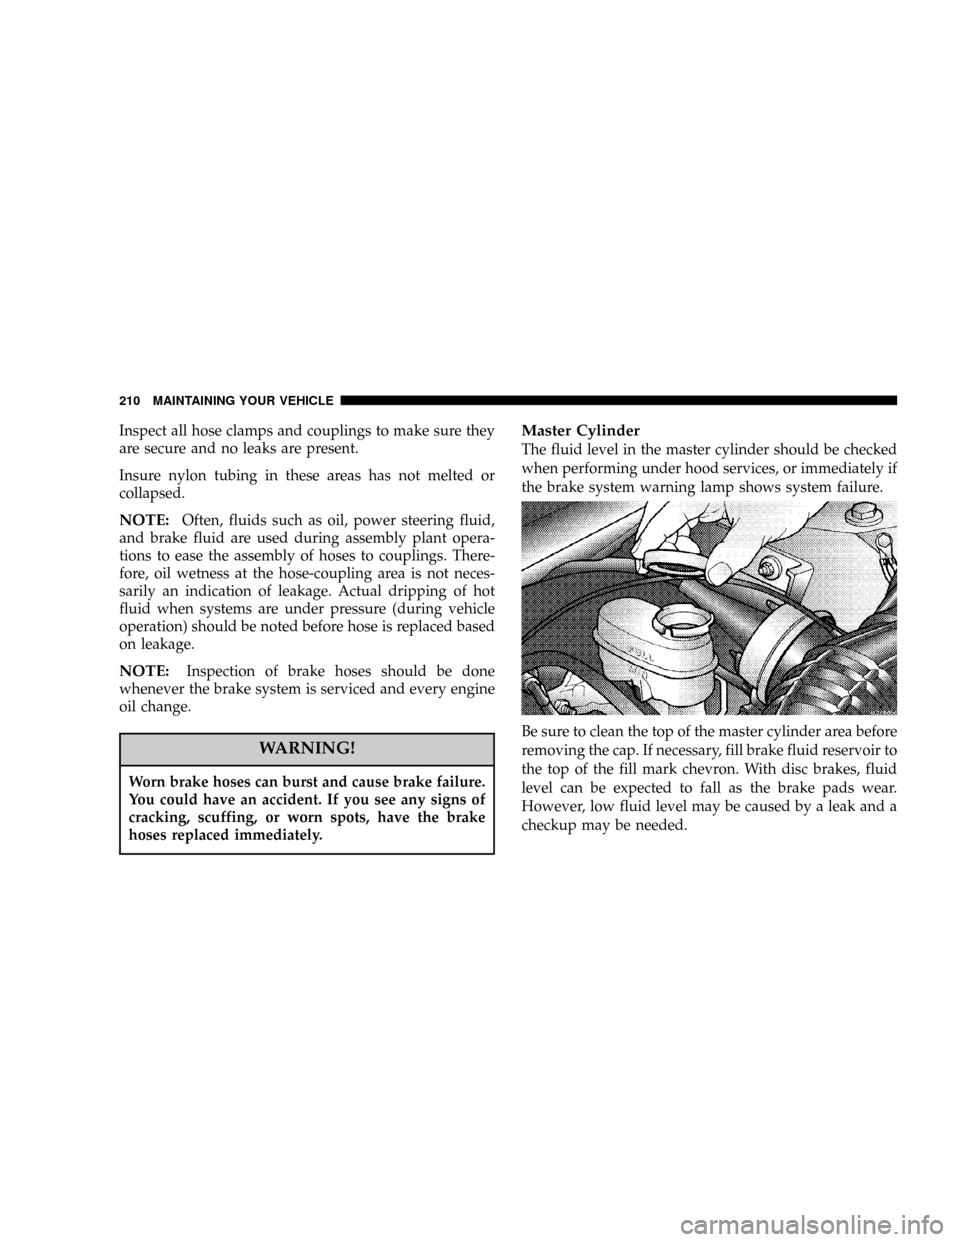
Master Cylinder
The fluid level in the master cylinder should be checked
when performing under hood services, or immediately if
the brake system warning lamp shows system failure.
Be sure to clean the top of the master cylinder area before
removing the cap. If necessary, fill brake fluid reservoir to
the top of the fill mark chevron. With disc brakes, fluid
level can be expected to fall as the brake pads wear.
However, low fluid level may be caused by a leak and a
checkup may be needed.
210 MAINTAINING YOUR VEHICLE
Page 227 of 273
License Plate Bulb Replacement
1. Locate both small slots on the outboard side of the
license lamp. Using a small screwdriver, remove the
entire housing.
2. Turn the bulb socket counterclockwise to remove it
from the housing. Pull the bulb out of the socket. Replace
the bulb and snap it back into place on the housing of the
chrome appliqu×.
Headlight Aiming
The headlights on your new vehicle were aimed at the
factory. The factory setting was made at a no load setting.
A great increase in weight will change the aiming and it
may be necessary to readjust the headlights if carrying an
excessive amount of weight in the trunk, rear seats or
pulling a trailer. To readjust the headlights first mark the
position of the headlights on a wall prior to loading the
vehicle. Load the vehicle and then readjust the headlights
to the original position. If any further adjustments are
necessary contact your manufacturer's dealer. A detailed
service procedure is contained in the manufacturer's
Service Manual. Information on purchasing a Service
Manual can be found at the back of this Owner's Manual.
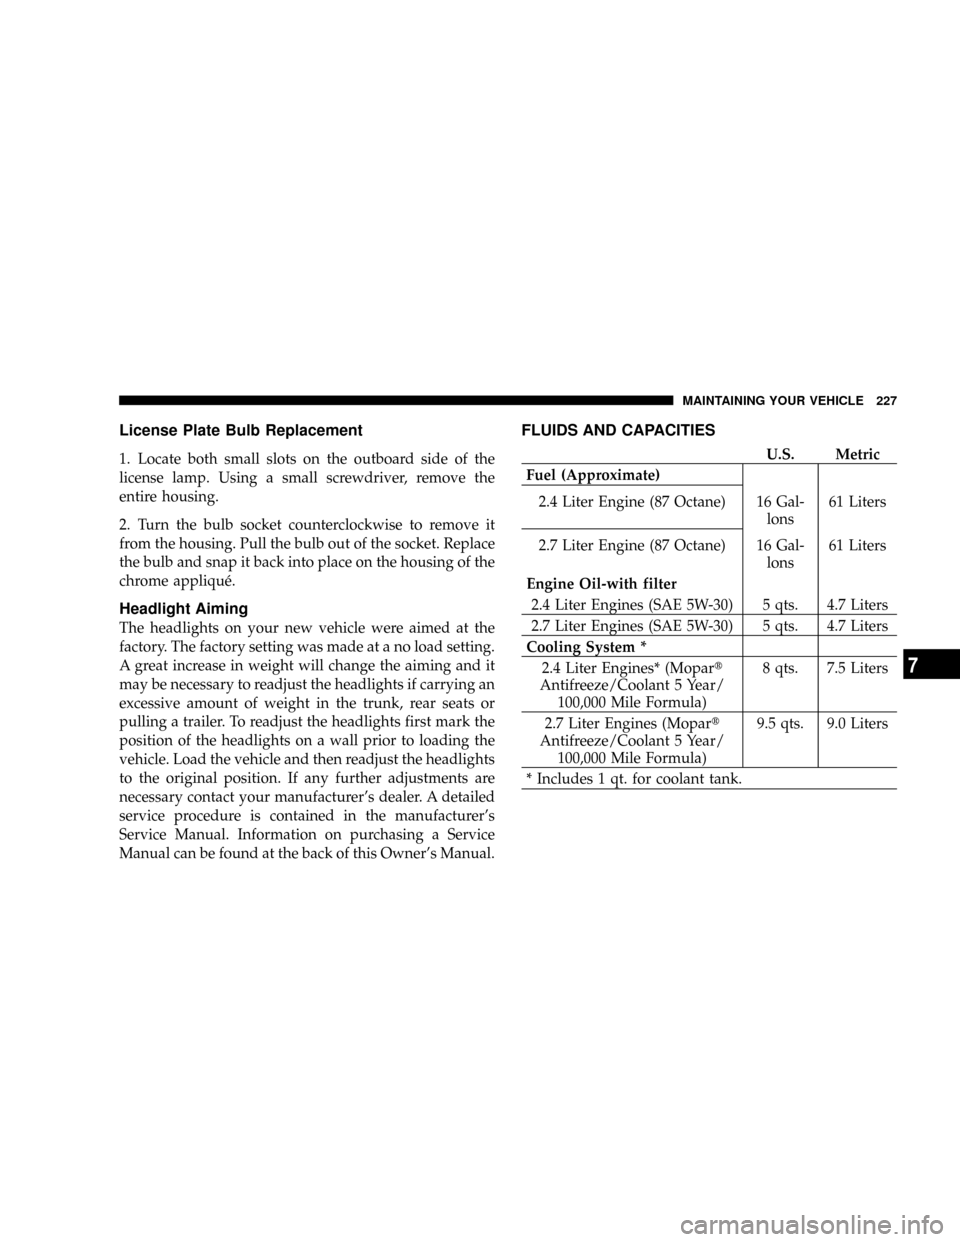
FLUIDS AND CAPACITIES
U.S. Metric
Fuel (Approximate)
2.4 Liter Engine (87 Octane) 16 Gal-
lons61 Liters
2.7 Liter Engine (87 Octane) 16 Gal-
lons61 Liters
Engine Oil-with filter
2.4 Liter Engines (SAE 5W-30) 5 qts. 4.7 Liters
2.7 Liter Engines (SAE 5W-30) 5 qts. 4.7 Liters
Cooling System *
2.4 Liter Engines* (Mopart
Antifreeze/Coolant 5 Year/
100,000 Mile Formula)8 qts. 7.5 Liters
2.7 Liter Engines (Mopart
Antifreeze/Coolant 5 Year/
100,000 Mile Formula)9.5 qts. 9.0 Liters
* Includes 1 qt. for coolant tank.
MAINTAINING YOUR VEHICLE 227
7