Page 85 of 273
INSTRUMENT CLUSTER PREMIUM
UNDERSTANDING YOUR INSTRUMENT PANEL 85
4
Page 86 of 273

INSTRUMENT CLUSTER DESCRIPTION
1. Fuel Gauge
When the ignition key is in the ON position, the
pointer will show the level of fuel remaining in
the fuel tank.
2. Traction Control Ð If Equipped
This display indicator illuminates momentarily
as a bulb check when the ignition switch is first
turned ON. The indicator will blink during an
active traction event, but will remain solid when the
system is deactivated or if a system malfunction occurs.
The Traction Control indicator will turn ON if:
²The Traction Control system is in use.
²The Traction Control switch has been used to turn
the system OFF.
²There is an Anti-Lock Brake system malfunction or
Traction Control system malfunction.
²The system has been deactivated to prevent damage
to the brake system due to overheated brake tem-
peratures.
NOTE:Extended heavy use of Traction Control may
cause the system to deactivate and turn on the Traction
Control indicator. This is to prevent overheating of the
brake system and is a normal condition. The system will
remain disabled for about 4 minutes until the brakes have
cooled. The system will automatically reactivate and turn
off the Traction Control indicator.
3. Cruise Light Ð If Equipped
This light shows that the Speed Control System is ON.
This light will also illuminate for a 5±second bulb check
when the ignition switch is first turned to the ON
position.
4. Airbag Light
The light comes on and remains on for 6 to 8
seconds as a bulb check when the ignition
switch is first turned ON. If the bulb does not
come on during starting, have the bulb replaced. If the
light stays on, or comes on while driving, have the
system checked by an authorized dealer.
86 UNDERSTANDING YOUR INSTRUMENT PANEL
Page 91 of 273

In an ABS equipped vehicle, the Brake System Warning
light will come on if the ABS light is not functioning or if
the ABS system is not communicating.
19. Seat Belt Reminder Light
When the ignition switch is first turned ON, this
light will turn on for 5 to 8 seconds as a bulb
check. During the bulb check, if the driver's seat
belt is unbuckled, a chime will sound. After the bulb
check or when driving, if the driver seat belt remains
unbuckled, the Seat Belt Warning Light will flash or
remain on continuously. Refer to9Enhanced Driver
Seat Belt Reminder System (BeltAlertŸ)9in the Occu-
pant Restraints section for more information.
20. Theft Alarm Light Ð If Equipped
The light in the instrument cluster will flash rapidly for
15 seconds. This shows that the system is arming. If the
light comes on but does not flash, the system is still
armed, but there is a problem in the trunk circuit. After 15
seconds the light will continue to flash slowly. This
shows that the system is fully armed.
21. Low Fuel Light
When the fuel level drops to about 21¤2gallons (91¤2liters), the fuel symbol will light and remain lit
until fuel is added.
COMPASS, TEMPERATURE, AND TRIP
COMPUTER DISPLAY Ð IF EQUIPPED
This feature allows you to choose between a compass /
temperature display and one of five trip conditions being
monitored.
UNDERSTANDING YOUR INSTRUMENT PANEL 91
4
Page 139 of 273

NOTE:Using the ª3º range while operating the vehicle
under heavy operating conditions will improve perfor-
mance, fuel economy, and extend transaxle life by reduc-
ing excessive shifting and heat build up.
Use the ª3º range when descending steep grades to
prevent brake system distress.
ªLº Low
This range should be used for maximum engine braking
when descending steep grades. In this range, up shifts
will occur only to prevent engine over speed while down
shifts occur as early as possible.
WARNING!
Never use Park position on an automatic transmis-
sion as a substitute for the parking brake. Always
apply parking brake fully when parked to guard
against vehicle movement and possible injury or
damage.
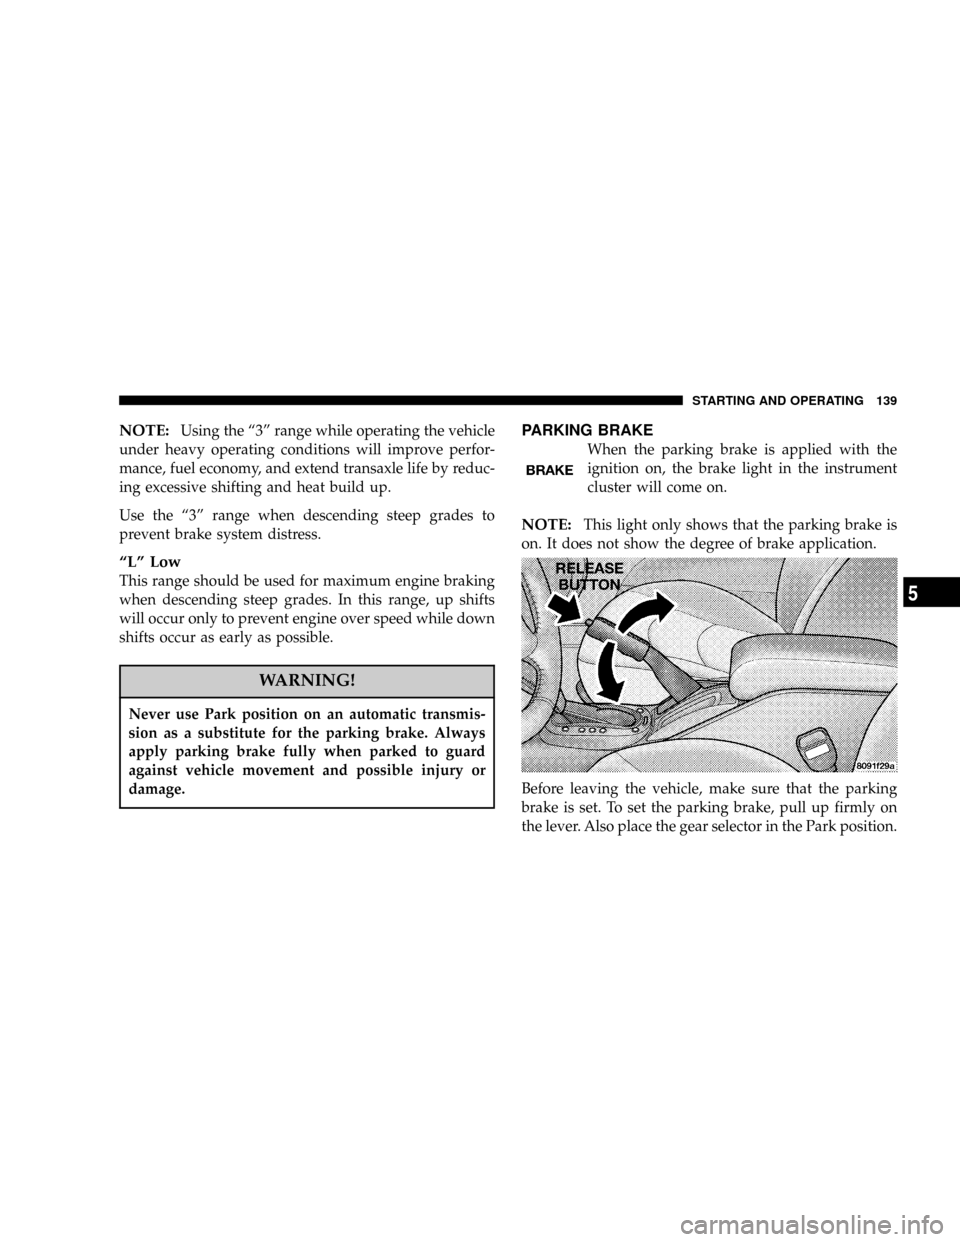
PARKING BRAKE
When the parking brake is applied with the
ignition on, the brake light in the instrument
cluster will come on.
NOTE:This light only shows that the parking brake is
on. It does not show the degree of brake application.
Before leaving the vehicle, make sure that the parking
brake is set. To set the parking brake, pull up firmly on
the lever. Also place the gear selector in the Park position.
STARTING AND OPERATING 139
5
Page 143 of 273
TRACTION CONTROL Ð IF EQUIPPED
The Traction Control System reduces wheel
slip and maintains traction at the driving
(front) wheels. The system reduces wheel slip
by engaging the brake on the wheel that is
losing traction while spinning. The traction system oper-
ates at speeds below 35 mph (56 km/h).The system is always in the ªstand byº mode unless:
²The Traction Control switch has been used to turn the
system off;
²There is an Anti-Lock Brake or Traction System mal-
function;
²The system has been deactivated to prevent damage to
the brake system due to overheated brake tempera-
tures.
NOTE:Extended heavy use of Traction Control may
cause the system to deactivate and turn on the Traction
Control indicator located in the instrument cluster.
This is to prevent overheating of the brake system and is
a normal condition. After cooling, the system will auto-
matically reactivate and turn off the Traction Control
Light.
STARTING AND OPERATING 143
5
Page 218 of 273

Glass Surfaces
All glass surfaces should be cleaned on a regular basis
with any commercial household-type glass cleaner.
Never use an abrasive type cleaner. Use caution when
cleaning inside rear windows equipped with electric
defrosters. Do not use scrapers or other sharp instru-
ments which may scratch the elements.
Instrument Panel Cover
The instrument panel cover has a low glare surface which
minimizes reflections in the windshield. Do not use
protectants or other products which may cause undesir-
able reflections. Use soap and warm water to restore the
low glare surface.
Cleaning Plastic Instrument Cluster Lenses
The lenses in front of the instruments in this vehicle are
molded in clear plastic. When cleaning the lenses, care
must be taken to avoid scratching the plastic.
²Clean with a wet soft rag. A mild soap solution may be
used, but do not use high alcohol content or abrasive
cleaners. If soap is used, wipe clean with a clean damp
rag.
²Dry with a soft tissue.
Seat Belt Maintenance
Do not bleach, dye or clean the belts with chemical
solvents or abrasive cleaners. This will weaken the fabric.
Sun damage will also weaken the fabric.
If the belts need cleaning, use a mild soap solution or
lukewarm water. Do not remove the belts from the
vehicle to wash them.
Replace the belts if they appear frayed or worn or if the
buckles do not work properly.
218 MAINTAINING YOUR VEHICLE
Page 220 of 273

Cavity Fuse Circuit
1 30 Amp Green Blower Motor
2 10 Amp Red Right High Beam Headlight,
High Beam Indicator
3 10 Amp Red Left High Beam Headlight
4 15 Amp Blue Power Door Lock Switch Illu-
mination, Transmission
Range Switch, Daytime Run-
ning Light Module (Canada),
Power Windows, Anti-lock
Brake System Module
5 10 Amp Red Power Door Lock and Door
Lock Arm/Disarm Switches,
Vanity, Reading, Map, Rear
Seating, Ignition, and Trunk
Lights, Illuminated Entry,
Radio, Power Antenna, Data
Link Connector, Body Con-
trol Module, Power Amplifier
6 10 Amp Red Heated Rear Window Indica-
tor
7 20 Amp Yel-
lowInstrument cluster illumina-
tion, Park and tail Lights
8 20 Amp Yel-
lowPower Receptacle, Horns,
Ignition, Fuel, StartCavity Fuse Circuit
9 15 Amp Blue Power Door Lock Motors
(Body Control Module)
10 20 Amp Yel-
lowDaytime Running Light Mod-
ule (Canada)
11 10 Amp Red Instrument Cluster, Transmis-
sion Control, Park/Neutral
Switch, Body Control Module
12 10 Amp Red Left Low beam Headlight
13 20 Amp Yel-
lowRight Low Beam Headlight,
Fog Light Switch
14 10 Amp Red Radio
15 10 Amp Red Turn Signal and Hazard
Flashers, Wiper Switch, Seat
Belt Control Module, Wiper
Relays, Rear Window De-
froster Relay
16 10 Amp Red Airbag Control Module
17 10 Amp Airbag Control Module
18 20 Amp
C/BRKRPower Seat Switch, Remote
Trunk Release
19 30 Amp
C/BRKRPower Windows
220 MAINTAINING YOUR VEHICLE
Page 221 of 273

CAUTION!
When replacing a blown fuse, it is important to use
only a fuse having the correct amperage rating. The
use of a fuse with a rating other than indicated may
result in a dangerous electrical system overload. If a
properly rated fuse continues to blow, it shows a
problem in the circuit that must be corrected.
REPLACEMENT LIGHT BULBS
LIGHT BULBS Ð Interior Bulb Number
Instrument Cluster..................... PC194
ABS Lamp........................... PC161
Fog Light Indicator..................... PC161
Dome Light............................ 578
Front Reading/Map Lights.................. 906
Trunk Light............................ 562
Climate Control Light...................... 37
Traction Control Light...................PC161LIGHT BULBS Ð Exterior Bulb Number
Headlight.............................9007
Park/Turn Signal (Front).................3157A
Side / Marker (Front)..................... 168
Fog Light.............................880L
Tail/Stop/Turn Signal....................3157
Back Up Light........................... 921
Center Stop Light........................ 921
License Light...........................2825
MAINTAINING YOUR VEHICLE 221
7