Page 90 of 273

If the light comes on and remains on while driving, stop
the vehicle and shut off the engine. Do not operate the
vehicle until the cause is corrected.
The light does not show the quantity of oil in the engine.
This can be determined using the procedure shown in
Section 7.
18. Brake System Warning Light
This light monitors both the brake fluid level
and the parking brake. If the light comes on,
it indicates either that the parking brake is
on or there is a low fluid level in the brake
master cylinder. On vehicles equipped with Anti-lock
brakes (ABS), the brake light may also indicate re-
duced braking performance.
If the parking brake is off and the light remains on, have
the brake system inspected as soon as possible.
WARNING!
Driving a vehicle with the brake light on is danger-
ous. A significant decrease in braking performance
may occur. It will take you longer to stop the vehicle.
You could have an accident. Have the vehicle
checked immediately.
The warning light should be checked frequently to assure
that it is operating properly. Turn the ignition key to the
RUN position. (Refer to ªA Word About Your Keys,
Ignition Key Removalº in this manual for an illustration
of the ignition positions.) The light should come on. If the
light does not come on, have the system checked by an
authorized dealer.
The light will also come on when the parking brake is
applied with the ignition in the RUN position.
NOTE:This light shows only that the parking brake is
on. It does not show the degree of brake application.
90 UNDERSTANDING YOUR INSTRUMENT PANEL
Page 185 of 273

MAINTAINING YOUR VEHICLE
CONTENTS
m2.4L Engine..........................187
m2.7L Engine..........................188
mOnboard Diagnostic System Ð OBD II......189
mEmissions Inspection And Maintenance
Programs
............................190
mReplacement Parts.....................191
mDealer Service........................191
mMaintenance Procedures.................192
NEngine Oil..........................192
NCrankcase Emission Control System........198
NMaintenance-Free Battery................198
NAir Conditioner......................199NPower Steering Fluid Check..............200
NSuspension Ball Joints..................201
NBody Mechanism Lubrication.............201
NWindshield Wiper Blades................203
NWindshield Washers...................203
NExhaust System......................204
NCooling System.......................205
NHoses And Vacuum/Vapor Harnesses.......209
NBrakes.............................209
NFuel System Hoses....................211
NAutomatic Transmission................211
7
Page 210 of 273

Inspect all hose clamps and couplings to make sure they
are secure and no leaks are present.
Insure nylon tubing in these areas has not melted or
collapsed.
NOTE:Often, fluids such as oil, power steering fluid,
and brake fluid are used during assembly plant opera-
tions to ease the assembly of hoses to couplings. There-
fore, oil wetness at the hose-coupling area is not neces-
sarily an indication of leakage. Actual dripping of hot
fluid when systems are under pressure (during vehicle
operation) should be noted before hose is replaced based
on leakage.
NOTE:Inspection of brake hoses should be done
whenever the brake system is serviced and every engine
oil change.
WARNING!
Worn brake hoses can burst and cause brake failure.
You could have an accident. If you see any signs of
cracking, scuffing, or worn spots, have the brake
hoses replaced immediately.
Master Cylinder
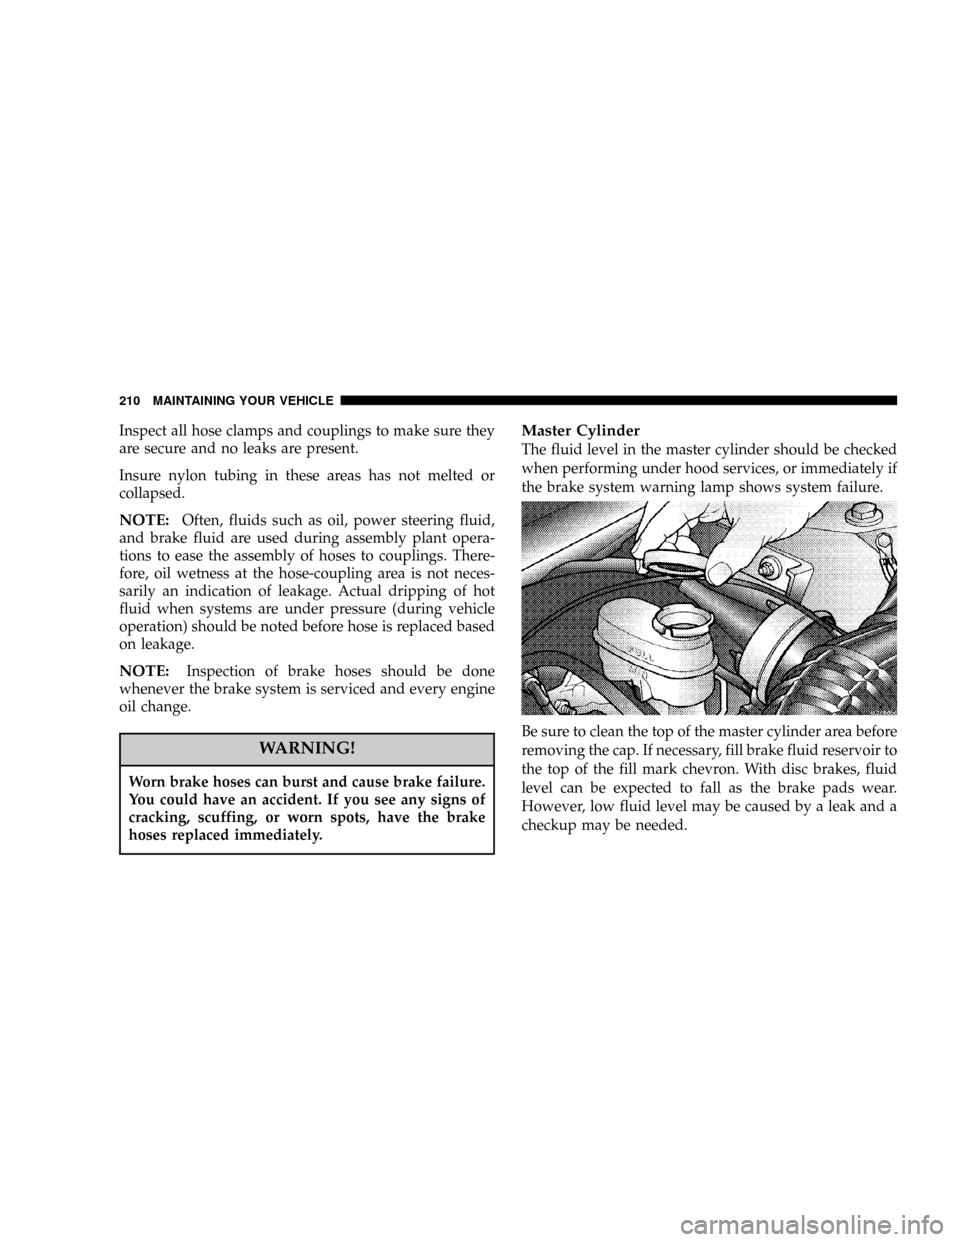
The fluid level in the master cylinder should be checked
when performing under hood services, or immediately if
the brake system warning lamp shows system failure.
Be sure to clean the top of the master cylinder area before
removing the cap. If necessary, fill brake fluid reservoir to
the top of the fill mark chevron. With disc brakes, fluid
level can be expected to fall as the brake pads wear.
However, low fluid level may be caused by a leak and a
checkup may be needed.
210 MAINTAINING YOUR VEHICLE
Page 211 of 273

Use only manufacturer's recommended brake fluid, refer
to Recommended Fluids, Lubricants and Genuine Parts
for correct fluid type.
WARNING!
Use of a brake fluid that has a lower initial boiling
point than MOPAR DOT 3 Brake Fluid or that is
unidentified as to DOT FMVSS specification may
result in sudden brake failure during hard or pro-
longed braking. You could have an accident.
WARNING!
Overfilling the brake fluid reservoir can result in
spilling brake fluid on hot engine parts and the
brake fluid catching fire.
Use only brake fluid that has been in a tightly closed
container to avoid contamination from foreign matter.Do not allow petroleum base fluid to contaminate the
brake fluid as seal damage will result!
Fuel System Hoses
Electronic Fuel Injection high pressure fuel systems are
designed with hoses and clamps which have unique
material characteristics to provide adequate sealing and
resist attack by deteriorated gasoline.
You are urged to use only manufacturer specified hoses
and clamps, or their equivalent in material and specifi-
cation, in any fuel system servicing. It is mandatory to
replace all clamps that have been loosened or removed
during service. Care should be taken in installing new
clamps to insure they are properly torqued.
Automatic Transmission
Your front wheel drive vehicle has a transmission and
differential assembly contained within a single housing.
This is referred to as a ªTransaxle.º
MAINTAINING YOUR VEHICLE 211
7
Page 212 of 273

Selection of Lubricant
It is important that the proper lubricant is used in the
transmission to assure optimum transmission perfor-
mance. Use only manufacturers recommended transmis-
sion fluid, refer to Recommended Fluids, Lubricants and
Genuine Parts for correct fluid type. It is important that
the transmission fluid be maintained at the prescribed
level using the recommended fluid.
CAUTION!
Using a transmission fluid other than the manufac-
turers recommended fluid may cause deterioration
in transmission shift quality and/or torque converter
shudder. Using a transmission fluid other than the
manufacturers recommended fluid will result in
more frequent fluid and filter changes. Refer to
Recommended Fluids, Lubricants and Genuine Parts
for correct fluid type.
Procedure For Checking Fluid Level
The fluid level in the automatic transaxle should be
checked whenever the vehicle is serviced. Operation with
an improper fluid level will greatly reduce the life of the
transaxle and of the fluid.
To properly check the automatic transaxle fluid level, the
following procedure must be used:
²The vehicle must be on level ground.
²The engine should be running at curb idle speed for a
minimum of 60 seconds.
²Fully apply parking brake.
²Place the gear selector momentarily in each gear
position ending with the lever in P (PARK).
²Wipe the dipstick clean and reinsert until seated.
Remove dipstick and note reading.
²If the fluid is cold (80ÉF / 27ÉC), the reading should be
in the cross hatched area marked ªCOLDº (between
the lower two holes in the dipstick).
212 MAINTAINING YOUR VEHICLE
Page 229 of 273
Chassis
Component Fluid, Lubricant, or Genuine Part
Automatic Transmission MopartATF+4 Automatic Transmission Fluid.
Manual Transmission MopartATF+4 Automatic Transmission Fluid.
Brake Master Cylinder MopartBrake Fluid DOT 3 Motor Vehicle.
Power Steering Reservoir MopartATF+4 Automatic Transmission Fluid.
Steering Gear & Linkage, Ball
Joints, Prop Shafts & Yokes, Wheel
BearingsMopartMulti-Purpose Lubricant NLGI Grade 2.
MAINTAINING YOUR VEHICLE 229
7
Page 235 of 273

Once a Month
²
Check tire pressure and look for unusual wear or
damage.
²Inspect the battery and clean and tighten the terminals
as required.
²Check the fluid levels of coolant reservoir, brake
master cylinder, and transaxle and add as needed.
²Check all lights and all other electrical items for correct
operation.
²Check rubber seals on each side of the radiator for
proper fit.
At Each Oil Change
²
Change the engine oil filter.
²Inspect the exhaust system.
²Inspect the brake linings, hoses and calipers.
²Inspect the CV joints and front and rear suspension
components.
²Check the automatic transmission fluid level.
²Check the brake master cylinder fluid level.
²Check the manual transmission fluid level.
²Check the coolant level, hoses, and clamps.
²Rotate the tires at each oil change interval shown on
Schedule ªAº 6,000 miles (10 000 km) or every other
interval shown on Schedule ªBº 6,000 miles (10 000
km).
NOTE:In 2.7L Engines equipped with Flex Fuel Engine
(FFV), change engine oil every 5 months or 5,000 miles,
whichever comes first. This applies to both Maintenance
Schedule A and B.
MAINTENANCE SCHEDULES 235
8
M
A
I
N
T
E
N
A
N
C
E
S
C
H
E
D
U
L
E
S
Page 240 of 273
Miles 57,000 60,000 63,000 66,000 69,000 72,000
(Kilometers) (91 000) (96 000) (101 000) (106 000) (110 000) (115 000)
Change engine oil and engine oil filter.XXXXX X
Inspect theair cleaner filterand replace if
necessary.*X XXX X
Replace theair cleaner filter.X
Inspect and check tension for power steering
belt (2.4 Liter Engine). Adjust or replace if re-
quired.X
Inspect the front and rear brake pads, linings,
rotors, rear drums and shoes.XX
Replace theignition cableson 2.4 liter engine.
**X
Replace the accessory drive belts on the 2.7
liter engine.X
Replace thespark plugson the 2.4 liter en-
gine. **X
Check and replace, if necessary, thePCV
valve.*³X
Change the automatic transmission fluid and
filter.LX
240 SCHEDULE ªBº
8
M
A
I
N
T
E
N
A
N
C
E
S
C
H
E
D
U
L
E
S