Page 65 of 273

Turn Signals
Move the turn signal lever up or down and the arrows in
the instrument cluster flash to show proper operation of
the front and rear turn signal lights. You can signal a lane
change by moving the lever partially up or down.
Headlight Beam Select Switch
Pull the turn signal lever towards you to switch the
headlights to HIGH beam. Pull the turn signal lever a
second time to switch the headlights to LOW beam.
Passing Light
You can signal another vehicle with your headlights by
lightly pulling the turn signal lever toward the steering
wheel. This will cause the headlights to turn on at high
beam and remain on until the lever is released.
Headlight Time Delay
This feature provides the safety of headlight illumination
for about 90 seconds when leaving your vehicle in an
unlighted area.
To activate the delay, turn off the ignition while the
headlights are still on. Then turn off the headlights. The
delay interval begins when the ignition is turned off.If the headlights are turned off before the ignition, they
will turn off in the normal manner.
WINDSHIELD WIPERS AND WASHERS
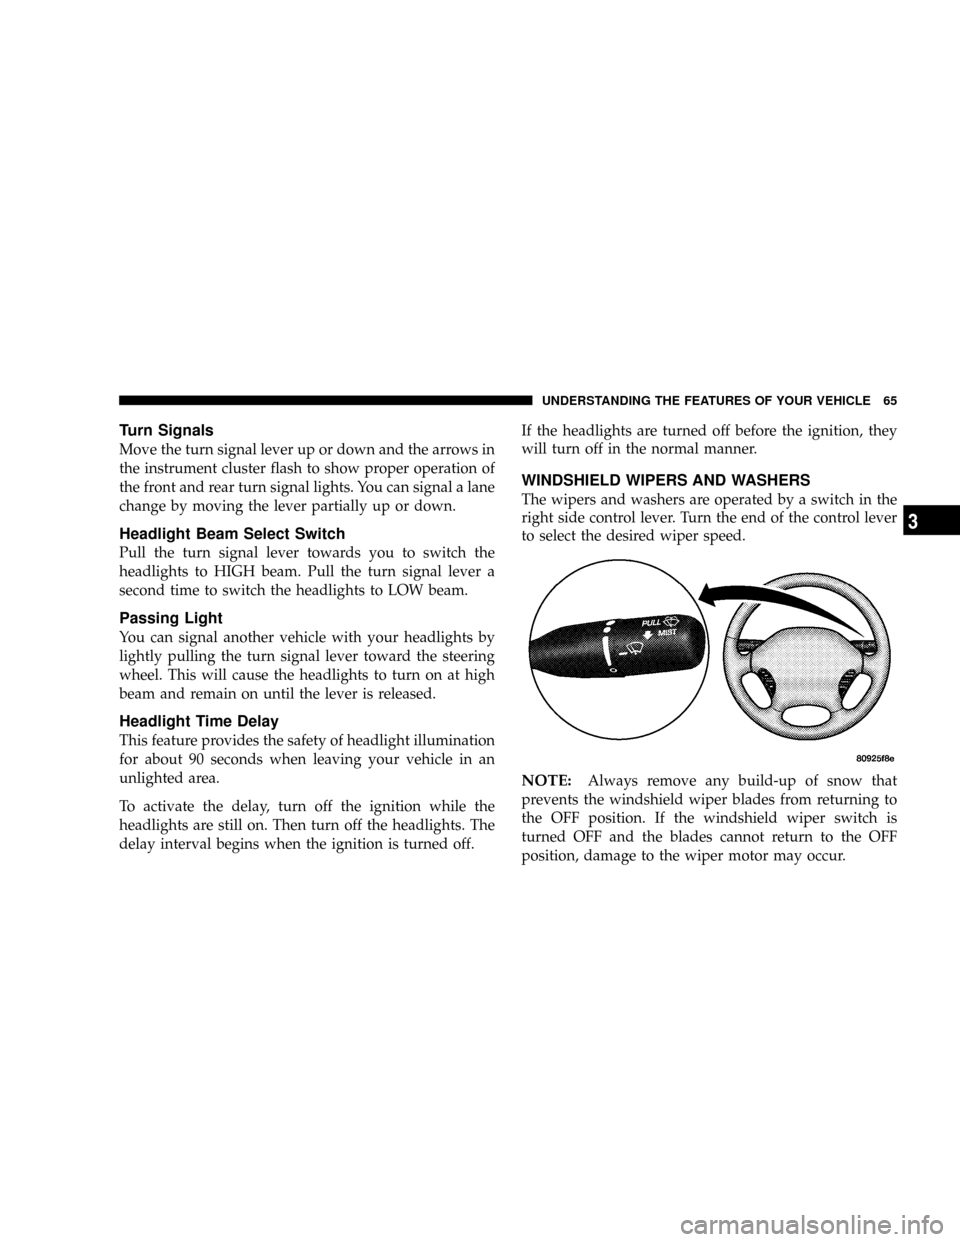
The wipers and washers are operated by a switch in the
right side control lever. Turn the end of the control lever
to select the desired wiper speed.
NOTE:Always remove any build-up of snow that
prevents the windshield wiper blades from returning to
the OFF position. If the windshield wiper switch is
turned OFF and the blades cannot return to the OFF
position, damage to the wiper motor may occur.
UNDERSTANDING THE FEATURES OF YOUR VEHICLE 65
3
Page 67 of 273
WARNING!
Tilting the steering column while the vehicle is
moving is dangerous. Without a stable steering col-
umn, you could lose control of the vehicle and have
an accident. Adjust the column only while the ve-
hicle is stopped. Be sure it is locked before driving.
TRACTION CONTROLÐ IF EQUIPPED
To turn the Traction Control System Off, press
the switch located on the top of the steering
column, to the right of the hazard switch, until
the Traction Control indicator in the instrument
cluster lights up.
To turn the Traction Control System On, press the switch
until the Traction Control indicator in the instrument
cluster turns off.
UNDERSTANDING THE FEATURES OF YOUR VEHICLE 67
3
Page 68 of 273

NOTE:The Traction Control System is enabled each
time the ignition switch is turned On. This will occur
even if you used the switch to turn the system off before
powering down or turning the ignition to Lock.
ELECTRONIC SPEED CONTROLÐ IF EQUIPPED
When engaged, this device will control the throttle op-
eration to maintain a constant vehicle speed between 30
mph (48 km/h) and 85 mph (137 km/h). The controls are
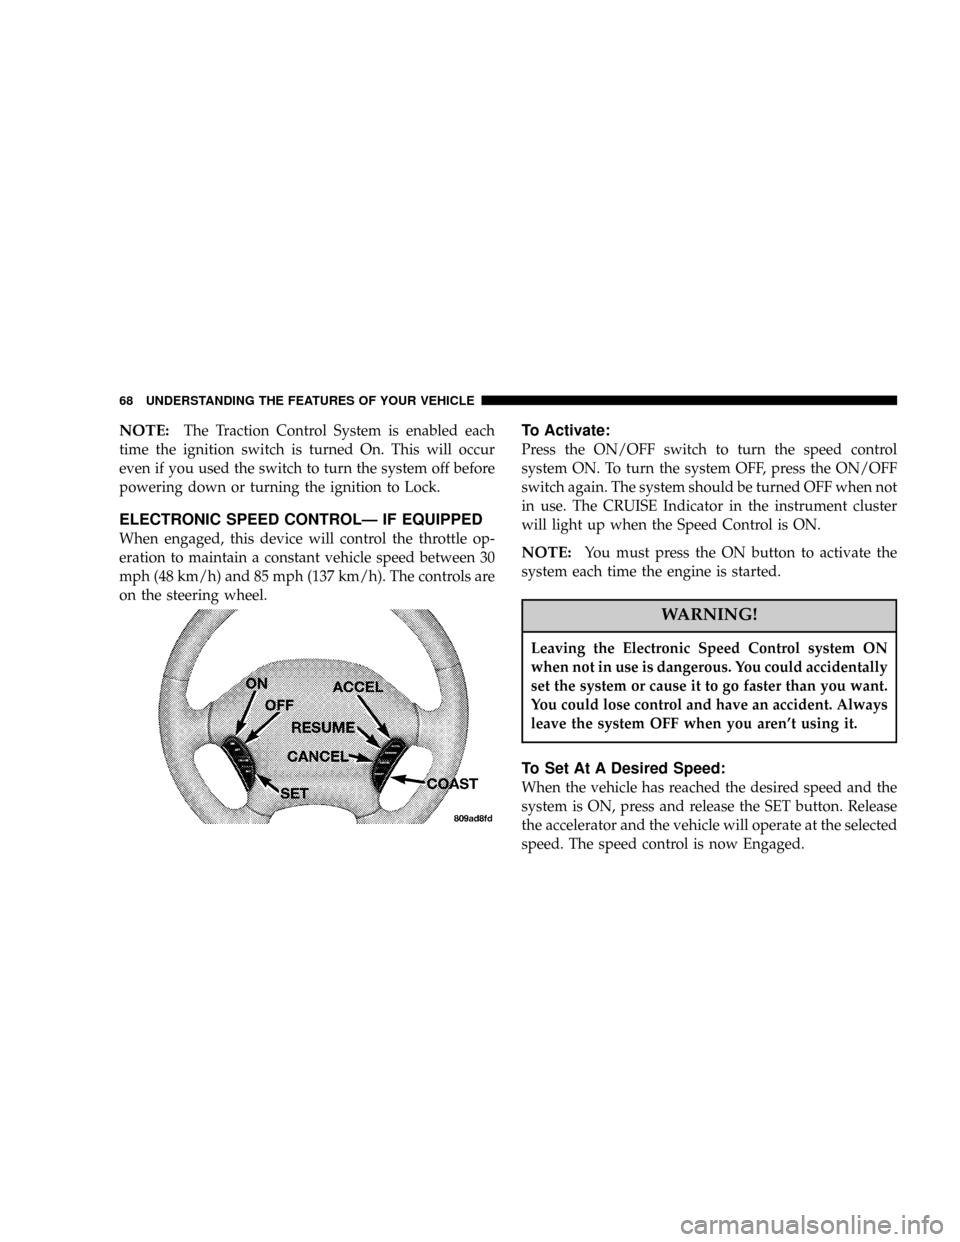
on the steering wheel.
To Activate:
Press the ON/OFF switch to turn the speed control
system ON. To turn the system OFF, press the ON/OFF
switch again. The system should be turned OFF when not
in use. The CRUISE Indicator in the instrument cluster
will light up when the Speed Control is ON.
NOTE:You must press the ON button to activate the
system each time the engine is started.
WARNING!
Leaving the Electronic Speed Control system ON
when not in use is dangerous. You could accidentally
set the system or cause it to go faster than you want.
You could lose control and have an accident. Always
leave the system OFF when you aren't using it.
To Set At A Desired Speed:
When the vehicle has reached the desired speed and the
system is ON, press and release the SET button. Release
the accelerator and the vehicle will operate at the selected
speed. The speed control is now Engaged.
68 UNDERSTANDING THE FEATURES OF YOUR VEHICLE
Page 77 of 273

NOTE:The sunshade can only be closed by hand.
WARNING!
In an accident, there is greater risk of being thrown
from a vehicle with an open sunroof. You could also
be seriously injured or killed. Always fasten your
seat belt properly and make sure all passengers are
properly secured too.
Do not allow small children to operate the sunroof.
Never allow fingers or other body parts, or any
object to project through the sunroof opening. Injury
may result.
Sunroof Maintenance
Use only a non abrasive cleaner and a soft cloth to clean
the glass panel.
Wind Buffeting
Wind buffeting can be described as the perception of
pressure on the ears or a helicopter type sound in the
ears. Your vehicle may exhibit wind buffeting with the
windows down, or the sunroof (if so equipped) in certain
open or partially open positions. This is a normal occur-
rence and can be minimized. If the buffeting occurs with
the rear windows open, open the front and rear windows
together to minimize the buffeting. If the buffeting occurs
with the sunroof open, adjust the sunroof opening to
minimize the buffeting.
ELECTRICAL POWER OUTLET
The power outlet is located in the lower center of your
instrument panel. If your vehicle is equipped with heated
seats, a second power outlet is located inside the center
console. All accessories connected to any outlet should be
removed or turned off when the vehicle is not in use.
UNDERSTANDING THE FEATURES OF YOUR VEHICLE 77
3
Page 79 of 273

UNDERSTANDING YOUR INSTRUMENT PANEL
CONTENTS
mInstruments And Controls.................83
mInstrument Cluster Standard...............84
mInstrument Cluster Premium...............85
mInstrument Cluster Description.............86
mCompass, Temperature, And Trip Computer
Display Ð If Equipped
...................91
NControl Buttons.......................92
NTrip Conditions........................92
NCompass Temperature Display.............93
mCigar Lighter/Ashtray...................95
mElectronic Digital Clock..................95
NTo Set The Clock.......................95
mRadio General Information................95
NRadio Broadcast Signals..................95
NTwo Types Of Signals...................96
NElectrical Disturbances...................96
NAM Reception........................96
NFM Reception.........................96
mSales Code RAZÐAM/ FM Stereo Radio With
Cassette Tape Player, CD Player And CD
Changer Controls Ð If Equipped
...........96
NOperating Instructions Ð Radio............96
NPower Switch, Volume Control.............96
NSeek Button (Radio Mode)................97
4
Page 80 of 273

NTuning..............................97
NPTY (Program Type) Button...............97
NBalance.............................98
NFade...............................98
NTone Control.........................98
NAM/FM Selection......................99
NScan Button..........................99
NTo Set The Radio Push-Button Memory.......99
NTo Change From Clock To Radio Mode.......99
NOperating Instructions Ð Tape Player........99
NSeek Button.........................100
NFast Forward (FF).....................100
NRewind (RW)........................100
NTape Eject...........................100
NScan Button.........................100
NChanging Tape Direction................100NMetal Tape Selection...................100
NPinch Roller Release...................100
NNoise Reduction......................101
NOperating Instructions Ð CD Player........101
NInserting The Compact Disc..............101
NSeek Button.........................102
NEJT CD (Eject) Button..................102
NFF/Tune/RW........................102
NProgram Button 4 (Random Play)..........102
NMode..............................103
NTape CD Button......................103
NTime Button.........................103
NScan Button.........................103
NCD Changer Control Capability Ð If
Equipped...........................103
80 UNDERSTANDING YOUR INSTRUMENT PANEL
Page 81 of 273

mSales Code RBBÐAM/FM Stereo Radio With
Cassette Tape Player And CD Changer
Capability
...........................105
NOperating Instructions..................105
NPower Button........................105
NElectronic Volume Control...............105
NSeek..............................105
NTune ..............................106
NTo Set The Push-Button Memory..........106
NBalance............................106
NFade..............................106
NBass And Treble Tone Control............106
NAM/FM Selection.....................107
NMode Button........................107
NCassette Player Features................107
NCD Changer Control Capability Ð If
Equipped...........................108NRadio Display Messages................109mSales Code RBKÐAM/ FM Stereo Radio With
CD Player And CD Changer Controls
.......110
NRadio Operation......................110
NCD Player Operation...................112
NCD Changer Control Capability Ð If
Equipped...........................113
NRadio Display Messages................115
m6 Disc CD Changer Ð If Equipped.........115
NLoading The CD Changer...............115
NPlaying Discs........................116
NSeek Button.........................116
NFF/Tune/RW........................116
NMode Button........................116
NProgram Button 1.....................116
NProgram Button 4 (Random Play)..........116
UNDERSTANDING YOUR INSTRUMENT PANEL 81
4
Page 82 of 273
NProgram Button 5.....................117
NTime Button.........................117
NChanging Modes......................117
NRemoving Discs From The CD Changer.....117
NCD Changer Operation With The Changer
Off ...............................117
mRemote Sound System Controls Ð If
Equipped
............................118
NRadio Operation......................118NTape Player.........................118
NCD Player Ð Single Disc In Radio.........119
NCD Player Ð 6 Disc CD Changer..........119
mCassette Tape And Player Maintenance......119
mCompact Disc Maintenance...............120
mRadio Operation And Cellular Phones.......121
mClimate Controls......................121
NManual Air Conditioning/Heater Control....121
82 UNDERSTANDING YOUR INSTRUMENT PANEL