2004 CHRYSLER SEBRING child restraint
[x] Cancel search: child restraintPage 43 of 273

in adjacent rear-seating positions or if your child re-
straints are not LATCH-compatible, install the restraints
using the vehicle's seat belts.
Installing the LATCH-Compatible Child Restraint
System
We urge that you carefully follow the directions of the
manufacturer when installing your child restraint. Not all
child restraint systems will be installed as described here.
Again, carefully follow the installation instructions that
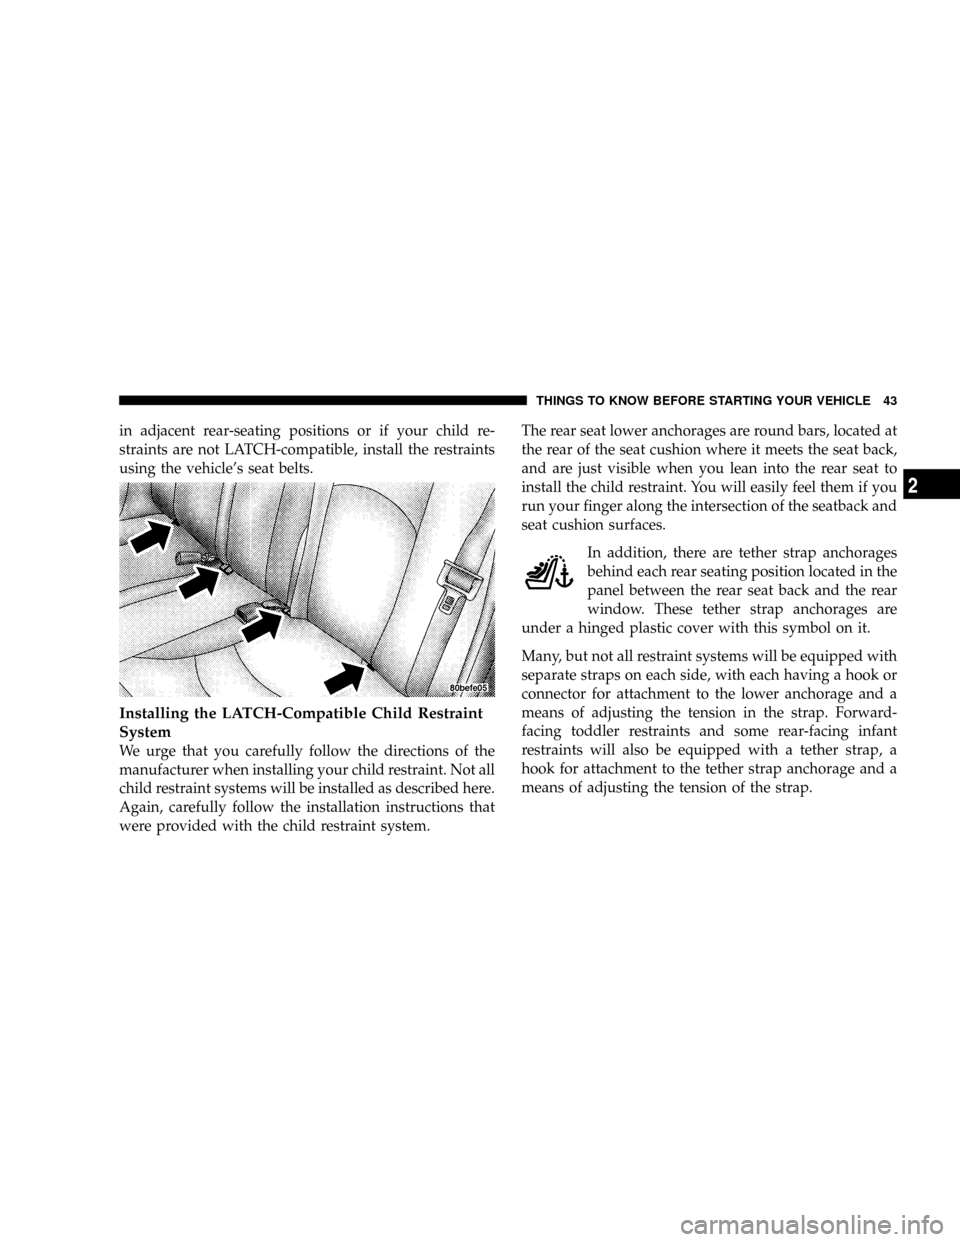
were provided with the child restraint system.The rear seat lower anchorages are round bars, located at
the rear of the seat cushion where it meets the seat back,
and are just visible when you lean into the rear seat to
install the child restraint. You will easily feel them if you
run your finger along the intersection of the seatback and
seat cushion surfaces.
In addition, there are tether strap anchorages
behind each rear seating position located in the
panel between the rear seat back and the rear
window. These tether strap anchorages are
under a hinged plastic cover with this symbol on it.
Many, but not all restraint systems will be equipped with
separate straps on each side, with each having a hook or
connector for attachment to the lower anchorage and a
means of adjusting the tension in the strap. Forward-
facing toddler restraints and some rear-facing infant
restraints will also be equipped with a tether strap, a
hook for attachment to the tether strap anchorage and a
means of adjusting the tension of the strap.
THINGS TO KNOW BEFORE STARTING YOUR VEHICLE 43
2
Page 44 of 273

You will first loosen the adjusters on the lower straps and
on the tether strap so that you can more easily attach the
hooks or connectors to the vehicle anchorages. Next
attach the lower hooks or connectors over the top of the
anchorage bars, pushing aside the seat cover material.
Then lift the tether anchorage cover directly behind the
seat where you are placing the child restraint and attach
the tether strap to the anchorage, being careful to route
the tether strap to provide the most direct path between
the anchor and the child restraint. If your vehicle is
equipped with adjustable rear head restraints, raise the
head restraint and, where possible, route the tether strap
under the head restraint and between the two posts. If
not possible, lower the head restraint and route the tether
strap around the outboard side of the head restraint.
Finally, tighten all three straps as you push the child
restraint rearward and downward into the seat, remov-
ing slack in the straps according to the child restraint
manufacturer's instructions.WARNING!
Improper installation of a child restraint to the
LATCH anchorages can lead to failure of an infant or
child restraint. The child could be badly injured or
killed. Follow the manufacturer's directions exactly
when installing an infant or child restraint.
Installing Child Restraints Using the Vehicle Seat
belt
The passenger seat belts are equipped with cinching latch
plates which are designed to keep the lap portion tight
around the child restraint so that it is not necessary to use
a locking clip. Pulling up on the shoulder portion of the
lap/shoulder belt will tighten the belt. The cinching latch
plate will keep the belt tight, however, any seat belt
system will loosen with time, so check the belt occasion-
ally and pull it tight if necessary.
44 THINGS TO KNOW BEFORE STARTING YOUR VEHICLE
Page 45 of 273

In the rear seat, you may have trouble tightening the
lap/shoulder belt on the child restraint because the
buckle or latch plate is too close to the belt path opening
on the restraint. Disconnect the latch plate from the
buckle and twist the short buckle-end belt several times
to shorten it. Insert the latch plate into the buckle with the
release button facing out.
If the belt still can't be tightened, or if by pulling and
pushing on the restraint loosens the belt, you may need
to do something more. Disconnect the latch plate from
the buckle, turn the buckle around, and insert the latch
plate into the buckle again. If you still can't make the
child restraint secure, try a different seating position.
NOTE:This vehicle may be equipped with rotating
tether caps for accessing the tether anchors. Follow the
appropriate instructions below to attach child restraint
tether strap.
Child restraint tether strap attachment
(Non-Rotating Tether Caps)
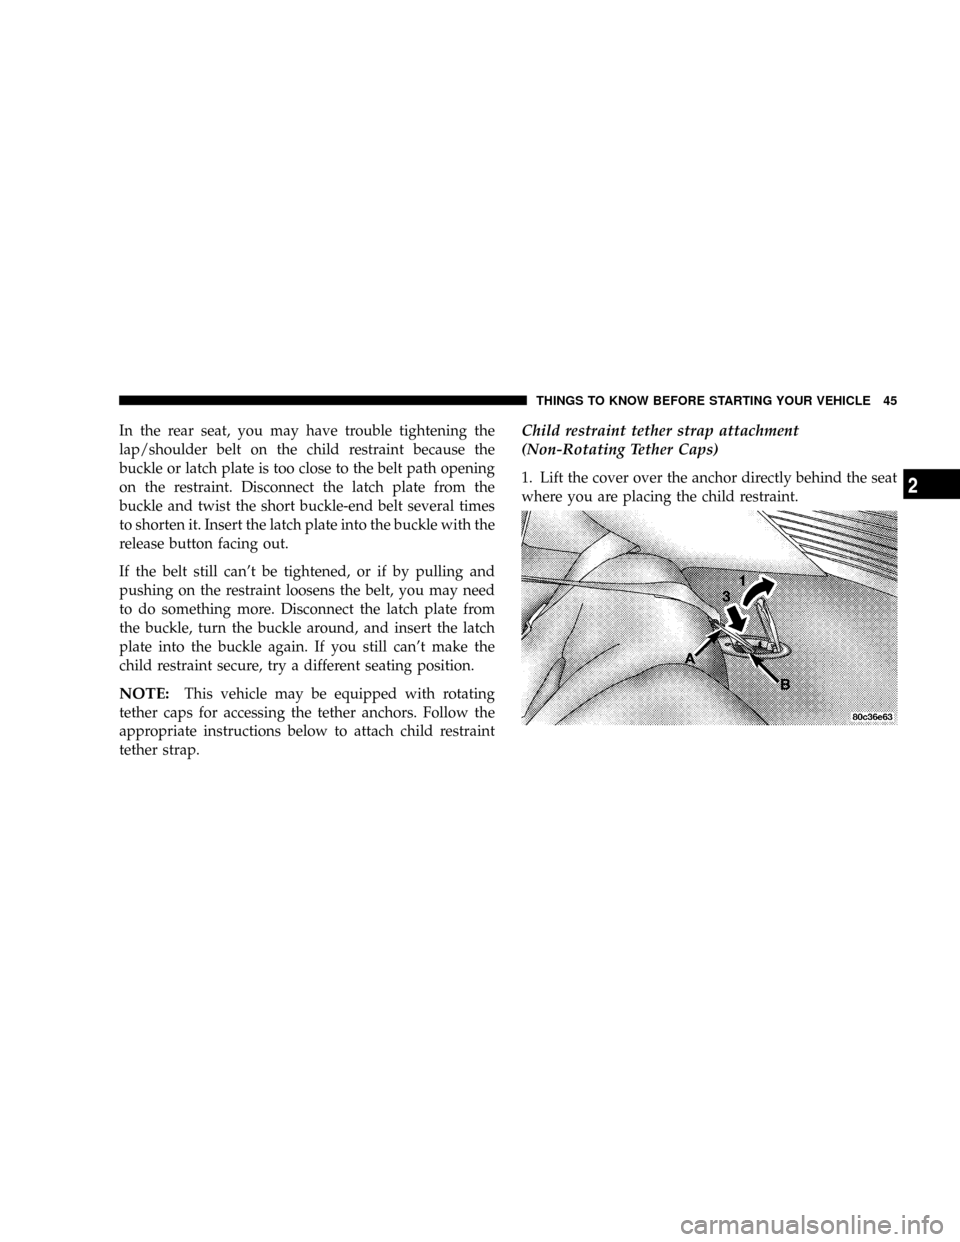
1. Lift the cover over the anchor directly behind the seat
where you are placing the child restraint.
THINGS TO KNOW BEFORE STARTING YOUR VEHICLE 45
2
Page 46 of 273

2. Route the tether strap to provide the most direct path
for the strap between the anchor and the child seat. If
your vehicle is equipped with adjustable rear head
restraints, raise the head restraint and, where possible,
route the tether strap under the head restraint and
between the two posts. If not possible, lower the head
restraint and pass the tether strap around the outboard
side of the head restraint.
3. Attach the tether strap hook (A) of the child restraint
to the anchor (B) and remove slack in the tether strap
according to the child restraint manufacturer's instruc-
tions.
Child restraint tether strap attachment (Rotating
Tether Caps)
1. Rotate the cover over the anchor directly behind the
seat where you are placing the child restraint.2. Route the tether strap to provide the most direct path
for the strap between the anchor and the child seat. If
your vehicle is equipped with adjustable rear head
restraints, raise the head restraint and, where possible,
route the tether strap under the head restraint and
between the two posts. If not possible, lower the head
restraint and pass the tether strap around the outboard
side of the head restraint.
46 THINGS TO KNOW BEFORE STARTING YOUR VEHICLE
Page 47 of 273

3. Attach the tether strap hook (A) of the child restraint
to the anchor (B) and remove slack in the tether strap
according to the child restraint manufacturer's instruc-
tions.
WARNING!
An incorrectly anchored tether strap could lead to
increased head motion and possible injury to the
child. Use only the anchor positions directly behind
the child seat to secure a child restraint top tether
strap.
Transporting Pets
Airbags deploying in the front seat could harm your pet.
An unrestrained pet will be thrown about and possibly
injured, or injure a passenger during panic braking or in
a collision.
Pets should be restrained in the rear seat in pet harnesses
or pet carriers that are secured by seat belts.
ENGINE BREAK-IN RECOMMENDATIONS
The engine in your new vehicle does not require a long
break-in period.
Drive moderately during the first 300 miles (500 km).
After the initial 60 miles (100 km), speeds up to 50 or 55
mph (80 or 90 km/h) are desirable.
While cruising, brief full-throttle acceleration, within the
limits of local traffic laws, contributes to a good break-in.
Wide open throttle acceleration in low gear can be
detrimental and should be avoided.
The crankcase oil installed in the engine at the factory is
a high quality energy conserving type lubricant. Oil
changes should be consistent with expected climate con-
ditions under which vehicle operations will occur. The
recommended viscosity and quality grades are in Section
7 of this manual.
Do not use non-detergent or straight mineral oils.
A new engine may consume some oil during its first few
thousand miles of operation. This is a normal part of the
break-in and not an indication of a problem.
THINGS TO KNOW BEFORE STARTING YOUR VEHICLE 47
2
Page 60 of 273

WARNING!
The cargo area in the rear of the vehicle (with the
rear seatbacks in the locked-up or folded down
position) should not be used as a play area by
children when the vehicle is in motion. They could
be seriously injured in an accident. Children should
be seated and using the proper restraint system.
TO OPEN AND CLOSE THE HOOD
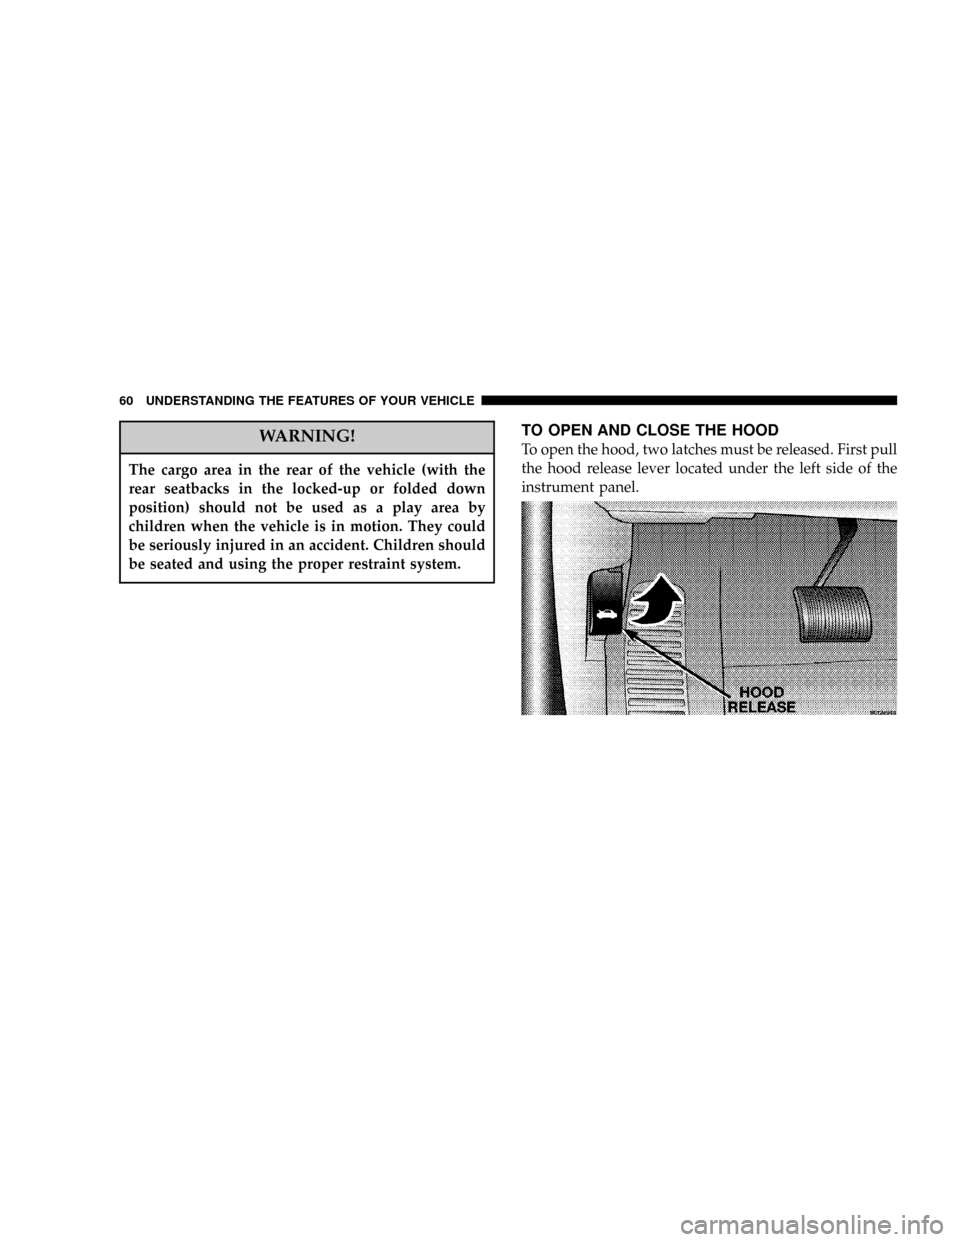
To open the hood, two latches must be released. First pull
the hood release lever located under the left side of the
instrument panel.
60 UNDERSTANDING THE FEATURES OF YOUR VEHICLE
Page 263 of 273

Jump Starting........................ 179
Keyless Transmitter Replacement.......... 21
Location.........................179,198
Belts, Drive........................... 196
Belts, Engine.......................... 198
Body Mechanism Lubrication.............. 201
B-Pillar Location....................... 148
Brake, Parking......................... 139
Brake System.......................141,209
Anti-Lock........................... 141
Fluid Check......................... 210
Hoses.............................. 209
Master Cylinder...................... 210
Warning Light........................ 90
Brake/Transmission Interlock...........135,137
Break-In Recommendations, New Vehicle...... 47
Bulb Replacement...................... 224
Bulbs, Light........................... 221
Capacities, Antifreeze (Engine Coolant)...... 227
Capacities, Fluid....................... 227
Car Washes........................... 215
Carpeting............................. 216Cassette Tape and Player Maintenance....... 119
Cassette Tape Player...............96,105,107
Catalytic Converter..................... 197
CD Changer..................103,108,113,115
CD Player....................101,110,112,119
Center High Mounted Stop Light........... 226
Central Locking......................... 16
Chains, Tire........................... 158
Changing A Flat Tire.................... 174
Charging System Light................... 87
Chart, Tire Sizing....................... 145
Checking Your Vehicle For Safety............ 48
Child Restraint...................39,41,43,44
Child Restraint Tether Anchors............. 43
Child Safety Locks....................... 18
Cigar Lighter........................... 95
Circuit Breakers........................ 219
Cleaning
Glass.............................. 218
Headlights.......................... 217
Instrument Panel..................... 218
Climate Control........................ 121
Clock................................. 95
INDEX 263
10
Page 267 of 273

Infant Restraint......................... 40
Inside Rearview Mirror................... 55
Instrument Cluster.....................84,85
Instrument Panel and Controls.............. 83
Instrument Panel Cover.................. 218
Instrument Panel Lens Cleaning............ 218
Interior Fuses.......................... 219
Interior Lighting........................ 61
Interior Lights.......................... 62
Introduction............................ 4
Jack Location.......................... 174
Jack Operation......................... 174
Jump Starting......................... 179
Key, Programming....................... 14
Key, Sentry............................ 12
Key-In Reminder........................ 12
Keyless Entry System..................... 19
Keys................................. 11
Knee Bolster........................... 32
Lap/Shoulder Belts...................... 26LATCH
(Lower Anchors and Tether for CHildren)..... 43
Latch Plate............................ 27
Leaks, Fluid............................ 49
Lights................................ 61
Airbag..........................36,48,86
Anti-Lock............................ 89
Brake Warning.....................90,139
Bulb Replacement..................221,222
Check Engine......................... 87
Daytime Running...................... 64
Dimmer Switch, Headlight.............63,65
Exterior Check........................ 49
Fog ...........................64,88,225
Front Replacement.................... 225
Headlight Switch...................... 64
High Beam Indicator................... 87
Illuminated Entry...................... 14
Instrument Cluster..................... 64
Interior.............................. 61
License............................. 227
Lights On Reminder.................... 64
Low Fuel............................ 91
INDEX 267
10