2004 CHRYSLER SEBRING CONVERTIBLE child seat
[x] Cancel search: child seatPage 39 of 271

child restraint systems will be installed as described here.
Again, carefully follow the installation instructions that
were provided with the child restraint system.
The rear seat lower anchorages are round bars, located at
the rear of the seat cushion where it meets the seat back,
and are just visible when you lean into the rear seat to
install the child restraint. You will easily feel them if you
run your finger along the intersection of the seatback and
seat cushion surfaces.
In addition, there are tether strap anchorages
behind each rear seating position located in the
bottom of the convertible top well, behind the
seat back. The anchors are under the carpet
cutouts marked with this symbol. (Shown to the left).
Many, but not all restraint systems will be equipped with
separate straps on each side, with each having a hook or
connector for attachment to the lower anchorage and a
means of adjusting the tension in the strap. Forward-
facing toddler restraints and some rear-facing infant
restraints will also be equipped with a tether strap, a
hook for attachment to the tether strap anchorage and a
means of adjusting the tension of the strap.You will first loosen the adjusters on the lower straps and
on the tether strap so that you can more easily attach the
hooks or connectors to the vehicle anchorages. Next
attach the lower hooks or connectors over the top of the
anchorage bars, pushing aside the seat cover material.
Then lift the carpet flap to expose the tether anchor
directly behind the seat where you are placing the child
restraint and attach the tether strap to provide the most
direct path between the anchor and the child restraint.
Finally, tighten all three straps as you push the child
restraint rearward and downward into the seat, remov-
ing slack in the straps according to the child restraint
manufacturer's instructions.
WARNING!
Improper installation of a child restraint to the
LATCH anchorages can lead to failure of an infant or
child restraint. The child could be badly injured or
killed. Follow the manufacturer's directions exactly
when installing an infant or child restraint.
THINGS TO KNOW BEFORE STARTING YOUR VEHICLE 39
2
Page 40 of 271

Installing Child Restraints Using the Vehicle Seat
Belts
The passenger seat belts are equipped with cinching latch
plates which are designed to keep the lap portion tight
around the child restraint so that it is not necessary to use
a locking clip. Pulling up on the shoulder portion of the
lap/shoulder belt will tighten the belt. The cinching latch
plate will keep the belt tight, however, any seat belt
system will loosen with time, so check the belt occasion-
ally and pull it tight if necessary.
In the rear seat, you may have trouble tightening the
lap/shoulder belt on the child restraint because the
buckle or latch plate is too close to the belt path opening
on the restraint. Disconnect the latch plate from the
buckle and twist the short buckle-end belt several times
to shorten it. Insert the latch plate into the buckle with the
release button facing out.
If the belt still can't be tightened, or if by pulling and
pushing on the restraint loosens the belt, you may need
to do something more. Disconnect the latch plate from
the buckle, turn the buckle around, and insert the latchplate into the buckle again. If you still can't make the
child restraint secure, try a different seating position.
To attach a child restraint tether strap:
1. Lift the carpet flap to expose the anchor directly behind
the seat where you are placing the child restraint.
2. Route the tether strap to provide the most direct path
for the strap between the anchor and the child seat.
40 THINGS TO KNOW BEFORE STARTING YOUR VEHICLE
Page 41 of 271

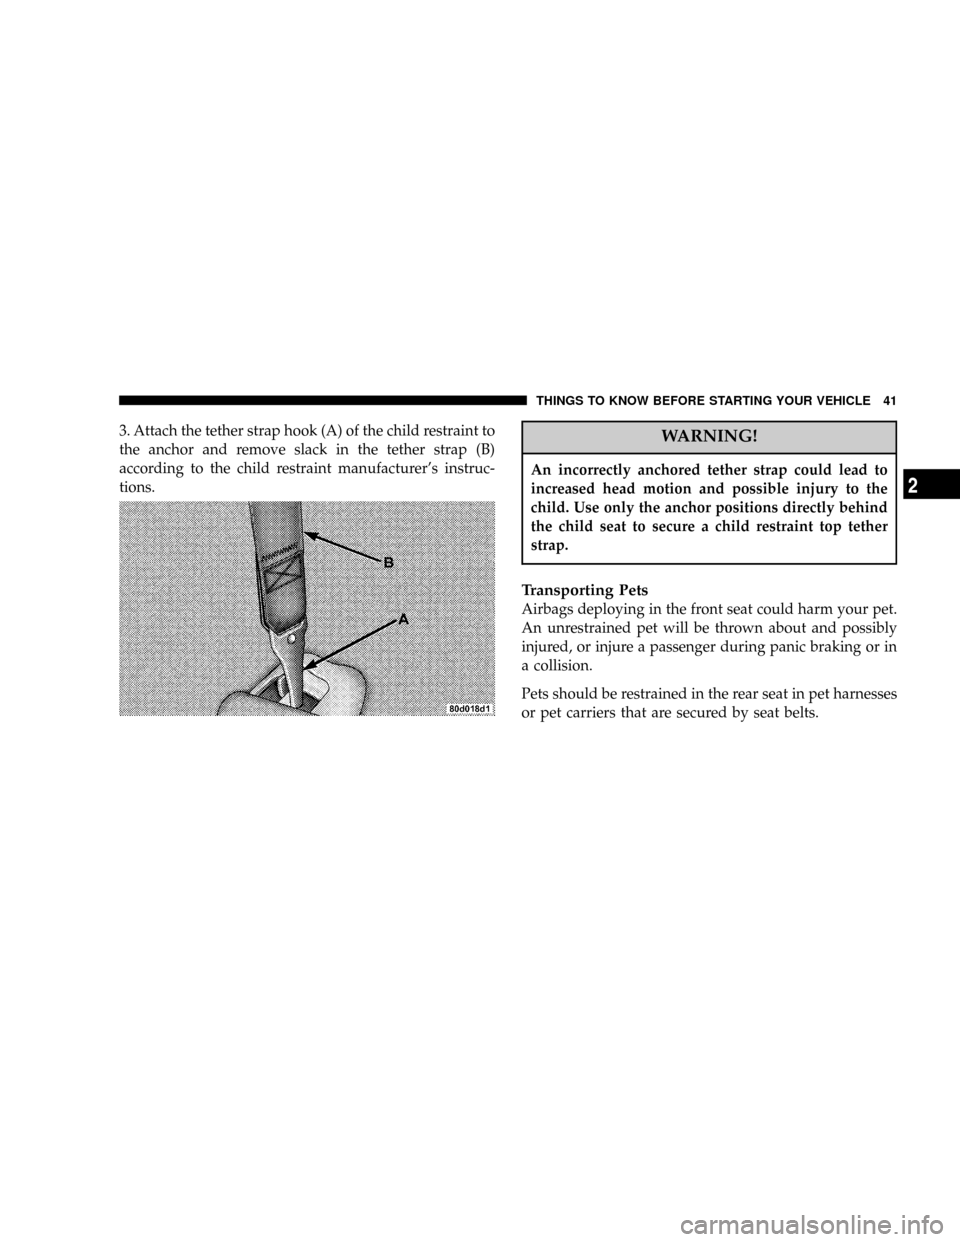
3. Attach the tether strap hook (A) of the child restraint to
the anchor and remove slack in the tether strap (B)
according to the child restraint manufacturer's instruc-
tions.WARNING!
An incorrectly anchored tether strap could lead to
increased head motion and possible injury to the
child. Use only the anchor positions directly behind
the child seat to secure a child restraint top tether
strap.
Transporting Pets
Airbags deploying in the front seat could harm your pet.
An unrestrained pet will be thrown about and possibly
injured, or injure a passenger during panic braking or in
a collision.
Pets should be restrained in the rear seat in pet harnesses
or pet carriers that are secured by seat belts.
THINGS TO KNOW BEFORE STARTING YOUR VEHICLE 41
2
Page 47 of 271

CONVERTIBLE TOP OPERATION
WARNING!
The convertible top does not provide the structural
protection that a reinforced metal roof does, and the
fabric top cannot be expected to prevent the ejection
of the occupants of a vehicle in a collision. Therefore
it is important that all occupants wear their seat belts
at all times when riding in a convertible. Studies
have shown that it is generally safer to remain inside
a vehicle during a collision, than to be ejected from
the vehicle.
NOTE:The top and top storage area should be thor-
oughly dry before lowering the top.
To Lower The Top:
NOTE:
To avoid damage to the convertible top or its
components, your vehicle is equipped with a feature that
prevents convertible top operation at speeds over 10 mph
(16 km/h).
CAUTION!
To fully insure that no damage occurs, be sure that
the vehicle is at a complete stop with the gear
selector in the Park position before lowering or
raising the top.
1. To avoid damage to either the top or the rear window,
check the top storage area at the rear of the vehicle
interior to be sure that it is clear of debris or other items.
Be sure that child seat flip up bars are lowered. Do not
use the top storage area for other storage purposes.
2. Turn the ignition key to the On position.
UNDERSTANDING THE FEATURES OF YOUR VEHICLE 47
3
Page 132 of 271

STARTING PROCEDURES
Before starting your vehicle, adjust your seat, adjust both
inside and outside mirrors, and fasten your seat belts.
CAUTION!
Long periods of engine idling, especially at high
engine speeds can cause excessive exhaust tempera-
tures which can damage your vehicle. Do not leave
your vehicle unattended with the engine running.
WARNING!
Do not leave children or animals inside parked
vehicles in hot weather. Interior heat build up may
cause serious injury or death.
Automatic Transaxle
The gear selector must be in the NEUTRAL or PARK
position before you can start the engine. Apply the brakes
before shifting to any driving gear.
Manual Transaxle
Fully apply the parking brake, press the clutch pedal to
the floor and place the gear selector in NEUTRAL before
starting the engine.
Normal Starting
Normal Starting of either a cold or a warm engine does
not require pumping or depressing the accelerator pedal.
Simply turn the key to the ªSTART'º position and release
when the engine starts. If the engine has not started
within 3 seconds, slightly depress the accelerator pedal
while continuing to crank. If the engine fails to start
within 15 seconds, turn the key to the ªOFFº position,
wait 10 to 15 seconds, then repeat the normal starting
procedure.
132 STARTING AND OPERATING
Page 266 of 271

Oil Pressure.......................... 90
Park............................... 228
Passing............................. 67
Reading............................. 64
Rear Servicing....................... 230
Seat Belt Reminder..................... 91
Security Alarm........................ 19
Service..........................225,226
Service Engine Soon.................... 88
Theft Alarm.......................... 92
Turn Signal.......................... 67
Voltage.............................. 88
Loading Vehicle........................ 166
Capacities........................... 166
Tires ............................... 149
Locks
Central.............................. 13
Door............................... 12
Ignition.............................. 9
Lower Anchors and Tether for CHildren
(LATCH)............................37,38
Lubricants............................ 203
Luggage/Cargo Capacity................. 166Maintenance Free Battery................. 200
Maintenance Procedures.................. 194
Maintenance Schedule................... 236
Light Duty Schedule9B9................ 239
Schedule9A9......................... 246
Schedule9B9......................... 239
Malfunction Indicator Light............... 192
Manual, Service........................ 255
Manual Transaxle....................139,186
Mirrors............................... 56
Electric Remote....................... 57
Exterior Folding....................... 57
Outside............................. 57
Rearview............................ 56
Vanity.............................. 58
Modifications/Alterations, Vehicle............ 6
Mopar Parts........................193,255
Multi-Function Control Lever............... 66
Occupant Restraints...................... 22
Odometer............................. 89
Tampering........................... 89
Trip ................................ 89
266 INDEX
Page 268 of 271

Recommended Fluids, Lubricants and Genuine
Parts............................... 233
Reformulated Gasoline................... 162
Refrigerant............................ 202
Reminder, Seat Belt...................... 27
Remote Keyless Entry.................... 15
Remote Trunk Release.................... 20
Replacement Tires...................... 157
Reporting Safety Defects................. 255
Restraints, Child........................ 34
Restraints, Occupant..................... 22
Rotation, Tires......................... 159
Safety Checks Outside Vehicle.............. 43
Safety Defects, Reporting................. 255
Safety Information, Tire.................. 145
Safety Tips............................. 42
Schedule, Maintenance................... 236
Seat Belt Maintenance................... 220
Seat Belt Reminder...................... 27
Seat Belts.........................22,23,40
And Pregnant Women.................. 28
Child Restraint........................ 40Extender............................ 28
Inspection........................... 43
Reminder............................ 91
Seats................................. 58
Adjustment.......................... 58
Cleaning............................ 218
Head Restraints....................... 62
Lumbar Support....................... 59
Power.............................. 60
Reclining............................ 59
Security Alarm......................... 19
Sentry Key...........................9,10
Service Assistance...................... 252
Service Contract........................ 254
Service Engine Soon Light................. 88
Service Manuals........................ 255
Setting the Clock........................ 96
Side Window Demisters.................. 125
Slippery Surfaces, Driving On............. 184
Snow Tires............................ 159
Spark Plugs........................... 198
Speed Control........................70,87
Speedometer........................... 88
268 INDEX