Page 14 of 277
ILLUMINATED ENTRY SYSTEM
The interior lights will come on when you unlock the
vehicle with the remote keyless entry or central unlock.
They will remain on for about 30 seconds after all doors
are closed then fade to off.
The lights also will fade to off if you turn on the ignition
after you close all the doors.
DOOR LOCKS
Power Door Locks
There is a door lock switch on each front door trim panel.
Press this switch to lock or unlock the four doors.
14 THINGS TO KNOW BEFORE STARTING YOUR VEHICLE
Page 20 of 277

Enable/Disable Trunk Press and Hold:
The transmitter can be programmed to unlatch the trunk
immediately upon activation of the Trunk button (with-
out pressing and holding) by performing the following
procedure:
1. Press and hold the Unlock button on the transmitter.
2. Continue to hold the Unlock button, wait at least 4 but
no longer than 10 seconds, then press the Trunk button.
3. Release both buttons.
Panic Alarm
The panic alarm unlocks the driver’s door, turns on the
interior lights, flashes the foglights and sounds the horn
for about 3 minutes or until the alarm is turned off. The
vehicle can be driven while in the Panic mode.
To Use The Panic Alarm:
Press and hold the Panic button to activate the alarm.
Press and hold the Panic button or unlock the door with
the key to deactivate the alarm. The alarm will also shut
itself off after 3 minutes or when vehicle speed reaches 15
m.p.h. (24 km/h).
To Program Additional Transmitters:
Up to 4 transmitters can be programmed to your vehicle.
To program a transmitter, perform the following proce-
dure.
On vehicles equipped with an EVIC (Electronic Vehicle
Information Center), these functions can be selected at
the EVIC using the Customer Programmable Features.
Refer to EVIC— Customer Programmable Features for
details.
NOTE:When entering program mode, all previously
programmed transmitters are erased from memory,
therefore you must reprogram ALL the transmitters
when you enter program mode.
20 THINGS TO KNOW BEFORE STARTING YOUR VEHICLE
Page 49 of 277

UNDERSTANDING THE FEATURES OF YOUR VEHICLE
CONTENTS
�Console Features.......................53
�Cup Holders..........................53
▫Front Seat Cupholders...................53
�Coat Hook............................54
�Mirrors..............................54
▫Adjusting The Inside Day/Night Mirror......54
▫Automatic Dimming Mirror Feature.........54
▫Heated Remote Control Mirrors............55
▫Electric Remote Control Mirrors............55
▫Supplemental Indicators — 300M Special Only .56
▫Mirror Adjustment.....................56
�Seats................................57▫Power Seats..........................57
▫Power Reclining Seats...................58
▫Driver’s Seat Glide –To – Exit Feature........58
▫Lumbar Support.......................59
▫Heated Seats.........................59
▫Memory Feature.......................60
▫Programming The Remote Keyless Transmitter
For The Memory Feature.................61
▫Head Restraints.......................62
▫Folding Rear Seat......................62
�To Open And Close The Hood.............63
�Interior Lights.........................64
3
Page 50 of 277

▫To Turn The Interior Lights On.............64
▫Battery Saver Feature—Interior Lights........64
▫Instrument Panel Lighting................65
▫Front Map/Reading Lights...............65
▫Rear Seat Reading/Courtesy Lights.........65
�Exterior Lights.........................66
▫Headlights And Parking Lights............66
▫Lights-On Reminder....................66
▫Automatic Headlights...................66
▫Headlight Time Delay...................67
▫Battery Saver Feature...................67
▫Fog Lights...........................67
▫Daytime Running Lights (Canada Only)......68
�Multifunction Control Lever...............68
▫Turn Signals..........................68
▫Headlight Dimmer Switch................68▫Passing Light.........................68
▫Windshield Wipers And Washers...........69
▫Speed Sensitive Intermittent Wipers System....69
�Tilt Steering Column.....................70
�Traction Control Switch..................70
�Electronic Speed Control..................71
▫To Activate...........................72
▫To Set At A Desired Speed................72
▫To Deactivate.........................72
▫To Resume Speed......................73
▫To Vary The Speed Setting................73
▫To Accelerate For Passing................73
▫Using Speed Control On Hills.............73
�Overhead Console......................74
▫Dome/Reading Lights...................74
�Garage Door Opener — If Equipped.........75
50 UNDERSTANDING THE FEATURES OF YOUR VEHICLE
Page 64 of 277

Then lift up on the catch located under the front edge of
the hood, near the center.
To prevent possible damage, do not slam the hood to
close it. Use a firm downward push at the center front
edge of the hood to ensure that both latches engage.
Never drive your vehicle unless the hood is fully closed,
with both latches engaged.WARNING!
If the hood is not fully latched, it could fly up when
the vehicle is moving and block your forward vision.
You could have a collision. Be sure all hood latches
are fully latched before driving.
INTERIOR LIGHTS
To Turn The Interior Lights On:
Rotate the Dimmer Control upward to the second detent.
Rotate the switch downward to turn the interior lights
off.
NOTE:The interior lights have a “fade to off” feature.
When the lights are turned off, they gradually “fade” off.
Battery Saver Feature—Interior Lights
The interior courtesy lights come on when a door is open
or left ajar. To prevent battery drain, if you leave a door
open or ajar these lights will turn off after 15 minutes.
After you close the door, the interior courtesy lights will
again function in the normal matter.
64 UNDERSTANDING THE FEATURES OF YOUR VEHICLE
Page 75 of 277

The dome/reading lights illuminate when a door is
opened or when the interior lights are turned on by
rotating the dimmer control located on the multi-function
lever.
The reading lights are activated by pressing on the
recessed area of the corresponding lens.
NOTE:The dome/reading lights will remain on until
the switch is pressed a second time, so be sure they have
been turned off before leaving the vehicle.
GARAGE DOOR OPENER — IF EQUIPPED
Equipped in vehicles that have the optional Overhead
Travel Information System (OTIS)
The HomeLink�Universal Transceiver replaces up to
three remote controls (hand held transmitters) that oper-
ate devices such as garage door openers, motorized
gates, or home lighting. It triggers these devices at the
push of a button. The Universal Transceiver operates off
your vehicle’s battery and charging system; no batteries
are needed.For additional information on HomeLink�, call
1–800–355–3515, or on the internet at
www.homelink.com.
UNDERSTANDING THE FEATURES OF YOUR VEHICLE 75
3
Page 226 of 277

CAUTION!
The use of vinyl, leather or plastic protectants may
cause excessive gloss and/or discoloration of interior
trim parts.
Leather Seat Care and Cleaning
Leather is best preserved by regular cleaning with a
damp soft cloth. Small particles of dirt can act as an
abrasive and damage the leather surface and should be
removed immediately with a damp cloth. Stubborn soils
can be removed easily with a soft cloth and Mopar Total
Clean. Care should be taken to avoid soaking the leather
with any liquid. Please do not use polishes, oils, cleaning
fluids, solvents, detergents, or ammonia based cleaners
to clean the leather. Application of a leather conditioner is
not required to maintain the original condition.
Wooden Steering Wheel Care — If Equipped
If your vehicle is equipped with a wood steering wheel,
it is finished with a clear topcoat. Please take care to
avoid scratching the surface with sharp or abrasive
materials.
Cleaning Headlights
Your vehicle has plastic headlights that are lighter and
less susceptible to stone breakage than glass headlights.
Plastic is not as scratch resistant as glass and therefore
different lens cleaning procedures must be followed.
To minimize the possibility of scratching the lenses and
reducing light output, avoid wiping with a dry cloth. To
remove road dirt, wash with a mild soap solution fol-
lowed by rinsing.
Do not use abrasive cleaning components, solvents, steel
wool or other aggressive material to clean the lenses.
Glass Surfaces
All glass surfaces should be cleaned on a regular basis
with any commercial household-type glass cleaner.
Never use an abrasive type cleaner. Use caution when
cleaning inside rear windows equipped with electric
defrosters. Do not use scrapers or other sharp instru-
ments which may scratch the elements.
Instrument Panel Cover
The instrument panel cover has a low glare surface which
minimizes reflections in the windshield. Do not use
226 MAINTAINING YOUR VEHICLE
Page 230 of 277

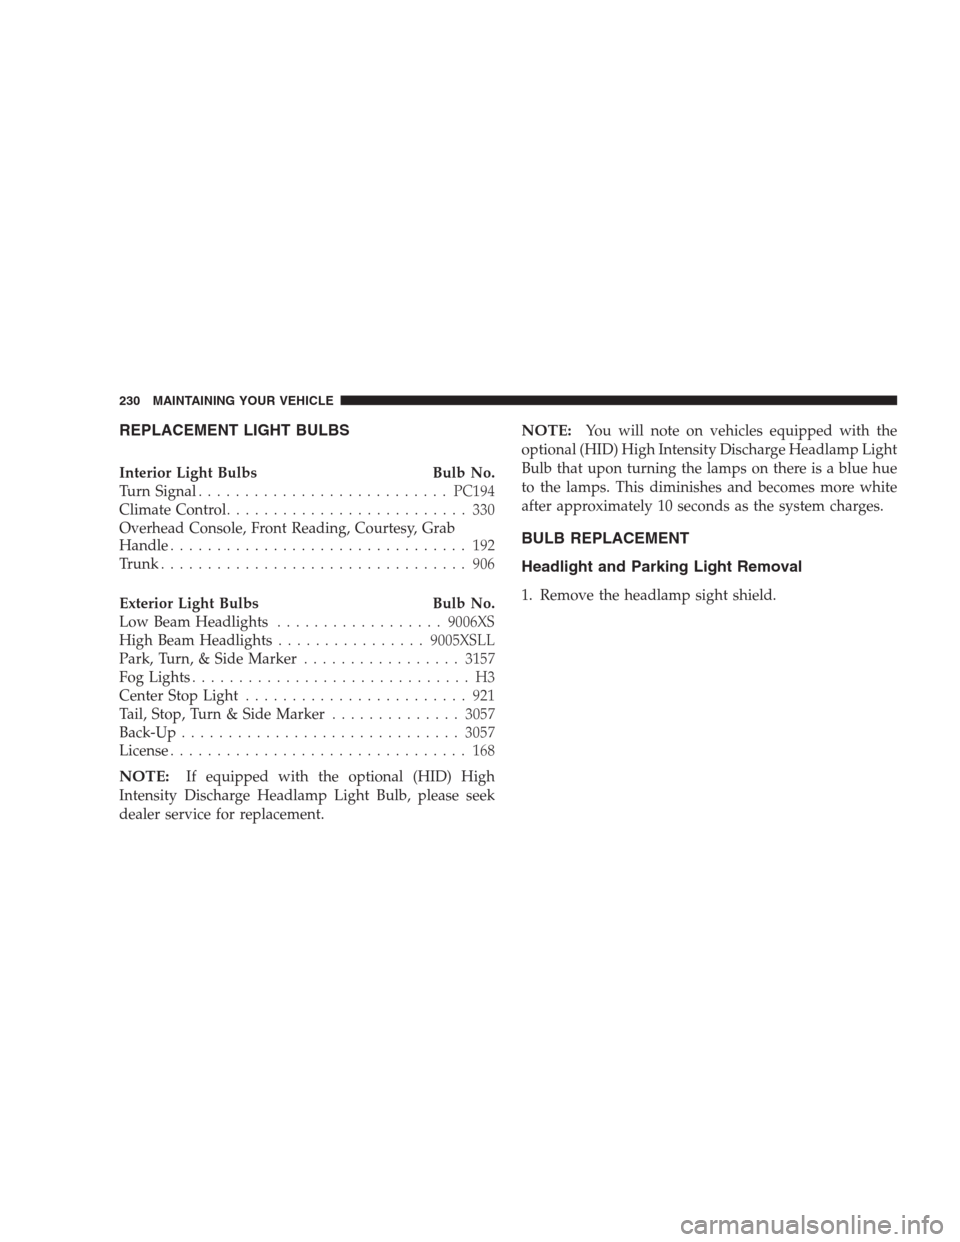
REPLACEMENT LIGHT BULBS
Interior Light Bulbs Bulb No.
Turn Signal...........................PC194
Climate Control.......................... 330
Overhead Console, Front Reading, Courtesy, Grab
Handle................................ 192
Trunk................................. 906
Exterior Light Bulbs Bulb No.
Low Beam Headlights..................9006XS
High Beam Headlights................9005XSLL
Park, Turn, & Side Marker.................3157
Fog Lights.............................. H3
Center Stop Light........................ 921
Tail, Stop, Turn & Side Marker..............3057
Back-Up..............................3057
License................................ 168
NOTE:If equipped with the optional (HID) High
Intensity Discharge Headlamp Light Bulb, please seek
dealer service for replacement.
NOTE:You will note on vehicles equipped with the
optional (HID) High Intensity Discharge Headlamp Light
Bulb that upon turning the lamps on there is a blue hue
to the lamps. This diminishes and becomes more white
after approximately 10 seconds as the system charges.
BULB REPLACEMENT
Headlight and Parking Light Removal
1. Remove the headlamp sight shield.
230 MAINTAINING YOUR VEHICLE