Page 215 of 277

Check the front of the radiator and condenser for any
accumulation of bugs, leaves, etc. Clean the radiator and
condenser by gently spraying water from a garden hose
at the back of the core.
Check the engine cooling system hoses for condition and
tightness of connection. Inspect the entire system for
leaks. Any hoses that show cuts or severe abrasion must
be replaced.
Cooling System — Drain, Flush and Refill
At the intervals shown on the Maintenance Schedules (5
years/100,000 miles), the system should be drained,
flushed and refilled.
If the solution is dirty and contains a considerable
amount of sediment, clean and flush with a reliable
cooling system cleaner. Follow with a thorough rinsing to
remove all deposits and chemicals.
Engine Coolant Disposal
Used ethylene glycol based engine coolant is a regulated
substance requiring proper disposal. Check with your
local authorities to determine the disposal rules for your
community. Do not store ethylene glycol based enginecoolant in open containers or allow it to remain in
puddles on the ground. Prevent ingestion by animals or
children. If ingested by a child, contact a physician
immediately.
Selection Of Coolant
Use only the manufacturer’s recommended coolant. Re-
fer to the Recommended Fluids, Lubricants and Genuine
Parts section for correct coolant type.
CAUTION!
Failure to use the proper antifreeze could cause
radiator plugging and engine overheating. Do not
mix antifreeze brands or types. Do not use plain
water alone or alcohol base antifreeze products. Do
not use additional rust inhibitors or antirust prod-
ucts, as they may not be compatible with the radiator
coolant and may plug the radiator.
Adding Coolant
When adding coolant, a minimum solution of 50% eth-
ylene glycol antifreeze coolant in water should be used.
MAINTAINING YOUR VEHICLE 215
7
Page 217 of 277

Coolant Level
The coolant bottle provides a quick visual method for
determining that the coolant level is adequate. With the
engine Off and cold, the level of the coolant in the bottle
should be between the MIN and MAX cold fill lines.
When additional coolant is needed to maintain the
proper level, it should be added to the coolant bottle. Do
not overfill.
Points to Remember
NOTE:
When the vehicle is stopped after a few miles of
operation, you may observe vapor coming from the front of
the engine compartment. This is normally a result of
moisture from rain, snow, or high humidity accumulating
on the radiator and being vaporized when the thermostat
opens, allowing hot water to enter the radiator.
If an examination of your engine compartment shows no
evidence of radiator or hose leaks, the vehicle may be
safely driven. The vapor will soon dissipate.
•Do not overfill the coolant bottle.
•Check coolant freeze point in the system.
•If frequent coolant additions are required, or if the
level in the recovery bottle does not drop when the
engine cools, the cooling system should be pressure
tested for leaks.
MAINTAINING YOUR VEHICLE 217
7
Page 218 of 277

•Maintain a coolant concentration of a minimum of 50%
ethylene glycol and high quality water with recom-
mended antifreeze for proper corrosion protection of
your engine cooling system that contains aluminum
components.
•Make sure that the radiator and coolant bottle hoses
are not kinked or obstructed.
•Keep the front of the radiator and air conditioning
condenser clean.
•Do not change the thermostat for summer or winter
operation. If replacement is ever necessary, install
ONLY the correct type thermostat. Other designs may
result in unsatisfactory engine cooling performance,
poor gas mileage, and increased emissions.
Hoses and Vacuum/Vapor Harnesses
Inspect surfaces of hoses and nylon tubing for evidence
of heat and mechanical damage. Hard or soft spots,
brittle rubber, cracking, checking, tears, cuts, abrasions,
and excessive swelling indicate deterioration of the rub-
ber.Pay particular attention to those hoses nearest to high
heat sources such as the exhaust manifold. Inspect hose
routing to be sure hoses do not touch any heat source or
moving component that may cause heat damage or
mechanical wear.
Insure nylon tubing in these areas has not melted or
collapsed. Inspect all hose connections such as clamps
and couplings to make sure they are secure and no leaks
are present. Components should be replaced immedi-
ately if there is any evidence of degradation that could
cause failure.
Brakes
In order to assure brake system performance, all brake
system components should be inspected periodically.
Suggested service intervals can be found in Section 8,
Maintenance Schedules.
218 MAINTAINING YOUR VEHICLE
Page 219 of 277

WARNING!
Riding the brakes can lead to brake failure and
possibly an accident. Driving with your foot resting
or riding on the brake pedal can result in abnormally
high brake temperatures, excessive lining wear, and
possible brake damage. You wouldn’t have your full
braking capacity in an emergency.
Brake and Power Steering System Hoses
When servicing the vehicle for scheduled maintenance,
inspect surface of hoses for evidence of heat and me-
chanical damage. Hard and brittle rubber, cracking,
checking, tears, cuts, abrasion, and excessive swelling
suggest deterioration of the rubber. Particular attention
should be made to examining those hose surfaces nearest
to high heat sources, such as the exhaust manifold.
Inspect all hose clamps and couplings to make sure they
are secure and no leaks are present.
NOTE:Often, fluids such as oil, power steering fluid,
and brake fluid are used during assembly plant opera-
tions to ease the assembly of hoses to couplings. There-
fore, oil wetness at the hose-coupling area is not neces-
sarily an indication of leakage. Actual dripping of hot
fluid when systems are under pressure (during vehicle
operation) should be noted before hose is replaced based
on leakage.
NOTE:Inspection of brake hoses should be done
whenever the brake system is serviced and every engine
oil change.
WARNING!
Worn brake hoses can burst and cause brake failure.
You could have an accident. If you see any signs of
cracking, scuffing, or worn spots, have the brake
hoses replaced immediately.
Brake Master CylinderThe fluid level in the master cylinder should be checked
when performing under hood services, or immediately if
the brake system warning lamp shows system failure.
MAINTAINING YOUR VEHICLE 219
7
Page 222 of 277

Fluid Level Check
The fluid level in the automatic transaxle should be
checked whenever the vehicle is serviced. Operation with
an improper fluid level will greatly reduce the life of the
transaxle and of the fluid.
Procedure For Checking Fluid Level
To properly check the automatic transaxle fluid level, the
following procedure must be used:
•The vehicle must be on level ground.
•The engine should be running at curb idle speed for a
minimum of 60 seconds.
•Fully apply parking brake.
•Place the gear selector momentarily in each gear
position ending with the lever in P (PARK).
•Wipe the dipstick clean and reinsert until seated.
Remove dipstick and note reading.
•If the fluid is hot(180° F / 82° C), the reading should be
in the cross hatched area marked ”HOT” (between the
upper two holes in the dipstick).
•If the fluid is cold(80° F / 27° C), the reading should be
in the cross hatched area marked “COLD” (between
the lower two holes in the dipstick).
•If the fluid level shows low, add sufficient transmis-
sion fluid to bring to the proper level.
222 MAINTAINING YOUR VEHICLE
Page 238 of 277
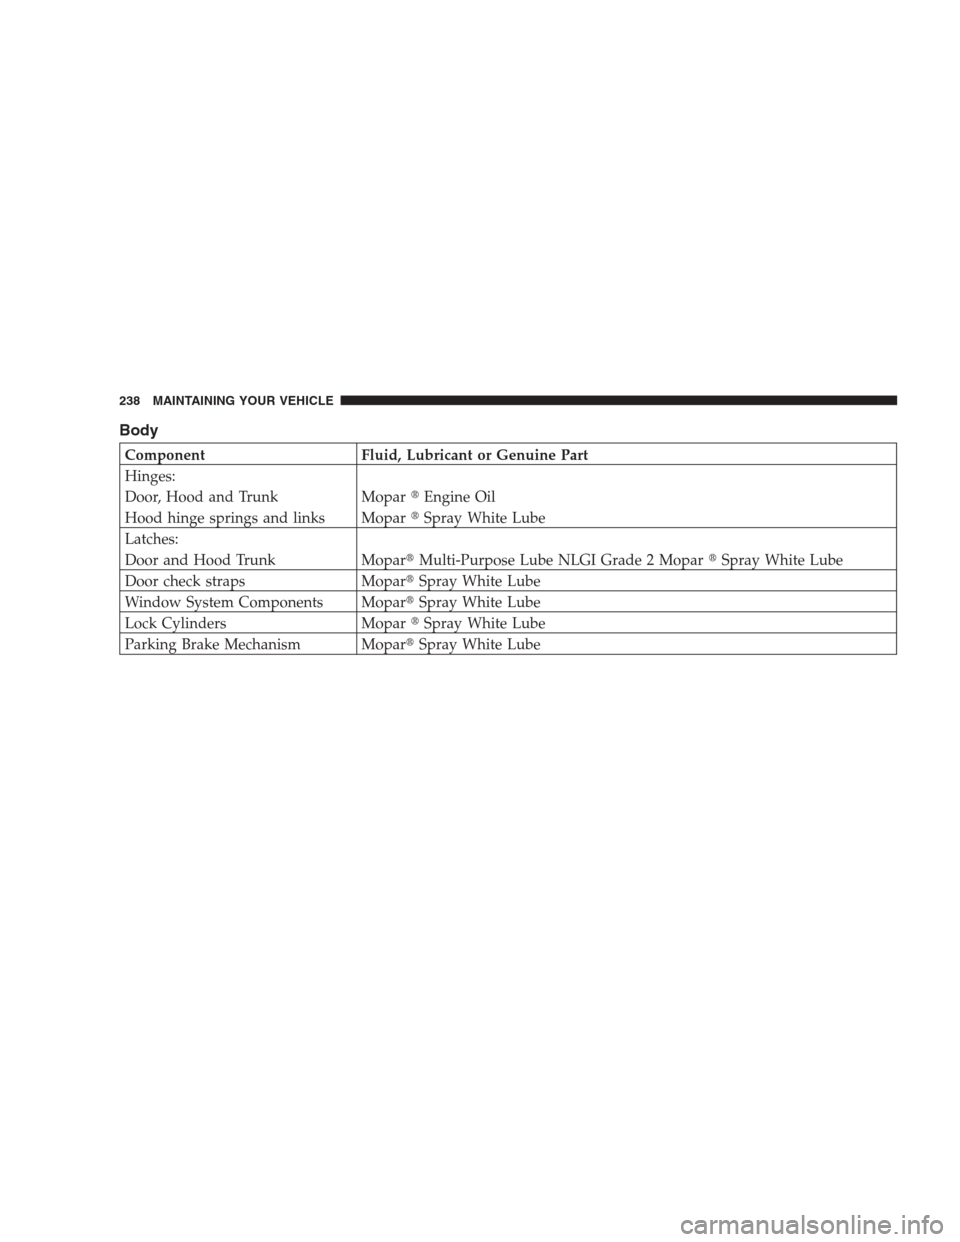
Body
Component Fluid, Lubricant or Genuine Part
Hinges:
Door, Hood and Trunk Mopar�Engine Oil
Hood hinge springs and links Mopar�Spray White Lube
Latches:
Door and Hood Trunk Mopar�Multi-Purpose Lube NLGI Grade 2 Mopar�Spray White Lube
Door check straps Mopar�Spray White Lube
Window System Components Mopar�Spray White Lube
Lock Cylinders Mopar�Spray White Lube
Parking Brake Mechanism Mopar�Spray White Lube
238 MAINTAINING YOUR VEHICLE
Page 241 of 277
 or 3 months,
whichever comes first and follow schedule “B” of the
�Maintenance Schedules�section of this ma")
NOTE:IfANYof these apply to you then change your
engine oil every 3,000 miles (5 000 km) or 3 months,
whichever comes first and follow schedule “B” of the
�Maintenance Schedules�section of this manual.
NOTE:Most vehicles are operated under the conditions
listed for Schedule�B�.
Second is Schedule“A”. It is for vehicles that are not
operated under any of the conditions listed under Sched-
ule�B�.
Use the schedule that best describes your driving condi-
tions. Where time and mileage are listed, follow the
interval that occurs first.
NOTE:Under no circumstances should oil change
intervals exceed 6000 miles (10 000 km) or 6 months
whichever comes first.
CAUTION!
Failure to perform the required maintenance items
may result in damage to the vehicle.
At Each Stop for Fuel
•
Check the engine oil level about 5 minutes after a fully
warmed engine is shut off. Checking the oil level while
the vehicle is on level ground will improve the accu-
racy of the oil level reading. Add oil only when the
level is at or below the ADD or MIN mark.
•Check the windshield washer solvent and add if
required.
MAINTENANCE SCHEDULES 241
8
M
A
I
N
T
E
N
A
N
C
E
S
C
H
E
D
U
L
E
S
Page 242 of 277
Once a Month
•
Check tire pressure and look for unusual wear or
damage.
•Inspect the battery and clean and tighten the terminals
as required.
•Check the fluid levels of coolant reservoir, brake
master cylinder, power steering and transaxle and add
as needed.
•Check all lights and all other electrical items for correct
operation.
•Check rubber seals on each side of the radiator for
proper fit.
At Each Oil Change
•
Change the engine oil filter.
•Inspect the exhaust system.
•Inspect the brake hoses.
•Inspect the CV joints and front and rear suspension
components.
•Check the automatic transmission fluid level.
•Check the coolant level, hoses, and clamps.
•Rotate the tires at each oil change interval shown on
Schedule “A” 6,000 miles (10 000 km) or every other
interval shown on Schedule “B” 6,000 miles (10 000
km).
242 MAINTENANCE SCHEDULES
8
M
A
I
N
T
E
N
A
N
C
E
S
C
H
E
D
U
L
E
S