2004 CHEVROLET TRAIL BLAZER flat tire
[x] Cancel search: flat tirePage 297 of 448
Service............................................................5-3
Doing Your Own Service Work.........................5-4
Adding Equipment to the Outside of
Your Vehicle..............................................5-4
Fuel................................................................5-4
Gasoline Octane............................................5-5
Gasoline Speci�cations....................................5-5
California Fuel...............................................5-5
Additives.......................................................5-6
Fuels in Foreign Countries...............................5-6
Filling Your Tank............................................5-7
Filling a Portable Fuel Container.......................5-9
Checking Things Under the Hood....................5-10
Hood Release..............................................5-10
Engine Compartment Overview.......................5-12
Engine Oil...................................................5-15
Engine Air Cleaner/Filter................................5-20
Automatic Transmission Fluid.........................5-21
Engine Coolant.............................................5-23
Radiator Pressure Cap..................................5-25
Engine Overheating.......................................5-26
Cooling System............................................5-28
Engine Fan Noise.........................................5-34
Power Steering Fluid.....................................5-35Windshield Washer Fluid................................5-36
Brakes........................................................5-37
Battery........................................................5-40
Jump Starting...............................................5-41
Rear Axle.......................................................5-46
Four-Wheel Drive............................................5-46
Front Axle......................................................5-47
Bulb Replacement..........................................5-48
Taillamps and Turn Signal Lamps...................5-48
Replacement Bulbs.......................................5-49
Windshield Wiper Blade Replacement..............5-49
Tires..............................................................5-52
In�ation - Tire Pressure.................................5-60
Tire Inspection and Rotation...........................5-61
When It Is Time for New Tires.......................5-62
Buying New Tires.........................................5-63
Uniform Tire Quality Grading..........................5-64
Wheel Alignment and Tire Balance..................5-65
Wheel Replacement......................................5-65
Tire Chains..................................................5-67
If a Tire Goes Flat........................................5-67
Changing a Flat Tire.....................................5-68
Spare Tire...................................................5-83
Section 5 Service and Appearance Care
5-1
Page 357 of 448
If you over�ll the tire, release air by pushing on the
metal stem in the center of the tire valve. Recheck the
tire pressure with the tire gage.
Be sure to put the valve caps back on the valve stems.
They help prevent leaks by keeping out dirt and
moisture.
Tire Inspection and Rotation
Tires should be rotated every 5,000 to 8,000 miles
(8 000 to 13 000 km).
Any time you notice unusual wear, rotate your tires as
soon as possible and check wheel alignment. Also
check for damaged tires or wheels. SeeWhen It Is Time
for New Tires on page 5-62andWheel Replacement
on page 5-65for more information.
Make sure the spare tire is stored securely. Push, pull,
and then try to rotate or turn the tire. If it moves,
use the wheel wrench to tighten the cable. For
information on storing or removing the spare tire, see
Changing a Flat Tire on page 5-68.The purpose of regular rotation is to achieve more
uniform wear for all tires on the vehicle. The �rst rotation
is the most important. SeeScheduled Maintenance
on page 6-4.
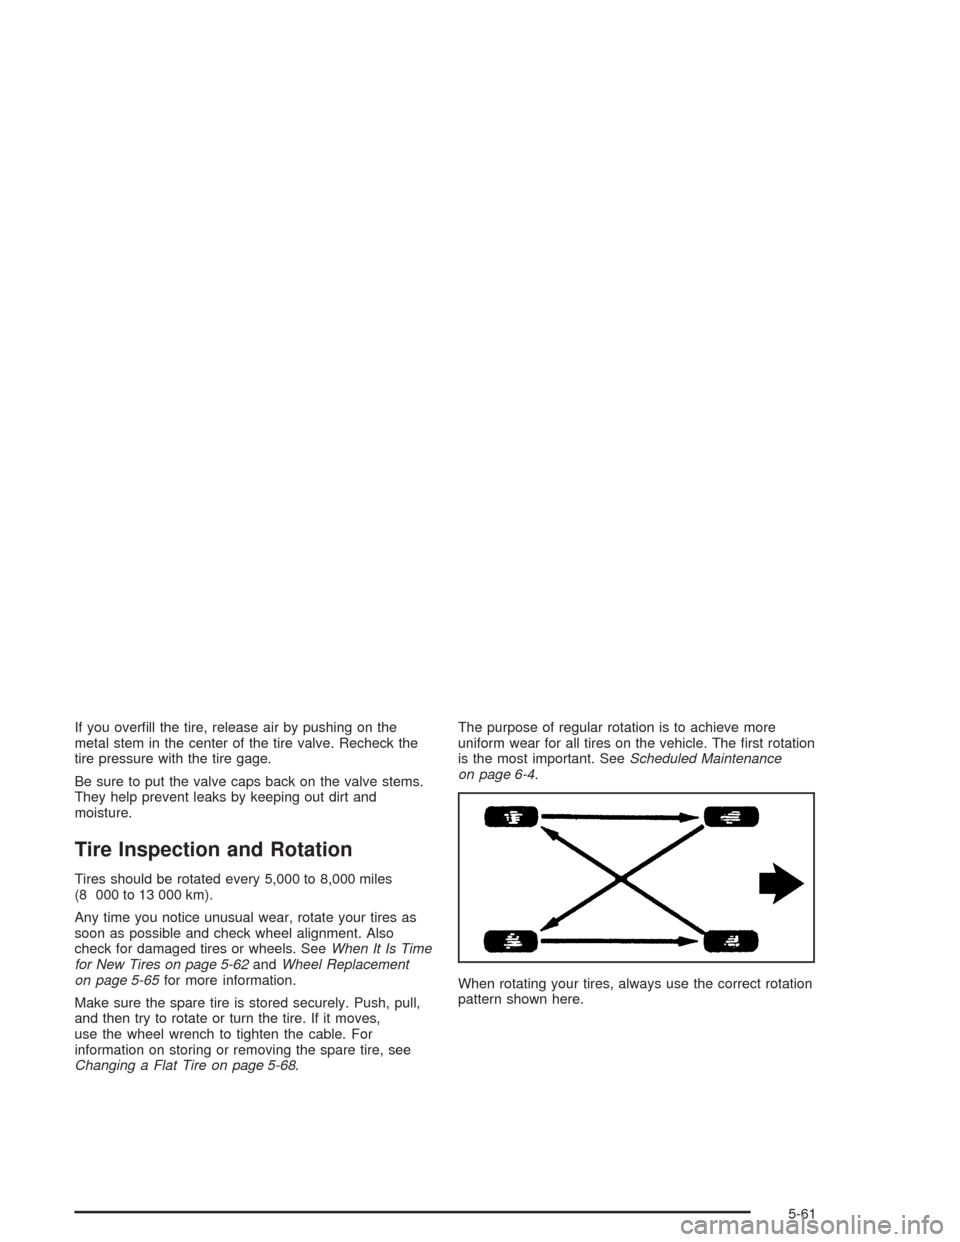
When rotating your tires, always use the correct rotation
pattern shown here.
5-61
Page 358 of 448
After the tires have been rotated, adjust the front and
rear in�ation pressures as shown on the
Certi�cation/Tire label or the Tire and Loading
Information label. Make certain that all wheel nuts are
properly tightened. See “Wheel Nut Torque” under
Capacities and Speci�cations on page 5-104.
{CAUTION:
Rust or dirt on a wheel, or on the parts to
which it is fastened, can make wheel nuts
become loose after a time. The wheel could
come off and cause an accident. When you
change a wheel, remove any rust or dirt from
places where the wheel attaches to the vehicle.
In an emergency, you can use a cloth or a
paper towel to do this; but be sure to use a
scraper or wire brush later, if you need to, to
get all the rust or dirt off. See “Changing a Flat
Tire” in the Index.
When It Is Time for New Tires
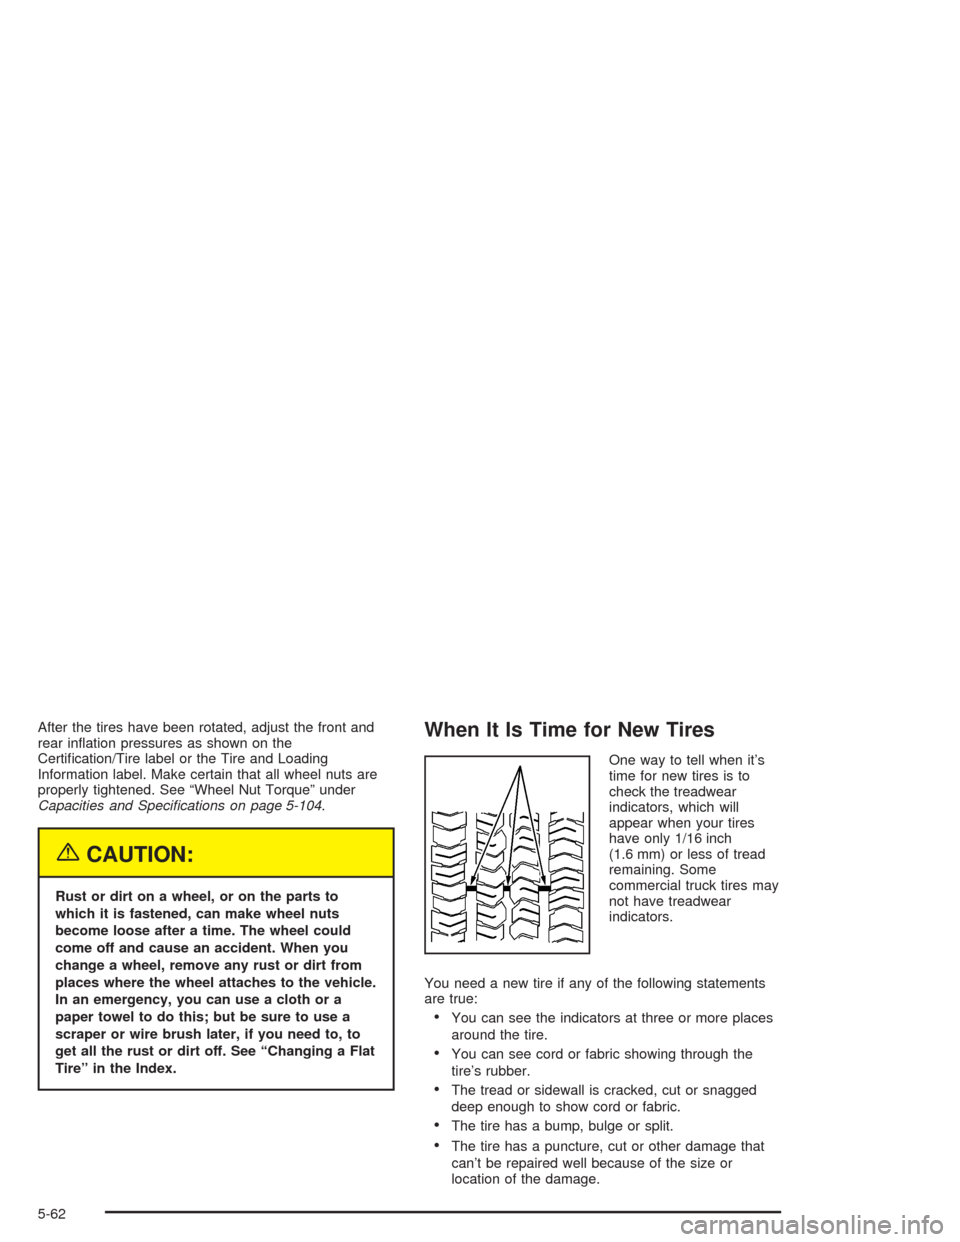
One way to tell when it’s
time for new tires is to
check the treadwear
indicators, which will
appear when your tires
have only 1/16 inch
(1.6 mm) or less of tread
remaining. Some
commercial truck tires may
not have treadwear
indicators.
You need a new tire if any of the following statements
are true:
You can see the indicators at three or more places
around the tire.
You can see cord or fabric showing through the
tire’s rubber.
The tread or sidewall is cracked, cut or snagged
deep enough to show cord or fabric.
The tire has a bump, bulge or split.
The tire has a puncture, cut or other damage that
can’t be repaired well because of the size or
location of the damage.
5-62
Page 362 of 448
Each new wheel should have the same load-carrying
capacity, diameter, width, offset and be mounted
the same way as the one it replaces.
If you need to replace any of your wheels, wheel bolts
or wheel nuts, replace them only with new GM
original equipment parts. This way, you will be sure to
have the right wheel, wheel bolts and wheel nuts
for your vehicle.
{CAUTION:
Using the wrong replacement wheels, wheel
bolts or wheel nuts on your vehicle can be
dangerous. It could affect the braking and
handling of your vehicle, make your tires lose
air and make you lose control. You could have
a collision in which you or others could be
injured. Always use the correct wheel, wheel
bolts and wheel nuts for replacement.Notice:The wrong wheel can also cause problems
with bearing life, brake cooling, speedometer or
odometer calibration, headlamp aim, bumper height,
vehicle ground clearance and tire or tire chain
clearance to the body and chassis.
SeeChanging a Flat Tire on page 5-68for more
information.
Used Replacement Wheels
{CAUTION:
Putting a used wheel on your vehicle is
dangerous. You can’t know how it’s been used
or how far it’s been driven. It could fail
suddenly and cause a crash. If you have to
replace a wheel, use a new GM original
equipment wheel.
5-66
Page 363 of 448
Tire Chains
{CAUTION:
Don’t use tire chains. There’s not enough
clearance. Tire chains used on a vehicle without
the proper amount of clearance can cause
damage to the brakes, suspension or other
vehicle parts. The area damaged by the tire
chains could cause you to lose control of your
vehicle and you or others may be injured in a
crash. Use another type of traction device only
if its manufacturer recommends it for use on
your vehicle and tire size combination and road
conditions. Follow that manufacturer’s
instructions. To help avoid damage to your
vehicle, drive slowly, readjust or remove the
device if it’s contacting your vehicle, and don’t
spin your wheels. If you do �nd traction devices
that will �t, install them on the rear tires.
If a Tire Goes Flat
It’s unusual for a tire to “blowout” while you’re driving,
especially if you maintain your tires properly. If air goes
out of a tire, it’s much more likely to leak out slowly.
But if you should ever have a “blowout,” here are a few
tips about what to expect and what to do:
If a front tire fails, the �at tire will create a drag that
pulls the vehicle toward that side. Take your foot off the
accelerator pedal and grip the steering wheel �rmly.
Steer to maintain lane position, and then gently brake to
a stop well out of the traffic lane.
5-67
Page 364 of 448
A rear blowout, particularly on a curve, acts much like a
skid and may require the same correction you’d use
in a skid. In any rear blowout, remove your foot from the
accelerator pedal. Get the vehicle under control by
steering the way you want the vehicle to go. It may be
very bumpy and noisy, but you can still steer. Gently
brake to a stop, well off the road if possible.
{CAUTION:
Lifting a vehicle and getting under it to do
maintenance or repairs is dangerous without
the appropriate safety equipment and training.
The jack provided with your vehicle is
designed only for changing a �at tire. If it is
used for anything else, you or others could be
badly injured or killed if the vehicle slips off
the jack. Use the jack provided with your
vehicle only for changing a �at tire.
If a tire goes �at, the next part shows how to use your
jacking equipment to change a �at tire safely.
Changing a Flat Tire
If a tire goes �at, avoid further tire and wheel damage
by driving slowly to a level place. Turn on your
hazard warning �ashers.
{CAUTION:
Changing a tire can be dangerous. The vehicle
can slip off the jack and roll over or fall on you
or other people. You and they could be badly
injured or even killed. Find a level place to
change your tire. To help prevent the vehicle
from moving:
1. Set the parking brake �rmly.
2. Put the shift lever in PARK (P).
3. If you have a four-wheel-drive vehicle,
be sure the transfer case is in a drive
gear – not in NEUTRAL.
4. Turn off the engine and do not restart
while the vehicle is raised.
CAUTION: (Continued)
5-68
Page 368 of 448
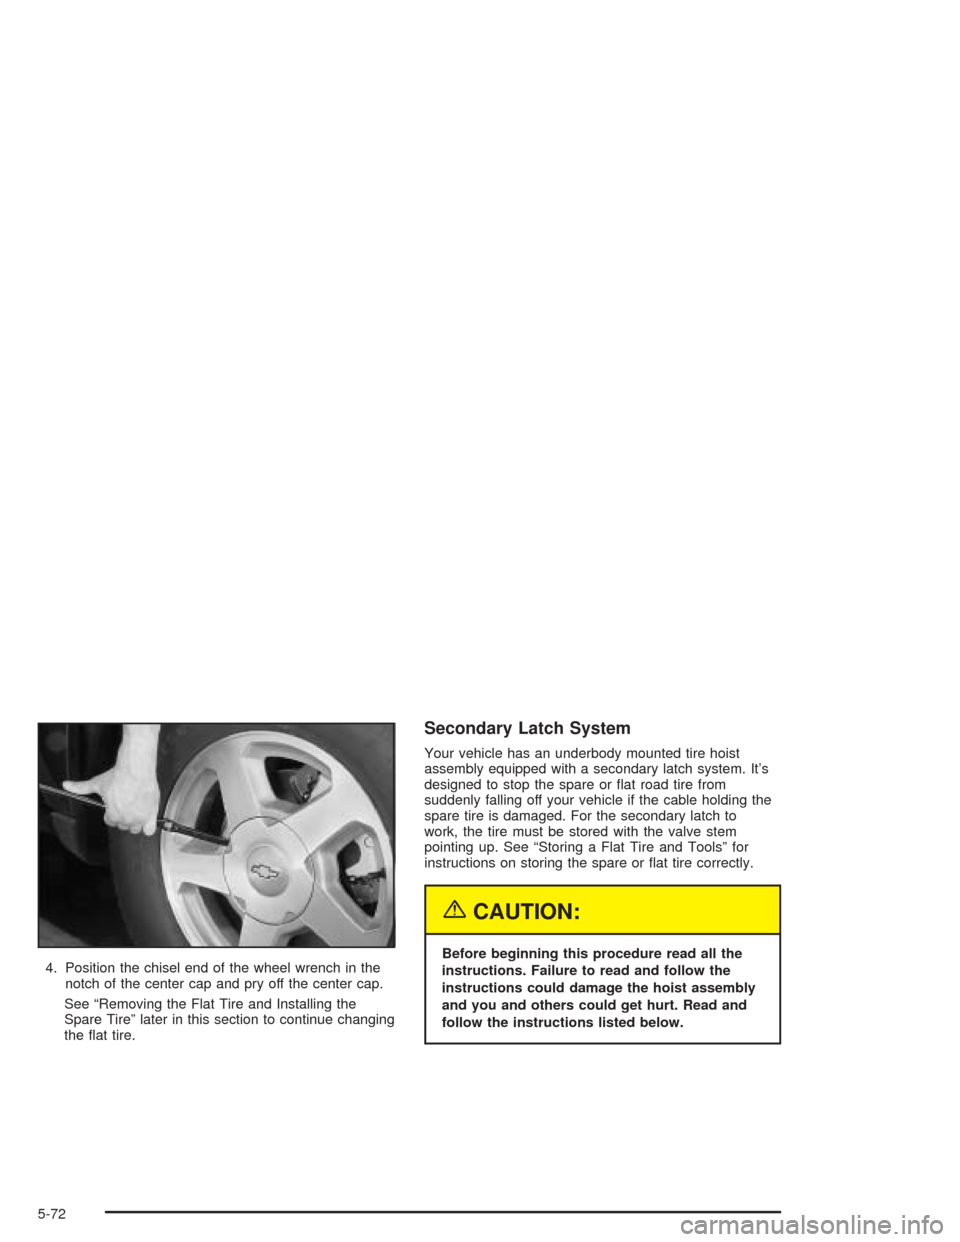
4. Position the chisel end of the wheel wrench in the
notch of the center cap and pry off the center cap.
See “Removing the Flat Tire and Installing the
Spare Tire” later in this section to continue changing
the �at tire.
Secondary Latch System
Your vehicle has an underbody mounted tire hoist
assembly equipped with a secondary latch system. It’s
designed to stop the spare or �at road tire from
suddenly falling off your vehicle if the cable holding the
spare tire is damaged. For the secondary latch to
work, the tire must be stored with the valve stem
pointing up. See “Storing a Flat Tire and Tools” for
instructions on storing the spare or �at tire correctly.
{CAUTION:
Before beginning this procedure read all the
instructions. Failure to read and follow the
instructions could damage the hoist assembly
and you and others could get hurt. Read and
follow the instructions listed below.
5-72
Page 372 of 448
Removing the Flat Tire and Installing
the Spare Tire
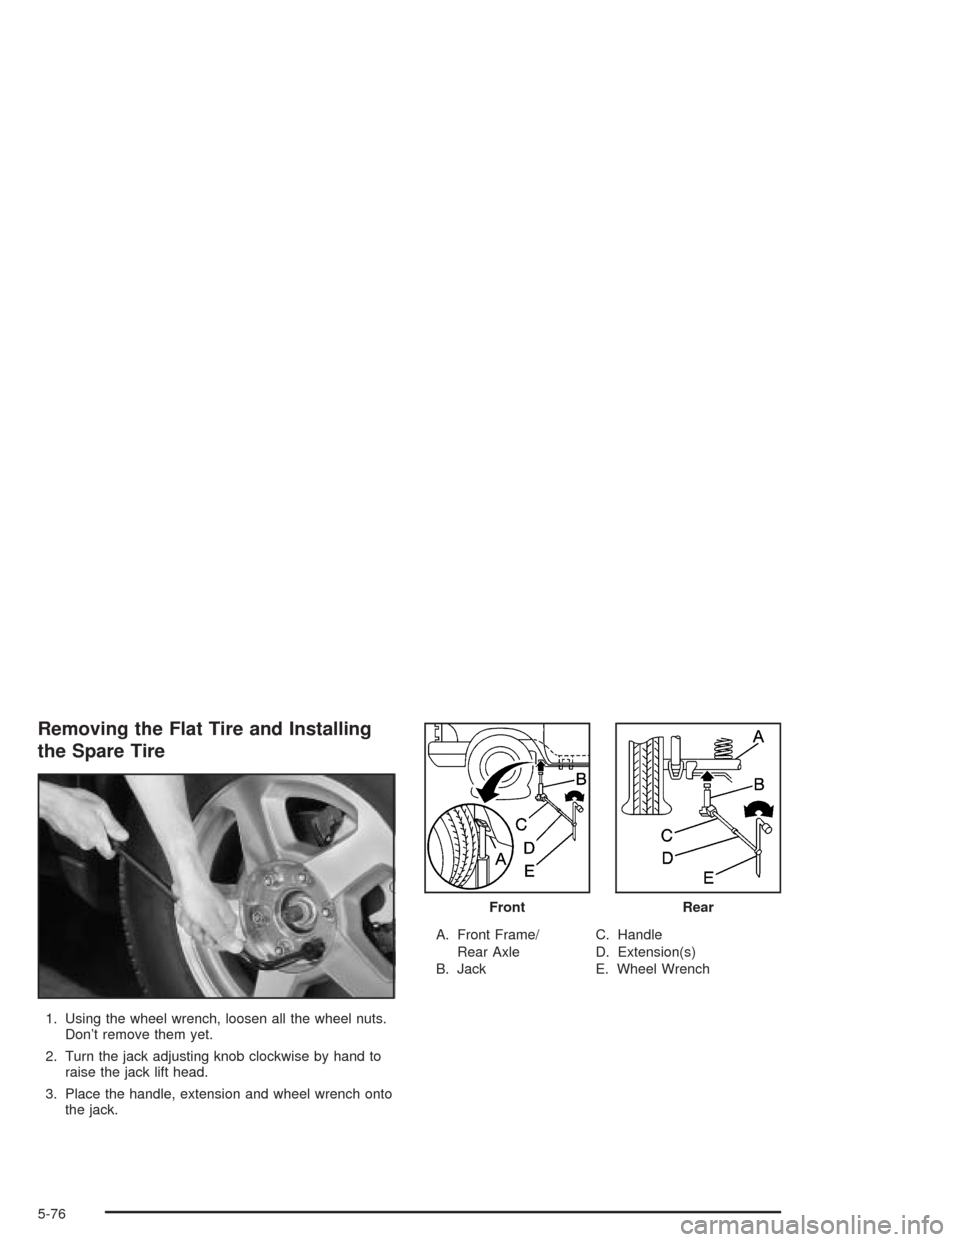
1. Using the wheel wrench, loosen all the wheel nuts.
Don’t remove them yet.
2. Turn the jack adjusting knob clockwise by hand to
raise the jack lift head.
3. Place the handle, extension and wheel wrench onto
the jack.A. Front Frame/
Rear Axle
B. JackC. Handle
D. Extension(s)
E. Wheel Wrench
FrontRear
5-76