2004 CHEVROLET IMPALA radio controls
[x] Cancel search: radio controlsPage 202 of 420

Adjusting the Speakers (Balance/Fade)
AUDIO:To adjust the balance between the right
and the left speakers, push and release the AUDIO
knob until BAL appears on the display. Turn the knob to
move the sound toward the right or the left speakers.
To adjust the fade between the front and the rear
speakers, push and release the AUDIO knob until FADE
appears on the display. Turn the knob to move the
sound toward the front or the rear speakers.
To adjust the balance and the fade to the middle
position, push the AUDIO knob, then push it again and
hold it until you hear one beep. The balance and the
fade will be adjusted to the middle position and the
display will show the speaker balance.
To adjust all tone and speaker controls to the middle
position, push and hold the AUDIO knob when no tone
or speaker control is displayed. ALL will appear on
the display and you will hear a beep.
Finding a Program Type (PTY) Station
(RDS and XM™)
To select and �nd a desired PTY perform the following:
1. Press the P-TYPE knob to activate program
type select mode. TYPE and a PTY will appear
on the display.
2. Turn the P-TYPE knob to select a PTY.
3. Once the desired PTY is displayed, press the
SEEK TYPE button to take you to the PTY’s
�rst station.
4. If you want to go to another station within that PTY
and the PTY is displayed, press the SEEK TYPE
button once. If the PTY is not displayed, press
the SEEK TYPE button twice to display the PTY and
then to go to another station.
5. Press the P-TYPE knob to exit program type select
mode.
If PTY times out and is no longer on the display, go
back to Step 1.
If both PTY and TRAF are on, the radio will search for
stations with the selected PTY and traffic
announcements.
3-82
Page 207 of 420

Playing a Cassette Tape
Your tape player is built to work best with tapes that are
up to 30 to 45 minutes long on each side. Tapes
longer than that are so thin they may not work well in
this player. The longer side with the tape visible should
face to the right. If the ignition is on and the radio is
off, the tape can be inserted and will begin playing.
A tape symbol is shown on the display whenever a tape
is inserted. If you hear nothing but a garbled sound,
the tape may not be in squarely. Press EJT to remove
the tape and start over. If you want to insert a tape
while the ignition is off, �rst press the EJT button or the
DISPL knob.
While the tape is playing, use VOL, TUNE, SEEK, and
PSCAN controls just as you do for the radio. The
radio will display TAPE and an arrow showing which
side of the tape is playing.
Your tape bias is set automatically when a metal or
chrome tape is inserted.
If an error appears on the display, see “Cassette Tape
Messages” later in this section.1 PREV (Previous):Your tape must have at least three
seconds of silence between each selection for previous
to work. Press this pushbutton to go to the previous
selection on the tape if the current selection has been
playing for less than three seconds. If pressed when the
current selection has been playing from 3 to 13 seconds,
it will go to the beginning of the previous selection or
the beginning of the current selection, depending upon
the position on the tape. If pressed when the current
selection has been playing for more than 13 seconds, it
will go to the beginning of the current selection.
SEEK and a negative number will appear on the display
while the cassette player is in the previous mode.
Pressing this pushbutton multiple times will increase the
number of selections to be searched back, up to -9.
2 NEXT:Your tape must have at least three seconds of
silence between each selection for next to work.
Press this pushbutton to go to the next selection on the
tape. If you press this pushbutton more than once,
the player will continue moving forward through the tape.
SEEK and a positive number will appear on the
display. To forward through each selection press the
right SEEK arrow.
3-87
Page 213 of 420

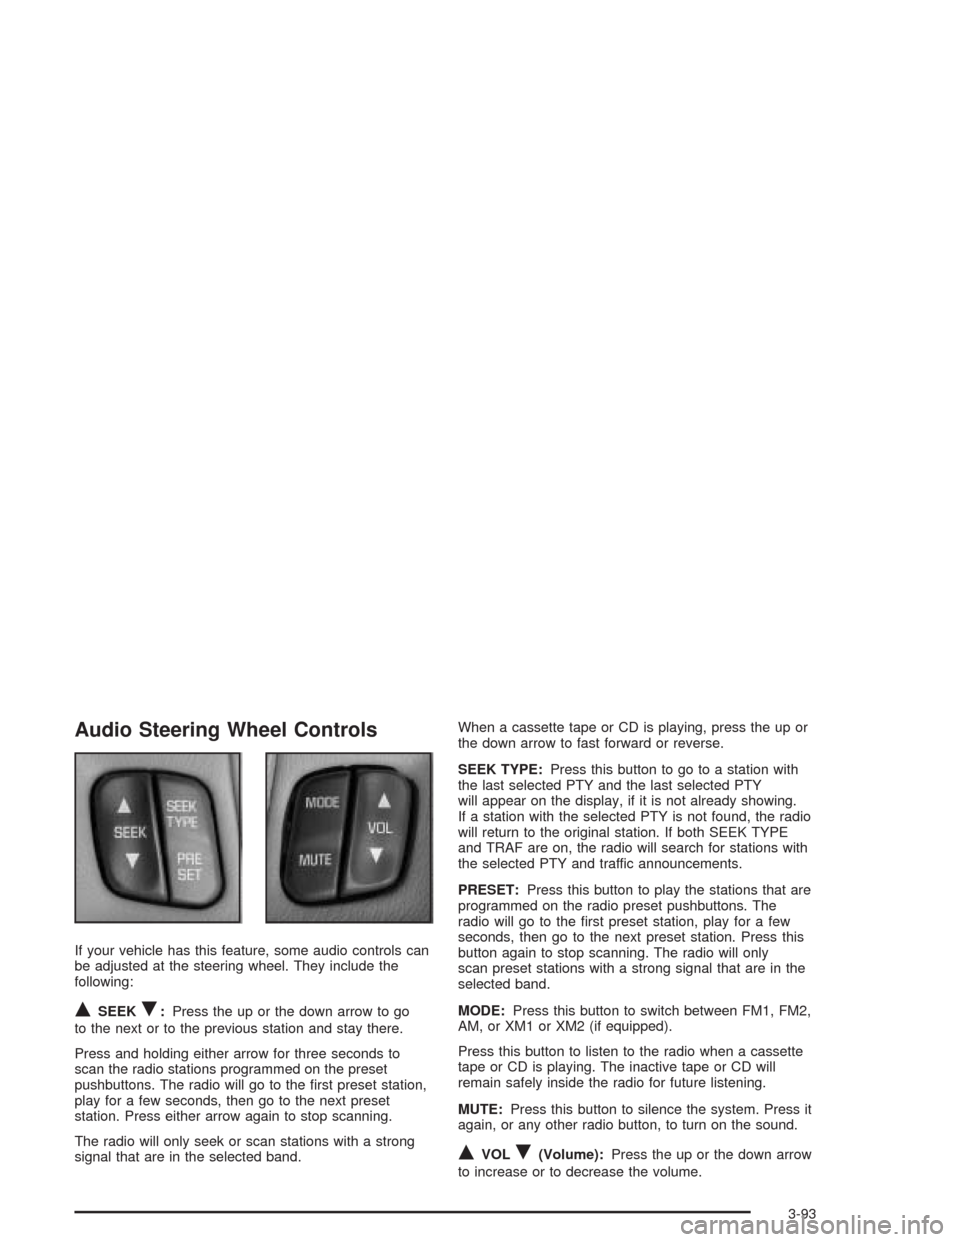
Audio Steering Wheel Controls
If your vehicle has this feature, some audio controls can
be adjusted at the steering wheel. They include the
following:
QSEEKR:Press the up or the down arrow to go
to the next or to the previous station and stay there.
Press and holding either arrow for three seconds to
scan the radio stations programmed on the preset
pushbuttons. The radio will go to the �rst preset station,
play for a few seconds, then go to the next preset
station. Press either arrow again to stop scanning.
The radio will only seek or scan stations with a strong
signal that are in the selected band.When a cassette tape or CD is playing, press the up or
the down arrow to fast forward or reverse.
SEEK TYPE:Press this button to go to a station with
the last selected PTY and the last selected PTY
will appear on the display, if it is not already showing.
If a station with the selected PTY is not found, the radio
will return to the original station. If both SEEK TYPE
and TRAF are on, the radio will search for stations with
the selected PTY and traffic announcements.
PRESET:Press this button to play the stations that are
programmed on the radio preset pushbuttons. The
radio will go to the �rst preset station, play for a few
seconds, then go to the next preset station. Press this
button again to stop scanning. The radio will only
scan preset stations with a strong signal that are in the
selected band.
MODE:Press this button to switch between FM1, FM2,
AM, or XM1 or XM2 (if equipped).
Press this button to listen to the radio when a cassette
tape or CD is playing. The inactive tape or CD will
remain safely inside the radio for future listening.
MUTE:Press this button to silence the system. Press it
again, or any other radio button, to turn on the sound.
QVOLR(Volume):Press the up or the down arrow
to increase or to decrease the volume.
3-93
Page 405 of 420

A
Accessory Power Outlets.................................3-19
Adding Washer Fluid.......................................5-46
Additional Program Information........................... 7-9
Additives, Fuel................................................. 5-6
Add-On Electrical Equipment...........................5-103
Adjusting the Speakers
(Balance/Fade)............................3-60, 3-71, 3-82
Air Bag
Readiness Light..........................................3-32
Air Bag Systems.............................................1-51
How Does an Air Bag Restrain?....................1-57
Servicing Your Air Bag-Equipped Vehicle.........1-60
What Makes an Air Bag In�ate?....................1-57
What Will You See After an Air Bag In�ates?......1-58
When Should an Air Bag In�ate?...................1-56
Where Are the Air Bags?..............................1-54
Air Cleaner/Filter, Engine.................................5-25
Airbag Sensing and Diagnostic Module (SDM)....7-10
ALARM (Content Theft Operation).....................2-49
AM ...............................................................3-94
Antenna, Backglass.........................................3-96
Antenna, XM™ Satellite Radio Antenna System.....3-97
Anti-lock Brake System (ABS)............................ 4-6
Anti-Lock Brake, System Warning Light..............3-35Appearance Care............................................5-94
Care of Safety Belts....................................5-97
Chemical Paint Spotting..............................5-100
Cleaning the Inside of Your Vehicle................5-94
Cleaning the Outside of Your Vehicle..............5-97
Finish Damage..........................................5-100
Sheet Metal Damage...................................5-99
Underbody Maintenance.............................5-100
Vehicle Care/Appearance Materials...............5-101
Weatherstrips..............................................5-97
Arming with the Power Lock Switch...................2-15
Arming with the Remote Keyless Entry
Transmitter.................................................2-16
Ashtrays........................................................3-20
Audio System(s).............................................3-56
Audio Steering Wheel Controls......................3-93
Backglass Antenna......................................3-96
Care of Your Cassette Tape Player................3-94
Care of Your CD Player...............................3-96
Care of Your CDs........................................3-96
Chime Level Adjustment...............................3-97
Radio with Cassette.....................................3-57
Radio with Cassette and CD.........................3-78
Radio with CD............................................3-68
Setting the Time..........................................3-56
1