2004 CHEVROLET CAVALIER bulb
[x] Cancel search: bulbPage 1 of 354

Seats and Restraint Systems........................... 1-1
Front Seats
............................................... 1-2
Rear Seats
............................................... 1-7
Safety Belts
.............................................. 1-8
Child Restraints
.......................................1-29
Air Bag Systems
......................................1-47
Restraint System Check
............................1-56
Features and Controls..................................... 2-1
Keys
........................................................ 2-2
Doors and Locks
....................................... 2-7
Windows
.................................................2-12
Theft-Deterrent Systems
............................2-14
Starting and Operating Your Vehicle
...........2-16
Mirrors
....................................................2-30
OnStar
®System
......................................2-32
Storage Areas
.........................................2-33
Sunroof
..................................................2-34
Instrument Panel............................................. 3-1
Instrument Panel Overview
.......................... 3-2
Climate Controls
......................................3-16
Warning Lights, Gages, and Indicators
........3-20
Audio System(s)
.......................................3-35Driving Your Vehicle....................................... 4-1
Your Driving, the Road, and Your Vehicle
..... 4-2
Towing
...................................................4-29
Service and Appearance Care.......................... 5-1
Service
..................................................... 5-3
Fuel
......................................................... 5-4
Checking Things Under the Hood
...............5-10
Bulb Replacement
....................................5-41
Windshield Wiper Blade Replacement
.........5-45
Tires
......................................................5-46
Appearance Care
.....................................5-72
Vehicle Identi�cation
.................................5-79
Electrical System
......................................5-80
Capacities and Speci�cations
.....................5-85
Normal Maintenance Replacement Parts
......5-86
Maintenance Schedule..................................... 6-1
Maintenance Schedule
................................ 6-2
Customer Assistance and Information.............. 7-1
Customer Assistance and Information
........... 7-2
Reporting Safety Defects
...........................7-10
Index.................................................................1
2004 Chevrolet Cavalier Owner ManualM
Page 104 of 354

Turn Signal/Multifunction Lever
The lever on the left side of the steering column
includes the following:
Turn and Lane-Change Signals
Headlamp High/Low-Beam Changer
Flash-to-Pass
Cruise Control
For information on the exterior lamps, seeExterior
Lamps on page 3-11.
Turn and Lane-Change Signals
The turn signal has two upward (for right) and two
downward (for left) positions. These positions allow you
to signal a turn or a lane change.
To signal a turn, move the lever all the way up or down.
When the turn is �nished, the lever will return
automatically.
An arrow on the instrument
panel cluster will �ash in
the direction of the
turn or lane change.
To signal a lane change, just raise or lower the lever
until the arrow starts to �ash. Hold it there until you
complete your lane change. The lever will return by itself
when you release it.
As you signal a turn or a lane change, if the arrows
�ash rapidly, a signal bulb may be burned out and other
drivers will not see your turn signal. If a bulb is burned
out, replace it to help avoid an accident.
If the arrows do not go on at all when you signal a turn,
check the fuse. SeeFuses and Circuit Breakers on
page 5-81.
3-6
Page 111 of 354

When the DRL are on, your low-beam headlamps will
be on at a reduced brightness. The taillamps,
sidemarker and other lamps will not be on. Your
instrument panel will not be lit up either.
When you turn the exterior lamp band to the headlamp
position, your low-beam headlamps will come on.
The other lamps that come on with your headlamps will
also come on.
When you turn off the headlamps, the regular lamps will
go off, and the low-beam headlamps will come on at
the reduced brightness.
To idle your vehicle with the DRL off, set the parking
brake. The DRL will stay off until you release the
parking brake.
As with any vehicle, you should turn on the regular
headlamp system when you need it.Fog Lamps
If your vehicle has this feature, use your fog lamps for
better visibility in foggy or misty conditions.
The button for your fog
lamps is located next to
the instrument panel
brightness control.
Push the top of the button to turn the fog lamps on. Push
the top of the button again to turn the fog lamps off.
When using fog lamps, the parking lamps or low-beam
headlamps must be on.
A light on the button will come on while the fog lamps
are on. Fog lamps will go off while the high-beam
headlamps are on.
Continuous use of the fog lamps will shorten bulb life.
Limit use as necessary.
3-13
Page 130 of 354

Your vehicle will not pass this inspection if the OBD
(on-board diagnostic) system determines that critical
emission control systems have not been completely
diagnosed by the system. The vehicle would be
considered not ready for inspection. This can happen if
you have recently replaced your battery or if your
battery has run down. The diagnostic system is
designed to evaluate critical emission control systems
during normal driving. This may take several days
of routine driving. If you have done this and your vehicle
still does not pass the inspection for lack of OBD
system readiness, your GM dealer can prepare the
vehicle for inspection.
Oil Pressure Light
If you have a low engine
oil pressure problem, this
light will stay on after
you start your engine, or
come on when you
are driving. This indicates
that your engine is not
receiving enough oil.
The engine could be low on oil, or could have some
other oil problem. Have it �xed immediately.The oil light could also come on in three other situations:
When the ignition is on but the engine is not
running, the light will come on as a test to show you
it is working, but the light will go out when you
turn the ignition to START. If it doesn’t come on with
the ignition on, you may have a problem with the
fuse or bulb. Have it �xed right away.
If you’re idling at a stop sign, the light may blink on
and then off.
If you make a hard stop, the light may come on for
a moment. This is normal.
{CAUTION:
Do not keep driving if the oil pressure is low. If
you do, your engine can become so hot that it
catches �re. You or others could be burned.
Check your oil as soon as possible and have
your vehicle serviced.
Notice:Lack of proper engine oil maintenance may
damage the engine. The repairs would not be
covered by your warranty. Always follow the
maintenance schedule in this manual for changing
engine oil.
3-32
Page 207 of 354

Before you start, check all trailer hitch parts and
attachments, safety chains, electrical connector, lamps,
tires and mirror adjustment. If the trailer has electric
brakes, start your vehicle and trailer moving and then
apply the trailer brake controller by hand to be sure
the brakes are working. This lets you check your
electrical connection at the same time.
During your trip, check occasionally to be sure that the
load is secure, and that the lamps and any trailer
brakes are still working.
Following Distance
Stay at least twice as far behind the vehicle ahead as
you would when driving your vehicle without a trailer.
This can help you avoid situations that require
heavy braking and sudden turns.
Passing
You will need more passing distance up ahead when you
are towing a trailer. And, because the vehicle is a good
deal longer, you will need to go much farther beyond the
passed vehicle before you can return to your lane.
Backing Up
Hold the bottom of the steering wheel with one hand.
Then, to move the trailer to the left, just move that hand
to the left. To move the trailer to the right, move your
hand to the right. Always back up slowly and, if possible,
have someone guide you.
Making Turns
Notice:Making very sharp turns while trailering
could cause the trailer to come in contact with the
vehicle. Your vehicle could be damaged. Avoid
making very sharp turns while trailering.
When you are turning with a trailer, make wider turns
than normal. Do this so your trailer will not strike
soft shoulders, curbs, road signs, trees or other objects.
Avoid jerky or sudden maneuvers. Signal well in
advance.
Turn Signals When Towing a Trailer
When you tow a trailer, your vehicle may need a
different turn signal �asher and/or extra wiring. Check
with your dealer. The arrows on your instrument
panel will �ash whenever you signal a turn or lane
change. Properly hooked up, the trailer lamps will also
�ash, telling other drivers you are about to turn,
change lanes or stop.
When towing a trailer, the arrows on your instrument
panel will �ash for turns even if the bulbs on the trailer
are burned out. Thus, you may think drivers behind
you are seeing your signal when they are not. It
is important to check occasionally to be sure the trailer
bulbs are still working.
4-41
Page 211 of 354

Service............................................................5-3
Doing Your Own Service Work.........................5-4
Adding Equipment to the Outside of Your
Vehicle......................................................5-4
Fuel................................................................5-4
Gasoline Octane............................................5-5
Gasoline Speci�cations....................................5-5
California Fuel...............................................5-5
Additives.......................................................5-6
Fuels in Foreign Countries...............................5-6
Filling Your Tank............................................5-7
Filling a Portable Fuel Container.......................5-9
Checking Things Under the Hood....................5-10
Hood Release..............................................5-10
Engine Compartment Overview.......................5-12
Engine Oil...................................................5-13
Engine Air Cleaner/Filter................................5-17
Automatic Transaxle Fluid..............................5-19
Manual Transaxle Fluid..................................5-19
Hydraulic Clutch...........................................5-19
Engine Coolant.............................................5-20
Coolant Surge Tank Pressure Cap..................5-23
Engine Overheating.......................................5-23
Cooling System............................................5-25
Power Steering Fluid.....................................5-30Windshield Washer Fluid................................5-31
Brakes........................................................5-32
Battery........................................................5-36
Jump Starting...............................................5-36
Bulb Replacement..........................................5-41
Halogen Bulbs..............................................5-41
Headlamps..................................................5-41
Front Turn Signal and Parking Lamps..............5-43
Taillamps and Turn Signal Lamps...................5-44
Back-Up Lamps............................................5-44
Replacement Bulbs.......................................5-44
Windshield Wiper Blade Replacement..............5-45
Tires..............................................................5-46
In�ation - Tire Pressure.................................5-53
Tire Inspection and Rotation...........................5-54
When It Is Time for New Tires.......................5-55
Buying New Tires.........................................5-56
Uniform Tire Quality Grading..........................5-57
Wheel Alignment and Tire Balance..................5-58
Wheel Replacement......................................5-58
Tire Chains..................................................5-60
If a Tire Goes Flat........................................5-61
Changing a Flat Tire.....................................5-62
Compact Spare Tire......................................5-72
Section 5 Service and Appearance Care
5-1
Page 251 of 354

3. Disconnect the red positive (+) cable from the
vehicle with the good battery.
4. Disconnect the red positive (+) cable from the other
vehicle.
5. Return the terminal cover to its original position.
Bulb Replacement
For the type of bulb to use, seeReplacement Bulbs on
page 5-44.
For any bulb changing procedure not listed in this
section, contact your dealer.
Halogen Bulbs
{CAUTION:
Halogen bulbs have pressurized gas inside
and can burst if you drop or scratch the bulb.
You or others could be injured. Be sure to read
and follow the instructions on the bulb
package.
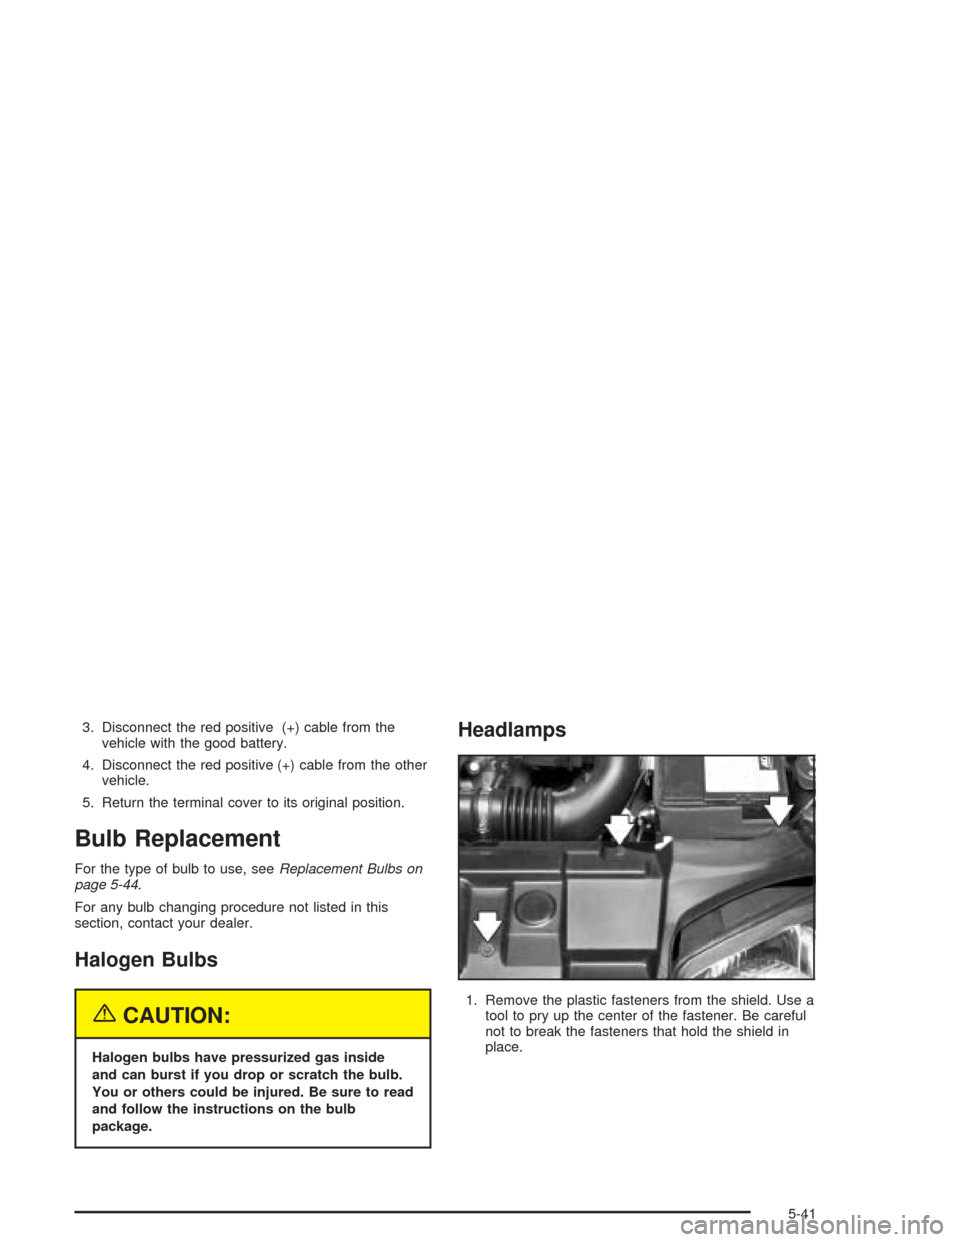
Headlamps
1. Remove the plastic fasteners from the shield. Use a
tool to pry up the center of the fastener. Be careful
not to break the fasteners that hold the shield in
place.
5-41
Page 252 of 354

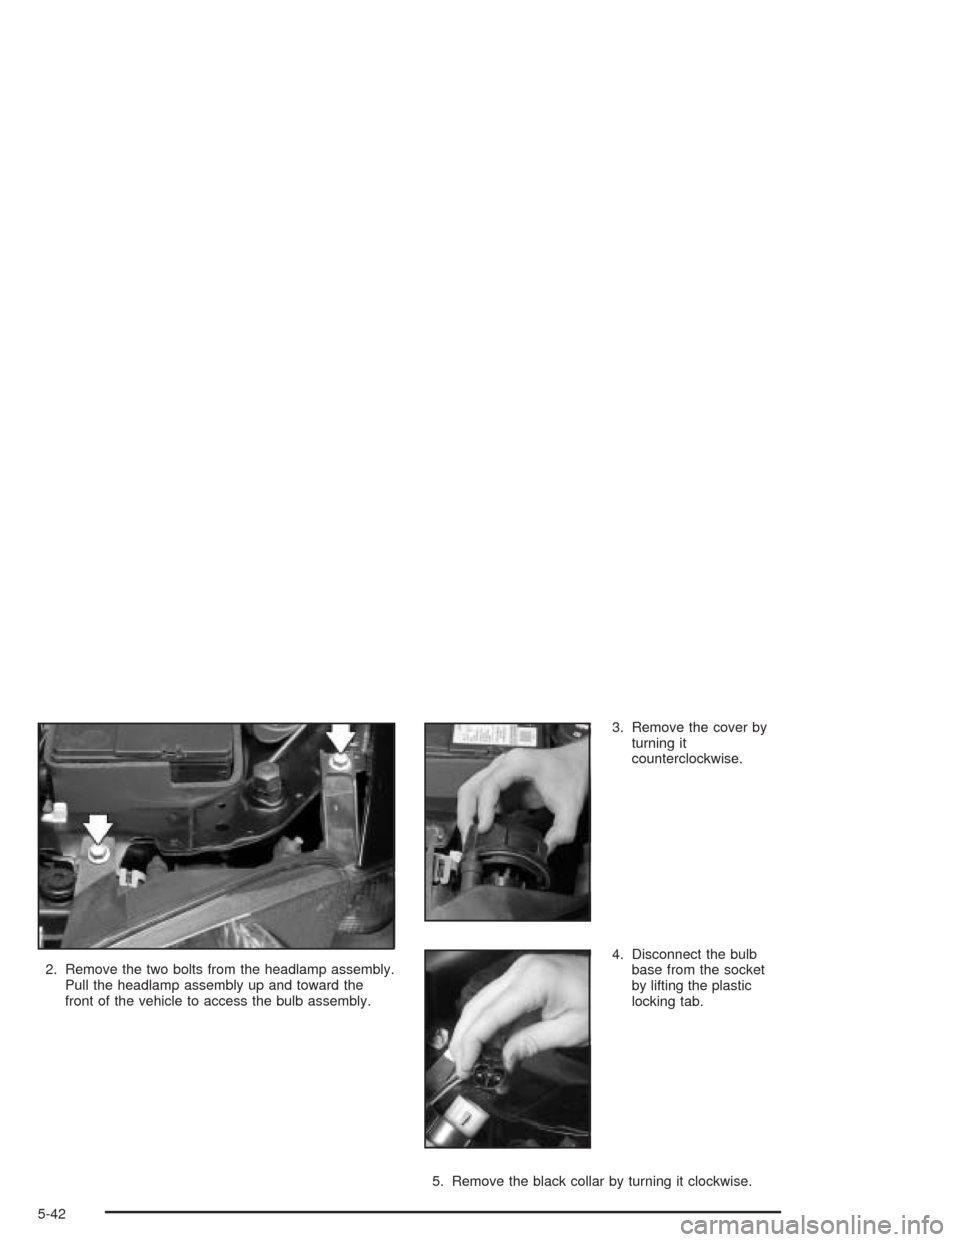
2. Remove the two bolts from the headlamp assembly.
Pull the headlamp assembly up and toward the
front of the vehicle to access the bulb assembly.3. Remove the cover by
turning it
counterclockwise.
4. Disconnect the bulb
base from the socket
by lifting the plastic
locking tab.
5. Remove the black collar by turning it clockwise.
5-42