2004 CHEVROLET AVALANCHE park assist
[x] Cancel search: park assistPage 75 of 548
Keys...............................................................2-3
Remote Keyless Entry System.........................2-4
Remote Keyless Entry System Operation...........2-5
Doors and Locks.............................................2-8
Door Locks....................................................2-8
Power Door Locks..........................................2-9
Delayed Locking...........................................2-10
Programmable Automatic Door Locks..............2-10
Rear Door Security Locks..............................2-13
Lockout Protection........................................2-13
Midgate.......................................................2-14
Tailgate.......................................................2-23
Windows........................................................2-25
Power Windows............................................2-26
Sun Visors...................................................2-26
Theft-Deterrent Systems..................................2-27
Content Theft-Deterrent.................................2-27
Passlock
®....................................................2-29
Starting and Operating Your Vehicle................2-30
New Vehicle Break-In....................................2-30
Ignition Positions..........................................2-31
Starting Your Engine.....................................2-32Adjustable Throttle and Brake Pedal................2-33
Engine Coolant Heater..................................2-33
Automatic Transmission Operation...................2-34
Four-Wheel Drive..........................................2-38
Parking Brake..............................................2-42
Shifting Into Park (P).....................................2-43
Shifting Out of Park (P).................................2-46
Parking Over Things That Burn.......................2-46
Engine Exhaust............................................2-47
Running Your Engine While You Are Parked. . . .2-48
Mirrors...........................................................2-49
Automatic Dimming Rearview Mirror with
OnStar
®, Compass and Temperature
Display....................................................2-49
Automatic Dimming Rearview Mirror with
Compass and Temperature Display..............2-52
Outside Camper-Type Mirrors.........................2-56
Outside Power Mirrors...................................2-56
Outside Convex Mirror...................................2-57
Outside Heated Mirrors..................................2-58
Outside Automatic Dimming Mirror with Curb
View Assist..............................................2-58
OnStar
®System.............................................2-59
Section 2 Features and Controls
2-1
Page 132 of 548

Outside Heated Mirrors
Your vehicle may have this feature.
This button is located on
the climate control panel.
Press this button to warm the heated driver’s and
passenger’s outside rearview mirrors to help clear them
of ice, snow and condensation.
If your vehicle has a rear window defogger, it will also
operate when you press this button. See “Rear Window
Defogger” underAutomatic Climate Control System
on page 3-22for more information.
Outside Automatic Dimming Mirror
with Curb View Assist
Your vehicle may have this feature.
The driver’s outside mirror will adjust for the glare of the
headlamps behind you. SeeAutomatic Dimming
Rearview Mirror with OnStar
®, Compass and
Temperature Display on page 2-49.
Your vehicle’s mirrors will also be capable of performing
the curb view assist mirror function. This feature will
cause the passenger’s and/or driver’s mirror to tilt to a
preselected position when the vehicle is in
REVERSE (R). This feature may be useful in allowing
you to view the curb when you are parallel parking.
When the vehicle is shifted out of REVERSE (R) and a
short delay has occurred, the passenger’s and/or
driver’s mirror will return to its original position.
To change the preselected tilt position, adjust the
mirrors to the desired position while the vehicle is in
REVERSE (R). When the vehicle is shifted out of
REVERSE (R), this new position is saved in memory as
the tilt position.
This feature can be enabled/disabled through the Driver
Information Center. SeeDriver Information Center
(DIC) on page 3-53for more information.
2-58
Page 136 of 548
Programming the HomeLink®
Transmitter
Do not use the HomeLink®Transmitter with any garage
door opener that does not have the “stop and reverse”
feature. This includes any garage door opener model
manufactured before April 1, 1982. If you have a newer
garage door opener with rolling codes, please be
sure to follow steps 6 through 8 to complete the
programming of your HomeLink
®Transmitter.
Read the instructions completely before attempting to
program the HomeLink
®Transmitter. Because of
the steps involved, it may be helpful to have another
person available to assist you in programming the
transmitter.
Keep the original transmitter for use in other vehicles as
well as for future HomeLink
®programming. It is also
recommended that upon the sale of the vehicle,
the programmed HomeLink
®buttons should be erased
for security purposes. Refer to “Erasing HomeLink®
Buttons” or, for assistance, contact HomeLink®on the
internet at: www.homelink.com or by calling
1-800-355-3515.
Be sure that people and objects are clear of the garage
door or gate operator you are programming. When
programming a garage door, it is advised to park outside
of the garage.It is recommended that a new battery be installed in
your hand-held transmitter for quicker and more
accurate transmission of the radio frequency.
Your vehicle’s engine should be turned off while
programming the transmitter. Follow these steps to
program up to three channels:
1. Press and hold down the two outside buttons,
releasing only when the indicator light begins to
�ash, after 20 seconds. Do not hold down the
buttons for longer than 30 seconds and do not
repeat this step to program a second and/or third
transmitter to the remaining two HomeLink
®buttons.
2. Position the end of your hand-held transmitter about
1 to 3 inches (3 to 8 cm) away from the HomeLink
®
buttons while keeping the indicator light in view.
3. Simultaneously press and hold both the desired
button on HomeLink
®and the hand-held transmitter
button. Do not release the buttons until Step 4
has been completed.
Some entry gates and garage door openers may
require you to substitute Step 3 with the procedure
noted in “Gate Operator and Canadian
Programming” later in this section.
4. The indicator light will �ash slowly at �rst and then
rapidly after HomeLink
®successfully receives the
frequency signal from the hand-held transmitter.
Release both buttons.
2-62
Page 171 of 548
The main components of your instrument panel are the
following:
A. Air Outlets. SeeOutlet Adjustment on page 3-32.
B. Exterior Lamps Control. SeeExterior Lamps
on page 3-14.
C. Cargo/Top-Box Lamps Button. SeeExterior Lamps
on page 3-14.
D. Automatic Transfer Case Buttons (If Equipped). See
Four-Wheel Drive on page 2-38. Traction Assist
System (If Equipped). SeeTraction Assist System
(TAS) on page 4-9. Stabilitrak
®Button (If Equipped).
SeeStabilitrak®System on page 4-11.
E. OnStar®and Radio Steering Wheel Buttons (If
Equipped). SeeOnStar®System on page 2-59and
Audio Steering Wheel Controls on page 3-114.
F. Instrument Panel Cluster. SeeInstrument Panel
Cluster on page 3-34.
G. Shift Lever/Tow/Haul Selector Button. SeeAutomatic
Transmission Operation on page 2-34.
H. Audio System. SeeAudio System(s) on page 3-72.
I. Dome Override Button. SeeInterior Lamps on
page 3-20.J. Fog Lamps Button. SeeExterior Lamps on
page 3-14.
K. Turn Signal/Multifunction Lever. SeeTurn
Signal/Multifunction Lever on page 3-8.
L. Hood Release. SeeHood Release on page 5-10.
M. Tilt Lever. SeeTilt Wheel on page 3-7.
N. Driver Information Center (DIC) Buttons. SeeDriver
Information Center (DIC) on page 3-53.
O. Parking Brake Release. SeeParking Brake on
page 2-42.
P. Comfort Control Systems. SeeAutomatic Climate
Control System on page 3-22andDual Climate
Control System on page 3-29.
Q. Lighter (If Equipped) or Accessory Power Outlet
(If Equipped). SeeAshtrays and Cigarette Lighter on
page 3-22andAccessory Power Outlets on
page 3-21.
R. Accessory Power Outlet (If Equipped). See
Accessory Power Outlets on page 3-21.
S. Glove Box. SeeGlove Box on page 2-65.
3-5
Page 212 of 548
At approximately 265°F (130°C), the DIC will display a
TRANSMISSION HOT message and the transmission
will enter a transmission protection mode. When
the transmission enters the protection mode, you may
notice a change in the transmission shifting patterns.
The transmission will return to normal shifting patterns
when the transmission �uid temperature falls below
260°F (127°C).
SeeDriver Information Center (DIC) on page 3-53for
further information.
If the transmission �uid reaches temperatures of
approximately 275°F (135°C) or greater, the DIC will
display a TRANS HOT IDLE ENGINE warning message
and a chime will sound. Pull the vehicle off the
roadway when it is safe to do so. Set the parking brake,
place the transmission in PARK (P) and allow the
engine to idle until the transmission temperature falls
below 260°F (127°C). If the transmission continues
to operate above 265°F (130°C), please contact your
nearest dealer or the GM Roadside Assistance Center.Notice:If you drive your vehicle with the
transmission temperature gage above normal
operating range, you can damage the transmission.
This could lead to costly repairs that would not
be covered by your warranty. Do not drive your
vehicle while the transmission temperature gage
reading is above normal. See your dealer for service.
The following situations can cause the transmission to
operate at higher temperatures:
Towing a trailer,
hot outside air temperatures,
hauling a large or heavy load,
low transmission �uid level,
high transmission �uid level,
restricted air �ow to the radiator.
A temporary solution to hotter transmission operating
temperatures may be to let the transmission cool down. If
the transmission is operated at higher temperatures on a
frequent basis, seeScheduled Maintenance on page 6-4
for the proper transmission maintenance intervals.
3-46
Page 354 of 548
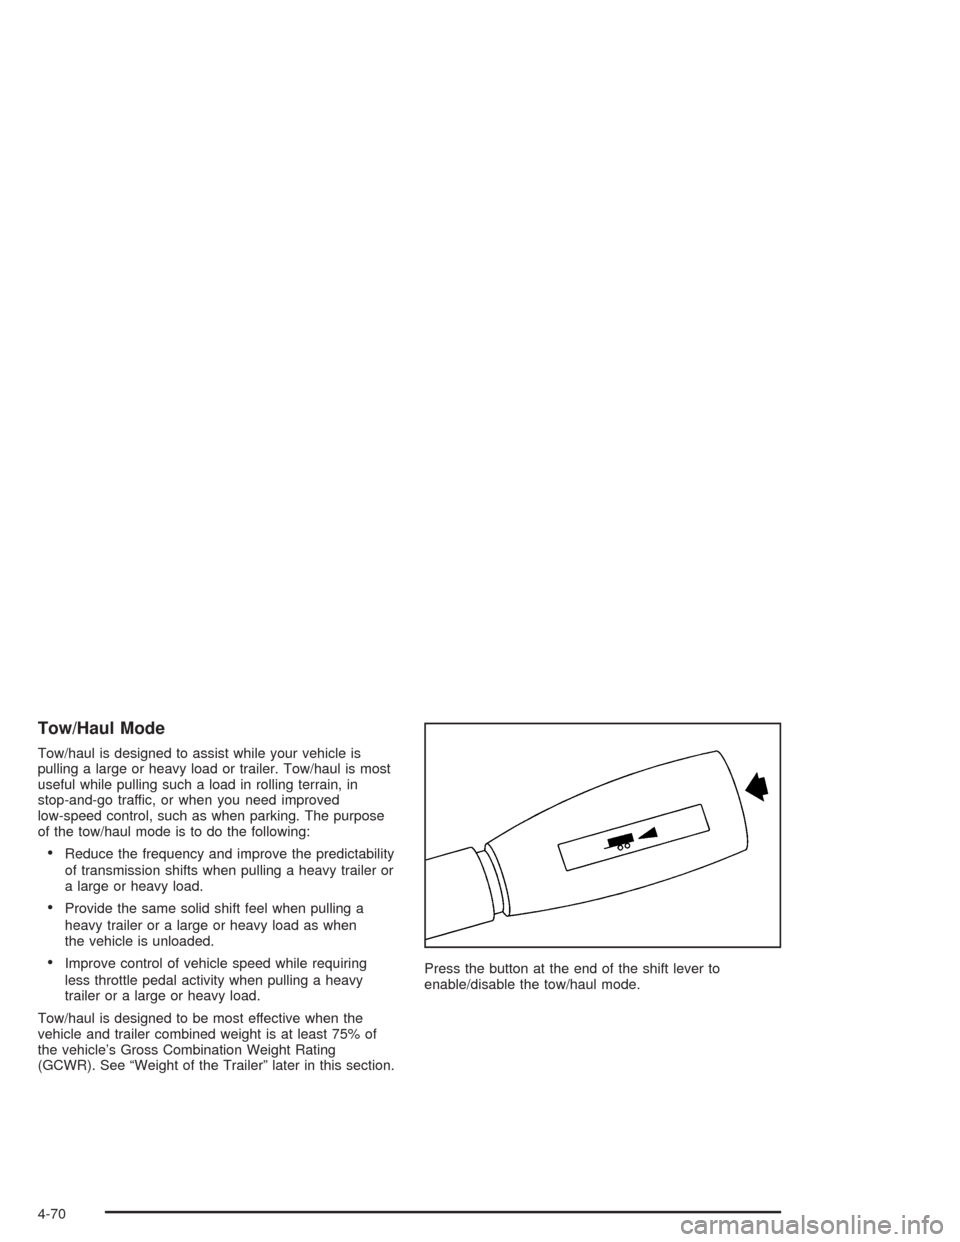
Tow/Haul Mode
Tow/haul is designed to assist while your vehicle is
pulling a large or heavy load or trailer. Tow/haul is most
useful while pulling such a load in rolling terrain, in
stop-and-go traffic, or when you need improved
low-speed control, such as when parking. The purpose
of the tow/haul mode is to do the following:
Reduce the frequency and improve the predictability
of transmission shifts when pulling a heavy trailer or
a large or heavy load.
Provide the same solid shift feel when pulling a
heavy trailer or a large or heavy load as when
the vehicle is unloaded.
Improve control of vehicle speed while requiring
less throttle pedal activity when pulling a heavy
trailer or a large or heavy load.
Tow/haul is designed to be most effective when the
vehicle and trailer combined weight is at least 75% of
the vehicle’s Gross Combination Weight Rating
(GCWR). See “Weight of the Trailer” later in this section.Press the button at the end of the shift lever to
enable/disable the tow/haul mode.
4-70
Page 544 of 548
Resynchronization............................................. 2-8
Retained Accessory Power (RAP)......................2-31
Right Front Passenger Position, Safety Belts......1-23
RIGHT REAR DOOR AJAR..............................3-70
Roadside
Assistance Program....................................... 7-6
Rocking Your Vehicle To Get It Out...................4-50
Routing, Engine Drive Belt...............................6-16
Running Your Engine While You Are Parked.......2-48
S
Safety Belt
Reminder Light............................................3-36
Safety Belts
Care of....................................................5-114
Center Front Passenger Position....................1-23
Driver Position............................................1-14
How to Wear Safety Belts Properly................1-14
Questions and Answers About Safety Belts.....1-13
Rear Safety Belt Comfort Guides for Children
and Small Adults......................................1-27
Rear Seat Passengers.................................1-24
Right Front Passenger Position......................1-23
Safety Belt Extender....................................1-29Safety Belts (cont.)
Safety Belt Use During Pregnancy.................1-22
Safety Belts Are for Everyone......................... 1-9
Safety Chains.................................................4-75
Safety Warnings and Symbols.............................. iii
Scanning the Terrain.......................................4-23
Scheduled Maintenance..................................... 6-4
Seats
Head Restraints............................................ 1-7
Heated Seats............................................... 1-4
Manual Passenger......................................... 1-2
Memory.....................................................2-90
Power Lumbar.............................................. 1-3
Power Seats................................................. 1-2
Rear Seat Operation...................................... 1-7
Reclining Seatbacks...................................... 1-5
Secondary Latch System................................5-107
Securing a Child Restraint
Center Front Seat Position............................1-46
Designed for the LATCH System...................1-44
Rear Seat Position......................................1-44
Right Front Seat Position..............................1-47
Security Light.................................................3-51
Security While You Travel.................................. 7-6
Select Button.................................................3-65
Service........................................................... 5-3
14