Page 91 of 382
Hatch Release
You can use your key to unlock the hatch and all of the
other doors from the outside. Insert the key into the
hatch release button and turn it counterclockwise. All of
the doors will unlock.
You may also use the keyless entry system described
earlier.
The hatch can be opened or closed without a key if the
door lock system is unlocked.
To open the hatch, unlock it, then press the button and
lift the handle located in the center of the door.
To lock the power lock system from the outside, insert
the key in the hatch release button and turn it clockwise.
All doors will lock.
2-13
Page 138 of 382

Climate Controls
Climate Control System
With this system you can control the heating, cooling
and ventilation for your vehicle.
Turn the right knob clockwise or counterclockwise to
direct the air¯ow inside of your vehicle.To change the current mode, select one of the following:
)(Bi-Level):This mode directs approximately half
of the air to the instrument panel outlets and directs
most of the remaining air to the ¯oor outlets. Some air
may be directed toward the windshield.
H(Vent):This mode directs air to the instrument
panel outlets.
6(Floor):This mode directs most of the air to the
¯oor outlets with some air directed to the outboard
outlets (for the side windows) and some air directed to
the windshield.
A/C (Air Conditioning):This setting brings in outside
air, cools and dehumidi®es it.
MAX A/C (Maximum Air Conditioning):This setting
cools the air the fastest, by recirculating the inside air.
The right knob can also be used to select the defrost
mode. Information on defogging and defrosting can be
found later in this section.
9(Fan):Turn the left knob clockwise or
counterclockwise to increase or decrease the fan speed.
Temperature Control:Turn the center knob clockwise
or counterclockwise to increase or decrease the
temperature inside your vehicle.
3-18
Page 158 of 382

Audio System(s)
Notice:Before you add any sound equipment to
your vehicle ± like a tape player, CB radio, mobile
telephone or two-way radio ± be sure you can
add what you want. If you can, it's very important to
do it properly. Added sound equipment may
interfere with the operation of your vehicle's engine,
radio or other systems, and even damage them.
Your vehicle's systems may interfere with the
operation of sound equipment that has been added
improperly.
So, before adding sound equipment, check with
your dealer and be sure to check federal rules
covering mobile radio and telephone units.
Your audio system has been designed to operate easily
and to give years of listening pleasure. You will get
the most enjoyment out of it if you acquaint yourself with
it ®rst. Figure out which radio you have in your vehicle,
®nd out what your audio system can do and how to
operate all of its controls to be sure you're getting the
most out of the advanced engineering that went into it.
Your vehicle has a feature called Retained Accessory
Power (RAP). With RAP, you can play your audio
system even after the ignition is turned off. See
ªRetained Accessory Power (RAP)º under
Ignition
Positions on page 2-17.
Setting the Time for Radios with the
Set Button
Press SET. Within ®ve seconds, press and hold the left
SEEK arrow until the correct hour appears on the
display. Press and hold the right SEEK arrow until the
correct minute appears on the display.
Setting the Time for Radios with HR
and MN Buttons
Press and hold HR until the correct hour appears on the
display. Press and hold MN until the correct minute
appears on the display. To display the time with
the ignition off, press RECALL or HR/MN and the time
will be displayed for a few seconds. There is an
initial two-second delay before the clock goes into the
time-set mode.
3-38
Page 161 of 382

Radio with CD
Playing the Radio
PWR (Power):Press this knob to turn the system
on and off.
VOL (Volume):Turn this knob to increase or to
decrease volume. The knob is capable of rotating
continuously.SCV (Speed-Compensated Volume):With SCV, your
audio system adjusts automatically to make up for
road and wind noise as you drive.
Set the volume at the desired level. Turn the control
ring behind the upper knob clockwise to increase
the SCV. Each notch on the control ring allows for more
volume compensation at faster vehicle speeds. Then,
as you drive, SCV automatically increases the volume,
as necessary, to overcome noise at any speed. The
volume level should always sound the same to you as
you drive. If you do not want to use SCV, turn the control
all the way down.
RECALL:Press this button to switch the display
between the radio station frequency and the time. Time
display is available with the ignition turned off.Finding a Station
AM FM:Press this button to switch between FM1, FM2,
and AM. The display will show your selection.
TUNE:Press this knob lightly so it extends. Turn it to
select radio stations. Push the knob back into its stored
position when you are not using it.
3-41
Page 181 of 382

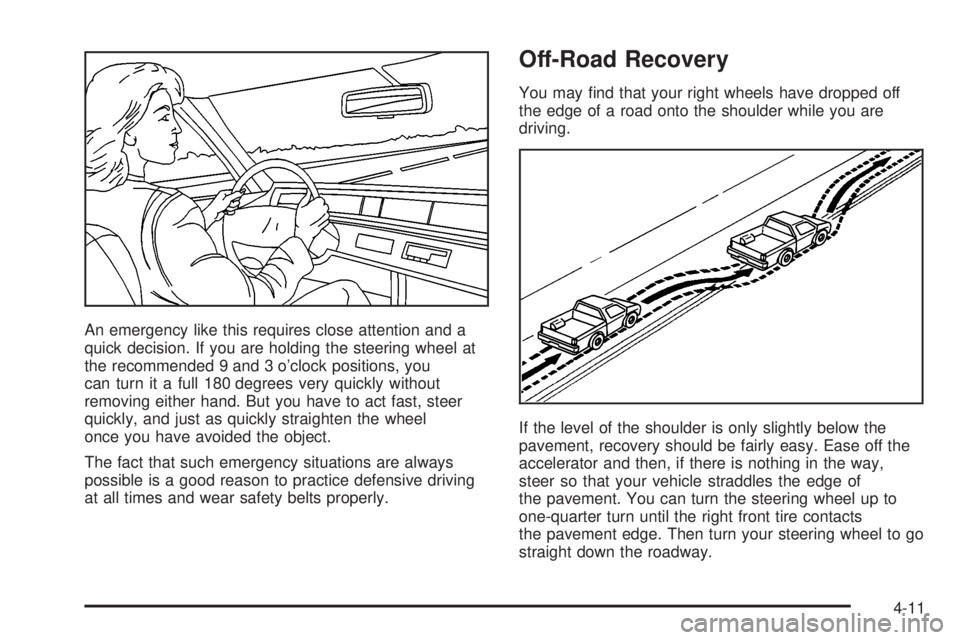
An emergency like this requires close attention and a
quick decision. If you are holding the steering wheel at
the recommended 9 and 3 o'clock positions, you
can turn it a full 180 degrees very quickly without
removing either hand. But you have to act fast, steer
quickly, and just as quickly straighten the wheel
once you have avoided the object.
The fact that such emergency situations are always
possible is a good reason to practice defensive driving
at all times and wear safety belts properly.
Off-Road Recovery
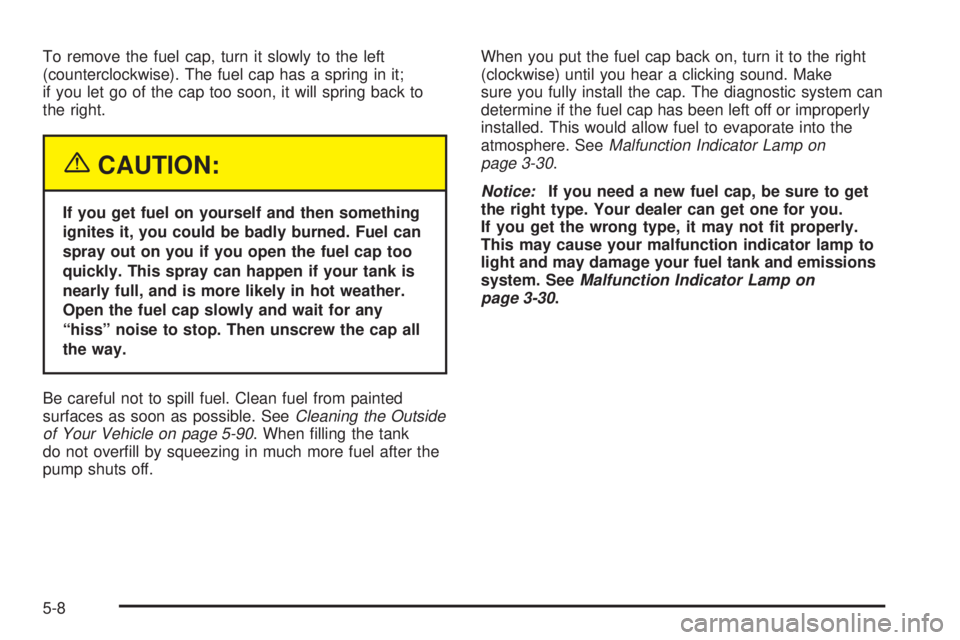
You may ®nd that your right wheels have dropped off
the edge of a road onto the shoulder while you are
driving.
If the level of the shoulder is only slightly below the
pavement, recovery should be fairly easy. Ease off the
accelerator and then, if there is nothing in the way,
steer so that your vehicle straddles the edge of
the pavement. You can turn the steering wheel up to
one-quarter turn until the right front tire contacts
the pavement edge. Then turn your steering wheel to go
straight down the roadway.
4-11
Page 222 of 382

To remove the fuel cap, turn it slowly to the left
(counterclockwise). The fuel cap has a spring in it;
if you let go of the cap too soon, it will spring back to
the right.
{CAUTION:
If you get fuel on yourself and then something
ignites it, you could be badly burned. Fuel can
spray out on you if you open the fuel cap too
quickly. This spray can happen if your tank is
nearly full, and is more likely in hot weather.
Open the fuel cap slowly and wait for any
ªhissº noise to stop. Then unscrew the cap all
the way.
Be careful not to spill fuel. Clean fuel from painted
surfaces as soon as possible. See
Cleaning the Outside
of Your Vehicle on page 5-90. When ®lling the tank
do not over®ll by squeezing in much more fuel after the
pump shuts off.When you put the fuel cap back on, turn it to the right
(clockwise) until you hear a clicking sound. Make
sure you fully install the cap. The diagnostic system can
determine if the fuel cap has been left off or improperly
installed. This would allow fuel to evaporate into the
atmosphere. See
Malfunction Indicator Lamp on
page 3-30.
Notice:If you need a new fuel cap, be sure to get
the right type. Your dealer can get one for you.
If you get the wrong type, it may not ®t properly.
This may cause your malfunction indicator lamp to
light and may damage your fuel tank and emissions
system. See
Malfunction Indicator Lamp on
page 3-30.
5-8
Page 248 of 382
How to Add Coolant to the Radiator
You can remove the
radiator pressure cap
when the cooling system,
including the radiator
pressure cap and upper
radiator hose, is no
longer hot.
1. Turn the pressure cap slowly counterclockwise until
it ®rst stops. (Don't press down while turning the
pressure cap.)
If you hear a hiss, wait for that to stop. A hiss
means there is still some pressure left.2. Then keep turning the
pressure cap, but now
push down as you
turn it. Remove
the pressure cap.
5-34
Page 267 of 382
7. Turn the halogen bulb
counterclockwise to
remove it from
the assembly.
8. Install the new bulb into the composite assembly by
turning it clockwise until it is completely tightened.
9. Reinstall the composite assembly by installing and
tightening all of the screws previously removed.
Front Turn Signal Lamps
1. Remove the two screws at the inside edge of the
parking/turn signal lamp assembly.
2. Remove the lamp assembly.3. Squeeze the tab on
the side of the lamp
socket while turning
the socket
counterclockwise.
4. Pull the socket out of the lamp assembly.
5. Pull the bulb from the socket.
6. Gently push the new bulb into the socket.
7. Put the socket back into the lamp assembly and
turn it clockwise until it locks.
8. Put the parking/turn signal lamp assembly back into
the vehicle and tighten the screws.
5-53