2004 CHEVROLET ASTRO CARGO VAN recommended
[x] Cancel search: recommendedPage 109 of 386
If your vehicle is equipped with the HomeLink®
Transmitter, it complies with Part 15 of the FCC Rules.
Operation is subject to the following two conditions:
(1) this device may not cause harmful interference,
and (2) this device must accept any interference
received, including interference that may cause
undesired operation.
This device complies with RSS-210 of Industry
Canada. Operation is subject to the following
two conditions: (1) this device may not cause
interference, and (2) this device must accept any
interference, including interference that may
cause undesired operation of the device.
Changes and modications to this system by
other than an authorized service facility could void
authorization to use this equipment.Programming the HomeLink®
Transmitter
Do not use the HomeLink®Transmitter with any garage
door opener that does not have the “stop and reverse”
feature. This includes any garage door opener model
manufactured before April 1, 1982. If you have a newer
garage door opener with rolling codes, please be
sure to follow steps 6 through 8 to complete the
programming of your HomeLink
®Transmitter.
Read the instructions completely before attempting to
program the HomeLink
®Transmitter. Because of the
steps involved, it may be helpful to have another person
available to assist you in programming the transmitter.
Keep the original transmitter for use in other vehicles as
well as for future HomeLink
®programming. It is also
recommended that upon the sale of the vehicle, the
programmed HomeLink
®buttons should be erased for
security purposes. Refer to “Erasing HomeLink®Buttons”
or, for assistance, contact HomeLink®on the internet at:
www.homelink.com or by calling 1-800-355-3515.
2-33
Page 110 of 386

Be sure that people and objects are clear of the garage
door or gate operator you are programming. When
programming a garage door, it is advised to park outside
of the garage.
It is recommended that a new battery be installed in
your hand-held transmitter for quicker and more
accurate transmission of the radio frequency.
Your vehicle’s engine should be turned off while
programming the transmitter. Follow these steps to
program up to three channels:
1. Press and hold down the two outside buttons,
releasing only when the indicator light begins to
ash, after 20 seconds. Do not hold down the
buttons for longer than 30 seconds and do not
repeat this step to program a second and/or third
transmitter to the remaining two HomeLink
®buttons.
2. Position the end of your hand-held transmitter about
1 to 3 inches (3 to 8 cm) away from the HomeLink
®
buttons while keeping the indicator light in view.
3. Simultaneously press and hold both the desired
button on HomeLink
®and the hand-held transmitter
button. Do not release the buttons until Step 4
has been completed.
Some entry gates and garage door openers may
require you to substitute Step 3 with the procedure
noted in “Gate Operator and Canadian
Programming” later in this section.4. The indicator light will ash slowly at rst and then
rapidly after HomeLink
®successfully receives the
frequency signal from the hand-held transmitter.
Release both buttons.
5. Press and hold the newly-trained HomeLink
®button
and observe the indicator light.
If the indicator light stays on constantly,
programming is complete and your device should
activate when the HomeLink
®button is pressed
and released.
To program the remaining two HomeLink
®buttons,
begin with Step 2 under “Programming HomeLink®.”
Do not repeat Step 1 as this will erase all of the
programmed channels.
If the indicator light blinks rapidly for two seconds
and then turns to a constant light, continue with
Steps 6 through 8 following to complete the
programming of a rolling-code equipped device
(most commonly, a garage door opener).
6. Locate in the garage, the garage door opener
receiver (motor-head unit). Locate the “Learn”
or “Smart” button. This can usually be found
where the hanging antenna wire is attached to the
motor-head unit.
7. Firmly press and release the “Learn” or “Smart”
button. The name and color of the button may
vary by manufacturer.
You will have 30 seconds to start Step 8.
2-34
Page 119 of 386
Luggage Carrier
If you have a luggage carrier, you can load things
on top of your vehicle.
The luggage carrier has side rails and crossrails
attached to the roof to secure cargo.
Be sure the cargo is properly loaded.
Follow these guidelines:
Carrying small, heavy loads on the roof is not
recommended.
Tie the load to the side rails. Use the crossrails
only to keep the load from sliding.
If you need to carry long items, tie the load to
the side rails. Also tie the load to the bumpers.
Do not tie the load so tightly that the crossrails
or side rails are damaged.
After moving the crossrails, be sure to tighten
all the slider screws.
For the purpose of wind noise reduction, locate
the front and rear crossrails in line with the
two center supports.Notice:Loading cargo on the luggage carrier
that weighs more than 200 lbs. (918 kg) or hangs
over the rear or sides of the vehicle may damage
your vehicle. Load cargo so that it rests on the
slats as far forward as possible and against the side
rails, making sure to fasten it securely.
Don’t exceed the maximum vehicle capacity when
loading your vehicle. For more information on vehicle
capacity and loading, seeLoading Your Vehicle
on page 4-29.
To prevent damage or loss of cargo as you’re driving,
check now and then to make sure the luggage
carrier and cargo are still securely fastened.
Convenience Net
You may have a convenience net in the rear of your
vehicle to help keep small loads, like grocery bags,
in place during sharp turns or quick stops and starts.
The net is not designed for larger, heavier items.
You can unhook the net so that it will lie at when
you’re not using it.
2-43
Page 178 of 386

Steering in Emergencies
There are times when steering can be more effective
than braking. For example, you come over a hill and
nd a truck stopped in your lane, or a car suddenly
pulls out from nowhere, or a child darts out from
between parked cars and stops right in front of you.
You can avoid these problems by braking — if you
can stop in time. But sometimes you can not; there is
not room. That is the time for evasive action — steering
around the problem.
Your vehicle can perform very well in emergencies like
these. First apply your brakes.
SeeBraking on page 4-6. It is better to remove as
much speed as you can from a possible collision.
Then steer around the problem, to the left or right
depending on the space available.An emergency like this requires close attention and a
quick decision. If you are holding the steering wheel
at the recommended 9 and 3 o’clock positions, you can
turn it a full 180 degrees very quickly without removing
either hand. But you have to act fast, steer quickly,
and just as quickly straighten the wheel once you have
avoided the object.
The fact that such emergency situations are always
possible is a good reason to practice defensive driving
at all times and wear safety belts properly.
4-10
Page 188 of 386

Once you are moving on the freeway, make certain
you allow a reasonable following distance. Expect
to move slightly slower at night.
When you want to leave the freeway, move to the
proper lane well in advance. If you miss your exit,
do not, under any circumstances, stop and back up.
Drive on to the next exit.
The exit ramp can be curved, sometimes quite sharply.
The exit speed is usually posted.
Reduce your speed according to your speedometer,
not to your sense of motion. After driving for any
distance at higher speeds, you may tend to think you
are going slower than you actually are.
Before Leaving on a Long Trip
Make sure you are ready. Try to be well rested. If you
must start when you are not fresh — such as after
a day’s work — do not plan to make too many miles
that rst part of the journey. Wear comfortable clothing
and shoes you can easily drive in.Is your vehicle ready for a long trip? If you keep it
serviced and maintained, it is ready to go. If it needs
service, have it done before starting out. Of course, you
will nd experienced and able service experts in GM
dealerships all across North America. They will be ready
and willing to help if you need it.
Here are some things you can check before a trip:
Windshield Washer Fluid:Is the reservoir full?
Are all windows clean inside and outside?
Wiper Blades:Are they in good shape?
Fuel, Engine Oil, Other Fluids:Have you checked
all levels?
Lamps:Are they all working? Are the lenses clean?
Tires:They are vitally important to a safe,
trouble-free trip. Is the tread good enough for
long-distance driving? Are the tires all inated
to the recommended pressure?
Weather Forecasts:What is the weather outlook
along your route? Should you delay your trip a
short time to avoid a major storm system?
Maps:Do you have up-to-date maps?
4-20
Page 198 of 386
Tire and Loading Information Label
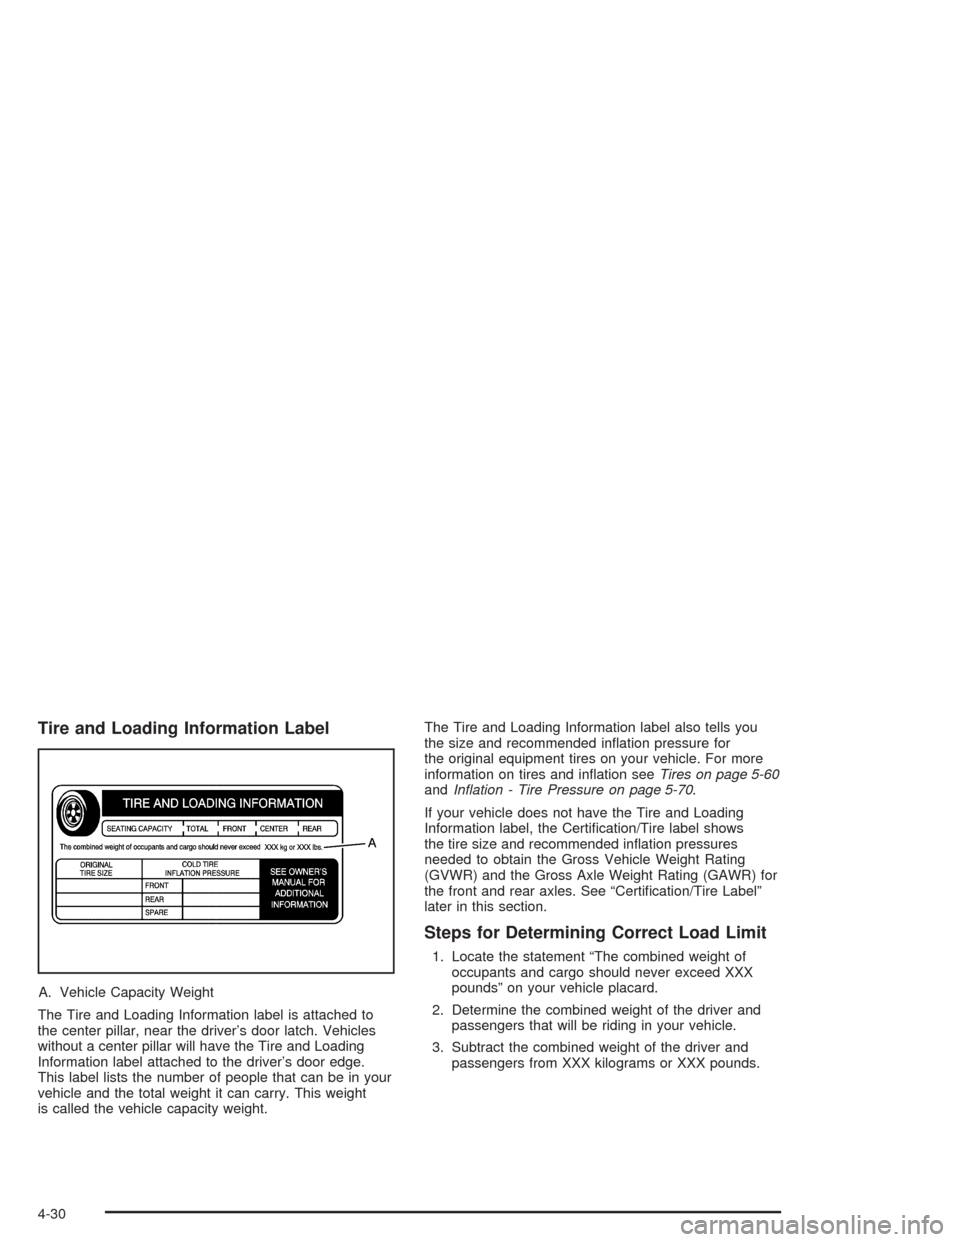
A. Vehicle Capacity Weight
The Tire and Loading Information label is attached to
the center pillar, near the driver’s door latch. Vehicles
without a center pillar will have the Tire and Loading
Information label attached to the driver’s door edge.
This label lists the number of people that can be in your
vehicle and the total weight it can carry. This weight
is called the vehicle capacity weight.The Tire and Loading Information label also tells you
the size and recommended ination pressure for
the original equipment tires on your vehicle. For more
information on tires and ination seeTires on page 5-60
andInation - Tire Pressure on page 5-70.
If your vehicle does not have the Tire and Loading
Information label, the Certication/Tire label shows
the tire size and recommended ination pressures
needed to obtain the Gross Vehicle Weight Rating
(GVWR) and the Gross Axle Weight Rating (GAWR) for
the front and rear axles. See “Certication/Tire Label”
later in this section.
Steps for Determining Correct Load Limit
1. Locate the statement “The combined weight of
occupants and cargo should never exceed XXX
pounds” on your vehicle placard.
2. Determine the combined weight of the driver and
passengers that will be riding in your vehicle.
3. Subtract the combined weight of the driver and
passengers from XXX kilograms or XXX pounds.
4-30
Page 218 of 386
You should keep a record with all parts receipts and list
the mileage and the date of any service work you
perform. SeePart E: Maintenance Record on page 6-30.
{CAUTION:
You can be injured and your vehicle could be
damaged if you try to do service work on a
vehicle without knowing enough about it.
Be sure you have sufficient knowledge,
experience, the proper replacement parts
and tools before you attempt any vehicle
maintenance task.
Be sure to use the proper nuts, bolts and
other fasteners. “English” and “metric”
fasteners can be easily confused. If you
use the wrong fasteners, parts can later
break or fall off. You could be hurt.
Adding Equipment to the Outside
of Your Vehicle
Things you might add to the outside of your vehicle
can affect the airow around it. This may cause
wind noise and affect windshield washer performance.
Check with your dealer before adding equipment to
the outside of your vehicle.
Fuel
Use of the recommended fuel is an important part of the
proper maintenance of your vehicle.
Gasoline Octane
Use regular unleaded gasoline with a posted octane of
87 or higher. If the octane is less than 87, you may get
a heavy knocking noise when you drive. If this occurs,
use a gasoline rated at 87 octane or higher as soon as
possible. Otherwise, you might damage your engine.
A little pinging noise when you accelerate or drive uphill
is considered normal. This does not indicate a problem
exists or that a higher-octane fuel is necessary. If you are
using 87 octane or higher-octane fuel and hear heavy
knocking, your engine needs service.
5-4
Page 219 of 386
Gasoline Specications
It is recommended that gasoline meet specications
which were developed by automobile manufacturers
around the world and contained in the World-Wide Fuel
Charter which is available from the Alliance of Automobile
Manufacturers at www.autoalliance.org/fuel_charter.htm.
Gasoline meeting these specications could provide
improved driveability and emission control system
performance compared to other gasoline.
In Canada, look for the
“Auto Makers’ Choice”
label on the pump.
California Fuel
If your vehicle is certied to meet California Emission
Standards (see the underhood emission control label),
it is designed to operate on fuels that meet California
specications. If this fuel is not available in states
adopting California emissions standards, your vehicle
will operate satisfactorily on fuels meeting federal
specications, but emission control system performance
may be affected. The malfunction indicator lamp may
turn on (seeMalfunction Indicator Lamp on page 3-29)
and your vehicle may fail a smog-check test. If this
occurs, return to your authorized GM dealer for
diagnosis. If it is determined that the condition is caused
by the type of fuel used, repairs may not be covered
by your warranty.
Canada Only
5-5