2004 BUICK PARK AVENUE lock
[x] Cancel search: lockPage 171 of 410
4. Scroll through the following messages and feature
options:
PARALLEL PARK – OFF/ON
AUTO DOOR LOCKS – OFF/ON
UNLOCK IN PARK – OFF/ON
WHICH DOORS – ALL/DRIVER
DELAYED LOCKING – OFF/ON
LOCK FEEDBACK – OFF/ON
LOCK FEEDBACK – LIGHTS/LIGHTS + HORN
UNLOCK FEEDBACK – OFF/LIGHTS
PERIMETER LIGHTS – OFF/ON
SEAT RECALL – OFF/ON
RECALL POSITION – MEMORY/EXIT
WINDOW LOCKOUT – ALL PASS/REAR
If you would like to exit the selection mode without
moving through each of the personal choice features,
simply press a different button on the DIC or turn off the
ignition. However, personal choices you made may
not be retained.If you happen to move past a selection you would like
to make a personal choice for, press the unlock
button on your transmitter or press the appropriate
MEMORY button. This will return you to the beginning
of the option feature programming mode.
A description of each feature programmable through the
DIC follows.
Outside Curb View Assist Mirror
The outside curb view assist mirror, which tilts the
passenger mirror while the vehicle is in REVERSE (R),
can be made active or inactive through the DIC.
When PARALLEL PARK-OFF-ON appears on the
display, use the ENG/MET button to toggle the arrow
between OFF and ON. When you have made your
choice, press the RESET button to record your
selection. For more information on this feature, see
Outside Curb View Assist Mirror on page 2-40.
3-53
Page 172 of 410
Programmable Automatic Door Locks
The automatic door lock modes, when shifting in and out
of PARK (P), can be changed through the DIC. You can
change these modes using different selections from the
following DIC displays:
AUTO DOOR LOCKS – OFF/ON
UNLOCK IN PARK – OFF/ON
If you choose OFF for AUTO DOOR LOCKS, your door
locks will operate normally with no automatic feature.
If you choose ON for AUTO DOOR LOCKS, and ON for
UNLOCK IN PARK, your doors will lock every time
you shift out of PARK (P), and the doors will unlock
every time you stop and shift into PARK (P).
If you choose ON for AUTO DOOR LOCKS, and OFF for
UNLOCK IN PARK, your door locks will lock every time
you shift out of PARK (P), and there will be no automatic
door unlock when shifting back into PARK (P).
When you choose ON for UNLOCK in PARK, the DIC
will display WHICH DOORS-ALL/DRIVER. You have the
choice of unlocking all doors, or just the driver’s door.To change modes, do the following:
1. Move the arrow on the display between ON and
OFF by pressing the ENG/MET button.
2. Once you have made your selection, press the
RESET button and your choice will be retained
in memory.
SeeProgrammable Automatic Door Locks on page 2-12
for more information about this feature.
Delayed Locking
The delayed locking feature, which delays the actual
locking of the vehicle, can be made active or inactive
through the DIC. When DELAYED LOCKING-OFF-ON
appears on the display, use the ENG/MET button to
toggle the arrow between OFF and ON. When you have
made your choice, press the RESET button to record
your selection.
For more information on this feature, seeDelayed
Locking on page 2-11.
3-54
Page 173 of 410
Security Feedback
By choosing different combinations of these selections,
you can choose the type of transmitter activated
feedback you receive when locking and unlocking your
vehicle with your transmitter. Each time you make a
selection by pressing the ENG/MET button, press
the RESET button to record your choice.
LOCK FEEDBACK – OFF/ON
LOCK FEEDBACK – LIGHTS/LIGHTS + HORN
UNLOCK FEEDBACK – OFF/LIGHTS
If you choose ON for LOCK FEEDBACK you will also
need to choose LIGHTS or LIGHTS + HORN.
You can select the following modes:
If you choose OFF for LOCK FEEDBACK and OFF
for UNLOCK FEEDBACK, you will receive no
security feedback when locking or unlocking your
vehicle.
If you choose OFF for LOCK FEEDBACK and
LIGHTS for UNLOCK FEEDBACK, you will receive
no security feedback when locking your vehicle
and the exterior lamps will �ash when unlocking
your vehicle.
If you choose LIGHTS for LOCK FEEDBACK and
OFF for UNLOCK FEEDBACK, your exterior
lamps will �ash when locking your vehicle and you
will receive no security feedback when unlocking
your vehicle.
If you choose LIGHTS for LOCK FEEDBACK and
LIGHTS for UNLOCK FEEDBACK, your exterior
lamps will �ash when locking and unlocking
your vehicle.
If you choose LIGHTS + HORN for LOCK
FEEDBACK and OFF for UNLOCK FEEDBACK,
your exterior lamps will �ash and the horn will chirp
when locking your vehicle and you will receive
no security feedback when unlocking your vehicle.
If you choose LIGHTS + HORN for LOCK
FEEDBACK and LIGHTS for UNLOCK FEEDBACK,
your exterior lamps will �ash and the horn will
chirp when locking your vehicle and your exterior
lamps will �ash when unlocking your vehicle.
For more information on this feature, see “Security
Feedback” underRemote Keyless Entry System
Operation on page 2-6.
3-55
Page 174 of 410
Perimeter Lighting
When the unlock button on the transmitter is pressed,
the DRL lamps (high-beams at reduced intensity),
parking lamps and back-up lamps will turn on, if it is
dark enough according to the Twilight Sentinel
®.
You can control activation of this feature by choosing
OFF or ON when the PERIMETER LIGHTS choice
is displayed on the DIC. Make your choice by pressing
the ENG/MET button and record your choice by
pressing the RESET button.
If you want to choose PERIMETER LIGHTS ON, you
must also choose LIGHTS for UNLOCK FEEDBACK
while making the security feedback choices.
For more information on this feature, see “Perimeter
Lighting” underExterior Lamps on page 3-12.
Memory Seat Recall
This feature recalls the position of your seat. When this
feature is active, the memory seat and mirror positions
will be recalled for the identi�ed driver when the remote
keyless entry transmitter is used to enter the vehicle.
You can program this feature to be active by choosing
ON when the SEAT RECALL choice appears, or
inactive by choosing OFF when the SEAT RECALL
choice appears on the DIC.
You can also program this feature to recall your
memory seat position or the exit seat position.
Memory Position: Choose ON when the SEAT
RECALL choice appears, and then choose
MEMORY when the RECALL POSITION choice
appears.
Exit Position: Choose ON when the SEAT RECALL
choice appears, then choose EXIT when the
RECALL POSITION choice appears and your seat
will move to the stored exit position. The seat will
also move when you enter the vehicle after unlocking
it with a remote keyless entry transmitter. This will
allow for easy entry as well.
For more information on this feature, seeMemory Seat
and Mirrors on page 2-51.
3-56
Page 175 of 410
Window Lock Out
The number of passenger windows locked out by the
WINDOW LOCK button can be programmed through
the DIC.
If you choose ALL PASS, all three passenger window
switches will be inactive when the WINDOW LOCK
button is enabled.
If you choose REAR, only the two rear passenger
window switches will be locked out when the WINDOW
LOCK button is enabled.
To change modes do the following:
1. Move the arrow on the display between ALL PASS
and REAR by pressing the ENG/MET button.
2. Once you have made your selection, press the
RESET button. Your choice will be retained in
memory.
For more information on this feature, see “Window
Lock Out” underPower Windows on page 2-18.
Audio System(s)
Notice:Before you add any sound equipment to
your vehicle – like a tape player, CB radio, mobile
telephone or two-way radio – be sure you can add
what you want. If you can, it’s very important to do it
properly. Added sound equipment may interfere with
the operation of your vehicle’s engine, radio or other
systems, and even damage them. Your vehicle’s
systems may interfere with the operation of sound
equipment that has been added improperly.
So, before adding sound equipment, check with
your dealer and be sure to check federal rules
covering mobile radio and telephone units.
Your audio system has been designed to operate easily
and to give years of listening pleasure. You will get
the most enjoyment out of it if you acquaint yourself with
it �rst. Figure out which radio you have in your vehicle,
�nd out what your audio system can do and how to
operate all of its controls to be sure you’re getting the
most out of the advanced engineering that went into it.
Your vehicle may have a feature called Retained
Accessory Power (RAP). With RAP, you can play your
audio system even after the ignition is turned off.
See “Retained Accessory Power (RAP)” underIgnition
Positions on page 2-24.
3-57
Page 181 of 410
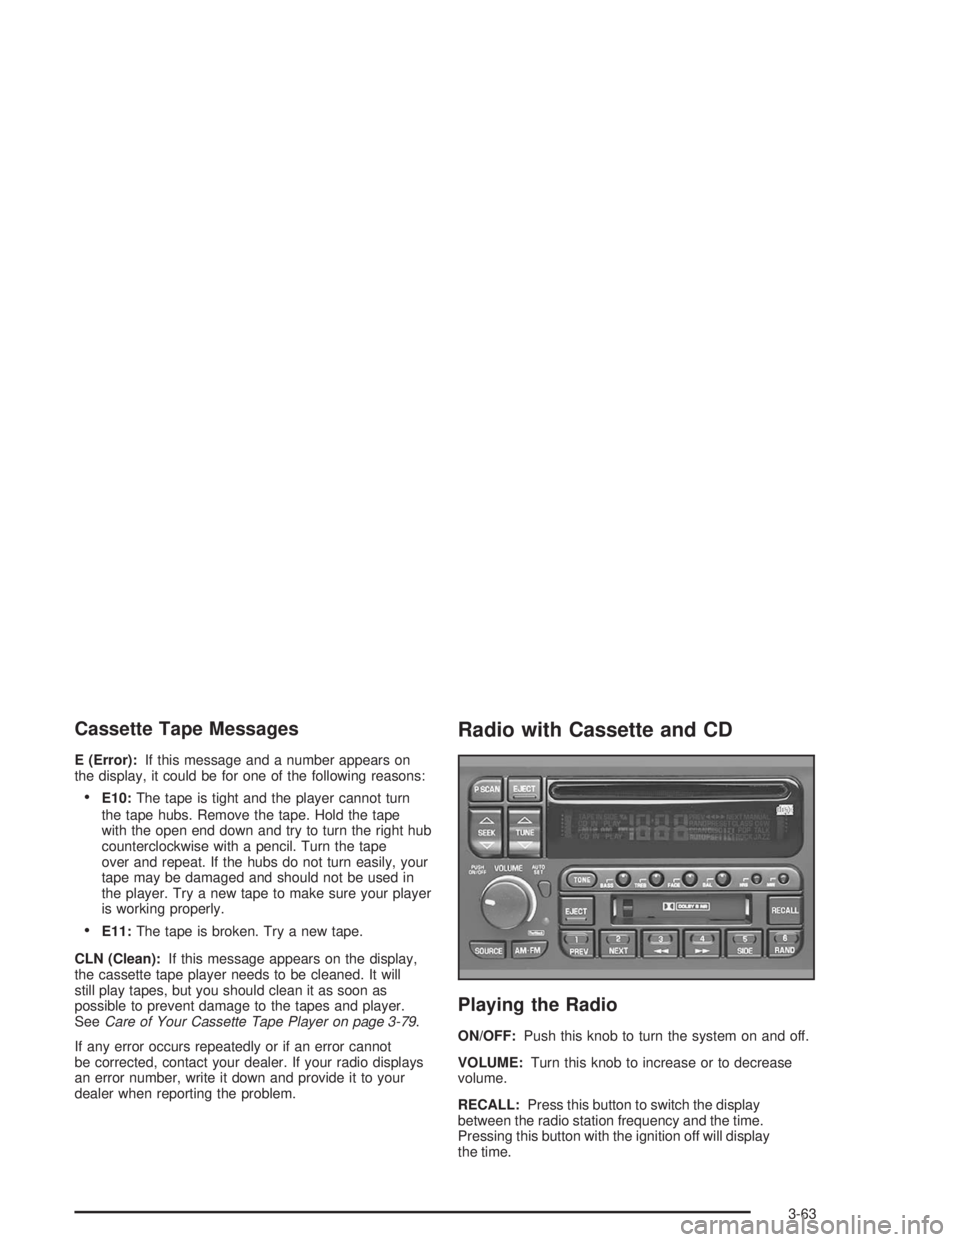
Cassette Tape Messages
E (Error):If this message and a number appears on
the display, it could be for one of the following reasons:
E10:The tape is tight and the player cannot turn
the tape hubs. Remove the tape. Hold the tape
with the open end down and try to turn the right hub
counterclockwise with a pencil. Turn the tape
over and repeat. If the hubs do not turn easily, your
tape may be damaged and should not be used in
the player. Try a new tape to make sure your player
is working properly.
E11:The tape is broken. Try a new tape.
CLN (Clean):If this message appears on the display,
the cassette tape player needs to be cleaned. It will
still play tapes, but you should clean it as soon as
possible to prevent damage to the tapes and player.
SeeCare of Your Cassette Tape Player on page 3-79.
If any error occurs repeatedly or if an error cannot
be corrected, contact your dealer. If your radio displays
an error number, write it down and provide it to your
dealer when reporting the problem.
Radio with Cassette and CD
Playing the Radio
ON/OFF:Push this knob to turn the system on and off.
VOLUME:Turn this knob to increase or to decrease
volume.
RECALL:Press this button to switch the display
between the radio station frequency and the time.
Pressing this button with the ignition off will display
the time.
3-63
Page 186 of 410
Cassette Tape Messages
E (Error):If this message and a number appears on
the display, it could be for one of the following reasons:
E10:The tape is tight and the player cannot turn
the tape hubs. Remove the tape. Hold the tape
with the open end down and try to turn the right hub
counterclockwise with a pencil. Turn the tape
over and repeat. If the hubs do not turn easily, your
tape may be damaged and should not be used in
the player. Try a new tape to make sure your player
is working properly.
E11:The tape is broken. Try a new tape.
CLN (Clean):If this message appears on the display,
the cassette tape player needs to be cleaned. It will
still play tapes, but you should clean it as soon as
possible to prevent damage to the tapes and player.
SeeCare of Your Cassette Tape Player on page 3-79.
If any error occurs repeatedly or if an error cannot
be corrected, contact your dealer. If your radio displays
an error number, write it down and provide it to your
dealer when reporting the problem.
Playing a CD
With the ignition on, insert a CD partway into the slot,
label side up. The player will pull it in. The CD
should begin playing. If you want to insert a CD while
the ignition or the radio is off, �rst press EJECT or
RECALL.
If you turn off the ignition or radio with a CD in the
player, it will stay in the player. When you turn on the
ignition or system, the CD will start playing where
it stopped, if it was the last selected audio source.
Also, as a protection feature, if a CD is ejected and left
in the player, it will be pulled back in the player with
the ignition on or off.
As each new track starts to play, the track number will
appear on the display.
The CD player can play the smaller 8 cm single CDs
with an adapter ring. Full-size CDs and the smaller CDs
are loaded in the same manner.
3-68
Page 193 of 410

Personal Choice Radio Controls
If your vehicle has this feature it will enable two drivers
to store and recall personal settings for radio presets,
last tuned station, volume, tone, and audio source
(radio, cassette, or CD).
The memory buttons 1 and 2 for this feature are located
on the driver’s door panel and correspond to the
numbers 1 and 2 found on the back of each remote
keyless entry transmitter.
To recall audio sources, press the unlock button on the
remote keyless entry transmitter and turn the ignition
on. The source last listened to will be recalled for
the identi�ed driver 1 or 2.
To program this feature, do the following:
1. Set all radio preferences. For more information see
“Setting Preset Stations” and “Setting the Tone”
listed for your particular radio.
2. Locate the memory buttons on the driver’s door
panel.
3. Press one of the memory buttons 1 or 2 until you
hear two beeps. The beeps con�rm that your
selection has been saved and can now be recalled.
Follow these steps each time you want to change the
stored settings.
Theft-Deterrent Feature
THEFTLOCK®is designed to discourage theft of your
radio. It works by using a secret code to disable all radio
functions whenever battery power is interrupted.
If THEFTLOCK
®is active, the THEFTLOCK®indicator
will �ash when the ignition is off.
The THEFTLOCK
®feature for the radio may be used or
ignored. If ignored, the system plays normally and the
radio is not protected by the feature. If THEFTLOCK
®is
activated, your radio will not operate if stolen.
When THEFTLOCK
®is activated, the radio will display
LOC to indicate a locked condition anytime battery
power is removed. If your battery loses power for any
reason, you must unlock the radio with the secret
code before it will operate.
Activating the Theft-Deterrent Feature
The instructions which follow explain how to enter
your secret code to activate the THEFTLOCK®system.
Read through all nine steps before starting the
procedure.
If you allow more than 15 seconds to elapse between
any steps, the radio automatically reverts to time
and you must start the procedure over at Step 4.
3-75