2004 BUICK PARK AVENUE radio
[x] Cancel search: radioPage 193 of 410

Personal Choice Radio Controls
If your vehicle has this feature it will enable two drivers
to store and recall personal settings for radio presets,
last tuned station, volume, tone, and audio source
(radio, cassette, or CD).
The memory buttons 1 and 2 for this feature are located
on the driver’s door panel and correspond to the
numbers 1 and 2 found on the back of each remote
keyless entry transmitter.
To recall audio sources, press the unlock button on the
remote keyless entry transmitter and turn the ignition
on. The source last listened to will be recalled for
the identied driver 1 or 2.
To program this feature, do the following:
1. Set all radio preferences. For more information see
“Setting Preset Stations” and “Setting the Tone”
listed for your particular radio.
2. Locate the memory buttons on the driver’s door
panel.
3. Press one of the memory buttons 1 or 2 until you
hear two beeps. The beeps conrm that your
selection has been saved and can now be recalled.
Follow these steps each time you want to change the
stored settings.
Theft-Deterrent Feature
THEFTLOCK®is designed to discourage theft of your
radio. It works by using a secret code to disable all radio
functions whenever battery power is interrupted.
If THEFTLOCK
®is active, the THEFTLOCK®indicator
will ash when the ignition is off.
The THEFTLOCK
®feature for the radio may be used or
ignored. If ignored, the system plays normally and the
radio is not protected by the feature. If THEFTLOCK
®is
activated, your radio will not operate if stolen.
When THEFTLOCK
®is activated, the radio will display
LOC to indicate a locked condition anytime battery
power is removed. If your battery loses power for any
reason, you must unlock the radio with the secret
code before it will operate.
Activating the Theft-Deterrent Feature
The instructions which follow explain how to enter
your secret code to activate the THEFTLOCK®system.
Read through all nine steps before starting the
procedure.
If you allow more than 15 seconds to elapse between
any steps, the radio automatically reverts to time
and you must start the procedure over at Step 4.
3-75
Page 194 of 410
1. Write down any three or four-digit number from 000
to 1999 and keep it in a safe place separate from
the vehicle.
2. Turn the ignition on.
3. Turn the radio off.
4. Press the 1 and 4 pushbuttons at the same time.
Hold them down until --- shows on the display.
Next you will use the secret code number which you
have written down.
5. Press MIN and 000 will appear on the display.
6. Press MIN again to make the last two digits agree
with your code.
7. Press HRS to make the rst one or two digits agree
with your code.
8. Press AM-FM after you have conrmed that the
code matches the secret code you have written
down. The display will show REP to let you know
that you need to repeat Steps 5 through 7 to conrm
your secret code.
9. Press AM-FM again, SEC will appear on the display
indicating that your radio is secure.Unlocking the Theft-Deterrent Feature
After a Power Loss
Enter your secret code as follows; pause no more than
15 seconds between steps:
1. Turn the ignition on. LOC will appear on the
display.
2. Press MIN and 000 will appear on the display.
3. Press MIN again to make the last two digits agree
with your code.
4. Press HRS to make the rst one or two digits agree
with your code.
5. Press AM-FM after you have conrmed that the
code matches the secret code you have written
down. SEC will appear on the display, indicating the
radio is now operable and secure.
If you enter the wrong code eight times, INOP will appear
on the display. You will have to wait an hour with the
ignition on before you can try again. When you try again,
you will only have three more chances (eight tries per
chance) to enter the correct code before INOP appears.
If you lose or forget your code, contact your dealer.
3-76
Page 195 of 410
Disabling the Theft-Deterrent Feature
Enter your secret code as follows; pause no more than
15 seconds between steps:
1. Turn the ignition on.
2. Turn the radio off.
3. Press the 1 and 4 pushbuttons at the same time.
Hold them down until SEC appears on the display.
4. Press MIN and 000 will appear on the display.
5. Press MIN again to make the last two digits agree
with your code.
6. Press HRS to make the rst one or two digits agree
with your code.
7. Press AM-FM after you have conrmed that the
code matches the secret code you have written
down. --- will appear on the display, indicating that
the radio is no longer secured.If the code entered is incorrect, SEC will appear on the
display. The radio will remain secured until the correct
code is entered.
When battery power is removed and later applied to a
secured radio, the radio will not turn on and LOC
will appear on the display.
To unlock a secured radio see “Unlocking the
Theft-Deterrent Feature After a Power Loss” earlier in
this section.
3-77
Page 196 of 410
Audio Steering Wheel Controls
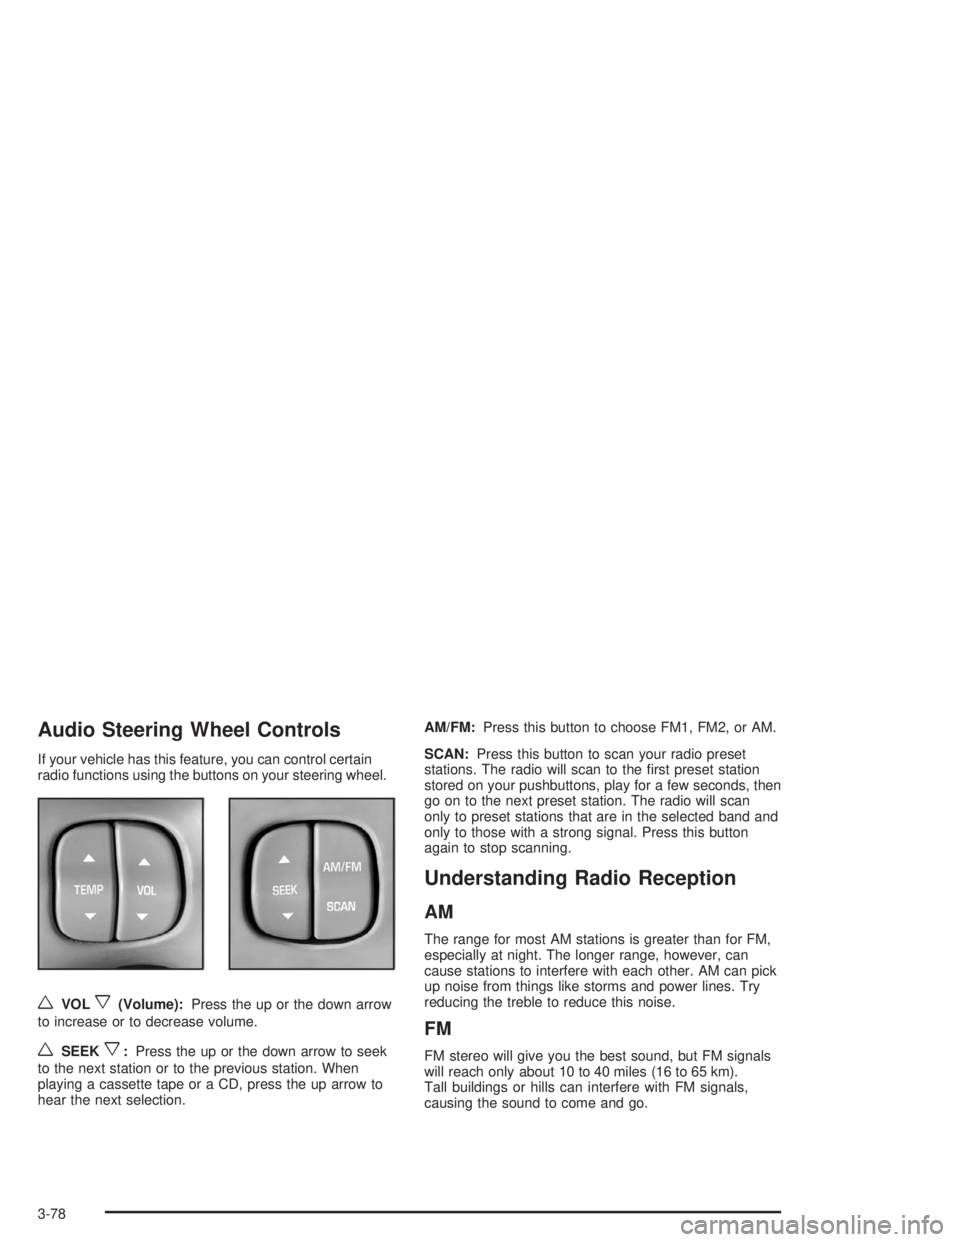
If your vehicle has this feature, you can control certain
radio functions using the buttons on your steering wheel.
wVOLx(Volume):Press the up or the down arrow
to increase or to decrease volume.
wSEEKx:Press the up or the down arrow to seek
to the next station or to the previous station. When
playing a cassette tape or a CD, press the up arrow to
hear the next selection.AM/FM:Press this button to choose FM1, FM2, or AM.
SCAN:Press this button to scan your radio preset
stations. The radio will scan to the rst preset station
stored on your pushbuttons, play for a few seconds, then
go on to the next preset station. The radio will scan
only to preset stations that are in the selected band and
only to those with a strong signal. Press this button
again to stop scanning.
Understanding Radio Reception
AM
The range for most AM stations is greater than for FM,
especially at night. The longer range, however, can
cause stations to interfere with each other. AM can pick
up noise from things like storms and power lines. Try
reducing the treble to reduce this noise.
FM
FM stereo will give you the best sound, but FM signals
will reach only about 10 to 40 miles (16 to 65 km).
Tall buildings or hills can interfere with FM signals,
causing the sound to come and go.
3-78
Page 197 of 410
Care of Your Cassette Tape Player
A tape player that is not cleaned regularly can cause
reduced sound quality, ruined cassettes, or a damaged
mechanism. Cassette tapes should be stored in their
cases away from contaminants, direct sunlight, and
extreme heat. If they are not, they may not operate
properly or may cause failure of the tape player.
Your tape player should be cleaned regularly after every
50 hours of use. Your radio may display CLN to
indicate that you have used your tape player for
50 hours without resetting the tape clean timer. If CLN
appears on the display, your cassette tape player needs
to be cleaned. It will still play tapes, but you should
clean it as soon as possible to prevent damage to your
tapes and player. If you notice a reduction in sound
quality, try a known good cassette to see if the tape or
the tape player is at fault. If this other cassette has
no improvement in sound quality, clean the tape player.
For best results, use a scrubbing action, non-abrasive
cleaning cassette with pads which scrub the tape
head as the hubs of the cleaner cassette turn.
The recommended cleaning cassette is available
through your dealer.The cut tape detection feature of your cassette tape
player may identify the cleaning cassette as a damaged
tape, in error. If the cleaning cassette ejects, insert
the cassette at least three times to ensure thorough
cleaning.
You may also choose a non-scrubbing action, wet-type
cleaner which uses a cassette with a fabric belt to
clean the tape head. This type of cleaning cassette will
not eject on its own. A non-scrubbing action cleaner
may not clean as thoroughly as the scrubbing type
cleaner. The use of a non-scrubbing action, dry-type
cleaning cassette is not recommended.
After you clean the player, press and hold the EJECT
button for ve seconds to reset the CLN indicator.
The radio will display --- to show the indicator was reset.
Cassettes are subject to wear and the sound quality
may degrade over time. Always make sure the cassette
tape is in good condition before you have your tape
player serviced.
3-79
Page 198 of 410
Care of Your CDs
Handle CDs carefully. Store them in their original cases
or other protective cases and away from direct
sunlight and dust. If the surface of a CD is soiled,
dampen a clean, soft cloth in a mild, neutral detergent
solution and clean it, wiping from the center to the edge.
Be sure never to touch the side without writing when
handling CDs. Pick up CDs by grasping the outer edges
or the edge of the hole and the outer edge.
Care of Your CD Player
The use of CD lens cleaners for CDs is not advised,
due to the risk of contaminating the lens of the CD optics
with lubricants internal to the CD mechanism.
Heated Backlite Antenna
Your AM-FM antenna is integrated with your rear
window defogger, located in the rear window. Be sure
that the inside surface of the rear window is not
scratched and that the lines on the glass are not
damaged. If the inside surface is damaged, it could
interfere with radio reception.Notice:Do not apply aftermarket glass tinting with
metallic lm. The metallic lm in some tinting
materials will interfere with or distort the incoming
radio reception. Any damage caused to your
backglass antenna due to metallic tinting materials
will not be covered by your warranty.
Notice:Using a razor blade or sharp object to
clear the inside rear window may damage the rear
window antenna and/or the rear window defogger.
Repairs would not be covered by your warranty.
Do not clear the inside rear window with sharp
objects.
If, when you turn on your rear window defogger, you
hear static on your radio station, it could mean that
a defogger grid line has been damaged. If this is true,
the grid line must be repaired.
If you choose to add a cellular telephone to your
vehicle, and the antenna needs to be attached to the
glass, be sure that you do not damage the grid lines for
the AM-FM antenna. Be sure the antenna does not
touch a grid line.
3-80
Page 288 of 410
Jump Starting
If your battery has run down, you may want to use
another vehicle and some jumper cables to start your
vehicle. Be sure to follow the steps below to do it safely.
{CAUTION:
Batteries can hurt you. They can be dangerous
because:
They contain acid that can burn you.
They contain gas that can explode or
ignite.
They contain enough electricity to burn you.
If you do not follow these steps exactly, some or
all of these things can hurt you.
Notice:Ignoring these steps could result in costly
damage to your vehicle that wouldn’t be covered
by your warranty.
Trying to start your vehicle by pushing or pulling it
won’t work, and it could damage your vehicle.
1. Check the other vehicle. It must have a 12-volt
battery with a negative ground system.Notice:If the other vehicle’s system is not a 12-volt
system with a negative ground, both vehicles can
be damaged. Only use vehicles with 12-volt systems
with negative grounds to jump start your vehicle.
2. Get the vehicles close enough so the jumper cables
can reach, but be sure the vehicles are not touching
each other. If they are, it could cause a ground
connection you do not want. You would not be able
to start your vehicle, and the bad grounding
could damage the electrical systems.
To avoid the possibility of the vehicles rolling, set
the parking brake rmly on both vehicles involved
in the jump start procedure. Put an automatic
transaxle in PARK (P) or a manual transaxle in
NEUTRAL (N) before setting the parking brake.
Notice:If you leave your radio or other accessories
on during the jump starting procedure, they could
be damaged. The repairs would not be covered
by your warranty. Always turn off your radio and
other accessories when jump starting your vehicle.
3. Turn off the ignition on both vehicles. Unplug
unnecessary accessories plugged into the cigarette
lighter or in the accessory power outlet(s). Turn off
the radio and all lamps that are not needed.
This will avoid sparks and help save both batteries.
And it could save your radio!
5-44
Page 336 of 410
Cleaning Vinyl
Use warm water and a clean cloth.
Rub with a clean, damp cloth to remove dirt.
You may have to do this more than once.
Things like tar, asphalt and shoe polish will stain if
you don’t get them off quickly. Use a clean cloth
and vinyl cleaner. See your dealer for this product.
Cleaning Leather
Use a soft cloth with lukewarm water and a mild soap
or saddle soap and wipe dry with a soft cloth. Then,
let the leather dry naturally. Do not use heat to dry.
For stubborn stains, use a leather cleaner.
Neveruse oils, varnishes, solvent-based or abrasive
cleaners, furniture polish or shoe polish on leather.
Soiled or stained leather should be cleaned
immediately. If dirt is allowed to work into the nish,
it can harm the leather.
Cleaning the Top of the Instrument
Panel
Use only mild soap and water to clean the top surfaces
of the instrument panel. Sprays containing silicones
or waxes may cause annoying reections in the
windshield and even make it difficult to see through the
windshield under certain conditions.
Cleaning Interior Plastic Components
Use only a mild soap and water solution on a soft cloth
or sponge. Commercial cleaners may affect the
surface nish.
Cleaning the Speaker Covers
Vacuum around a speaker cover gently, so that the
speaker won’t be damaged. Clean spots with just water
and mild soap.
Cleaning Glass Surfaces
Glass should be cleaned often. GM Glass Cleaner or
a liquid household glass cleaner will remove normal
tobacco smoke and dust lms on interior glass.
SeeVehicle Care/Appearance Materials on page 5-96.
Notice:If you use abrasive cleaners when
cleaning glass surfaces on your vehicle, you could
scratch the glass and/or cause damage to the
rear window defogger and the integrated radio
antenna. When cleaning the glass on your vehicle,
use only a soft cloth and glass cleaner.
5-92