2004 BMW Z4 ROADSTER 3.0I Winter
[x] Cancel search: WinterPage 25 of 120
Reference
At a glance
Controls
Driving tips
Mobility
23
could keep the convertible top from closing
properly.<
Ignition key in position 1 or higher.
With the vehicle standing.
1.Read and comply with the preceding
safety precautions
2.Make sure that the convertible top com-
partment panel in the luggage compart-
ment is lowered; refer to page 20. Oth-
erwise the convertible top cannot be
opened
3.Ensure that the luggage compartment
lid is closed
4.Press and hold the corresponding but-
ton for convertible top operation.
If the convertible top should halt right
before the closing phase is completed,
press against the front part of the convert-
ible top frame from the outside to help the
closing process along. Keep pressing the
button while doing so until the top starts up
again on its own.
Indicator lamps
>The red indicator lamp in the button will
light up while the convertible top is in
motion. It goes out as soon as the
opening or closing operation has been
completed
>If the red indicator lamp in the button
flashes after the button has been
released, then the opening or closing
operation has not yet been completed.
The sequence can be continued in the
desired direction by pressing this but-
ton
>If the yellow indicator lamp in the button
lights up continuously with the button
pressed, then the convertible top com-
partment panel is raised and the con-
vertible top cannot be moved.
The side windows will lower slightly when
you press the button for operating the con-
vertible top.
After the opening or closing operation, the
side windows will go back up if you keep
the button pressed for more than 2 sec-
onds after the indicator lamp has gone out.
Interruption
The automatic sequence will be interrupted
immediately if you release the button that
operates the top. The sequence can be
continued in the desired direction by press-
ing this button.
If the convertible top operation has
been interrupted, do not close the
side windows using the power window but-
tons. Otherwise the side windows may not
close properly against the rubber seal of
the convertible top.<
After the convertible top has been
stored for an extended period of time
in the convertible top compartment, e.g. in
the winter months because the hardtop was
being used, you may have to support the
convertible top by hand when closing it for
the first time.<
Convenience operation
Driver's door lock
Refer to page 18.
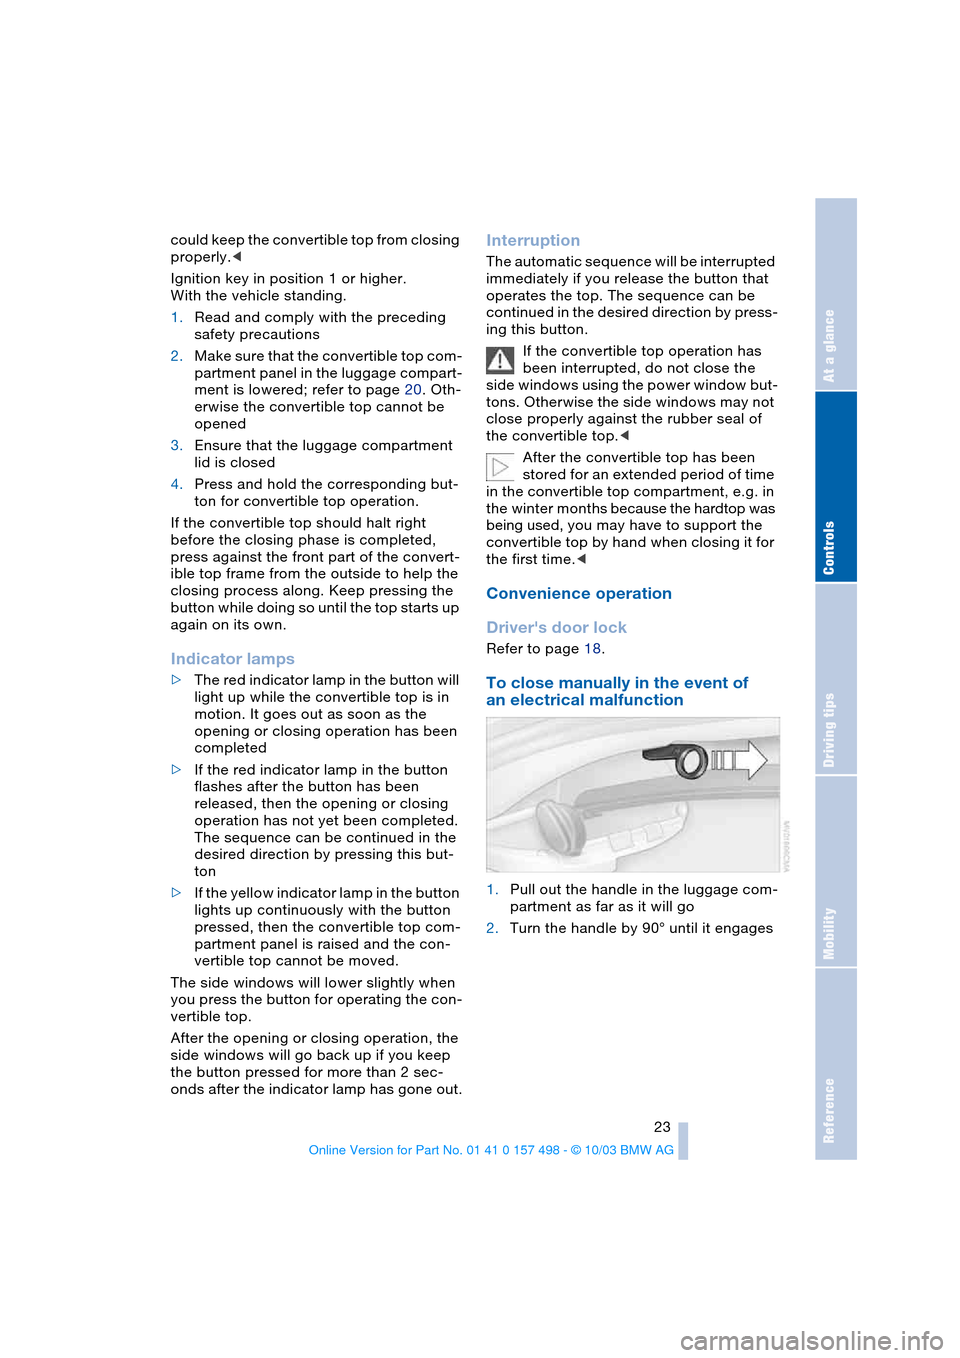
To close manually in the event of
an electrical malfunction
1.Pull out the handle in the luggage com-
partment as far as it will go
2.Turn the handle by 90° until it engages
Page 64 of 120
Controlling the climate for pleasant driving
62
Tips for pleasant driving
Use the automatic system – switch on with
AUTO button 6. Select the desired interior
temperature.
Detailed setting options are described for
you below.
Automatic air distribution and supply
The AUTO program assumes the
adjustment of the air distribution
and air supply for you and in addi-
tion adapts the temperature to
external influences, summer or winter, to
meet preferences you can specify.
In the AUTO program, the air conditioning
mode is also turned on at the same time.
The AUTO program functions only to
a limited extent when the convertible
top is open.<
Individual air distribution
You yourself can direct airflow
onto the windows , toward the
upper body and into the foot-
well . The arrow lights up. The
automatic air supply remains unchanged.
All intermediate settings are possible. By
pressing the AUTO button, you can reacti-
vate the air distribution.
Temperature
The interior temperature that
appears on the display panel is a
general figure intended for refer-
ence purposes. When you start
the vehicle, the system ensures that the
selected temperature is reached as quickly
as possible, regardless of the season. It
then maintains this temperature.
Air supply/blower
You can set the blower through
an infinitely variable range of
speeds. This shuts off the auto-
matic air supply. The arrow lights
up. The automatic air distribution remains
unchanged. You can reactivate the auto-
matic air supply by pressing the AUTO but-
ton.When you turn the rotary control toward
zero: the blower, heating and air condi-
tioner are switched off, and the air supply is
stopped. You can reactivate the system by
turning the control toward the right again.
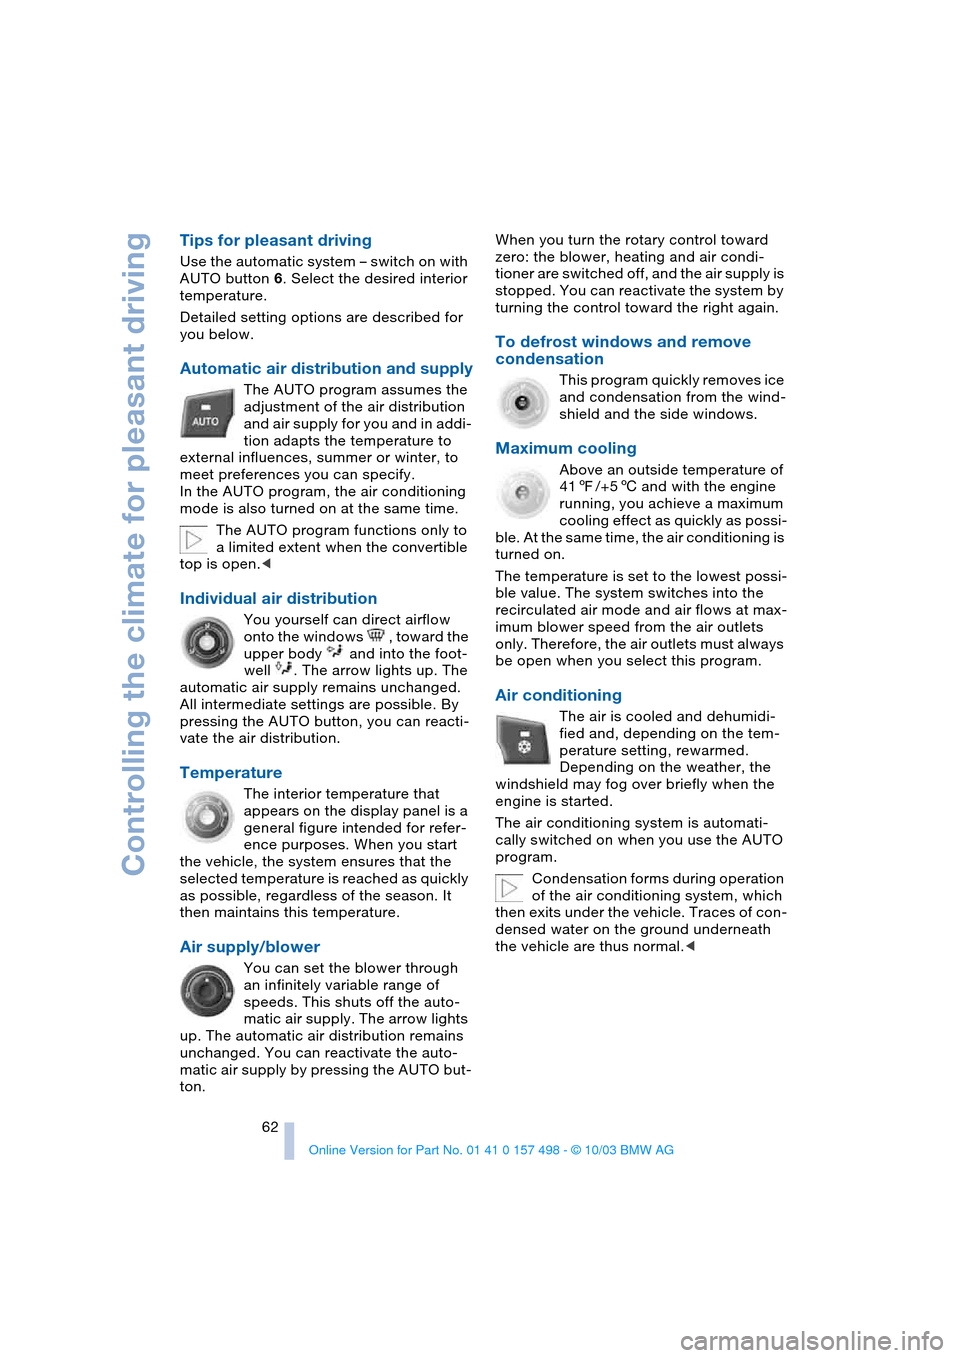
To defrost windows and remove
condensation
This program quickly removes ice
and condensation from the wind-
shield and the side windows.
Maximum cooling
Above an outside temperature of
417/+56 and with the engine
running, you achieve a maximum
cooling effect as quickly as possi-
ble. At the same time, the air conditioning is
turned on.
The temperature is set to the lowest possi-
ble value. The system switches into the
recirculated air mode and air flows at max-
imum blower speed from the air outlets
only. Therefore, the air outlets must always
be open when you select this program.
Air conditioning
The air is cooled and dehumidi-
fied and, depending on the tem-
perature setting, rewarmed.
Depending on the weather, the
windshield may fog over briefly when the
engine is started.
The air conditioning system is automati-
cally switched on when you use the AUTO
program.
Condensation forms during operation
of the air conditioning system, which
then exits under the vehicle. Traces of con-
densed water on the ground underneath
the vehicle are thus normal.<
Page 78 of 120
Wheels and tires
76
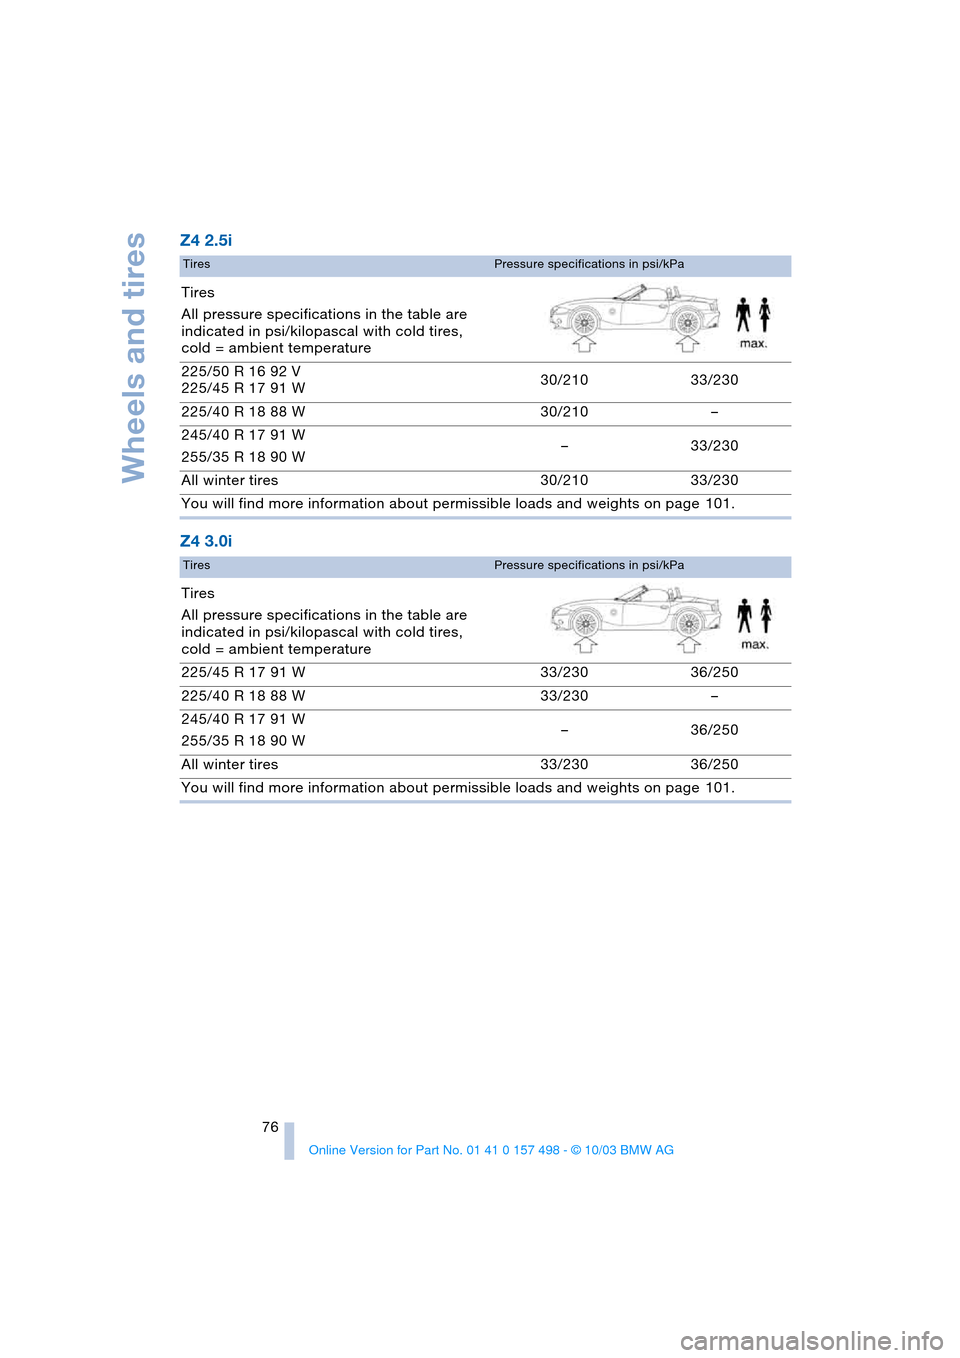
Z4 2.5i
Z4 3.0i
TiresPressure specifications in psi/kPa
Tires
All pressure specifications in the table are
indicated in psi/kilopascal with cold tires,
cold = ambient temperature
225/50 R 16 92 V
225/45 R 17 91 W30/210 33/230
225/40 R 18 88 W 30/210 –
245/40 R 17 91 W
255/35 R 18 90 W–33/230
All winter tires 30/210 33/230
You will find more information about permissible loads and weights on page 101.
TiresPressure specifications in psi/kPa
Tires
All pressure specifications in the table are
indicated in psi/kilopascal with cold tires,
cold = ambient temperature
225/45 R 17 91 W 33/230 36/250
225/40 R 18 88 W 33/230 –
245/40 R 17 91 W
255/35 R 18 90 W–36/250
All winter tires 33/230 36/250
You will find more information about permissible loads and weights on page 101.
Page 80 of 120
Wheels and tires
78
Temperature
The temperature grades are A, the highest,
B and C, representing the tire’s resistance
to the generation of heat and its ability to
dissipate heat when tested under con-
trolled conditions on a specified indoor lab-
oratory test wheel.
Sustained high temperature can cause the
material of the tire to degenerate and
reduce tire life, and excessive temperature
can lead to sudden tire failure. The grade C
corresponds to a level of performance
which all passenger car tires must meet
under the Federal Motor Vehicle Safety
Standard No. 109. Grades B and A repre-
sent higher levels of performance on the
laboratory test wheel than the minimum
required by law.
The temperature grade for this tire is
established for a tire that is properly
inflated and not overloaded. Excessive
speed, under-inflation, or excessive load-
ing, either separately or in combination,
can cause heat buildup and possible tire
failure.<
RSC: Run Flat tires
Run Flat tires are labeled on the sidewall
with a circular symbol containing the letters
RSC. Refer to page 80.
M+S
Winter and all-season tires.
These have better winter performance
properties than summer tires.
Tire condition
Inspect your tires frequently for tread wear,
signs of damage and for foreign objects
lodged in the tread. Check the tread depth.
Tire tread
Tread depth should not be allowed to go
below 1/8 in/3 mm even though in Europe,
for example, the legally specified minimum
tread depth is only 1/16 in/1.6 mm. Below
1/8 in/3 mm tread depth, there is a very
high risk of hydroplaning, even at relatively moderate speeds and with only small
amounts of water on the road.
At tread depths below approx. 1/6 in/
4 mm, winter tires display a perceptible
decrease in their ability to cope with winter
driving conditions, and should be replaced
in the interest of safety.
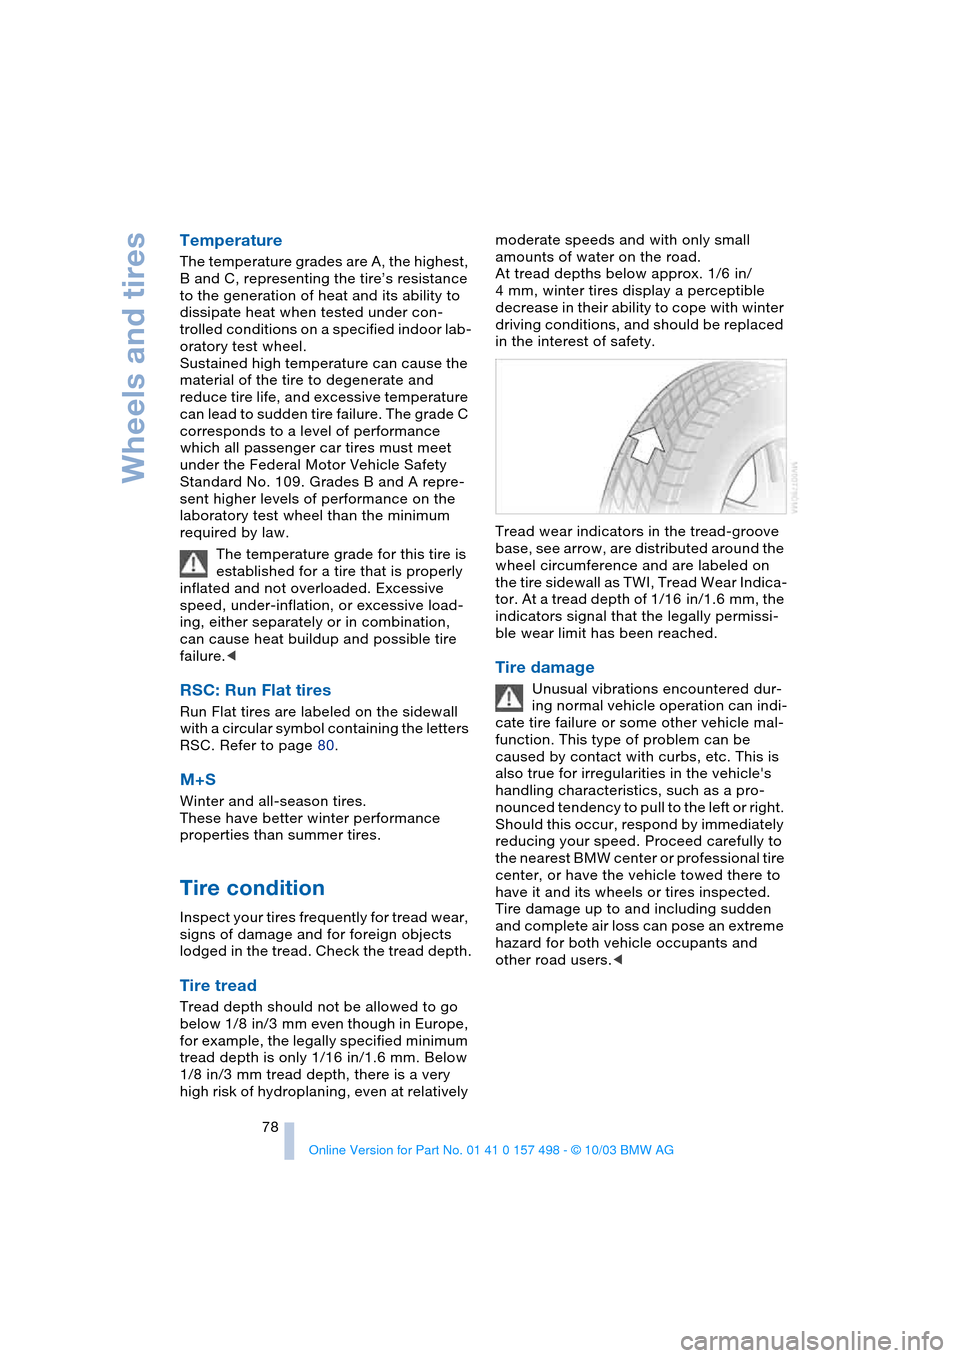
Tread wear indicators in the tread-groove
base, see arrow, are distributed around the
wheel circumference and are labeled on
the tire sidewall as TWI, Tread Wear Indica-
tor. At a tread depth of 1/16 in/1.6 mm, the
indicators signal that the legally permissi-
ble wear limit has been reached.
Tire damage
Unusual vibrations encountered dur-
ing normal vehicle operation can indi-
cate tire failure or some other vehicle mal-
function. This type of problem can be
caused by contact with curbs, etc. This is
also true for irregularities in the vehicle's
handling characteristics, such as a pro-
nounced tendency to pull to the left or right.
Should this occur, respond by immediately
reducing your speed. Proceed carefully to
the nearest BMW center or professional tire
center, or have the vehicle towed there to
have it and its wheels or tires inspected.
Tire damage up to and including sudden
and complete air loss can pose an extreme
hazard for both vehicle occupants and
other road users.<
Page 81 of 120
Reference
At a glance
Controls
Driving tips
Mobility
79
Wheel and tire replacement
Unprofessional attempts by laymen to
service tires can lead to damage and
accidents.
Have this work performed by skilled pro-
fessionals only. Any BMW center has the
required technical knowledge and the
proper equipment and will be happy to
assist you.<
The correct wheel and tire combination
also affects various systems that would
otherwise be impaired, for example ABS or
DSC.
Have the wheels balanced after each tire or
wheel replacement.
BMW advises against using retreaded
tires, since driving safety may be
impaired. This is due to possible variations
in casing structures and, in some cases, to
their extreme age, factors which can lead
to a decrease in their durability.<
The correct wheels and tires
BMW recommends using only wheels
and tires that have been tested and
approved by BMW for your particular vehi-
cle model, as otherwise body contact and
serious accidents can result despite the
use of the same nominal size, e.g. due to
manufacturing tolerances. If non-approved
wheels and tires are used, BMW cannot
evaluate their suitability, and therefore can-
not be held liable for driving safety.<
To maintain good handling and vehicle
response, use only tires of a single brand
and tread configuration. In the event of a
flat tire, remount the previous wheel and
tire combination as soon as possible.
Recommended tire sizes and brands
BMW tests certain tire brands for each tire
size, classifies them as road-safe and
approves them. You can best find out
about these at a specialized shop, particu-
larly your BMW center. Observe any coun-
try-specific regulations, e.g. on making a
corresponding entry in the vehicle docu-
ments.The factory-approved radial-ply tires are
matched to your vehicle and have been
selected to provide optimum safety and
driving comfort when used properly.
Run Flat tires fitted
Use only Run Flat tires, since no spare
wheel is available in the event of a flat.
Special characteristics of winter
tires
BMW recommends the use of winter tires
for operation under winter road conditions.
While all-season tires, with M+S designa-
tion, provide better winter traction than
summer tires, they generally do not achieve
the full performance of winter tires.
For mounting winter tires, refer to the
descriptions under Tire condition and
Wheel and tire replacement, pages 78, 79.
Run Flat tires fitted
Use only winter Run Flat tires, since no
spare wheel is available in the event of a
flat.
Observing speed ratings
Never exceed the maximum speed for
which the winter tires are rated.
Unprofessional attempts by laymen to ser-
vice tires can lead to damage and acci-
dents. Have this work performed by skilled
professionals only. The technicans at your
BMW center will be glad to assist you with
the required professional knowledge and
specialized equipment.<
Storage
Store tires in a cool, dry place, protecting
them against light whenever possible. Pro-
tect the tires from contact with oil, grease
and fuel. Do not exceed the maximum tire
inflation pressures specified on the tire
sidewall.
Page 82 of 120
Wheels and tires
80
Run Flat tires
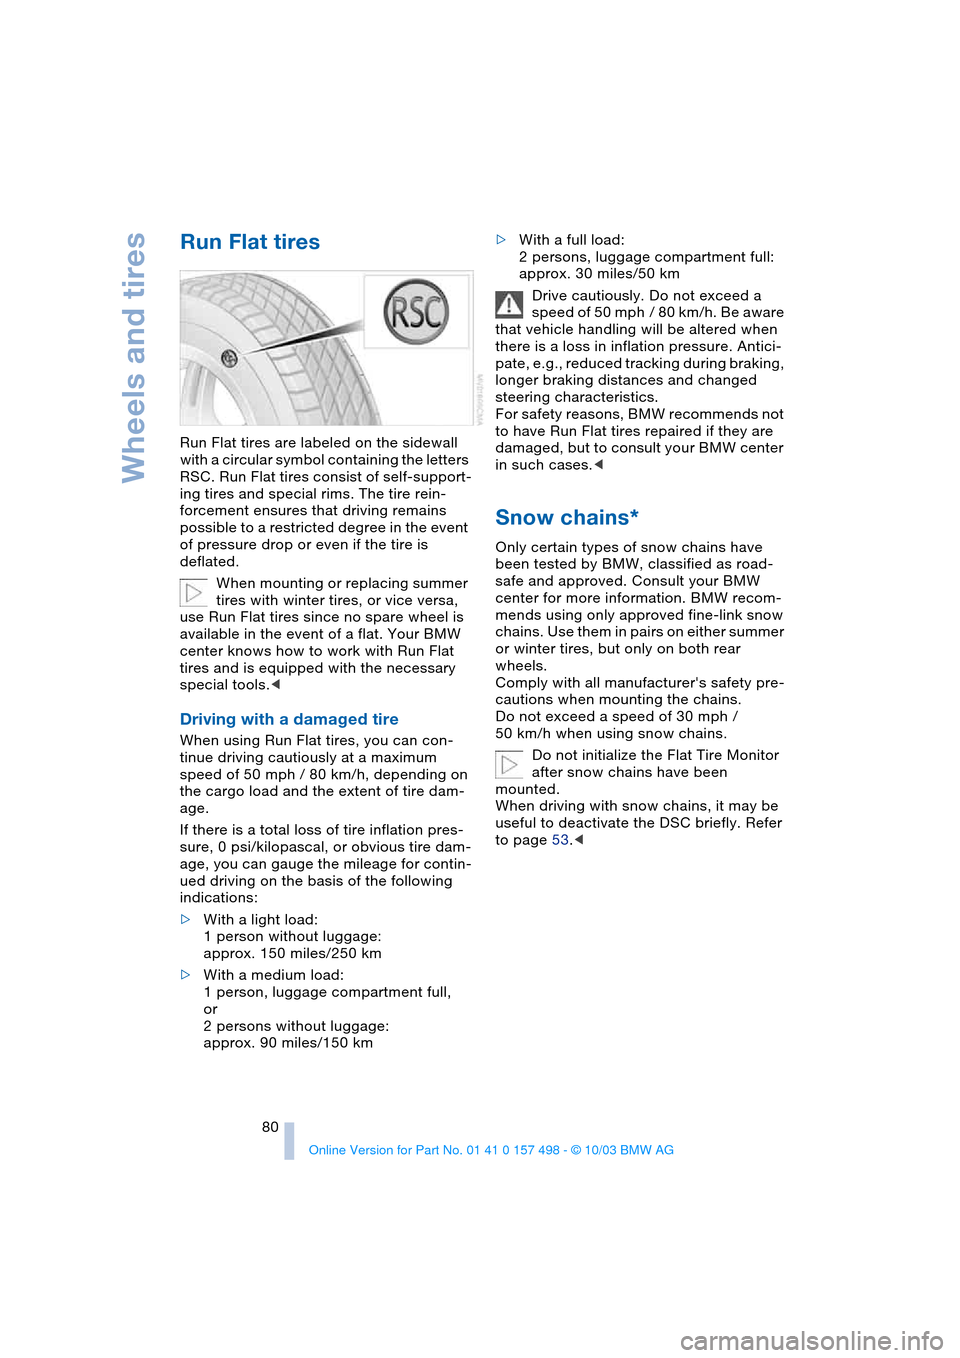
Run Flat tires are labeled on the sidewall
with a circular symbol containing the letters
RSC. Run Flat tires consist of self-support-
ing tires and special rims. The tire rein-
forcement ensures that driving remains
possible to a restricted degree in the event
of pressure drop or even if the tire is
deflated.
When mounting or replacing summer
tires with winter tires, or vice versa,
use Run Flat tires since no spare wheel is
available in the event of a flat. Your BMW
center knows how to work with Run Flat
tires and is equipped with the necessary
special tools.<
Driving with a damaged tire
When using Run Flat tires, you can con-
tinue driving cautiously at a maximum
speed of 50 mph / 80 km/h, depending on
the cargo load and the extent of tire dam-
age.
If there is a total loss of tire inflation pres-
sure, 0 psi/kilopascal, or obvious tire dam-
age, you can gauge the mileage for contin-
ued driving on the basis of the following
indications:
>With a light load:
1 person without luggage:
approx. 150 miles/250 km
>With a medium load:
1 person, luggage compartment full,
or
2 persons without luggage:
approx. 90 miles/150 km>With a full load:
2 persons, luggage compartment full:
approx. 30 miles/50 km
Drive cautiously. Do not exceed a
speed of 50 mph / 80 km/h. Be aware
that vehicle handling will be altered when
there is a loss in inflation pressure. Antici-
pate, e.g., reduced tracking during braking,
longer braking distances and changed
steering characteristics.
For safety reasons, BMW recommends not
to have Run Flat tires repaired if they are
damaged, but to consult your BMW center
in such cases.<
Snow chains*
Only certain types of snow chains have
been tested by BMW, classified as road-
safe and approved. Consult your BMW
center for more information. BMW recom-
mends using only approved fine-link snow
chains. Use them in pairs on either summer
or winter tires, but only on both rear
wheels.
Comply with all manufacturer's safety pre-
cautions when mounting the chains.
Do not exceed a speed of 30 mph /
50 km/h when using snow chains.
Do not initialize the Flat Tire Monitor
after snow chains have been
mounted.
When driving with snow chains, it may be
useful to deactivate the DSC briefly. Refer
to page 53.<
Page 93 of 120
Reference
At a glance
Controls
Driving tips
Mobility
91
Please contact a BMW center in case of a
malfunction.
License plate lamps
5 watt bulb
1.Push out the lamp with a suitable object
and remove it
2.Replace the bulb.
Snap the lamp back into place.
Changing a wheel
Run Flat tires
Your BMW is equipped with Run Flat tires.
Therefore, the wheel no longer has to be
changed immediately in the event of a loss
in inflation pressure.
Run Flat tires are labeled on the sidewall
with a circular symbol containing the letters
RSC. Refer to page 80.
BMW recommends that you consult your
BMW center if you wish to replace the tires
of your BMW, or change from summer to
winter tires or vice versa.
Your BMW center knows how to work with
Run Flat tires and is equipped with the nec-
essary special tools.
When mounting or replacing summer
tires with winter tires, or vice versa,
use only Run Flat tires since no spare
wheel is available in the event of a flat.<
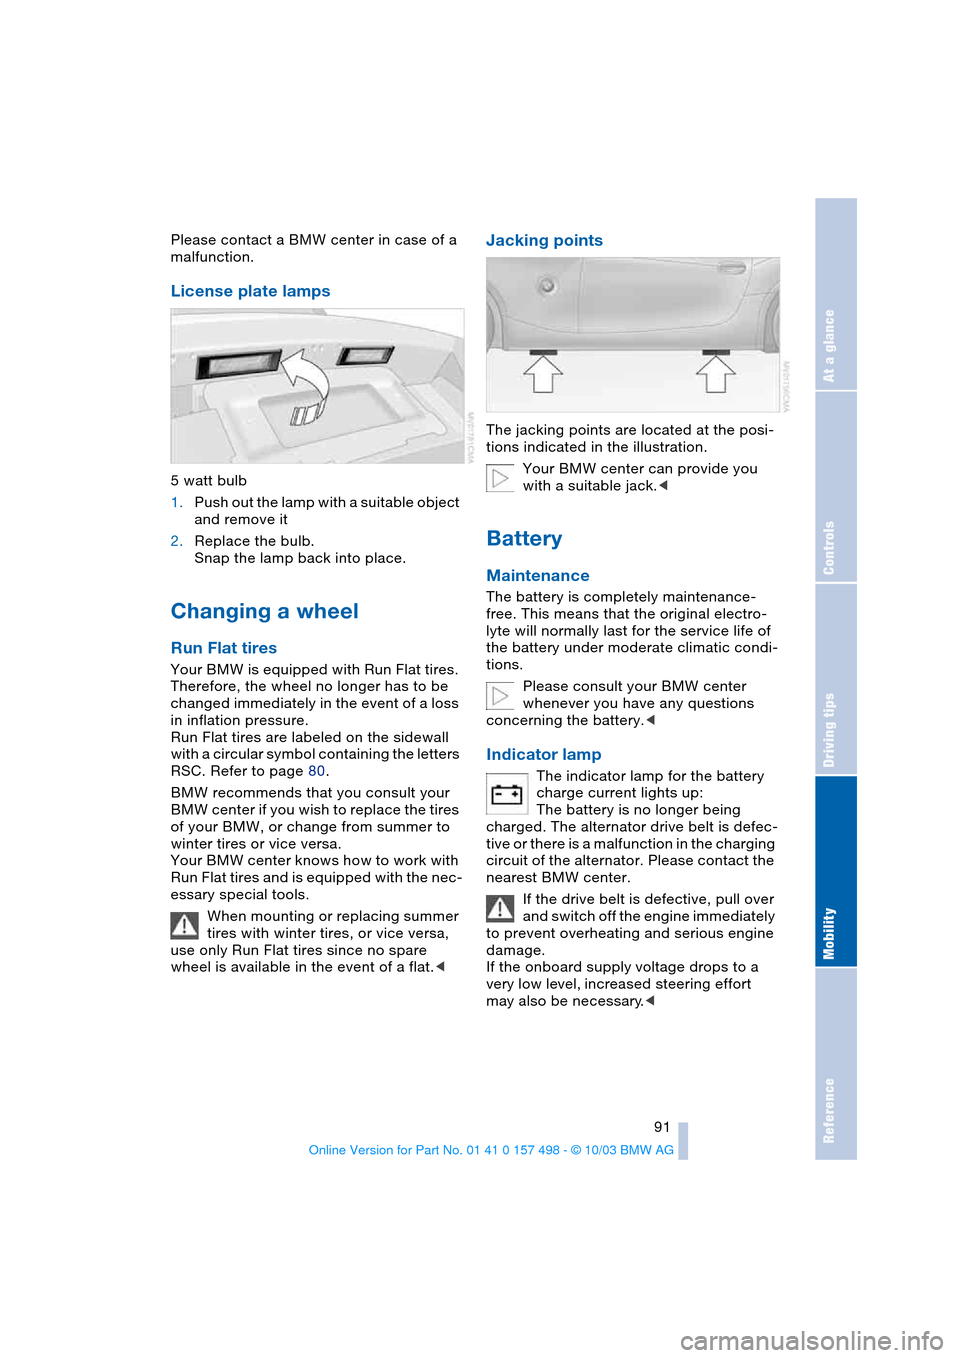
Jacking points
The jacking points are located at the posi-
tions indicated in the illustration.
Your BMW center can provide you
with a suitable jack.<
Battery
Maintenance
The battery is completely maintenance-
free. This means that the original electro-
lyte will normally last for the service life of
the battery under moderate climatic condi-
tions.
Please consult your BMW center
whenever you have any questions
concerning the battery.<
Indicator lamp
The indicator lamp for the battery
charge current lights up:
The battery is no longer being
charged. The alternator drive belt is defec-
tive or there is a malfunction in the charging
circuit of the alternator. Please contact the
nearest BMW center.
If the drive belt is defective, pull over
and switch off the engine immediately
to prevent overheating and serious engine
damage.
If the onboard supply voltage drops to a
very low level, increased steering effort
may also be necessary.<
Page 111 of 120

Reference
At a glance
Controls
Driving tips
Mobility
109
Lock buttons on doors,
refer to Locking 19
Locking the doors
– from inside 19
– from outside 17, 18
Locking the vehicle
– from inside 18
– from outside 16
Low beams 46
– automatic 46
– bulb replacement 89
– indicator lamp, defective
lamp 13
Lug bolts
– keys 88
Luggage compartment 20
– capacity 101
– increasing capacity 20
– opening/closing,
refer to Luggage
compartment lid 19
– opening from inside the
vehicle 19
– opening from the
outside 19
– opening via remote
control 17
Luggage compartment
lid 19
– opening from inside the
vehicle 19
– opening from the
outside 19
– remote control 17
M
Maintenance, refer to
Service interval
display 49, 86
Maintenance System 86
Making phone calls, refer to
Owner's Manual for
Telephone
Malfunction
– convertible top 23
– door lock 18
– fuel filler door 74
– storage compartments 64
Malfunction of electrical
accessory 92Manual convertible top 21
Manual mode, refer to
Automatic transmission
with Steptronic 39
Manual operation
– door lock 18
– driver's door 18
– fuel filler door 74
– luggage compartment
lid 19
– power convertible top 23
– storage compartments 64
Manual transmission 38
Manufacturer 5
Master key 16
– with remote control 16
Maximum cooling 62
Maximum speed
– with winter tires 79
Measurements, refer to
Dimensions 102
Mechanical seat 28
Memory, refer to Vehicle
Memory, Key Memory 31
Microfilter
– air conditioning 59
– automatic climate
control 63
Mirrors 31
– heated 31
Mobile Service 93
Modifications, technical,
refer to For your own
safety 5
M Sports seat 29
Multifunction steering
wheel MFL 11
Multifunction switch
– turn signal indicators/
headlamp flasher 43
– washer/wiper system 43
N
Neck supports, refer to
Head restraints 28
Nets 64
O
OBD interface socket 87Octane numbers, refer to
Fuel specifications 74
Odometer 48
Oil, refer to Engine oil
– alternative oils 84
– approved oils 84
– capacity 103
– dipstick 83
– indicator lamp 13
Oil change intervals,
refer to the Service and
Warranty Information
Booklet for US models,
Warranty and Service
Guide Booklet for
Canadian models
Oil consumption 83
Oil filter change 103
Oil level 83
– checking 83
– indicator lamp 13
Oil pressure 83
– indicator/warning
lamp 13
Oil sensor 83
– indicator lamp 13
OIL SERVICE 49
Oil types 84
Onboard computer, refer to
Computer or to the
Owner's Manual for
Onboard Computer
Onboard monitor, refer to
Computer or to the
Owner's Manual for
Onboard Computer
Onboard tool kit 88
Opening and closing the
vehicle
– from inside 18
– from outside 16, 17
– via the door lock 18
– via the remote control 17
Operating elements 10
Outlets, refer to
Ventilation 59, 63