2004 BMW Z4 ROADSTER 3.0I light
[x] Cancel search: lightPage 14 of 120
Cockpit
12
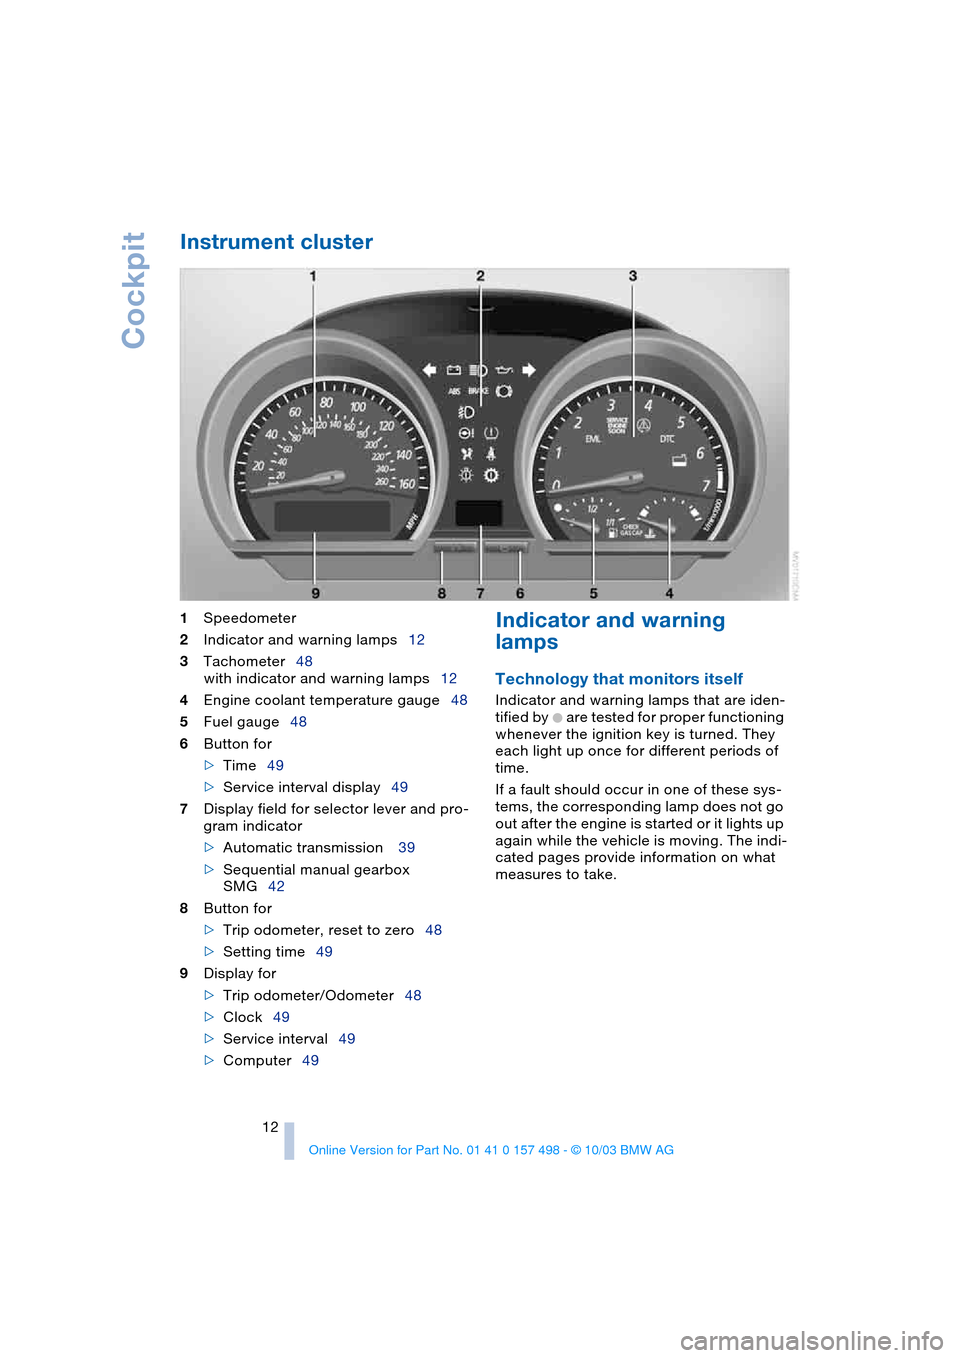
Instrument cluster
1
Speedometer
2
Indicator and warning lamps12
3
Tachometer48
with indicator and warning lamps12
4
Engine coolant temperature gauge48
5
Fuel gauge48
6
Button for
>
Time49
>Service interval display49
7Display field for selector lever and pro-
gram indicator
>Automatic transmission 39
>Sequential manual gearbox
SMG42
8Button for
>Trip odometer, reset to zero48
>Setting time49
9Display for
>Trip odometer/Odometer48
>Clock49
>Service interval49
>Computer49
Indicator and warning
lamps
Technology that monitors itself
Indicator and warning lamps that are iden-
tified by
+ are tested for proper functioning
whenever the ignition key is turned. They
each light up once for different periods of
time.
If a fault should occur in one of these sys-
tems, the corresponding lamp does not go
out after the engine is started or it lights up
again while the vehicle is moving. The indi-
cated pages provide information on what
measures to take.
Page 15 of 120

At a glance
Controls
Driving tips
Mobility Reference
13
Colors
The indicator and warning lamps can light
up in various colors and combinations.
The following section explains the signifi-
cance of the individual colors as well as
how you should respond.
>Red:
Stop the vehicle immediately
or
an important reminder
>Red and yellow:
Continue driving cautiously
>Yellow:
Have the system checked soon
or
for your information
>Green:
For your information
>Blue:
For your information. Please fasten safety belts
+30
Airbags
+56
Battery charge current
+91
Engine oil pressure/Engine oil
level/Engine oil sensor
+83
Parking brake/Chassis control sys-
tems/Dynamic Brake Control/
Brake fluid
+38/ 52/ 53/ 85
Parking brake/Chassis control sys-
tems/Dynamic Brake Control/
Brake fluid for Canadian models
+38/ 52/ 53/ 85
Antilock Brake System ABS/Chas-
sis control systems
+54/ 52
Antilock Brake System ABS/Chas-
sis control systems for Canadian
models
+54/ 52
Dynamic Stability Control
DSC
+52
Dynamic Traction Control
DTC
+52
Flat Tire Monitor
+54
Automatic transmission/
Sequential manual gearbox
SMG
+40/ 42
Brake pads
+70
Add coolant84
CHECK GAS CAP
+74
Service Engine Soon +87
Service Engine Soon warning lamp
for Canadian models
+87
Defective bulbs46
Turn signal indicators43
Fog lamps47
Headlamp flasher/
High beams43/ 47
Electric Power Steering EPS
+43
Engine electronics
+
Engine electronics malfunction.
You can continue to drive with
reduced engine output or engine
speed. Please have the system
inspected by your BMW center.
Page 18 of 120
Opening and closing
16
Opening and closing
Keys
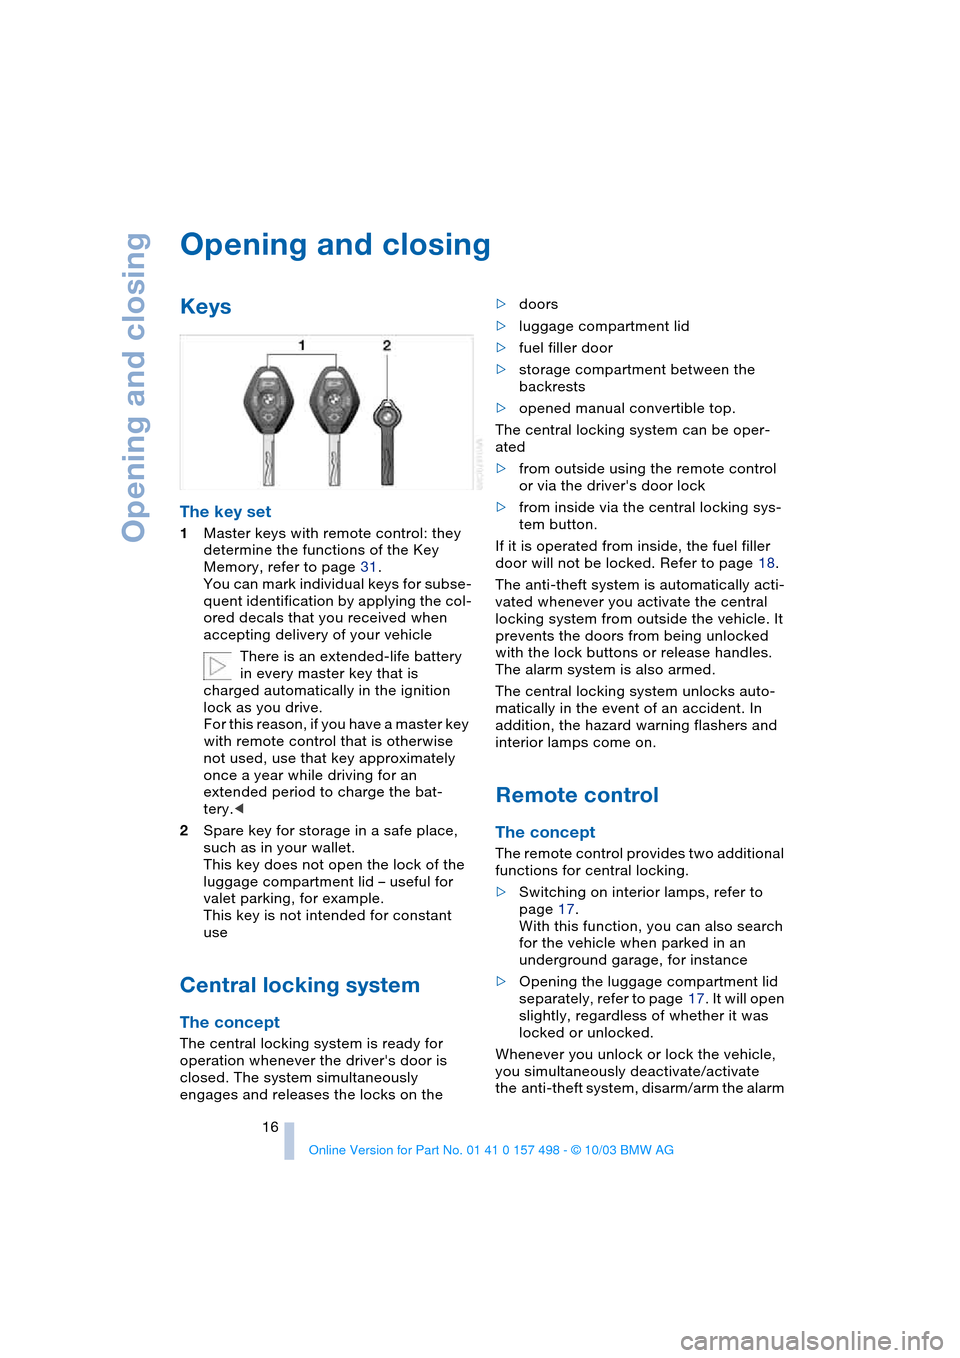
The key set
1Master keys with remote control: they
determine the functions of the Key
Memory, refer to page 31.
You can mark individual keys for subse-
quent identification by applying the col-
ored decals that you received when
accepting delivery of your vehicle
There is an extended-life battery
in every master key that is
charged automatically in the ignition
lock as you drive.
For this reason, if you have a master key
with remote control that is otherwise
not used, use that key approximately
once a year while driving for an
extended period to charge the bat-
tery.<
2Spare key for storage in a safe place,
such as in your wallet.
This key does not open the lock of the
luggage compartment lid – useful for
valet parking, for example.
This key is not intended for constant
use
Central locking system
The concept
The central locking system is ready for
operation whenever the driver's door is
closed. The system simultaneously
engages and releases the locks on the>doors
>luggage compartment lid
>fuel filler door
>storage compartment between the
backrests
>opened manual convertible top.
The central locking system can be oper-
ated
>from outside using the remote control
or via the driver's door lock
>from inside via the central locking sys-
tem button.
If it is operated from inside, the fuel filler
door will not be locked. Refer to page 18.
The anti-theft system is automatically acti-
vated whenever you activate the central
locking system from outside the vehicle. It
prevents the doors from being unlocked
with the lock buttons or release handles.
The alarm system is also armed.
The central locking system unlocks auto-
matically in the event of an accident. In
addition, the hazard warning flashers and
interior lamps come on.
Remote control
The concept
The remote control provides two additional
functions for central locking.
>Switching on interior lamps, refer to
page 17.
With this function, you can also search
for the vehicle when parked in an
underground garage, for instance
>Opening the luggage compartment lid
separately, refer to page 17. It will open
slightly, regardless of whether it was
locked or unlocked.
Whenever you unlock or lock the vehicle,
you simultaneously deactivate/activate
the anti-theft system, disarm/arm the alarm
Page 19 of 120

Reference
At a glance
Controls
Driving tips
Mobility
17
system and switch the interior lamps on/
off.
You can have a signal set to confirm
that the vehicle's locks have engaged
securely.<
Since persons or animals in the vehi-
cle could lock the doors from the
inside, always take the vehicle keys with
you so that the vehicle can be opened
again from the outside at any time.<
If it is no longer possible to lock the
vehicle via the remote control, the
battery is discharged. Use this key while
driving for an extended period in order to
recharge the battery.
In the event of a system malfunction,
please contact your BMW center. You can
also obtain replacement keys there.<
1To unlock
2To lock and secure, activate interior
lamps, disarm tilt alarm sensor and inte-
rior motion sensor
3To open the luggage compartment
To unlock
1.Press the button to unlock the driver's
door and the fuel filler door
2.Press the button a second time to dis-
engage all vehicle locks.
To lock and secure
Press the button.
To switch on the interior lamps
With the vehicle locked:
Press the button.
To deactivate the tilt alarm* and
interior motion sensors*
Press the button a second time immedi-
ately after locking.
For additional information, refer to
page 26.
To open the luggage compartment
Press the button.
The luggage compartment lid will open
slightly, regardless of whether it was
locked or unlocked.
Before and after a trip, be sure that
the luggage compartment lid has not
been opened unintentionally.<
Panic mode*: triggering alarm
By pressing the button for 2 to 5 seconds,
the alarm can be sounded in the event of
danger. The alarm is turned off by pressing
the unlocking button 1 again.
Malfunctions
External systems or devices may cause
local interference in the functions of the
remote control.
Should this occur, you can still open and
close the vehicle using the master key in
either the door or luggage compartment
locks.
For US owners only
The transmitter and receiver units comply
with part 15 of the FCC, Federal Communi-
cations Commission, regulations. Opera-
tion is governed by the following:
Page 21 of 120
Reference
At a glance
Controls
Driving tips
Mobility
19
To lock
>Either use the central locking button to
lock both doors at once or
>press the individual door lock buttons
down.
To prevent the driver from being
inadvertently locked out of the
vehicle, the driver's door lock button
will not engage as long as the door is
open.<
Since persons or animals in the vehi-
cle could lock the doors from the
inside, always take the vehicle keys with
you so that the vehicle can be opened
again from the outside at any time.<
Luggage compartment lid
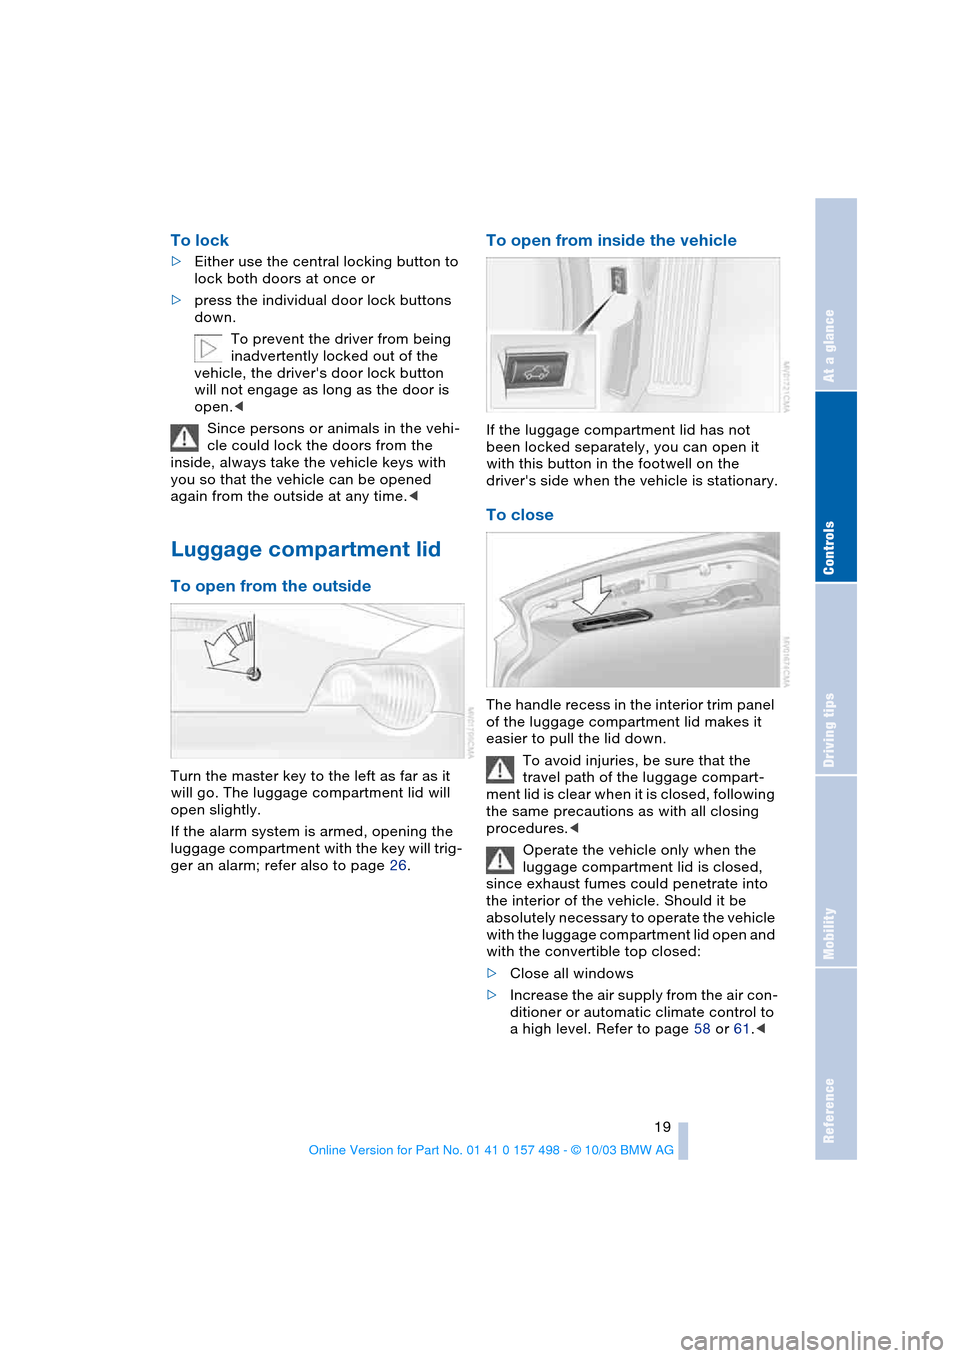
To open from the outside
Turn the master key to the left as far as it
will go. The luggage compartment lid will
open slightly.
If the alarm system is armed, opening the
luggage compartment with the key will trig-
ger an alarm; refer also to page 26.
To open from inside the vehicle
If the luggage compartment lid has not
been locked separately, you can open it
with this button in the footwell on the
driver's side when the vehicle is stationary.
To close
The handle recess in the interior trim panel
of the luggage compartment lid makes it
easier to pull the lid down.
To avoid injuries, be sure that the
travel path of the luggage compart-
ment lid is clear when it is closed, following
the same precautions as with all closing
procedures.<
Operate the vehicle only when the
luggage compartment lid is closed,
since exhaust fumes could penetrate into
the interior of the vehicle. Should it be
absolutely necessary to operate the vehicle
with the luggage compartment lid open and
with the convertible top closed:
>Close all windows
>Increase the air supply from the air con-
ditioner or automatic climate control to
a high level. Refer to page 58 or 61.<
Page 24 of 120
Opening and closing
22
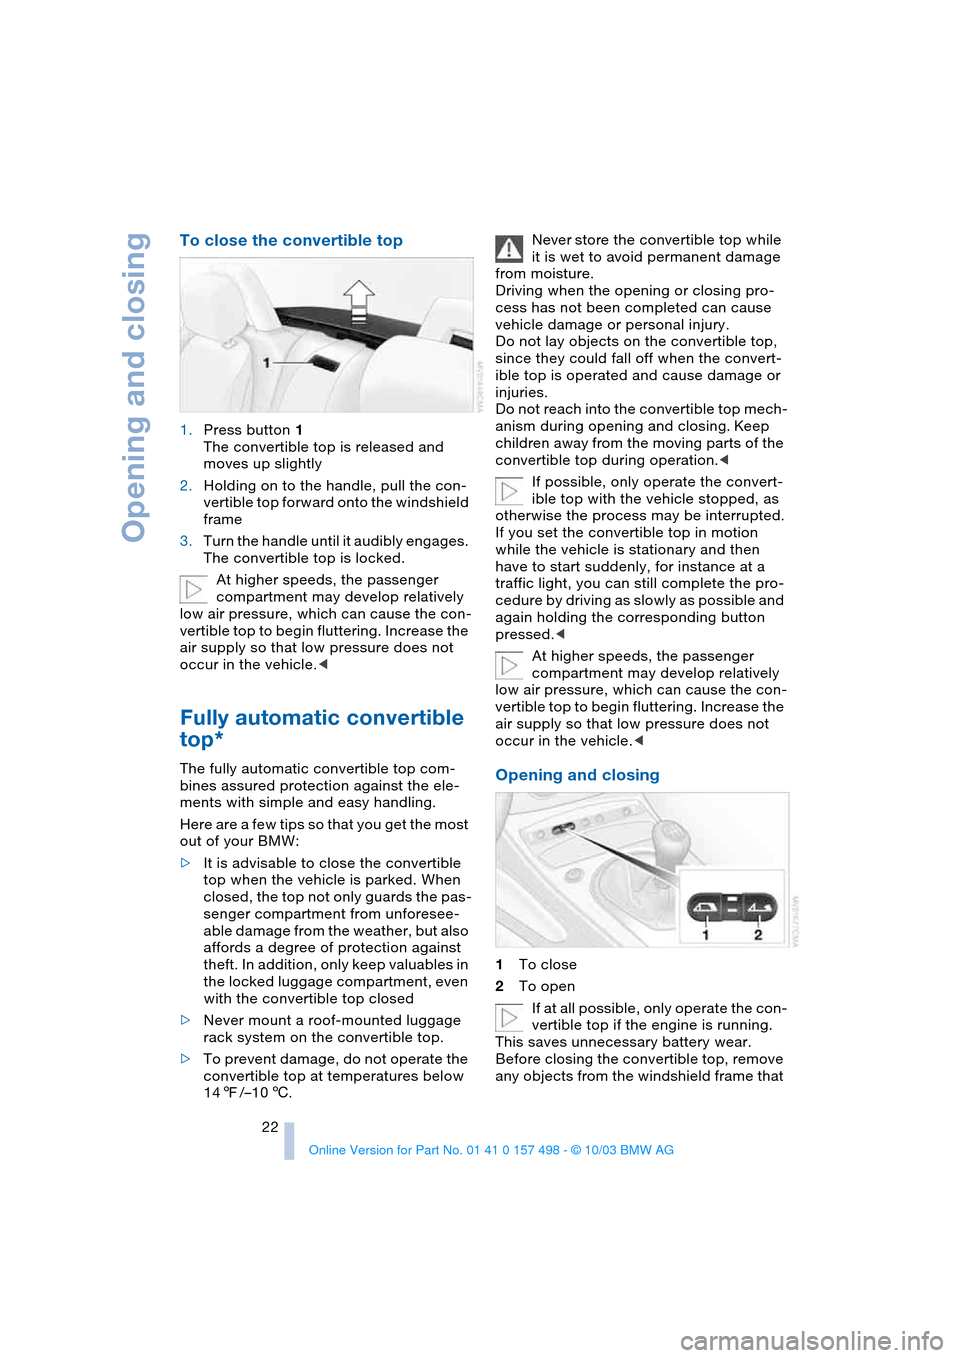
To close the convertible top
1.Press button 1
The convertible top is released and
moves up slightly
2.Holding on to the handle, pull the con-
vertible top forward onto the windshield
frame
3.Turn the handle until it audibly engages.
The convertible top is locked.
At higher speeds, the passenger
compartment may develop relatively
low air pressure, which can cause the con-
vertible top to begin fluttering. Increase the
air supply so that low pressure does not
occur in the vehicle.<
Fully automatic convertible
top*
The fully automatic convertible top com-
bines assured protection against the ele-
ments with simple and easy handling.
Here are a few tips so that you get the most
out of your BMW:
>It is advisable to close the convertible
top when the vehicle is parked. When
closed, the top not only guards the pas-
senger compartment from unforesee-
able damage from the weather, but also
affords a degree of protection against
theft. In addition, only keep valuables in
the locked luggage compartment, even
with the convertible top closed
>Never mount a roof-mounted luggage
rack system on the convertible top.
>To prevent damage, do not operate the
convertible top at temperatures below
147/–106.Never store the convertible top while
it is wet to avoid permanent damage
from moisture.
Driving when the opening or closing pro-
cess has not been completed can cause
vehicle damage or personal injury.
Do not lay objects on the convertible top,
since they could fall off when the convert-
ible top is operated and cause damage or
injuries.
Do not reach into the convertible top mech-
anism during opening and closing. Keep
children away from the moving parts of the
convertible top during operation.<
If possible, only operate the convert-
ible top with the vehicle stopped, as
otherwise the process may be interrupted.
If you set the convertible top in motion
while the vehicle is stationary and then
have to start suddenly, for instance at a
traffic light, you can still complete the pro-
cedure by driving as slowly as possible and
again holding the corresponding button
pressed.<
At higher speeds, the passenger
compartment may develop relatively
low air pressure, which can cause the con-
vertible top to begin fluttering. Increase the
air supply so that low pressure does not
occur in the vehicle.
2To open
If at all possible, only operate the con-
vertible top if the engine is running.
This saves unnecessary battery wear.
Before closing the convertible top, remove
any objects from the windshield frame that
Page 25 of 120
Reference
At a glance
Controls
Driving tips
Mobility
23
could keep the convertible top from closing
properly.<
Ignition key in position 1 or higher.
With the vehicle standing.
1.Read and comply with the preceding
safety precautions
2.Make sure that the convertible top com-
partment panel in the luggage compart-
ment is lowered; refer to page 20. Oth-
erwise the convertible top cannot be
opened
3.Ensure that the luggage compartment
lid is closed
4.Press and hold the corresponding but-
ton for convertible top operation.
If the convertible top should halt right
before the closing phase is completed,
press against the front part of the convert-
ible top frame from the outside to help the
closing process along. Keep pressing the
button while doing so until the top starts up
again on its own.
Indicator lamps
>The red indicator lamp in the button will
light up while the convertible top is in
motion. It goes out as soon as the
opening or closing operation has been
completed
>If the red indicator lamp in the button
flashes after the button has been
released, then the opening or closing
operation has not yet been completed.
The sequence can be continued in the
desired direction by pressing this but-
ton
>If the yellow indicator lamp in the button
lights up continuously with the button
pressed, then the convertible top com-
partment panel is raised and the con-
vertible top cannot be moved.
The side windows will lower slightly when
you press the button for operating the con-
vertible top.
After the opening or closing operation, the
side windows will go back up if you keep
the button pressed for more than 2 sec-
onds after the indicator lamp has gone out.
Interruption
The automatic sequence will be interrupted
immediately if you release the button that
operates the top. The sequence can be
continued in the desired direction by press-
ing this button.
If the convertible top operation has
been interrupted, do not close the
side windows using the power window but-
tons. Otherwise the side windows may not
close properly against the rubber seal of
the convertible top.<
After the convertible top has been
stored for an extended period of time
in the convertible top compartment, e.g. in
the winter months because the hardtop was
being used, you may have to support the
convertible top by hand when closing it for
the first time.<
Convenience operation
Driver's door lock
Refer to page 18.
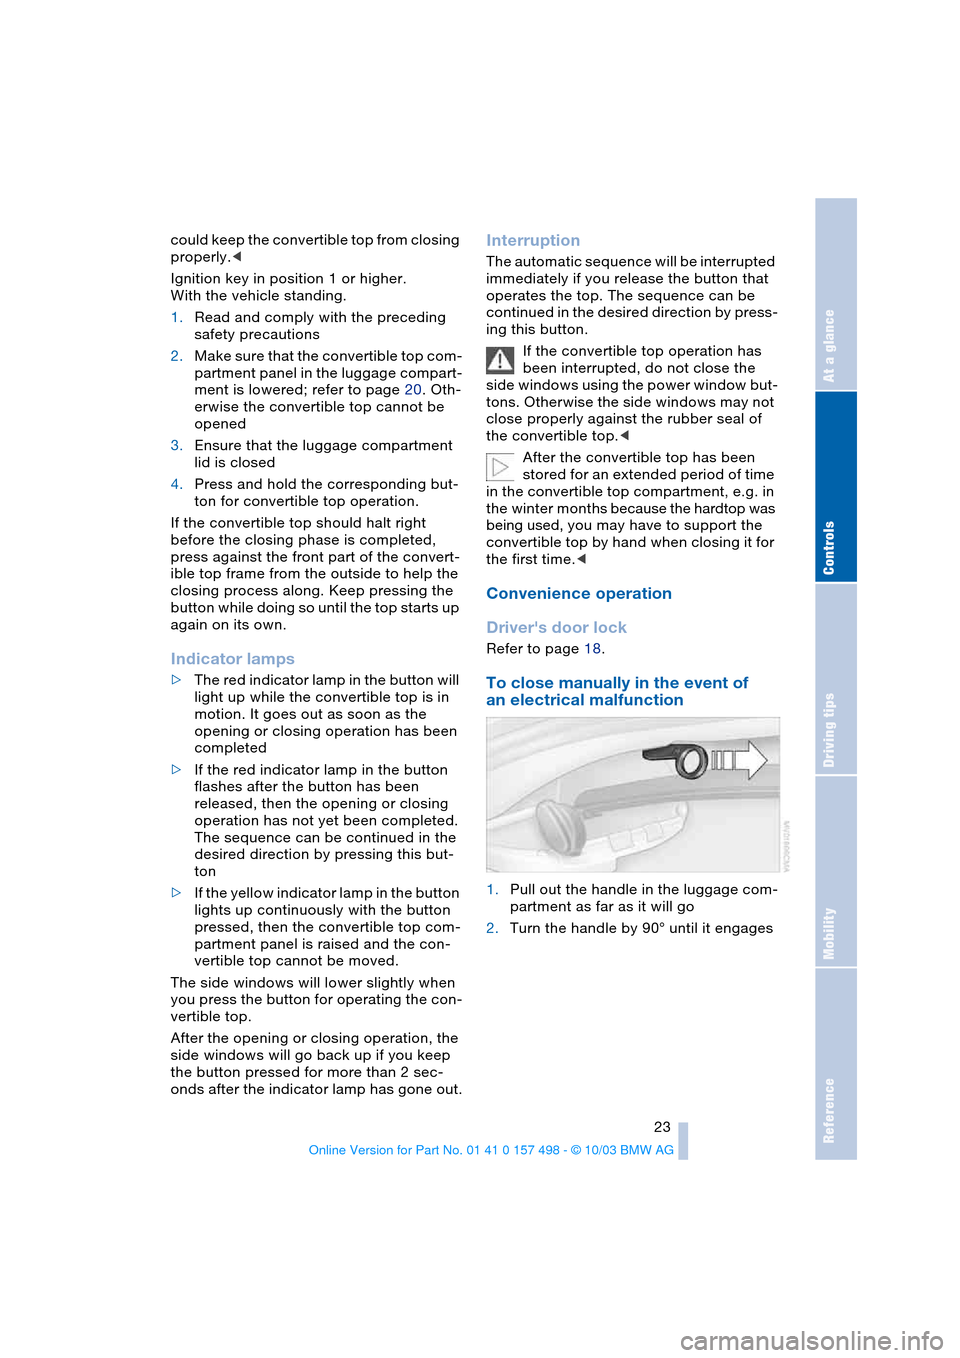
To close manually in the event of
an electrical malfunction
1.Pull out the handle in the luggage com-
partment as far as it will go
2.Turn the handle by 90° until it engages
Page 26 of 120
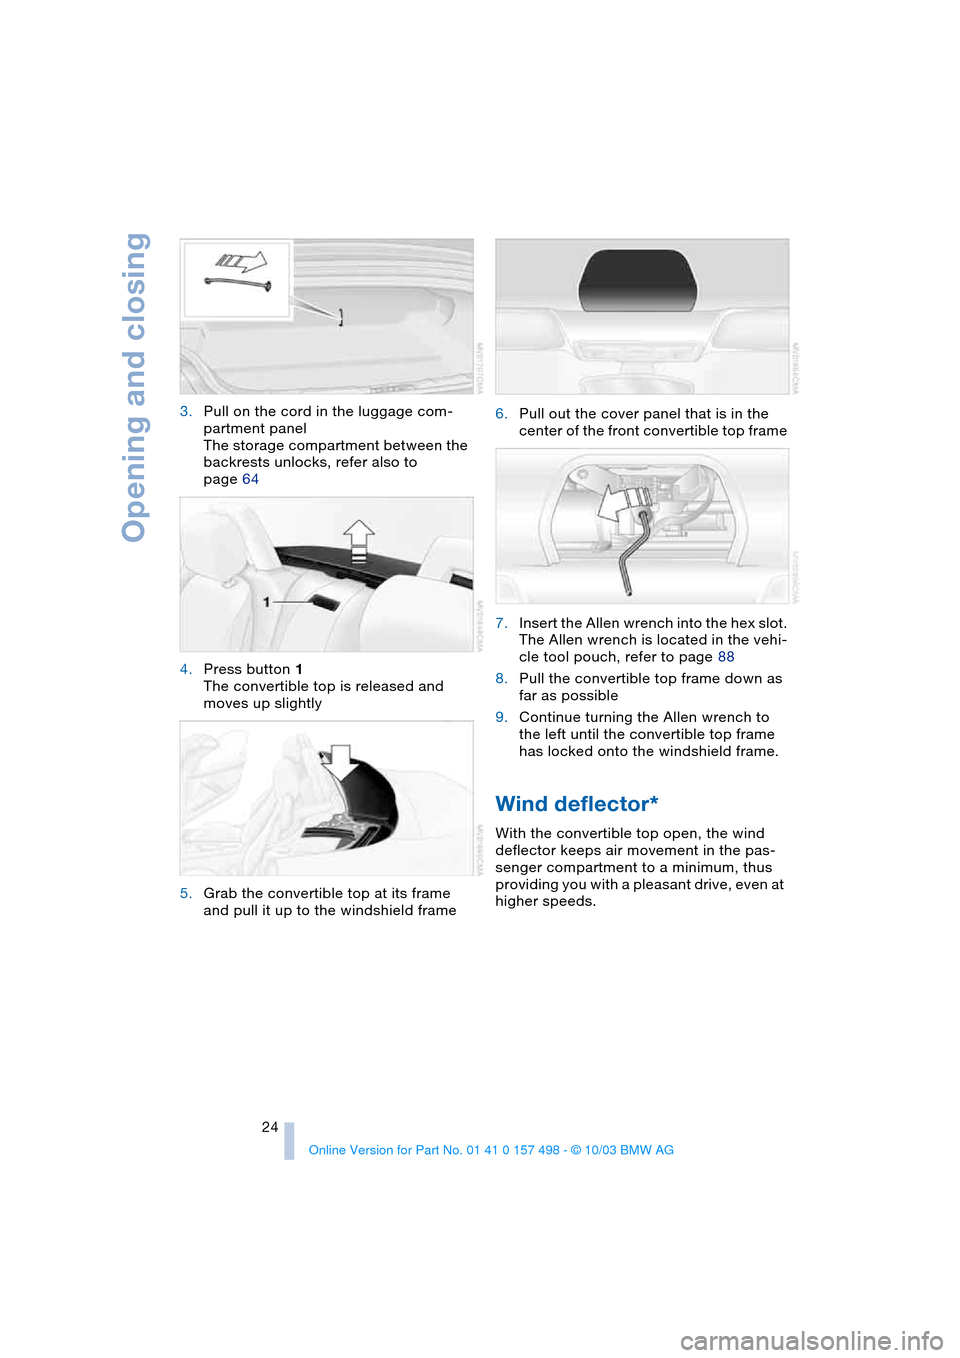
Opening and closing
24 3.Pull on the cord in the luggage com-
partment panel
The storage compartment between the
backrests unlocks, refer also to
page 64
4.Press button 1
The convertible top is released and
moves up slightly
5.Grab the convertible top at its frame
and pull it up to the windshield frame6.Pull out the cover panel that is in the
center of the front convertible top frame
7.Insert the Allen wrench into the hex slot.
The Allen wrench is located in the vehi-
cle tool pouch, refer to page 88
8.Pull the convertible top frame down as
far as possible
9.Continue turning the Allen wrench to
the left until the convertible top frame
has locked onto the windshield frame.
Wind deflector*
With the convertible top open, the wind
deflector keeps air movement in the pas-
senger compartment to a minimum, thus
providing you with a pleasant drive, even at
higher speeds.