2004 BMW 760LI SEDAN check engine
[x] Cancel search: check enginePage 82 of 232
Everything under control
80
Everything under control
Odometer, outside temperature display, clock
When the ignition is off you can briefly acti-
vate the time, outside temperature and
odometer displays by pressing the knob at
the upper left of the Info Display.
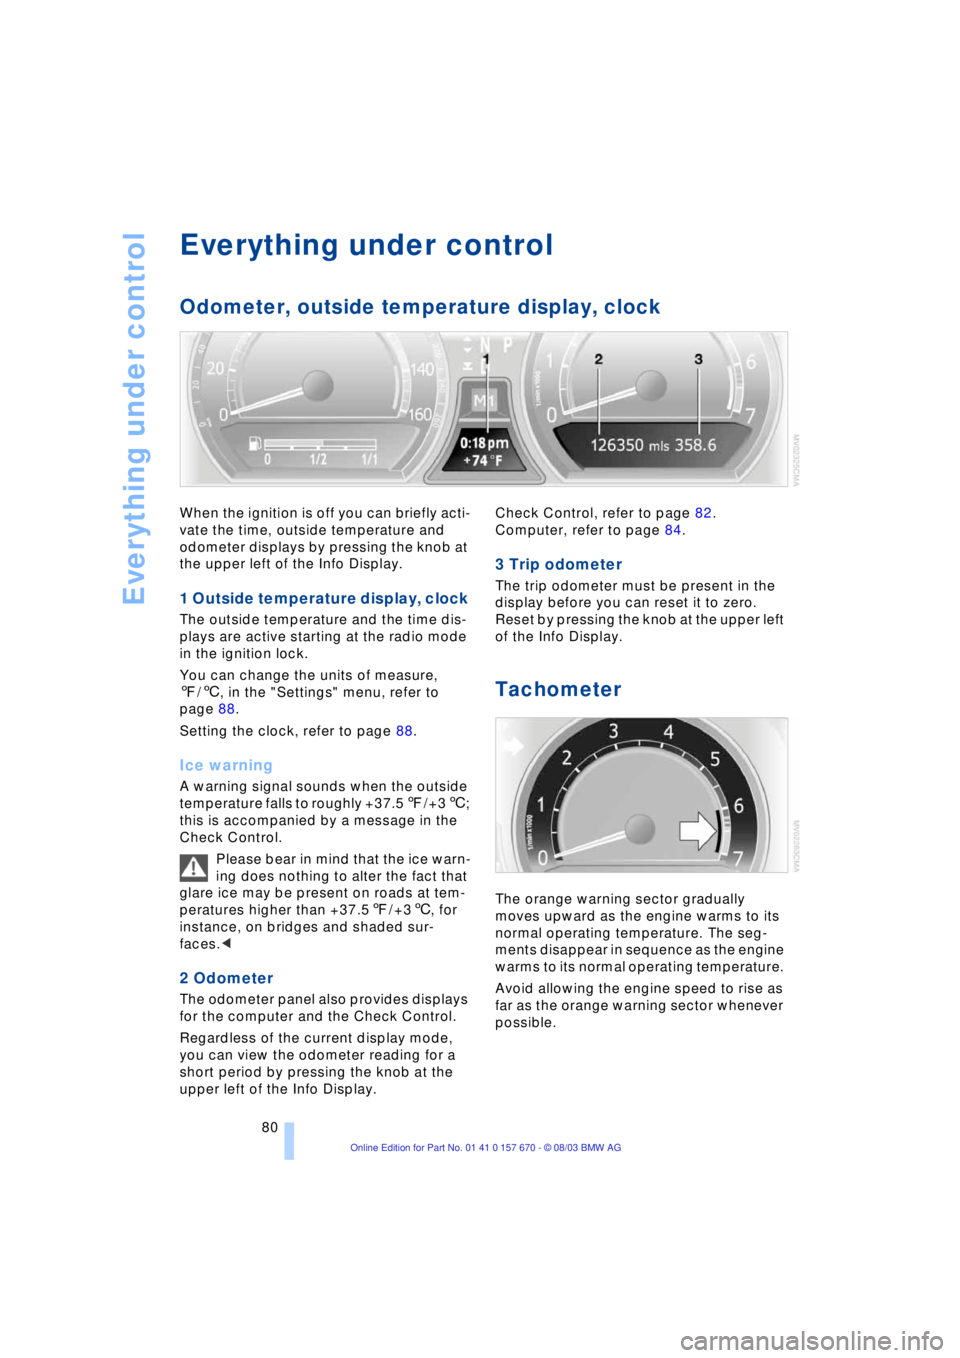
1 Outside temperature display, clock
The outside temperature and the time dis-
plays are active starting at the radio mode
in the ignition lock.
You can change the units of measure,
7/6, in the "Settings" menu, refer to
page 88.
Setting the clock, refer to page 88.
Ice warning
A warning signal sounds when the outside
temperature falls to roughly +37.57/+36;
this is accompanied by a message in the
Check Control.
Please bear in mind that the ice warn-
ing does nothing to alter the fact that
glare ice may be present on roads at tem-
peratures higher than +37.57/+36, for
instance, on bridges and shaded sur-
faces.<
2 Odometer
The odometer panel also provides displays
for the computer and the Check Control.
Regardless of the current display mode,
you can view the odometer reading for a
short period by pressing the knob at the
upper left of the Info Display. Check Control, refer to page 82.
Computer, refer to page 84.
3 Trip odometer
The trip odometer must be present in the
display before you can reset it to zero.
Reset by pressing the knob at the upper left
of the Info Display.
Tachometer
The orange warning sector gradually
moves upward as the engine warms to its
normal operating temperature. The seg-
ments disappear in sequence as the engine
warms to its normal operating temperature.
Avoid allowing the engine speed to rise as
far as the orange warning sector whenever
possible.
Page 94 of 232
Technology for comfort, convenience and safety
92
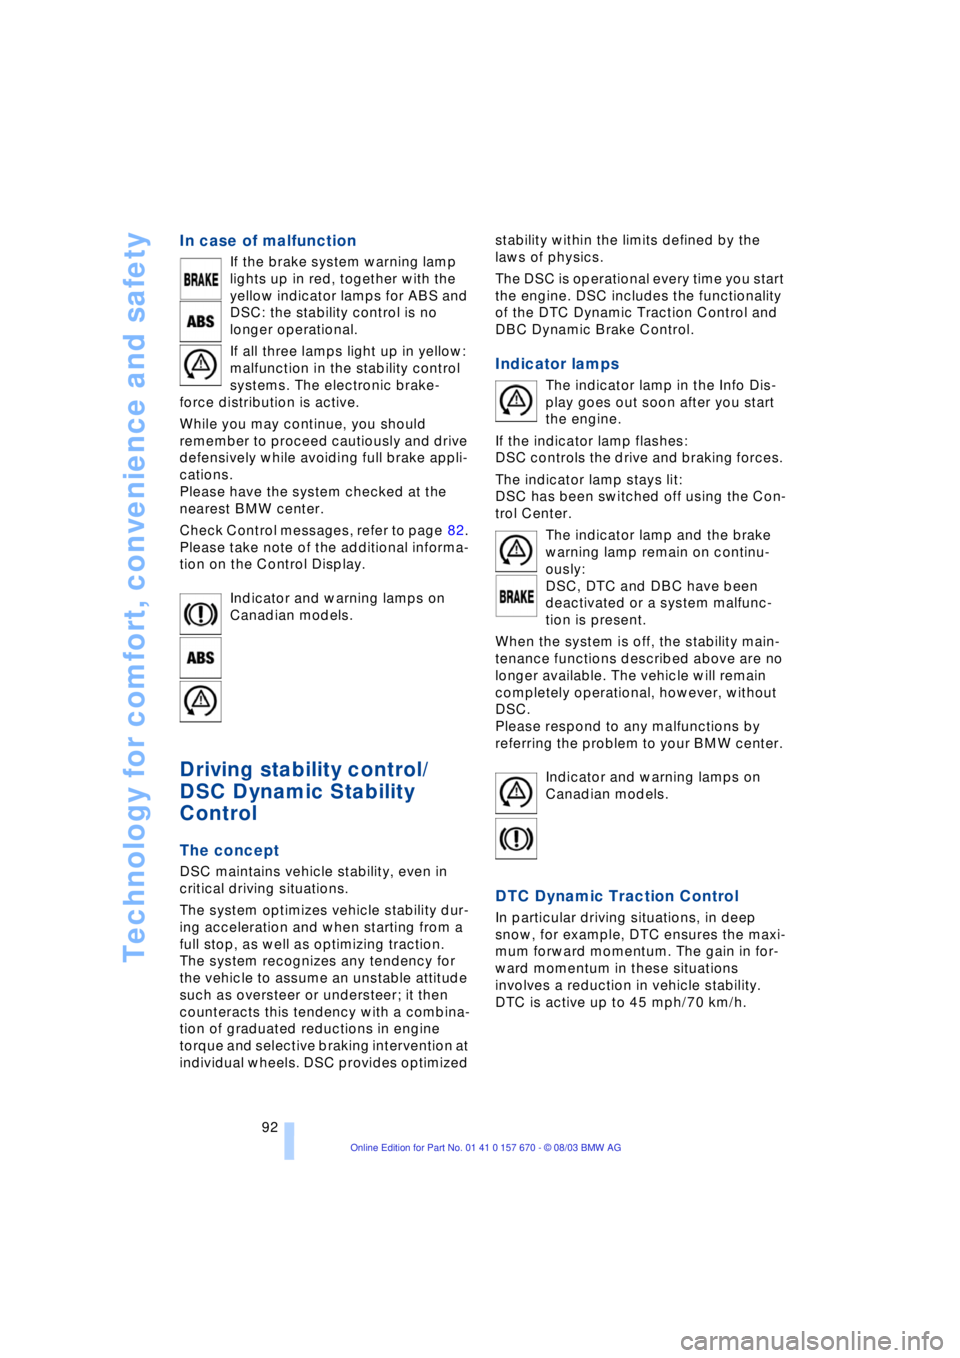
In case of malfunction
If the brake system warning lamp
lights up in red, together with the
yellow indicator lamps for ABS and
DSC: the stability control is no
longer operational.
If all three lamps light up in yellow:
malfunction in the stability control
systems. The electronic brake-
force distribution is active.
While you may continue, you should
remember to proceed cautiously and drive
defensively while avoiding full brake appli-
cations.
Please have the system checked at the
nearest BMW center.
Check Control messages, refer to page 82.
Please take note of the additional informa-
tion on the Control Display.
Indicator and warning lamps on
Canadian models.
Driving stability control/
DSC Dynamic Stability
Control
The concept
DSC maintains vehicle stability, even in
critical driving situations.
The system optimizes vehicle stability dur-
ing acceleration and when starting from a
full stop, as well as optimizing traction.
The system recognizes any tendency for
the vehicle to assume an unstable attitude
such as oversteer or understeer; it then
counteracts this tendency with a combina-
tion of graduated reductions in engine
torque and selective braking intervention at
individual wheels. DSC provides optimized stability within the limits defined by the
laws of physics.
The DSC is operational every time you start
the engine. DSC includes the functionality
of the DTC Dynamic Traction Control and
DBC Dynamic Brake Control.
Indicator lamps
The indicator lamp in the Info Dis-
play goes out soon after you start
the engine.
If the indicator lamp flashes:
DSC controls the drive and braking forces.
The indicator lamp stays lit:
DSC has been switched off using the Con-
trol Center.
The indicator lamp and the brake
warning lamp remain on continu-
ously:
DSC, DTC and DBC have been
deactivated or a system malfunc-
tion is present.
When the system is off, the stability main-
tenance functions described above are no
longer available. The vehicle will remain
completely operational, however, without
DSC.
Please respond to any malfunctions by
referring the problem to your BMW center.
Indicator and warning lamps on
Canadian models.
DTC Dynamic Traction Control
In particular driving situations, in deep
snow, for example, DTC ensures the maxi-
mum forward momentum. The gain in for-
ward momentum in these situations
involves a reduction in vehicle stability.
DTC is active up to 45 mph/70 km/h.
Page 96 of 232
Technology for comfort, convenience and safety
94 In the event of a malfunction, the
warning lamp lights up yellow.
Have the system checked and
repaired at your BMW center as soon as
possible.
Check Control messages, refer to page 82.
Please take note of the additional informa-
tion on the Control Display.
Warning lamp on Canadian models.
Dynamic Drive
The concept
Dynamic Drive minimizes body roll and
optimizes vehicle stability during cornering
and evasive maneuvers.
Active stabilizers at the front and rear axles
form the basis for Dynamic Drive. Suspen-
sion compliance adapts to suit driving con-
ditions, varying from performance-oriented
during cornering to smooth and comfort-
oriented when the vehicle is proceeding in
a straight line.
The system assumes operational status
each time you start the engine.
Driving with Dynamic Drive
During vehicle operation, the system con-
tinuously runs through closed-loop control
cycles lasting only fractions of a second.
In case of malfunction
The symbol will light up, accompa-
nied by a status message in the
Check Control. Please take note of
the additional information on the Control
Display.
You can find more information on the
Check Control starting on page 82.
If the Dynamic Drive system switches
off in response to malfunction, please
remember to adapt your speed accord-
ingly, especially in curves.
The suspension will be noticeably softer
and the vehicle will display a greater ten-dency to tilt during cornering and in cross-
winds.
If a Check Control message stating that
you should stop appears in addition to the
red symbol, stop immediately and switch
off the engine. In this case the oil level in
the reservoir may have dropped below the
minimum, possibly owing to a leak in the
hydraulic system.
Please observe the additional instructions
provided on the Control Display.<
EDC Electronic Damping
Control*
The suspension responds to changes in
factors such as road surface, or operating
conditions such as steering and braking, by
adapting to the new conditions within frac-
tions of a second.
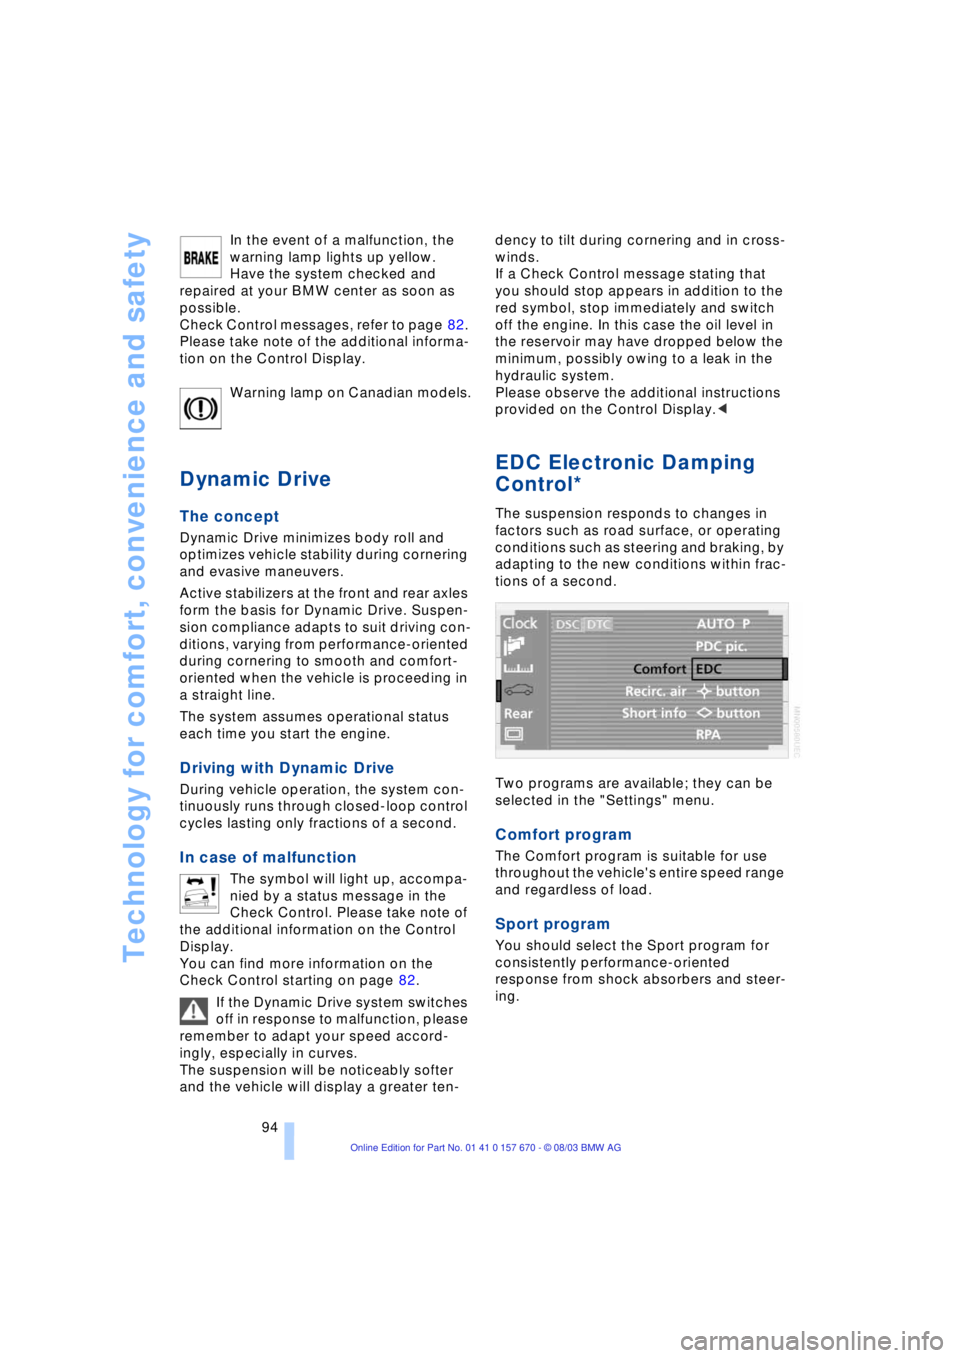
Two programs are available; they can be
selected in the "Settings" menu.
Comfort program
The Comfort program is suitable for use
throughout the vehicle's entire speed range
and regardless of load.
Sport program
You should select the Sport program for
consistently performance-oriented
response from shock absorbers and steer-
ing.
Page 97 of 232
Controls
95Reference
At a glance
Driving tips
Communications
Navigation
Entertainment
Mobility
Flat Tire Monitor
The concept
The Flat Tire Monitor keeps track of the
inflation pressures in the four fitted tires as
you drive. The system provides an alert
whenever the inflation pressure of one tire
drops significantly in relation to the pres-
sure of another tire.
The check of the tire inflation pressure is
based on monitoring the relative speeds of
the wheels. A flat tire is detected and
reported on the basis of a deviation in cer-
tain speed ratios.
Functional requirements
So that the Flat Tire Monitor can learn the
correct inflation pressure, please perform
the following:
1.Check the inflation pressures in all tires
2.Compare with the inflation pressure
table on page 189 and correct if neces-
sary
3.Initialize the system.
Limits of the system
The Flat Tire Monitor cannot indicate
sudden severe tire damage caused
by outside factors and does not detect a
natural, even pressure drop in all four
tires.<
In the following situations, on the other
hand, there can be delays in detecting tire
pressure losses, and even system failure:
>When you are driving on snow-covered
or slippery road surfaces
>In the case of performance-oriented
driving: slip on the drive wheels, high
lateral acceleration
>False alarms and undetected loss of
pressure may occur when you are driv-
ing with snow chains fitted.
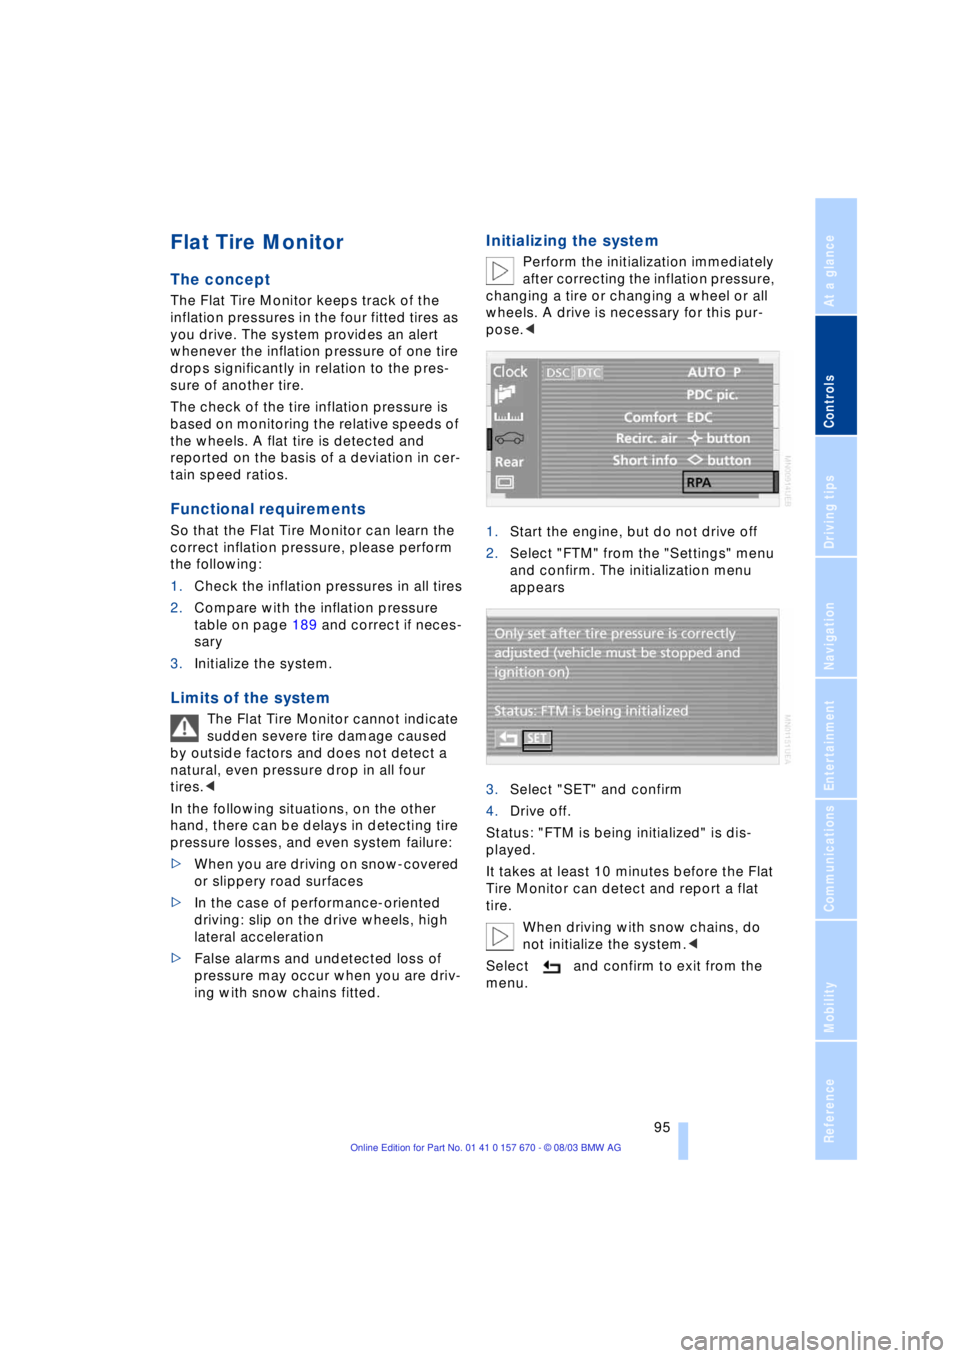
Initializing the system
Perform the initialization immediately
after correcting the inflation pressure,
changing a tire or changing a wheel or all
wheels. A drive is necessary for this pur-
pose.<
1.Start the engine, but do not drive off
2.Select "FTM" from the "Settings" menu
and confirm. The initialization menu
appears
3.Select "SET" and confirm
4.Drive off.
Status: "FTM is being initialized" is dis-
played.
It takes at least 10 minutes before the Flat
Tire Monitor can detect and report a flat
tire.
When driving with snow chains, do
not initialize the system.<
Select and confirm to exit from the
menu.
Page 125 of 232
Driving tips
123Reference
At a glance
Controls
Communications
Navigation
Entertainment
Mobility
to as hydroplaning, and is characterized
by a partial or complete loss of contact
between tires and road surface, ultimately
undermining your ability to steer and brake
the vehicle.<
Driving through water
Do not drive through water on the
road if it is deeper than 1 ft/30 cm,
and then only at walking speed at the most.
Otherwise, the vehicle's engine, the electri-
cal systems and the transmission may be
damaged.<
Brake system
Braking with ABS
The best way to achieve the best response
from the ABS is to apply maximum pres-
sure to the brake pedal Ð panic stop. Since
the vehicle maintains steering responsive-
ness, you can nevertheless avoid possible
obstacles with a minimum of steering
effort.
Pulsation at the brake pedal combines with
sounds from the hydraulic circuits to indi-
cate to the driver that ABS is in its active
mode.
Do not drive with your foot resting on
the brake pedal. Otherwise, even light
but consistent pedal pressure can lead to
high temperatures, brake wear and possi-
bly even brake failure.<
Disc brakes
Driving in wet conditions
While driving in wet conditions and in
heavy rain, it is a good idea to apply light
pressure to the brake pedal every few
miles. Monitor traffic conditions to ensure
that this maneuver does not endanger
other road users. The heat generated in this
process helps dry the pads and rotors to
ensure that full braking efficiency will then
be available when you need it.
Hills
You can retain full and unimpaired braking
efficiency by downshifting to a gear in
which only minimal brake applications are
needed when descending long or steep
downhill stretches.
You can further enhance the engine's
braking effect by selecting a lower gear
in the automatic transmission's manual
mode, downshifting as far as first gear
on extremely steep stretches, refer to
page 67. This strategy helps you avoid
placing excessive loads on the brake sys-
tem.
Never allow the vehicle to coast with
the transmission in Neutral Ð or with
the engine switched off Ð as there is no
engine braking when the transmission is in
Neutral, and no power-assist for brakes
and steering when the engine is not run-
ning.
Never allow floor mats, carpets or any other
objects to protrude into the area around the
accelerator and brake pedals and obstruct
their movement.<
Corrosion
When the vehicle is driven only occasion-
ally, during extended periods when the
vehicle is not used at all, and in operating
conditions where brake applications are
less frequent, there is an increased ten-
dency for corrosion to form on rotors, while
contaminants accumulate on the brake
pads. This occurs because the minimal
pressure which must be exerted by the
pads during brake applications to clean the
rotors is not reached.
Should corrosion form on the brake rotors,
the brakes will tend to respond with a pul-
sating effect that even extended applica-
tion will fail to cure.
Brake pads
If the brake pad wear warning lamp
appears in the Check Control,
accompanied by a text. Please take
careful note of the additional information on
the Control Display.
Page 188 of 232
Refueling
186
Refueling
Fuel filler door
Always switch off the engine before
refueling. If you do not, fuel cannot be
filled into the tank and a message will
appear in the Check Control.<
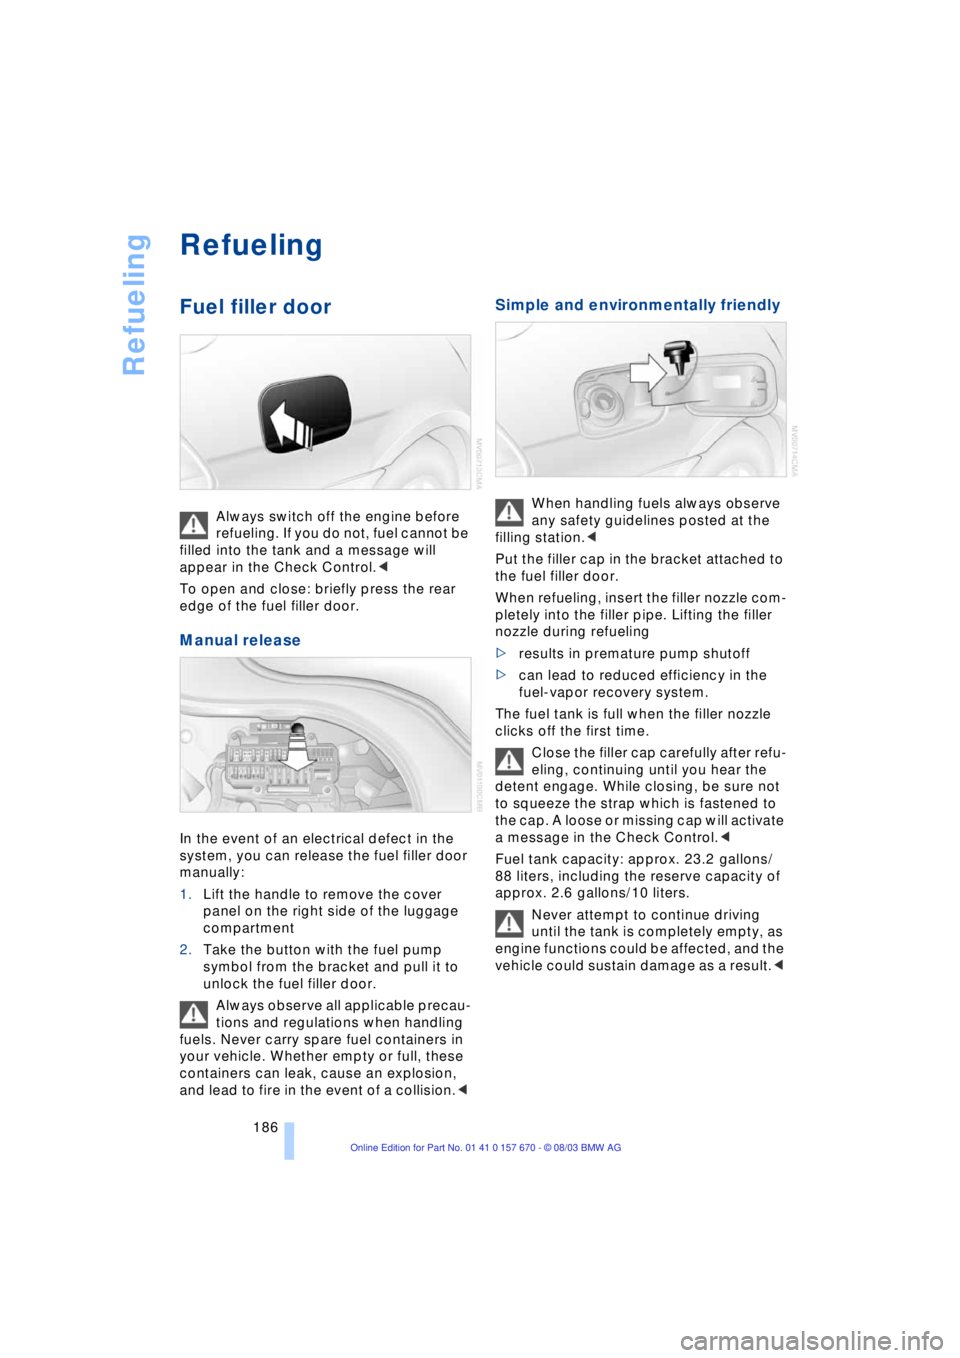
To open and close: briefly press the rear
edge of the fuel filler door.
Manual release
In the event of an electrical defect in the
system, you can release the fuel filler door
manually:
1.Lift the handle to remove the cover
panel on the right side of the luggage
compartment
2.Take the button with the fuel pump
symbol from the bracket and pull it to
unlock the fuel filler door.
Always observe all applicable precau-
tions and regulations when handling
fuels. Never carry spare fuel containers in
your vehicle. Whether empty or full, these
containers can leak, cause an explosion,
and lead to fire in the event of a collision.<
Simple and environmentally friendly
When handling fuels always observe
any safety guidelines posted at the
filling station.<
Put the filler cap in the bracket attached to
the fuel filler door.
When refueling, insert the filler nozzle com-
pletely into the filler pipe. Lifting the filler
nozzle during refueling
>results in premature pump shutoff
>can lead to reduced efficiency in the
fuel-vapor recovery system.
The fuel tank is full when the filler nozzle
clicks off the first time.
Close the filler cap carefully after refu-
eling, continuing until you hear the
detent engage. While closing, be sure not
to squeeze the strap which is fastened to
the cap. A loose or missing cap will activate
a message in the Check Control.<
Fuel tank capacity: approx. 23.2 gallons/
88 liters, including the reserve capacity of
approx. 2.6 gallons/10 liters.
Never attempt to continue driving
until the tank is completely empty, as
engine functions could be affected, and the
vehicle could sustain damage as a result.<
Page 197 of 232
Mobility
195Reference
At a glance
Controls
Driving tips
Communications
Navigation
Entertainment
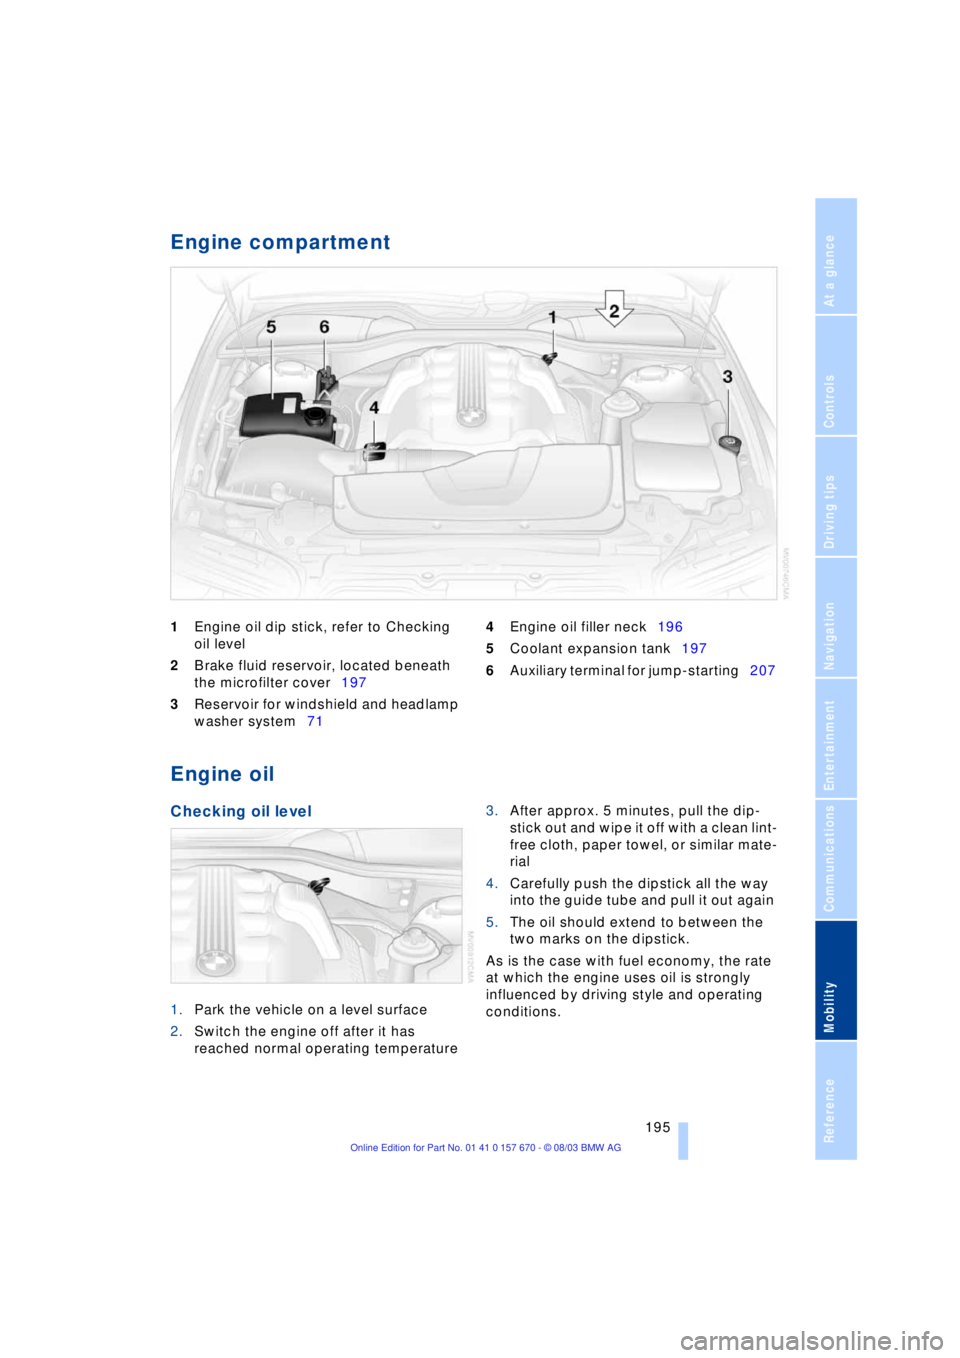
Engine compartment
1Engine oil dip stick, refer to Checking
oil level
2Brake fluid reservoir, located beneath
the microfilter cover197
3Reservoir for windshield and headlamp
washer system71 4Engine oil filler neck196
5Coolant expansion tank197
6Auxiliary terminal for jump-starting207
Engine oil
Checking oil level
1.Park the vehicle on a level surface
2.Switch the engine off after it has
reached normal operating temperature 3.After approx. 5 minutes, pull the dip-
stick out and wipe it off with a clean lint-
free cloth, paper towel, or similar mate-
rial
4.Carefully push the dipstick all the way
into the guide tube and pull it out again
5.The oil should extend to between the
two marks on the dipstick.
As is the case with fuel economy, the rate
at which the engine uses oil is strongly
influenced by driving style and operating
conditions.
Page 198 of 232
Under the hood
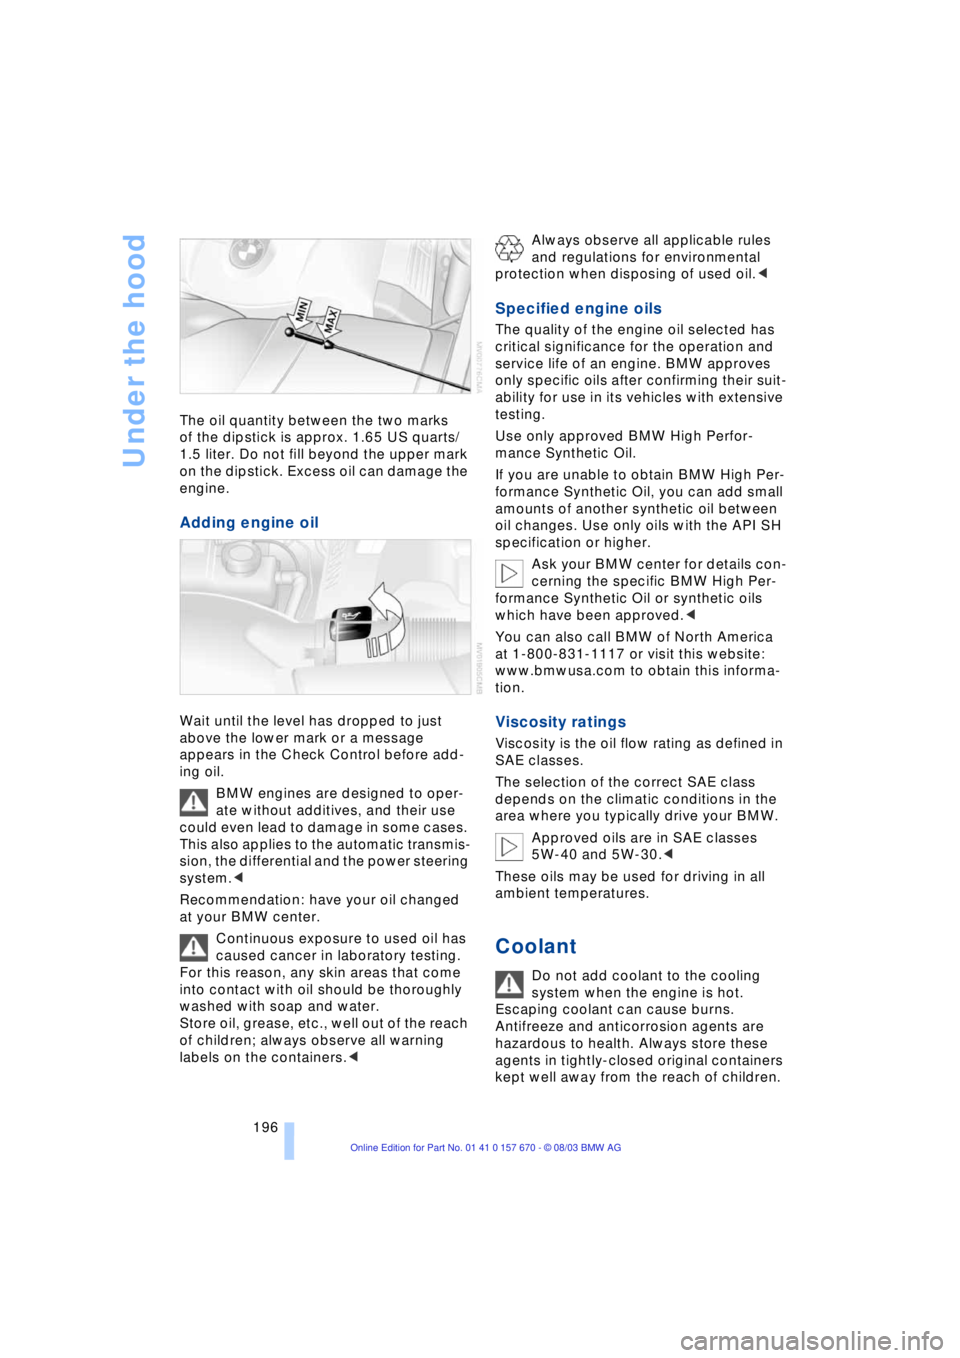
196 The oil quantity between the two marks
of the dipstick is approx. 1.65 US quarts/
1.5 liter. Do not fill beyond the upper mark
on the dipstick. Excess oil can damage the
engine.
Adding engine oil
Wait until the level has dropped to just
above the lower mark or a message
appears in the Check Control before add-
ing oil.
BMW engines are designed to oper-
ate without additives, and their use
could even lead to damage in some cases.
This also applies to the automatic transmis-
sion, the differential and the power steering
system.<
Recommendation: have your oil changed
at your BMW center.
Continuous exposure to used oil has
caused cancer in laboratory testing.
For this reason, any skin areas that come
into contact with oil should be thoroughly
washed with soap and water.
Store oil, grease, etc., well out of the reach
of children; always observe all warning
labels on the containers.
protection when disposing of used oil.<
Specified engine oils
The quality of the engine oil selected has
critical significance for the operation and
service life of an engine. BMW approves
only specific oils after confirming their suit-
ability for use in its vehicles with extensive
testing.
Use only approved BMW High Perfor-
mance Synthetic Oil.
If you are unable to obtain BMW High Per-
formance Synthetic Oil, you can add small
amounts of another synthetic oil between
oil changes. Use only oils with the API SH
specification or higher.
Ask your BMW center for details con-
cerning the specific BMW High Per-
formance Synthetic Oil or synthetic oils
which have been approved.<
You can also call BMW of North America
at 1-800-831-1117 or visit this website:
www.bmwusa.com to obtain this informa-
tion.
Viscosity ratings
Viscosity is the oil flow rating as defined in
SAE classes.
The selection of the correct SAE class
depends on the climatic conditions in the
area where you typically drive your BMW.
Approved oils are in SAE classes
5W-40 and 5W-30.<
These oils may be used for driving in all
ambient temperatures.
Coolant
Do not add coolant to the cooling
system when the engine is hot.
Escaping coolant can cause burns.
Antifreeze and anticorrosion agents are
hazardous to health. Always store these
agents in tightly-closed original containers
kept well away from the reach of children.