2004 BMW 645CI COUPE buttons
[x] Cancel search: buttonsPage 55 of 216
Controls
53Reference
At a glance
Driving tips
Communications
Navigation
Entertainment
Mobility
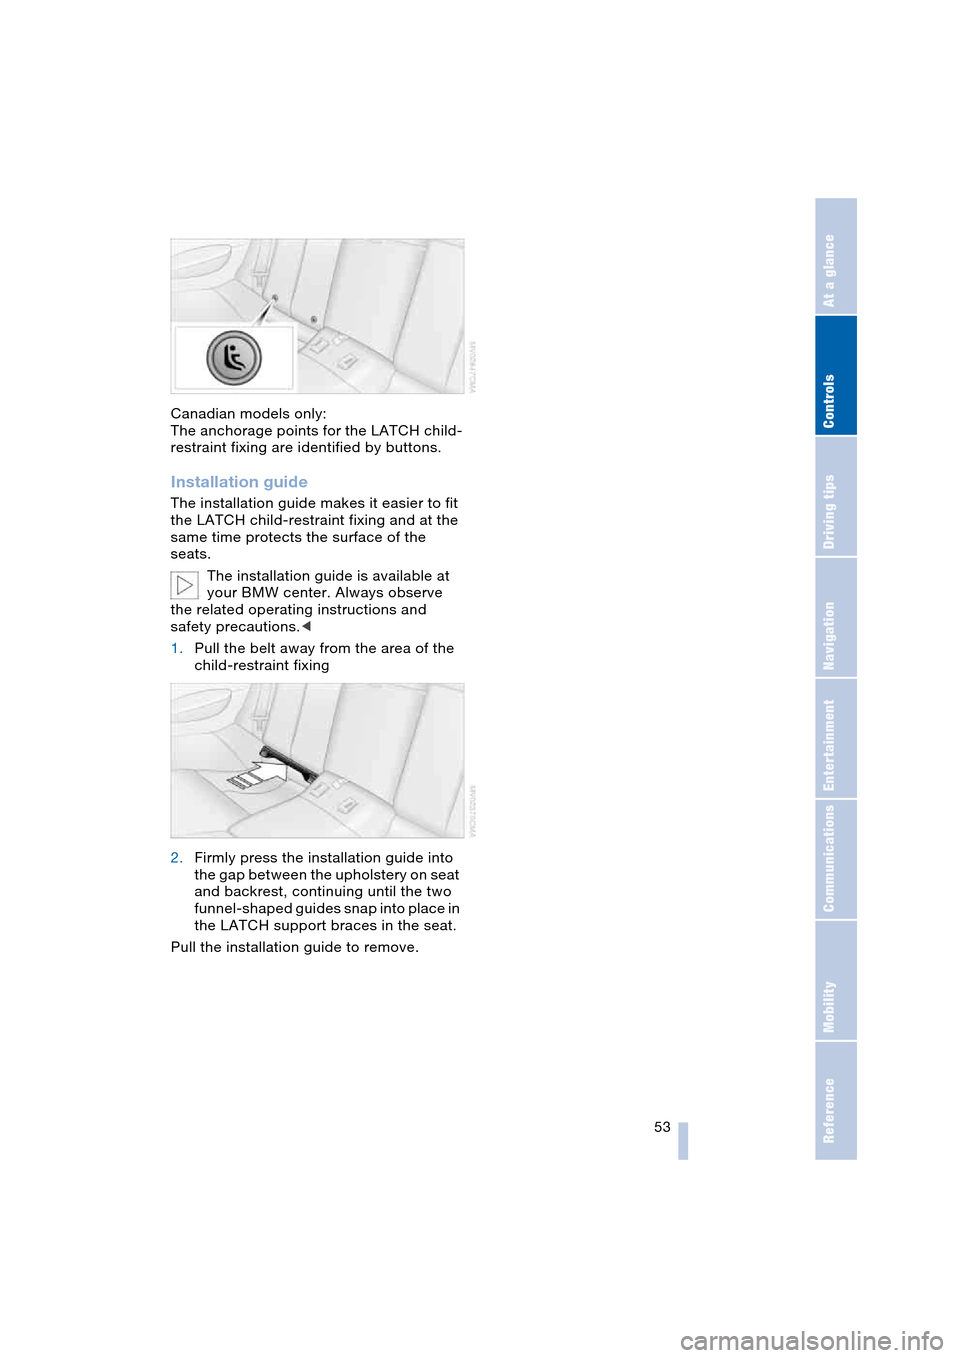
Canadian models only:
The anchorage points for the LATCH child-
restraint fixing are identified by buttons.
Installation guide
The installation guide makes it easier to fit
the LATCH child-restraint fixing and at the
same time protects the surface of the
seats.
The installation guide is available at
your BMW center. Always observe
the related operating instructions and
safety precautions.<
1.Pull the belt away from the area of the
child-restraint fixing
2.Firmly press the installation guide into
the gap between the upholstery on seat
and backrest, continuing until the two
funnel-shaped guides snap into place in
the LATCH support braces in the seat.
Pull the installation guide to remove.
Page 89 of 216

Controls
87Reference
At a glance
Driving tips
Communications
Navigation
Entertainment
Mobility
If the automatic headlamp control is
activated, the low beams will come on
automatically when you switch on the fog
lamps.<
Instrument lighting
Turn the serrated dial to adjust the illumina-
tion intensity.
Interior lamps
Control of the interior lamps, footwell
lamps, door entry lighting, courtesy lamps
*
and sill panel lighting
* is automatic.
Switching interior lamps on and off
manually
Briefly press button 1.
If you want the interior lamps to remain off
continuously, maintain pressure on the but-
ton for approx. 3 seconds.
To revert to normal operation, briefly press
the button.
Reading lamps
The reading lamps are beside the interior
lamp.
You can turn them on and off using the
buttons 2 located next to the lamps.
To avoid discharging the battery, all of
the vehicle's interior lamps are auto-
matically extinguished approx. 15 minutes
after the ignition is switched off.<
Page 92 of 216
A congenial climate
90 rently within the vehicle. AUC executes this
function automatically.
Press the button repeatedly to run through
the following control sequence:
>Indicator lamps off: outside air flows
into the vehicle continuously
>Right indicator lamp on, AUC mode: the
system detects pollutants in the outside
air and responds by blocking the supply
of outside air when required.
Depending upon air quality require-
ments, in the automatic mode the sys-
tem alternates between its outside-air
and recirculated-air modes
>Left indicator lamp on, recirculated-air
mode: the supply of outside air into the
vehicle is continuously blocked.
If condensation starts to form on the
inside window surfaces during opera-
tion in the recirculated-air mode, you
should switch it off while also increasing
the air volume as required.
The recirculated-air mode should not be
used over a longer period of time, as the air
quality inside the vehicle deteriorates con-
tinuously.<
Residual heat mode
If you press this button with the
engine switched off, the system
uses the warmth stored in the
engine to heat the interior, for
instance, while the vehicle is
stationary at a school to pick up a child.
You can adjust the automatic climate con-
trol settings as of ignition key position 2.
Provided that the engine has warmed to its
normal operating temperature and the bat-
tery is charged, you can use this function
for up to 15 minutes after switching off the
ignition. The LED within the button lights up
to confirm compliance with both of these
conditions.
Switching off automatic climate
control
The air volume, the heater and
the cooling function are all
switched off. You can restart
the automatic climate control
by pressing any of its buttons
except the REST button.
Settings using Control Center
Ignition key:
>On vehicles with separate drives for
audio CDs and navigation DVDs, igni-
tion key in position 2
>On vehicles with one drive for audio
CDs, ignition key in position 1.
Control Center, for principle details, refer to
page 16:
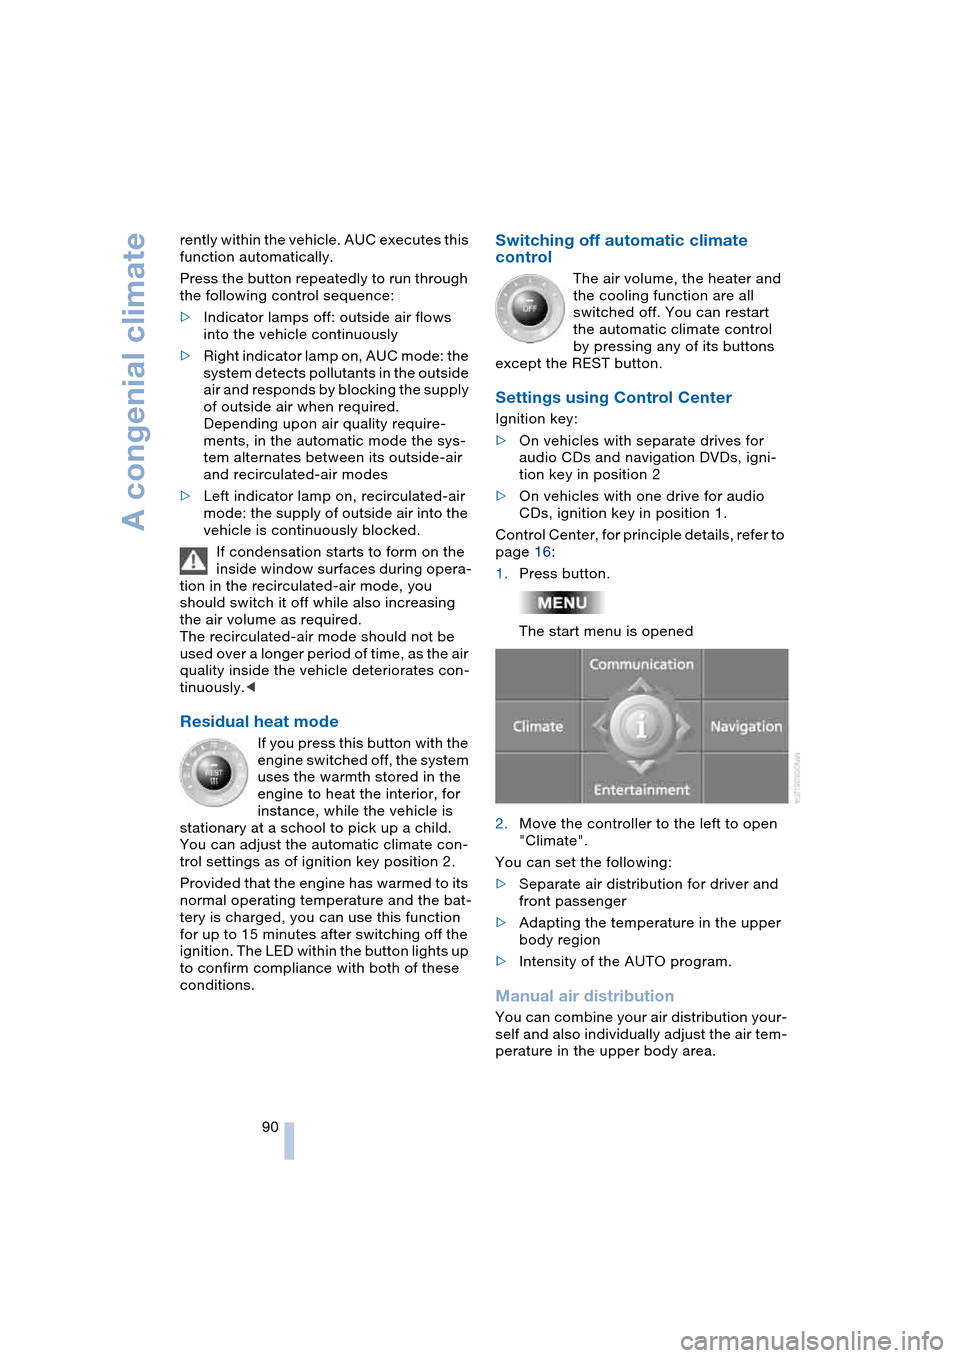
1.Press button.
The start menu is opened
2.Move the controller to the left to open
"Climate".
You can set the following:
>Separate air distribution for driver and
front passenger
>Adapting the temperature in the upper
body region
>Intensity of the AUTO program.
Manual air distribution
You can combine your air distribution your-
self and also individually adjust the air tem-
perature in the upper body area.
Page 96 of 216

Practical interior accessories
94
Practical interior accessories
Integrated universal remote
control*
The concept
The integrated universal remote control
replaces up to three different hand-held
transmitters for various items of radio-con-
trolled equipment such as door openers
and house alarm systems. The integrated
universal remote control registers and
stores signals from the original hand-held
transmitters.
The signal of an original hand-held trans-
mitter can be programmed on one of the
three memory buttons 1. Then the respec-
tive device can be actuated with the mem-
ory button 1 programmed for its use with
the ignition key in position 2. The indicator
lamp 2 flashes to confirm transmission of
the signal.
If you sell your vehicle one day, delete the
saved programs beforehand for your own
security, refer to page 95.
To prevent possible damage or injury,
before programming or using the inte-
grated universal remote control, always
inspect the immediate area to make certain
that no people, animals or objects are
within the travel range of the device. Also,
comply with the safety precautions of the
original hand-held transmitter.<
Checking compatibility
If you see this symbol on the pack-
aging or in the manual supplied with
the original hand-held transmitter, it
is safe to assume that it is compatible with
the integrated universal remote control.
If you have additional questions, please
consult your BMW Sports Activity Vehicle
Center or call 1-800-355-3515.
You can also visit these websites:
www.bmwusa.com or
www.homelink.com. HomeLink is a registered trademark owned
by Johnson Controls, Inc.
Programming
1Memory buttons
2Indicator lamp
Fixed-code hand-held transmitters
1.Ignition key in position 2
2.When using for the first time: press both
outer buttons 1 for approx. 20 seconds,
maintaining pressure until the indicator
lamp 2 starts to flash. The three mem-
ory buttons 1 are cleared
3.Hold the original hand-held transmitter
at a distance of approx. 2 in/5 cm to
8 in/20 cm to the memory buttons 1
The required distance between
the hand-held transmitter and the
memory buttons 1 depends on the rele-
vant system of the original hand-held
transmitter used.<
4.Simultaneously press the transmit but-
ton on the original hand-held transmit-
ter and the desired memory button 1 on
the integrated universal remote control.
Initially, the indicator lamp 2 flashes
slowly. Release both buttons as soon
as the indicator lamp 2 flashes rapidly.
If the indicator lamp 2 does not flash
rapidly after approx. 15 seconds,
change the distance
5.To program other original hand-held
transmitters, repeat steps 3 and 4.
Page 97 of 216

Controls
95Reference
At a glance
Driving tips
Communications
Navigation
Entertainment
Mobility
The corresponding memory button 1 is
now programmed with the signal of the
original hand-held transmitter.
The equipment can be used in ignition key
position 2.
If the device cannot be operated after
repeated programming, check
whether the original hand-held transmitter
uses an alternating-code system. Here,
either read the instructions for the original
hand-held transmitter or hold down the
programmed memory button 1 of the inte-
grated universal remote control. If the indi-
cator lamp 2 on the integrated universal
remote control flashes rapidly for a short
time then lights up for approx. 2 seconds,
this indicates that the original hand-held
transmitter uses an alternating-code sys-
tem. In the case of an alternating-code sys-
tem, program the memory buttons 1 as
described at Alternating-code hand-held
transmitters.<
Alternating-code hand-held
transmitters
To program the integrated universal remote
control, consult the Operating Instructions
for the equipment to be set. You will find
information there on the possibilities for
synchronization.
When programming hand-held transmitters
that employ an alternating code, please
observe the following supplementary
instructions:
Programming will be easier with the
aid of a second person.<
1.Park your vehicle within the range of the
remote-controlled equipment
2.Program the integrated universal
remote control as described above at
Fixed-code hand-held transmitters
3.Locate the button at the receiver of the
equipment to be set, e.g. on the drive
4.Press the button on the receiver of the
equipment to be set. After step 4, you
have approx. 30 seconds for step 55.Press the programmed memory
button 1 of the integrated universal
remote control three times.
The corresponding memory button 1 is
now programmed with the signal of the
original hand-held transmitter.
If you have any additional questions,
please contact your BMW center.<
Clearing memory buttons
Press both outer buttons 1 of the inte-
grated universal remote control for approx.
20 seconds, maintaining pressure until the
indicator lamp 2 starts to flash. All three
memory buttons are cleared.
The memory of individual memory but-
tons 1 cannot be cleared.
Glove compartment
Opening
Press button. The glove compartment
opens automatically and the lamps come
on.
Closing
Fold the cover up.
To prevent injury in the event of an
accident while the vehicle is being
driven, close the glove compartment
immediately after use.<
Rechargeable flashlight*
The flashlight is located on the left side of
the glove compartment.
The flashlight can remain there continu-
ously.
Page 128 of 216
On/off and tone
126
On/off and tone
The following equipment has shared con-
trols and setting options:
>Radio Business
>CD player
>CD changer
*.
Controls
The audio sources can be operated using:
>Buttons on the CD player
>Control Center
>Buttons on the steering wheel, refer to
page 11.
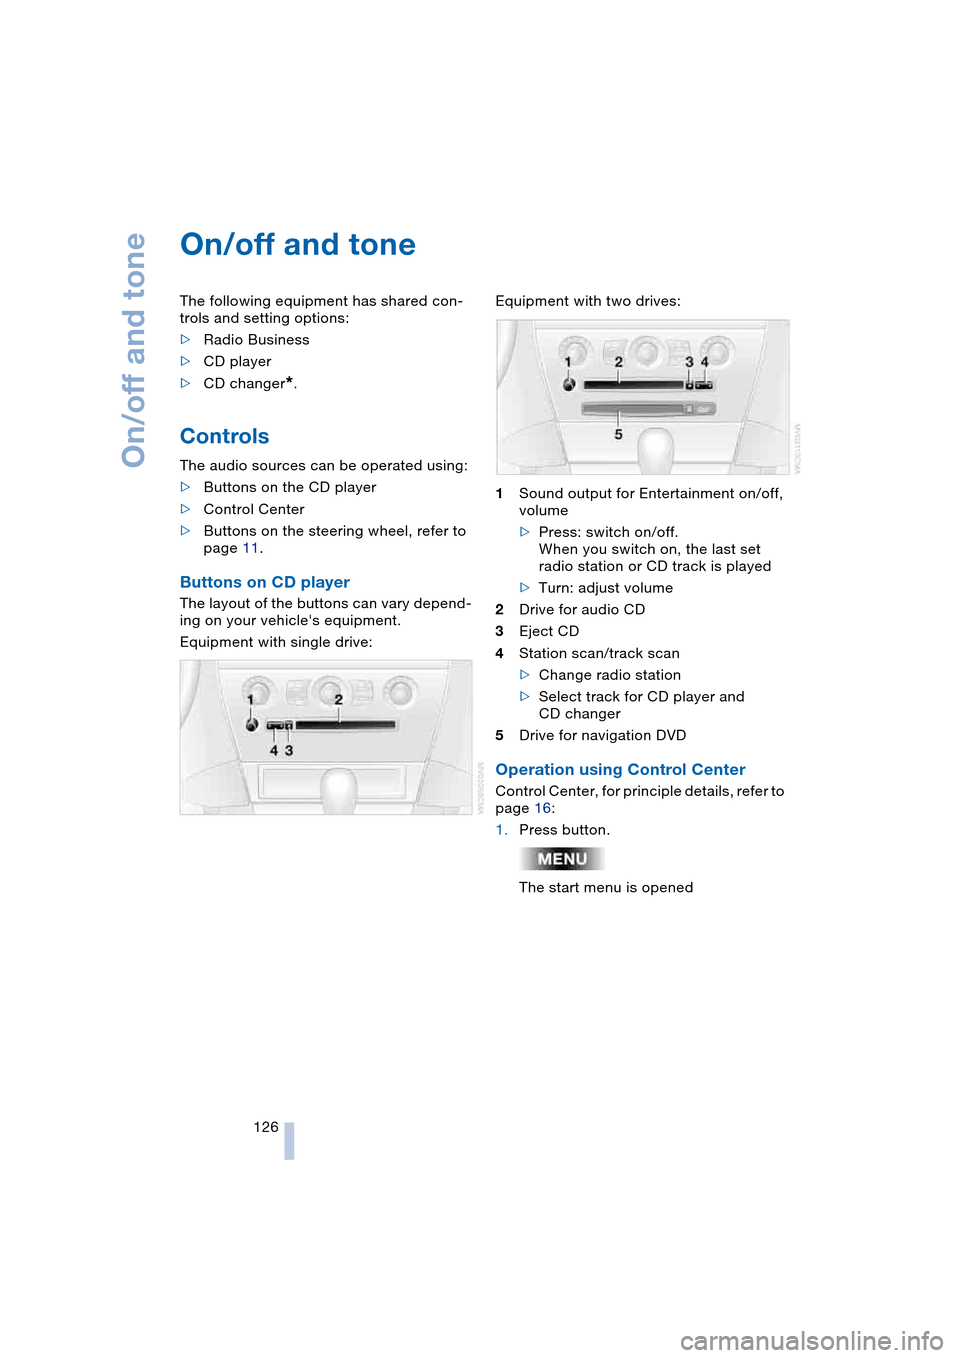
Buttons on CD player
The layout of the buttons can vary depend-
ing on your vehicle's equipment.
Equipment with single drive:Equipment with two drives:
1Sound output for Entertainment on/off,
volume
>Press: switch on/off.
When you switch on, the last set
radio station or CD track is played
>Turn: adjust volume
2Drive for audio CD
3Eject CD
4Station scan/track scan
>Change radio station
>Select track for CD player and
CD changer
5Drive for navigation DVD
Operation using Control Center
Control Center, for principle details, refer to
page 16:
1.Press button.
The start menu is opened
Page 133 of 216
Navigation
Entertainment
Driving tips
131Reference
At a glance
Controls
Communications
Mobility
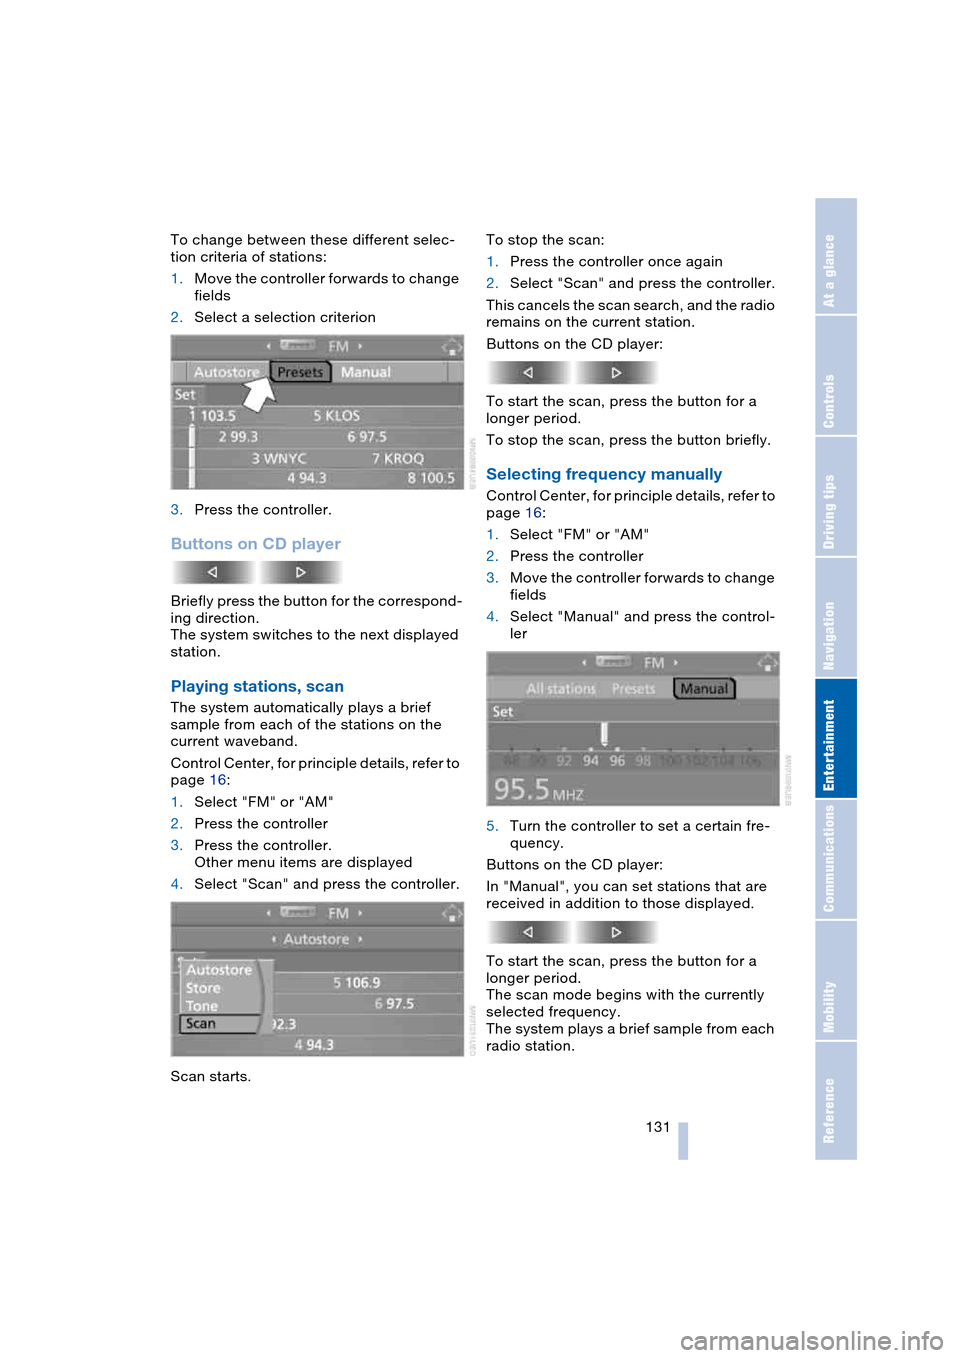
To change between these different selec-
tion criteria of stations:
1.Move the controller forwards to change
fields
2.Select a selection criterion
3.Press the controller.
Buttons on CD player
Briefly press the button for the correspond-
ing direction.
The system switches to the next displayed
station.
Playing stations, scan
The system automatically plays a brief
sample from each of the stations on the
current waveband.
Control Center, for principle details, refer to
page 16:
1.Select "FM" or "AM"
2.Press the controller
3.Press the controller.
Other menu items are displayed
4.Select "Scan" and press the controller.
Scan starts.To stop the scan:
1.Press the controller once again
2.Select "Scan" and press the controller.
This cancels the scan search, and the radio
remains on the current station.
Buttons on the CD player:
To start the scan, press the button for a
longer period.
To stop the scan, press the button briefly.
Selecting frequency manually
Control Center, for principle details, refer to
page 16:
1.Select "FM" or "AM"
2.Press the controller
3.Move the controller forwards to change
fields
4.Select "Manual" and press the control-
ler
5.Turn the controller to set a certain fre-
quency.
Buttons on the CD player:
In "Manual", you can set stations that are
received in addition to those displayed.
To start the scan, press the button for a
longer period.
The scan mode begins with the currently
selected frequency.
The system plays a brief sample from each
radio station.
Page 138 of 216
Radio
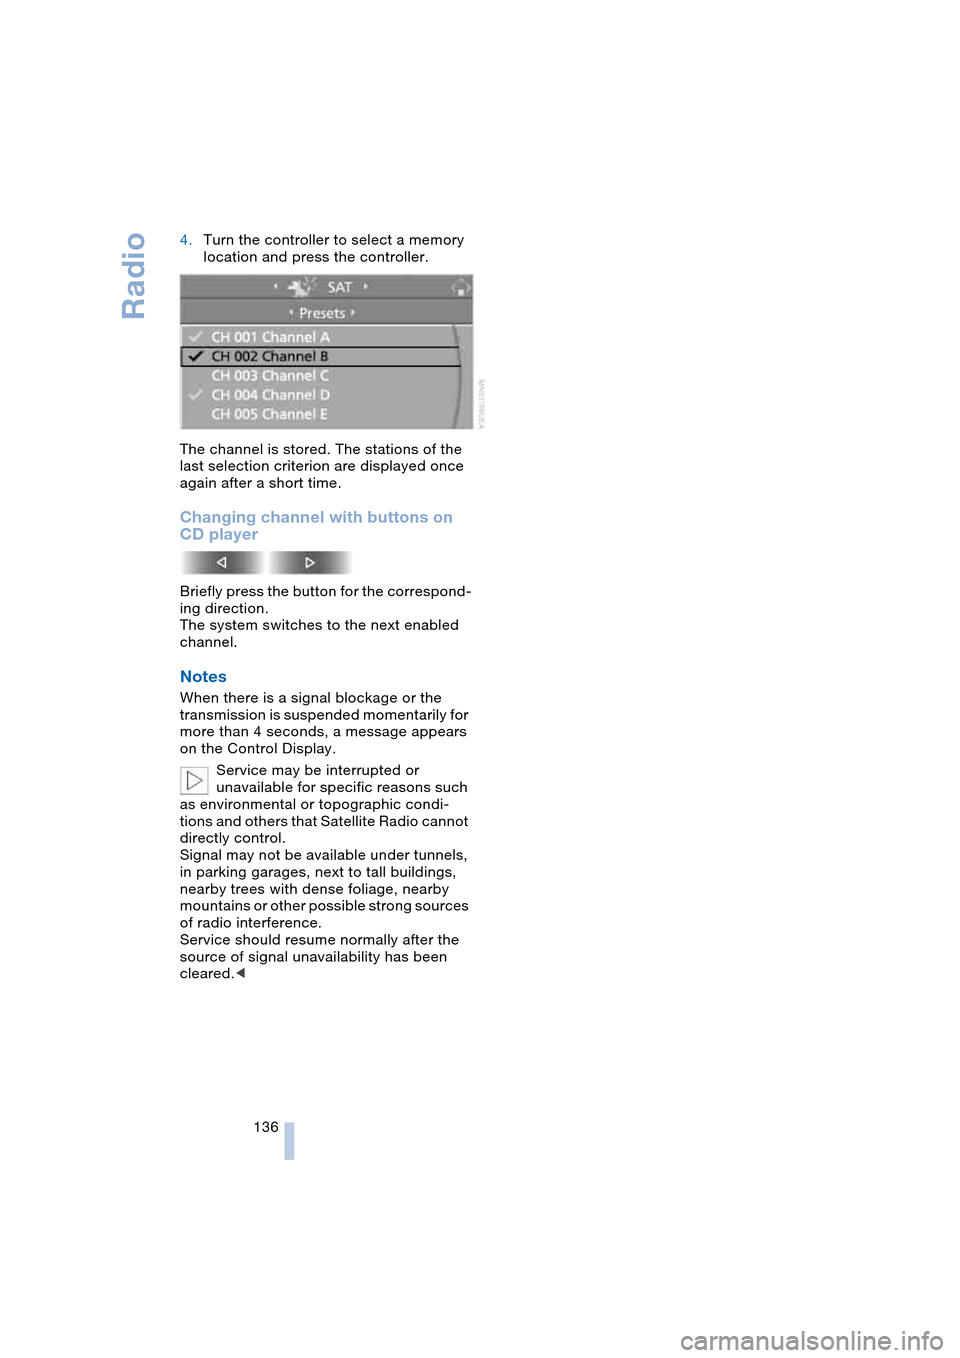
136 4.Turn the controller to select a memory
location and press the controller.
The channel is stored. The stations of the
last selection criterion are displayed once
again after a short time.
Changing channel with buttons on
CD player
Briefly press the button for the correspond-
ing direction.
The system switches to the next enabled
channel.
Notes
When there is a signal blockage or the
transmission is suspended momentarily for
more than 4 seconds, a message appears
on the Control Display.
Service may be interrupted or
unavailable for specific reasons such
as environmental or topographic condi-
tions and others that Satellite Radio cannot
directly control.
Signal may not be available under tunnels,
in parking garages, next to tall buildings,
nearby trees with dense foliage, nearby
mountains or other possible strong sources
of radio interference.
Service should resume normally after the
source of signal unavailability has been
cleared.<