2004 BMW 545I SEDAN reset
[x] Cancel search: resetPage 14 of 220
Cockpit
12
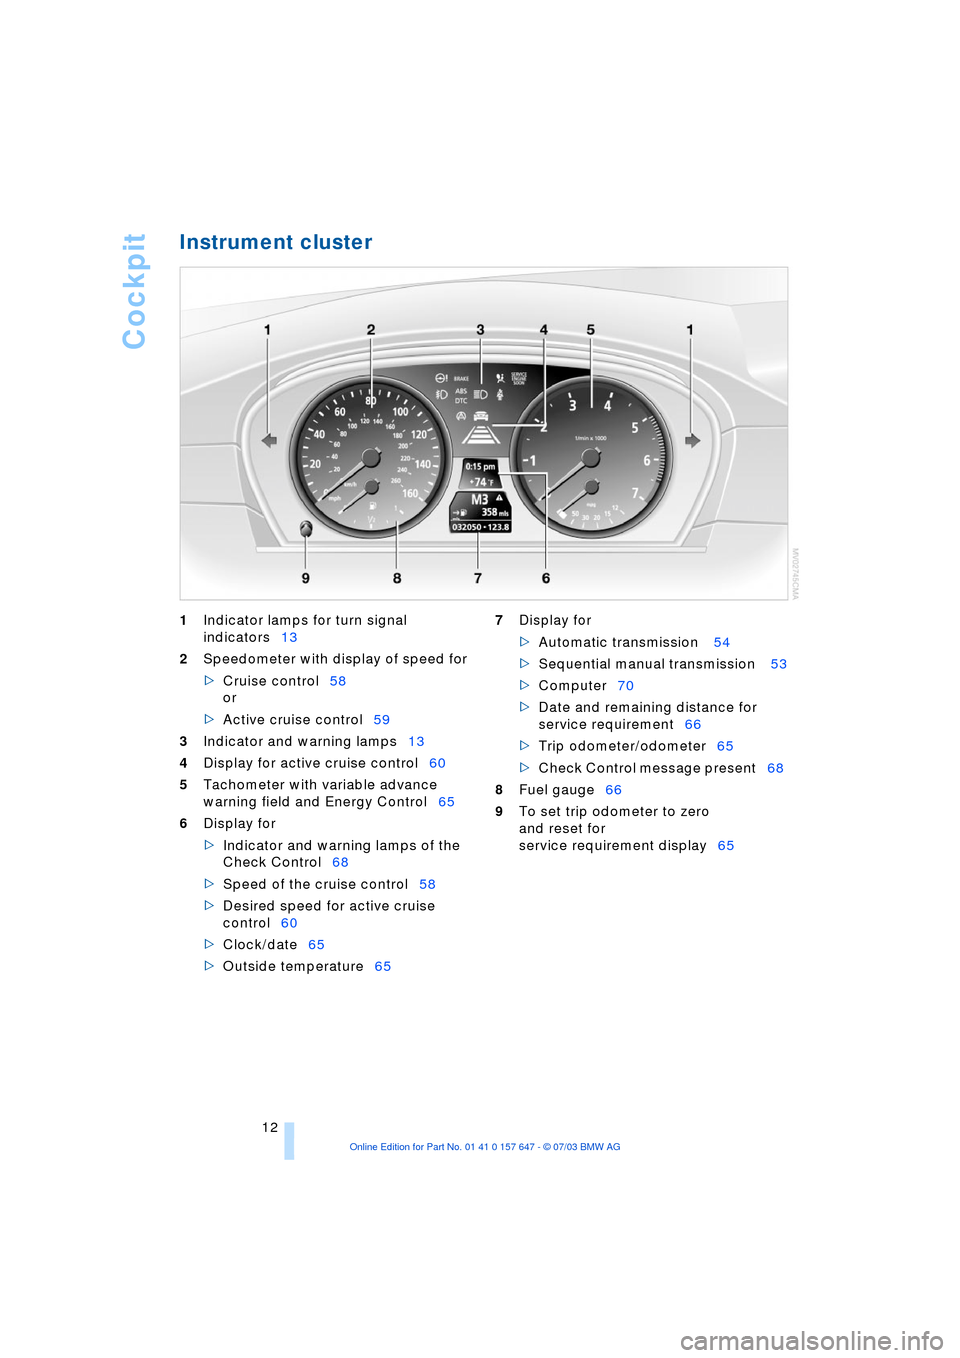
Instrument cluster
1Indicator lamps for turn signal
indicators13
2Speedometer with display of speed for
>Cruise control58
or
>Active cruise control59
3Indicator and warning lamps13
4Display for active cruise control60
5Tachometer with variable advance
warning field and Energy Control65
6Display for
>Indicator and warning lamps of the
Check Control68
>Speed of the cruise control58
>Desired speed for active cruise
control60
>Clock/date65
>Outside temperature65 7Display for
>Automatic transmission 54
>Sequential manual transmission 53
>Computer70
>Date and remaining distance for
service requirement66
>Trip odometer/odometer65
>Check Control message present68
8Fuel gauge66
9To set trip odometer to zero
and reset for
service requirement display65
Page 72 of 220
Everything under control
70
Computer
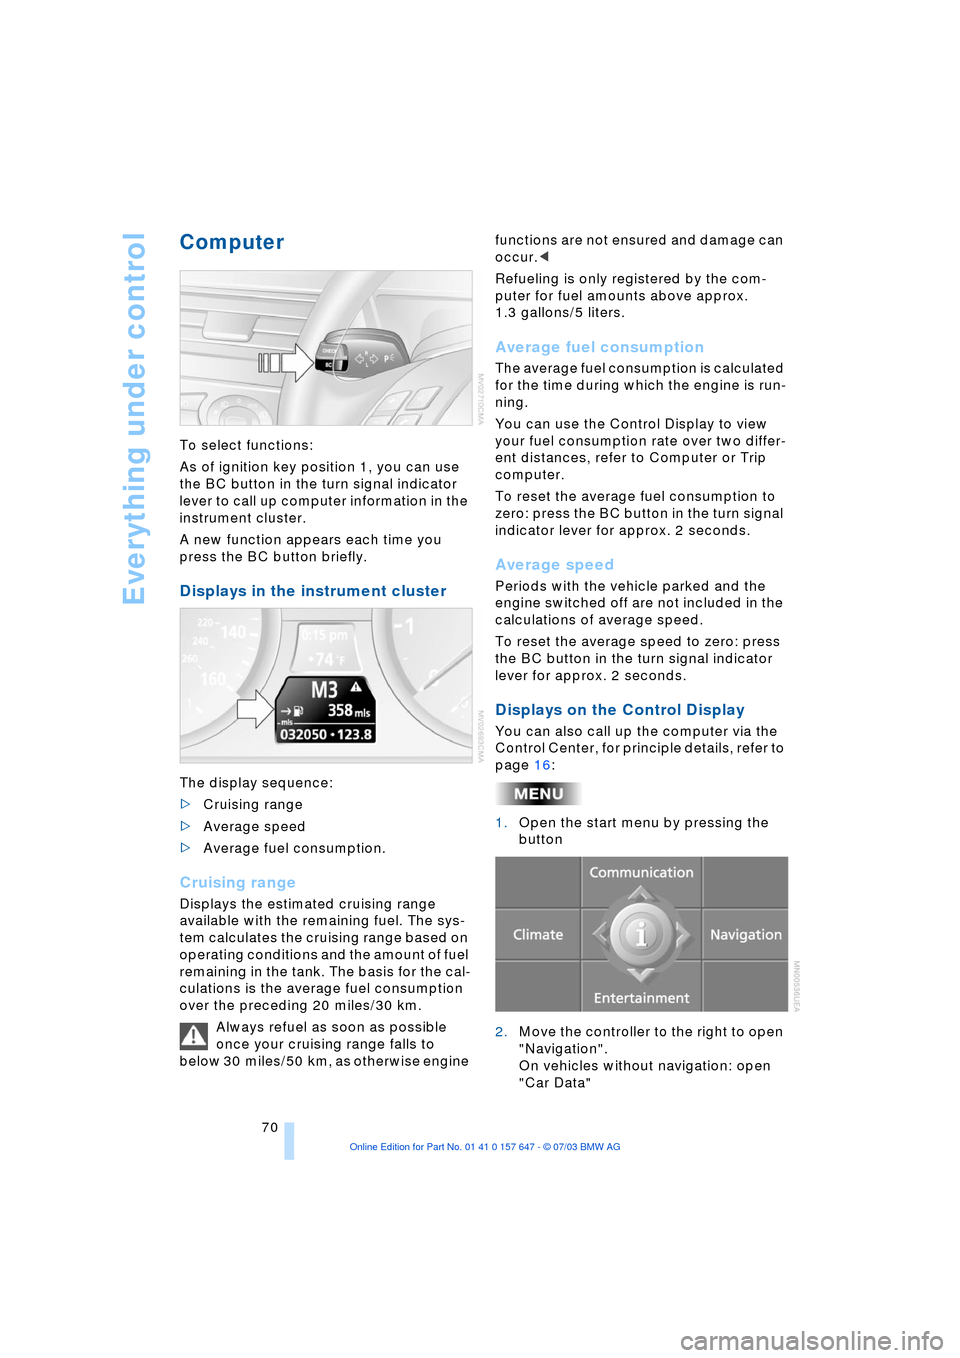
To select functions:
As of ignition key position 1, you can use
the BC button in the turn signal indicator
lever to call up computer information in the
instrument cluster.
A new function appears each time you
press the BC button briefly.
Displays in the instrument cluster
The display sequence:
>Cruising range
>Average speed
>Average fuel consumption.
Cruising range
Displays the estimated cruising range
available with the remaining fuel. The sys-
tem calculates the cruising range based on
operating conditions and the amount of fuel
remaining in the tank. The basis for the cal-
culations is the average fuel consumption
over the preceding 20 miles/30 km.
Always refuel as soon as possible
once your cruising range falls to
below 30 miles/50 km, as otherwise engine functions are not ensured and damage can
occur.<
Refueling is only registered by the com-
puter for fuel amounts above approx.
1.3 gallons/5 liters.
Average fuel consumption
The average fuel consumption is calculated
for the time during which the engine is run-
ning.
You can use the Control Display to view
your fuel consumption rate over two differ-
ent distances, refer to Computer or Trip
computer.
To reset the average fuel consumption to
zero: press the BC button in the turn signal
indicator lever for approx. 2 seconds.
Average speed
Periods with the vehicle parked and the
engine switched off are not included in the
calculations of average speed.
To reset the average speed to zero: press
the BC button in the turn signal indicator
lever for approx. 2 seconds.
Displays on the Control Display
You can also call up the computer via the
Control Center, for principle details, refer to
page 16:
1.Open the start menu by pressing the
button
2.Move the controller to the right to open
"Navigation".
On vehicles without navigation: open
"Car Data"
Page 73 of 220
Controls
71Reference
At a glance
Driving tips
Communications
Navigation
Entertainment
Mobility
3.Select "Car Data" and press the con-
troller.
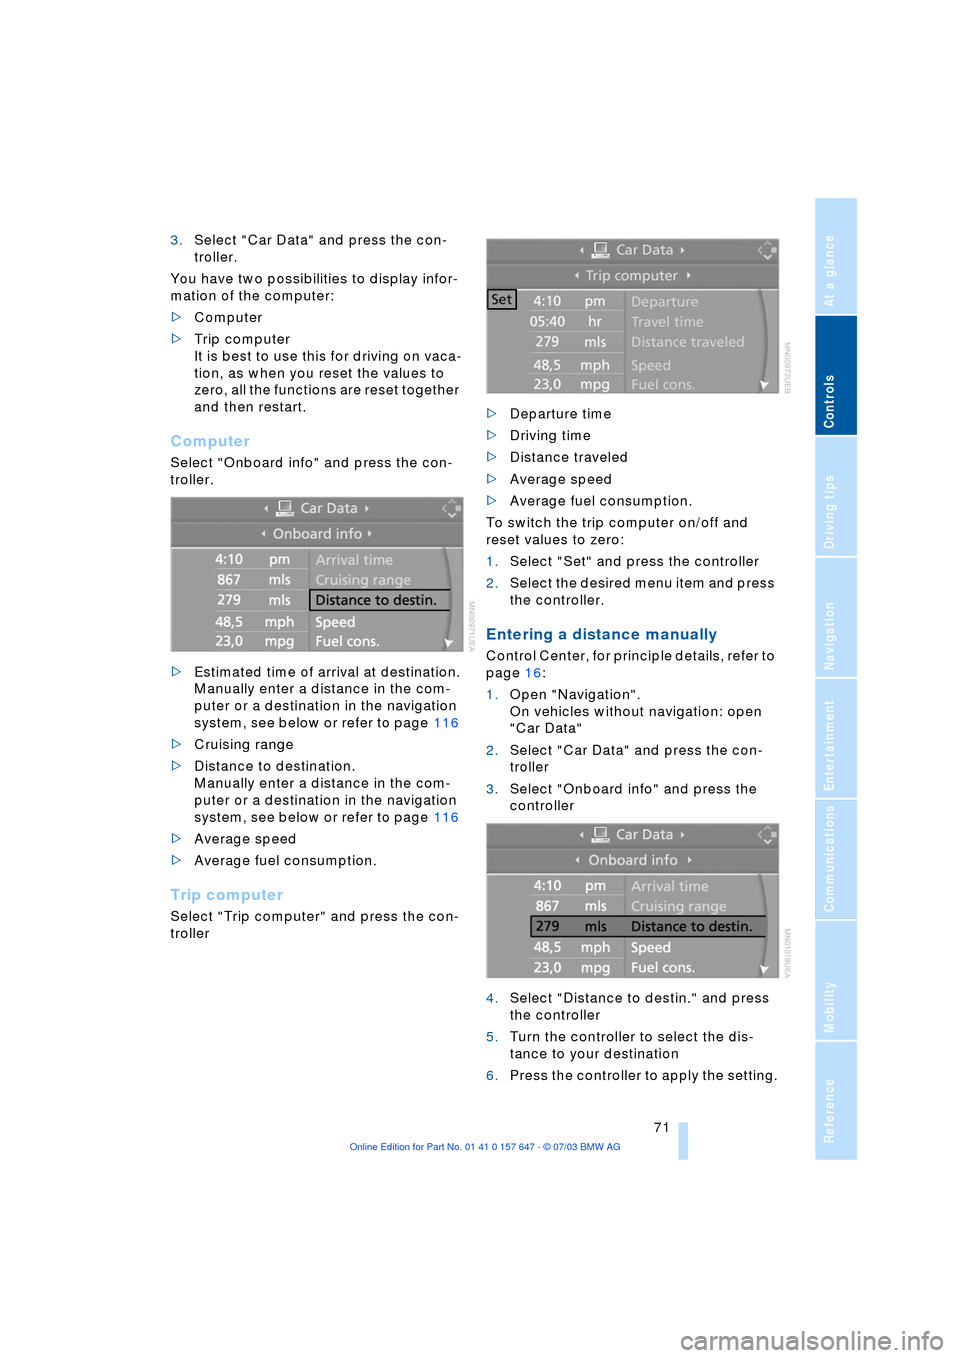
You have two possibilities to display infor-
mation of the computer:
>Computer
>Trip computer
It is best to use this for driving on vaca-
tion, as when you reset the values to
zero, all the functions are reset together
and then restart.
Computer
Select "Onboard info" and press the con-
troller.
>Estimated time of arrival at destination.
Manually enter a distance in the com-
puter or a destination in the navigation
system, see below or refer to page 116
>Cruising range
>Distance to destination.
Manually enter a distance in the com-
puter or a destination in the navigation
system, see below or refer to page 116
>Average speed
>Average fuel consumption.
Trip computer
Select "Trip computer" and press the con-
troller>Departure time
>Driving time
>Distance traveled
>Average speed
>Average fuel consumption.
To switch the trip computer on/off and
reset values to zero:
1.Select "Set" and press the controller
2.Select the desired menu item and press
the controller.
Entering a distance manually
Control Center, for principle details, refer to
page 16:
1.Open "Navigation".
On vehicles without navigation: open
"Car Data"
2.Select "Car Data" and press the con-
troller
3.Select "Onboard info" and press the
controller
4.Select "Distance to destin." and press
the controller
5.Turn the controller to select the dis-
tance to your destination
6.Press the controller to apply the setting.
Page 75 of 220
Controls
73Reference
At a glance
Driving tips
Communications
Navigation
Entertainment
Mobility
3.Select "Limit" and press the controller
4.Select "Select current speed" and
press the controller. The system adopts
your current speed as the limit.
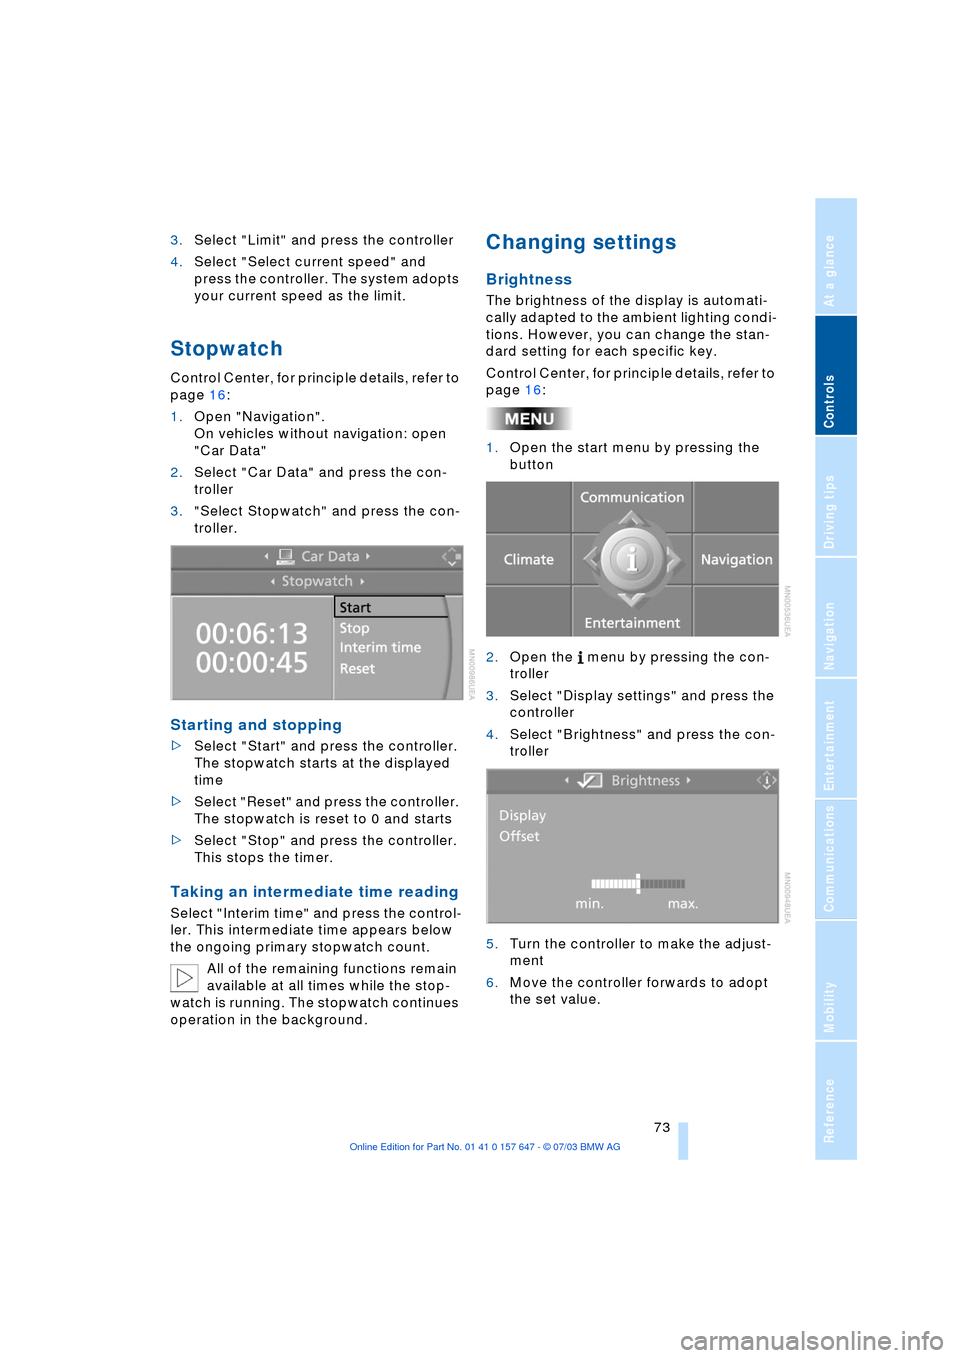
Stopwatch
Control Center, for principle details, refer to
page 16:
1.Open "Navigation".
On vehicles without navigation: open
"Car Data"
2.Select "Car Data" and press the con-
troller
3."Select Stopwatch" and press the con-
troller.
Starting and stopping
>Select "Start" and press the controller.
The stopwatch starts at the displayed
time
>Select "Reset" and press the controller.
The stopwatch is reset to 0 and starts
>Select "Stop" and press the controller.
This stops the timer.
Taking an intermediate time reading
Select "Interim time" and press the control-
ler. This intermediate time appears below
the ongoing primary stopwatch count.
All of the remaining functions remain
available at all times while the stop-
watch is running. The stopwatch continues
operation in the background.
Changing settings
Brightness
The brightness of the display is automati-
cally adapted to the ambient lighting condi-
tions. However, you can change the stan-
dard setting for each specific key.
Control Center, for principle details, refer to
page 16:
1.Open the start menu by pressing the
button
2.Open the menu by pressing the con-
troller
3.Select "Display settings" and press the
controller
4.Select "Brightness" and press the con-
troller
5.Turn the controller to make the adjust-
ment
6.Move the controller forwards to adopt
the set value.
Page 133 of 220
Navigation
Entertainment
Driving tips
131Reference
At a glance
Controls
Communications
Mobility
Operating temperatures
The system is configured for operat-
ing temperatures of 57/Ð156 to
1407/+606. Outside this temperature
range, malfunctions can occur.<
Care instructions
You can find everything you need to know
on this topic by consulting the separate
Caring for your vehicle brochure.
Switching on/off
Press button 1, refer to page 130.
Adjusting the volume
Adjusting the volume for audio
sources
The setting is made in dependence on a
specific key.
Turn button 1 until the desired volume has
been reached.
Tone control
You can change the following tone settings
in dependence on a specific key:
>Treble
>Bass
>Balance:
Right/left volume balance
>Fader:
Front/rear volume balance
>Speed volume:
Raises the volume with increasing
speed
>LOGIC7 spatial sound
*:
Improvement in spatial acoustics in all
frequency ranges
>Equalizer
*:
Setting individual frequency ranges to
include spatial acoustics>Reset:
Resets the tone settings to their stan-
dard default settings.
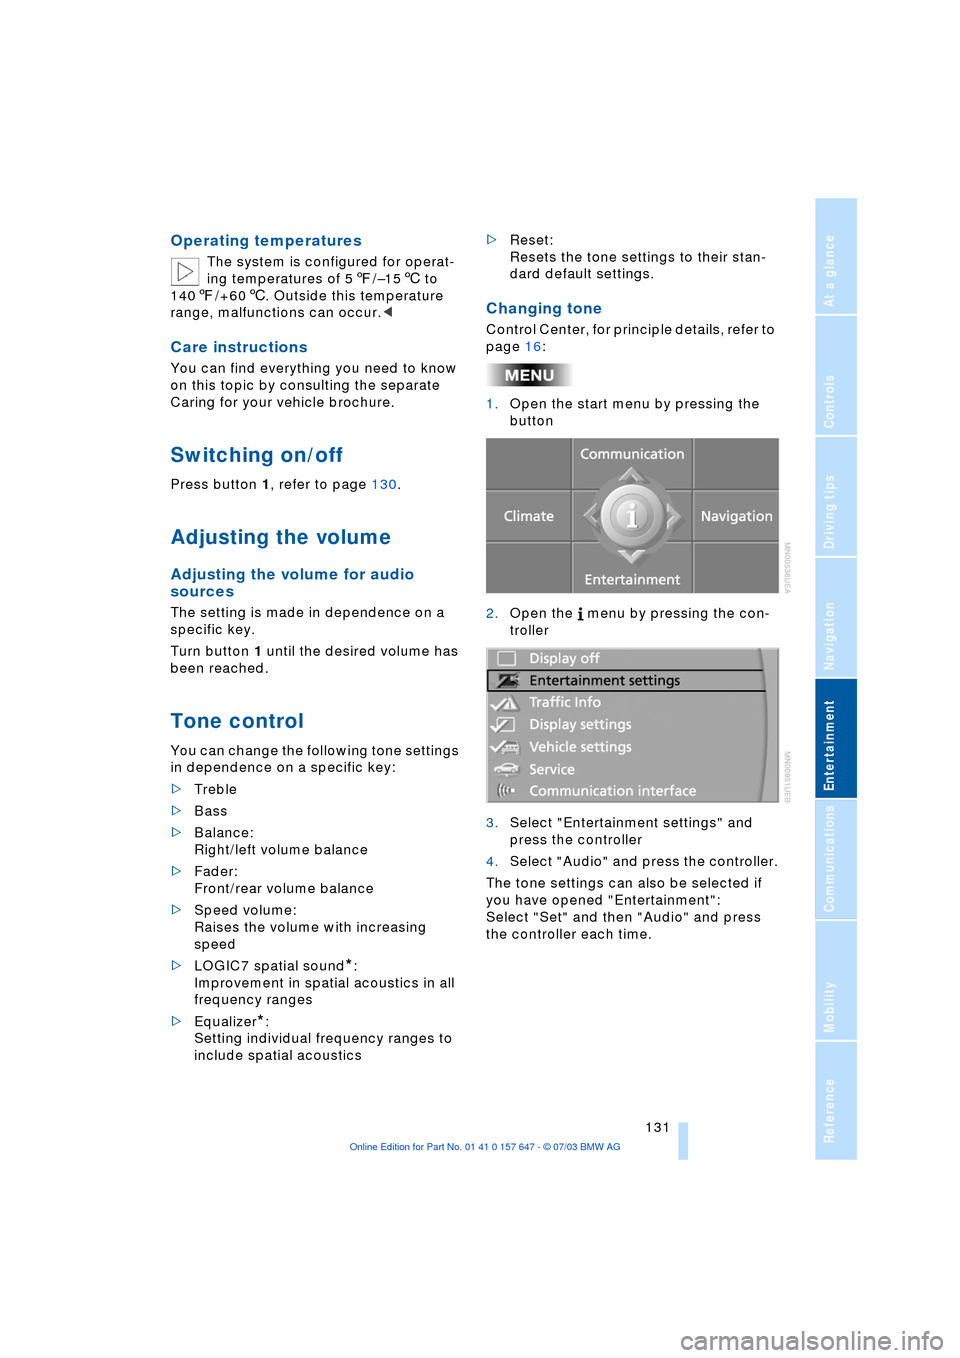
Changing tone
Control Center, for principle details, refer to
page 16:
1.Open the start menu by pressing the
button
2.Open the menu by pressing the con-
troller
3.Select "Entertainment settings" and
press the controller
4.Select "Audio" and press the controller.
The tone settings can also be selected if
you have opened "Entertainment":
Select "Set" and then "Audio" and press
the controller each time.
Page 135 of 220
Navigation
Entertainment
Driving tips
133Reference
At a glance
Controls
Communications
Mobility
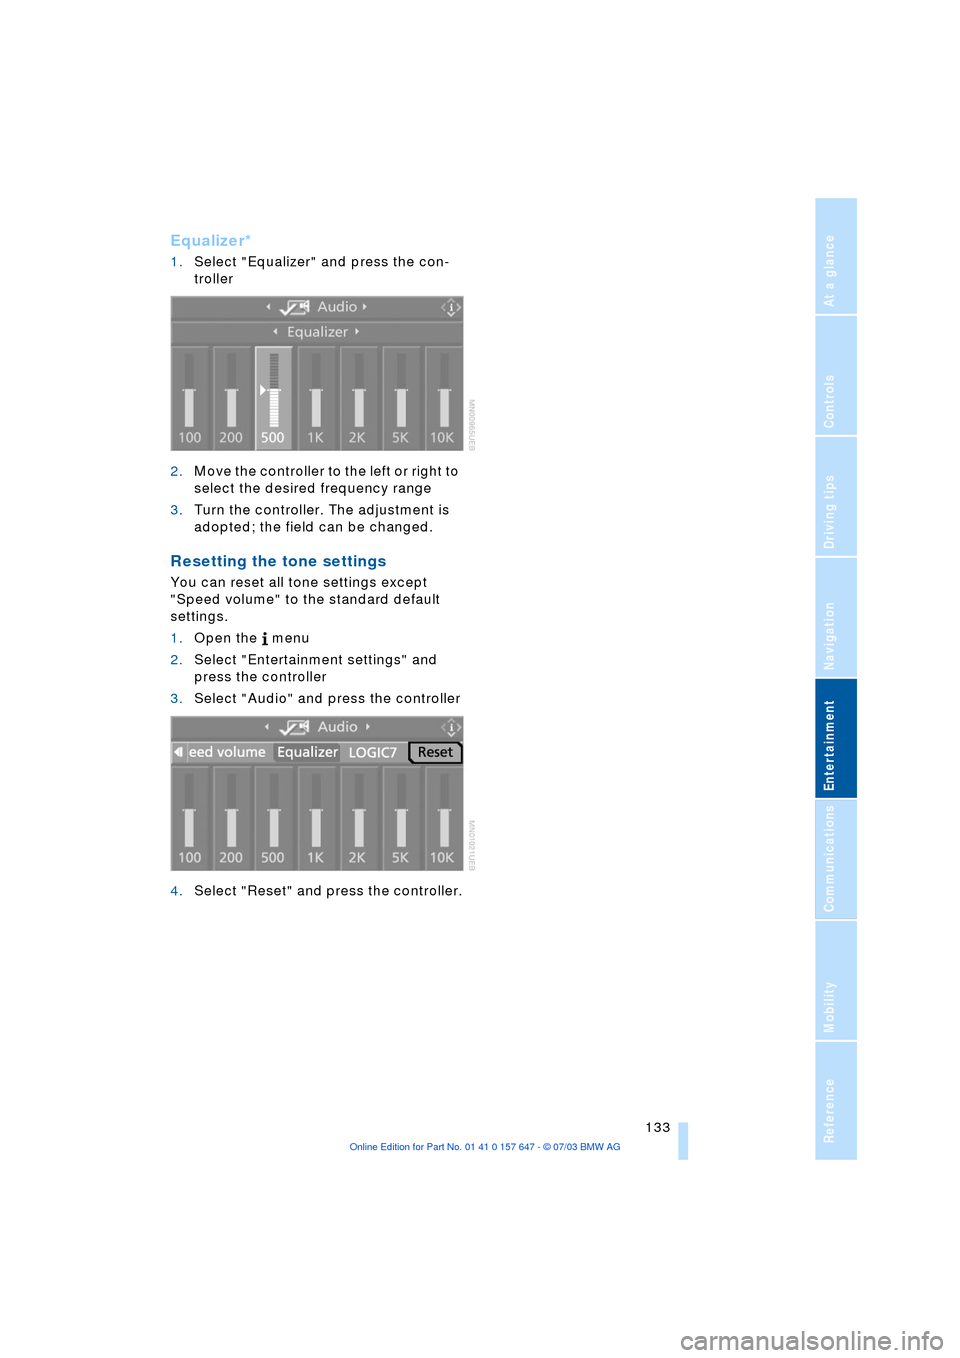
Equalizer*
1.Select "Equalizer" and press the con-
troller
2.Move the controller to the left or right to
select the desired frequency range
3.Turn the controller. The adjustment is
adopted; the field can be changed.
Resetting the tone settings
You can reset all tone settings except
"Speed volume" to the standard default
settings.
1.Open the menu
2.Select "Entertainment settings" and
press the controller
3.Select "Audio" and press the controller
4.Select "Reset" and press the controller.
Page 136 of 220
Radio
134
Radio
Your radio provides reception of the FM
and AM wavebands.
Listening to the radio
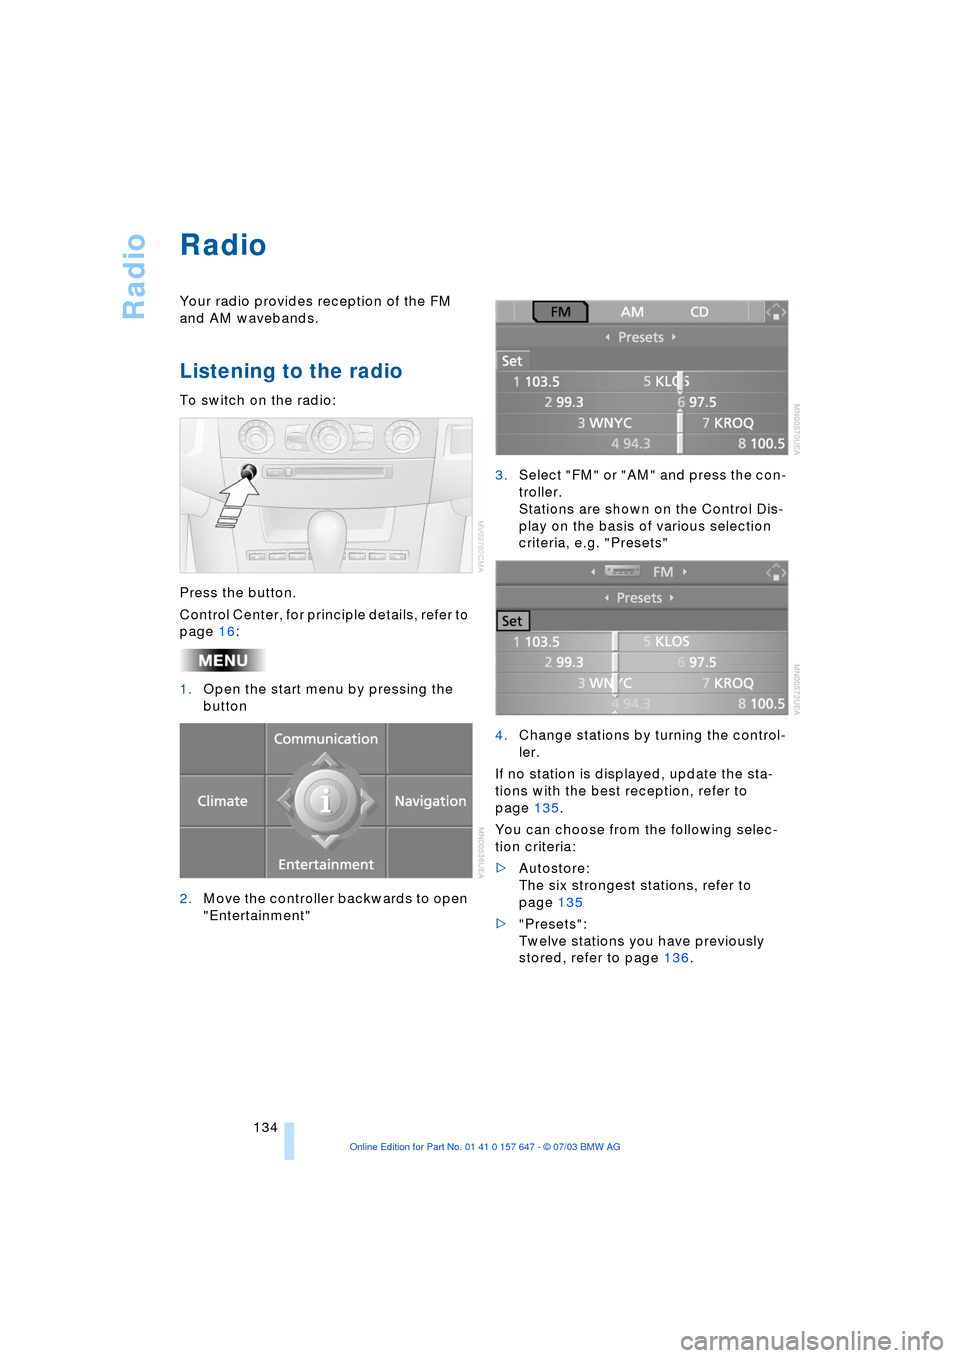
To switch on the radio:
Press the button.
Control Center, for principle details, refer to
page 16:
1.Open the start menu by pressing the
button
2.Move the controller backwards to open
"Entertainment"3.Select "FM" or "AM" and press the con-
troller.
Stations are shown on the Control Dis-
play on the basis of various selection
criteria, e.g. "Presets"
4.Change stations by turning the control-
ler.
If no station is displayed, update the sta-
tions with the best reception, refer to
page 135.
You can choose from the following selec-
tion criteria:
>Autostore:
The six strongest stations, refer to
page 135
>"Presets":
Twelve stations you have previously
stored, refer to page 136.
Page 138 of 220
Radio
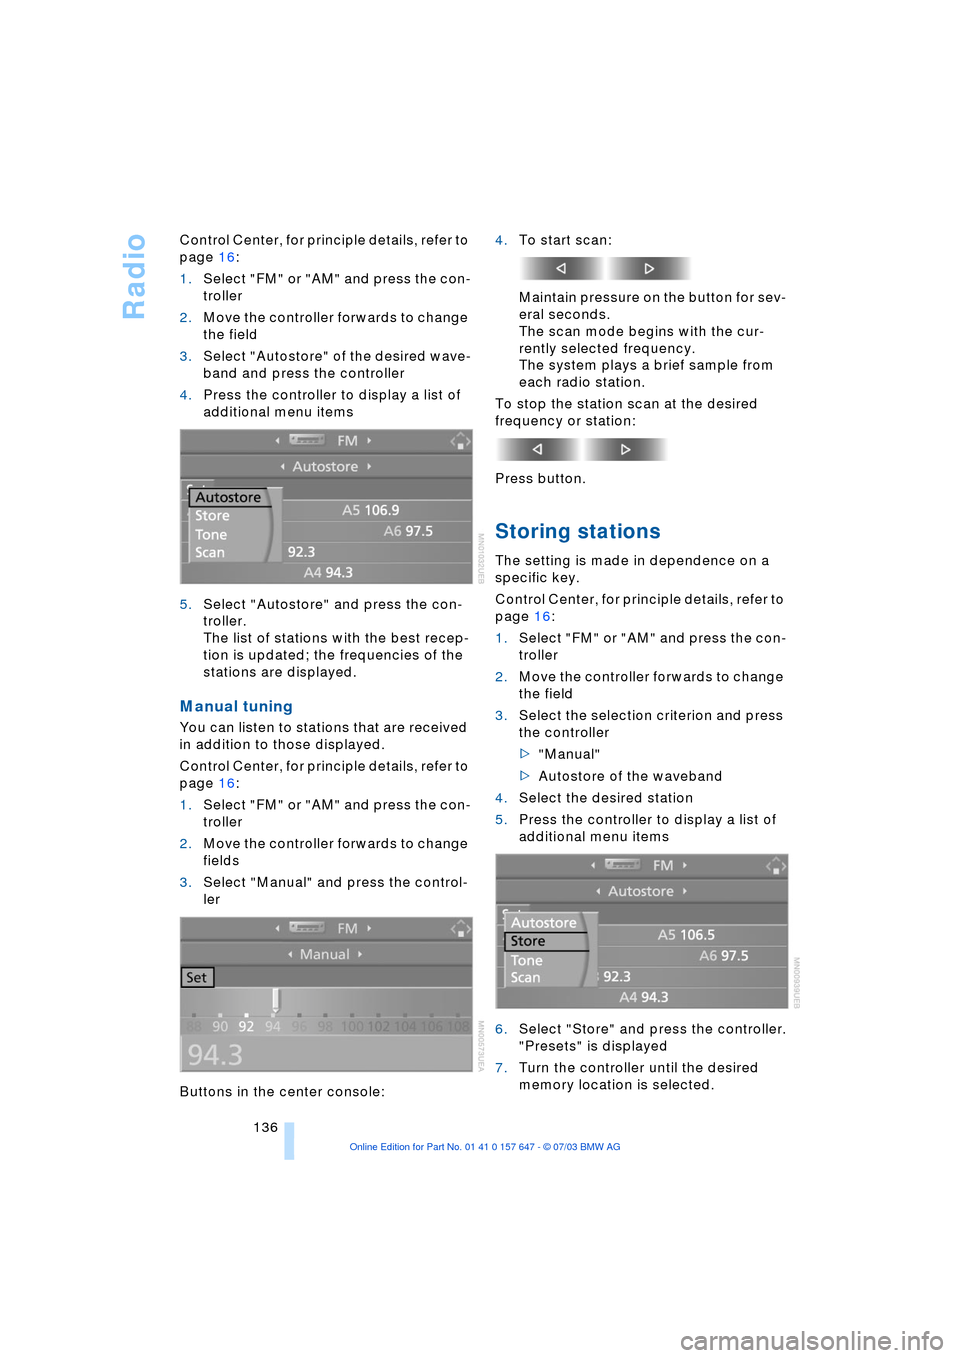
136 Control Center, for principle details, refer to
page 16:
1.Select "FM" or "AM" and press the con-
troller
2.Move the controller forwards to change
the field
3.Select "Autostore" of the desired wave-
band and press the controller
4.Press the controller to display a list of
additional menu items
5.Select "Autostore" and press the con-
troller.
The list of stations with the best recep-
tion is updated; the frequencies of the
stations are displayed.
Manual tuning
You can listen to stations that are received
in addition to those displayed.
Control Center, for principle details, refer to
page 16:
1.Select "FM" or "AM" and press the con-
troller
2.Move the controller forwards to change
fields
3.Select "Manual" and press the control-
ler
Buttons in the center console:4.To start scan:
Maintain pressure on the button for sev-
eral seconds.
The scan mode begins with the cur-
rently selected frequency.
The system plays a brief sample from
each radio station.
To stop the station scan at the desired
frequency or station:
Press button.
Storing stations
The setting is made in dependence on a
specific key.
Control Center, for principle details, refer to
page 16:
1.Select "FM" or "AM" and press the con-
troller
2.Move the controller forwards to change
the field
3.Select the selection criterion and press
the controller
>"Manual"
>Autostore of the waveband
4.Select the desired station
5.Press the controller to display a list of
additional menu items
6.Select "Store" and press the controller.
"Presets" is displayed
7.Turn the controller until the desired
memory location is selected.