2004 BMW 545I SEDAN engine compartment
[x] Cancel search: engine compartmentPage 35 of 220
Controls
33Reference
At a glance
Driving tips
Communications
Navigation
Entertainment
Mobility
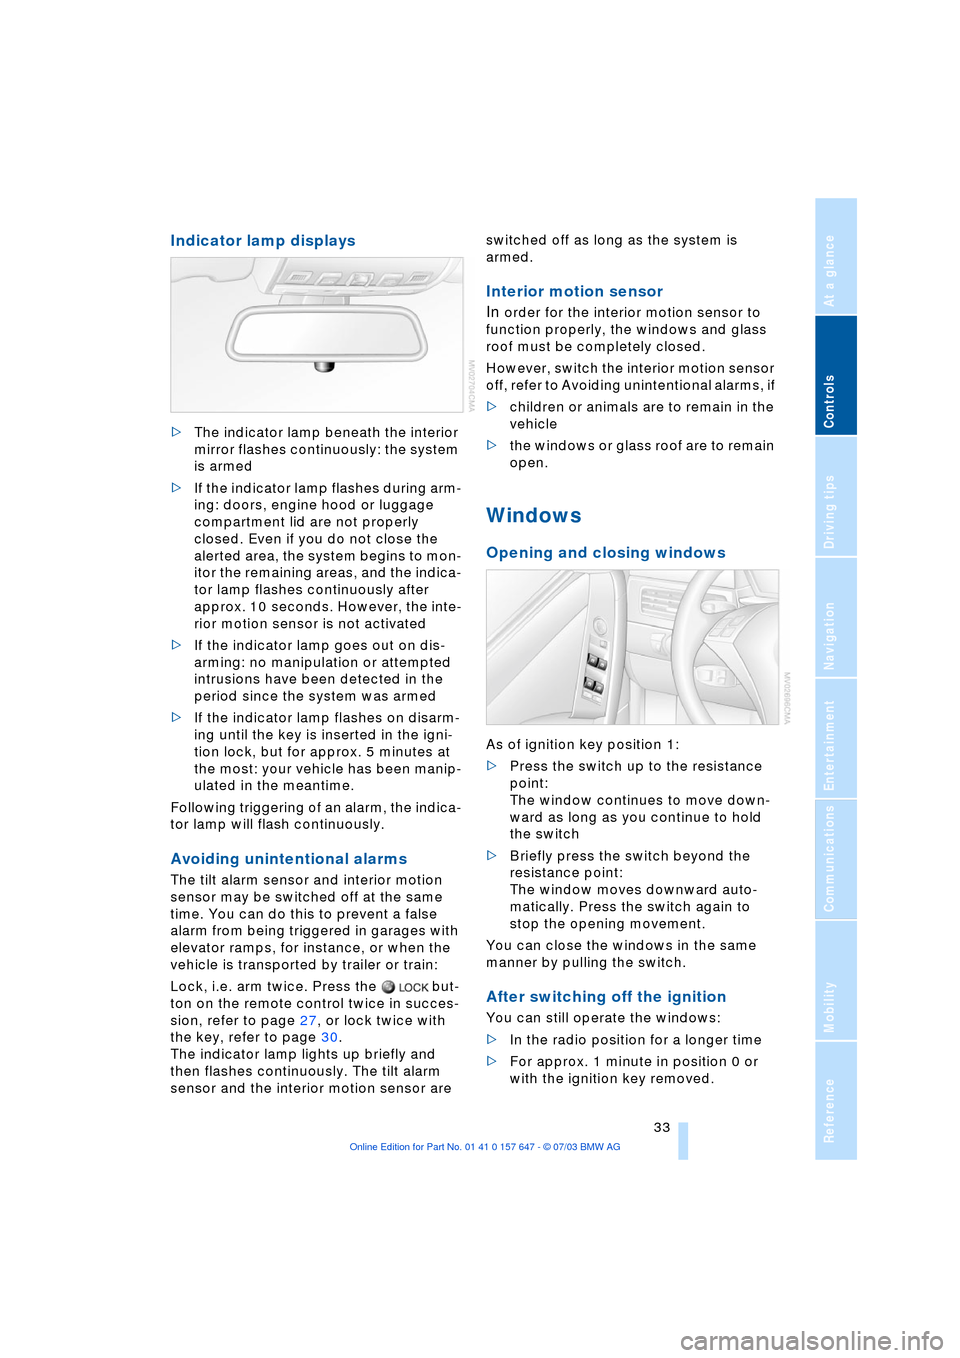
Indicator lamp displays
>The indicator lamp beneath the interior
mirror flashes continuously: the system
is armed
>If the indicator lamp flashes during arm-
ing: doors, engine hood or luggage
compartment lid are not properly
closed. Even if you do not close the
alerted area, the system begins to mon-
itor the remaining areas, and the indica-
tor lamp flashes continuously after
approx. 10 seconds. However, the inte-
rior motion sensor is not activated
>If the indicator lamp goes out on dis-
arming: no manipulation or attempted
intrusions have been detected in the
period since the system was armed
>If the indicator lamp flashes on disarm-
ing until the key is inserted in the igni-
tion lock, but for approx. 5 minutes at
the most: your vehicle has been manip-
ulated in the meantime.
Following triggering of an alarm, the indica-
tor lamp will flash continuously.
Avoiding unintentional alarms
The tilt alarm sensor and interior motion
sensor may be switched off at the same
time. You can do this to prevent a false
alarm from being triggered in garages with
elevator ramps, for instance, or when the
vehicle is transported by trailer or train:
Lock, i.e. arm twice. Press the but-
ton on the remote control twice in succes-
sion, refer to page 27, or lock twice with
the key, refer to page 30.
The indicator lamp lights up briefly and
then flashes continuously. The tilt alarm
sensor and the interior motion sensor are switched off as long as the system is
armed.
Interior motion sensor
In
order for the interior motion sensor to
function properly, the windows and glass
roof must be completely closed.
However, switch the interior motion sensor
off, refer to Avoiding unintentional alarms, if
>children or animals are to remain in the
vehicle
>the windows or glass roof are to remain
open.
Windows
Opening and closing windows
As of ignition key position 1:
>Press the switch up to the resistance
point:
The window continues to move down-
ward as long as you continue to hold
the switch
>Briefly press the switch beyond the
resistance point:
The window moves downward auto-
matically. Press the switch again to
stop the opening movement.
You can close the windows in the same
manner by pulling the switch.
After switching off the ignition
You can still operate the windows:
>In the radio position for a longer time
>For approx. 1 minute in position 0 or
with the ignition key removed.
Page 170 of 220
Refueling
168
Refueling
Fuel filler door
Always switch off the engine before
refueling. If you do not, fuel cannot be
filled into the tank and a message on the
Control Display will appear.<
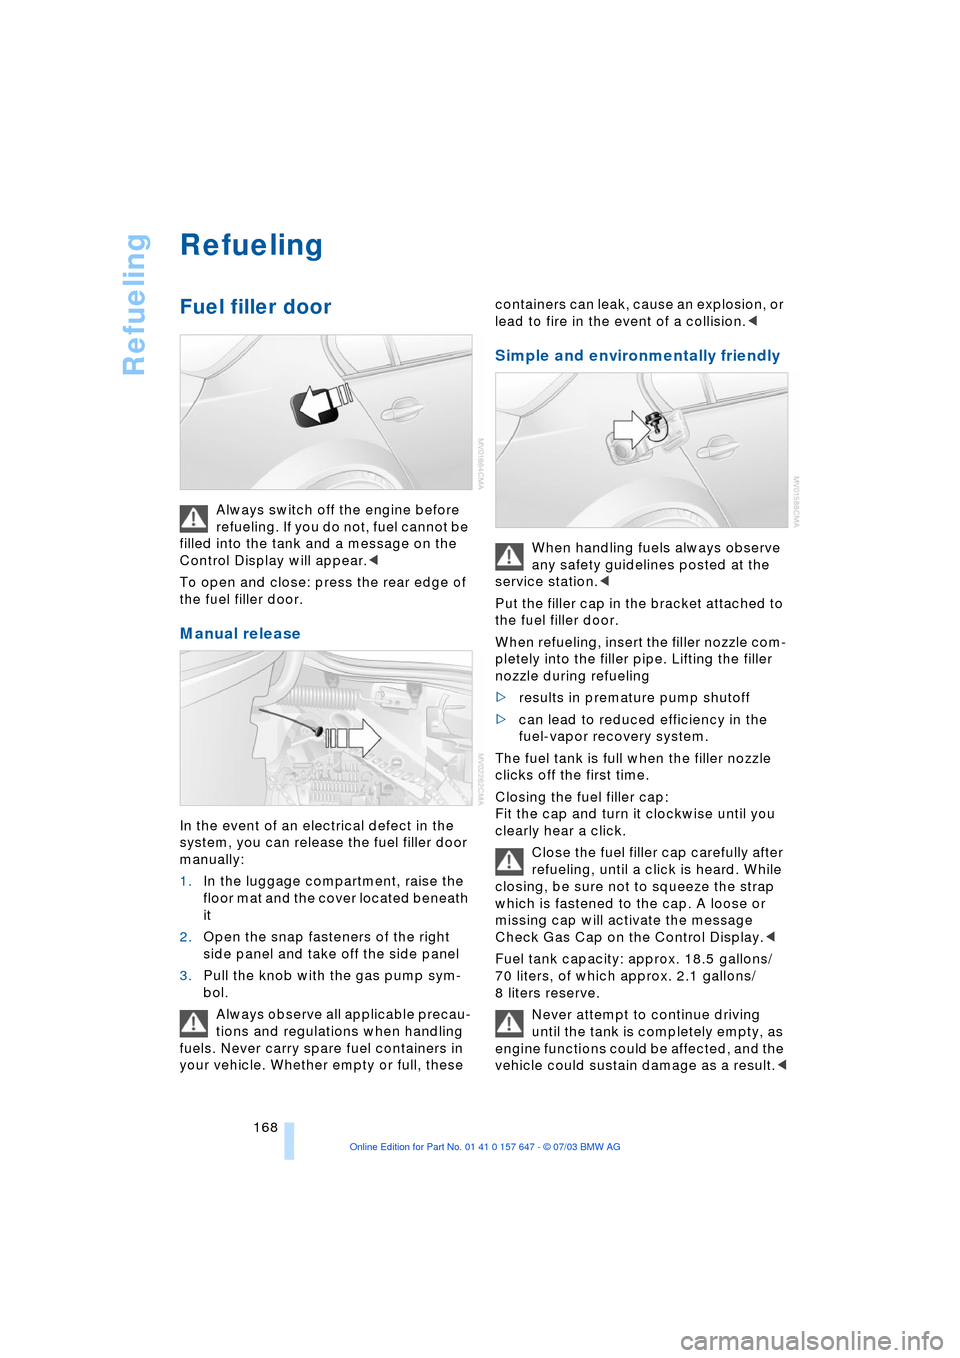
To open and close: press the rear edge of
the fuel filler door.
Manual release
In the event of an electrical defect in the
system, you can release the fuel filler door
manually:
1.In the luggage compartment, raise the
floor mat and the cover located beneath
it
2.Open the snap fasteners of the right
side panel and take off the side panel
3.Pull the knob with the gas pump sym-
bol.
Always observe all applicable precau-
tions and regulations when handling
fuels. Never carry spare fuel containers in
your vehicle. Whether empty or full, these containers can leak, cause an explosion, or
lead to fire in the event of a collision.<
Simple and environmentally friendly
When handling fuels always observe
any safety guidelines posted at the
service station.<
Put the filler cap in the bracket attached to
the fuel filler door.
When refueling, insert the filler nozzle com-
pletely into the filler pipe. Lifting the filler
nozzle during refueling
>results in premature pump shutoff
>can lead to reduced efficiency in the
fuel-vapor recovery system.
The fuel tank is full when the filler nozzle
clicks off the first time.
Closing the fuel filler cap:
Fit the cap and turn it clockwise until you
clearly hear a click.
Close the fuel filler cap carefully after
refueling, until a click is heard. While
closing, be sure not to squeeze the strap
which is fastened to the cap. A loose or
missing cap will activate the message
Check Gas Cap on the Control Display.<
Fuel tank capacity: approx. 18.5 gallons/
70 liters, of which approx. 2.1 gallons/
8 liters reserve.
Never attempt to continue driving
until the tank is completely empty, as
engine functions could be affected, and the
vehicle could sustain damage as a result.<
Page 180 of 220
Under the hood
178
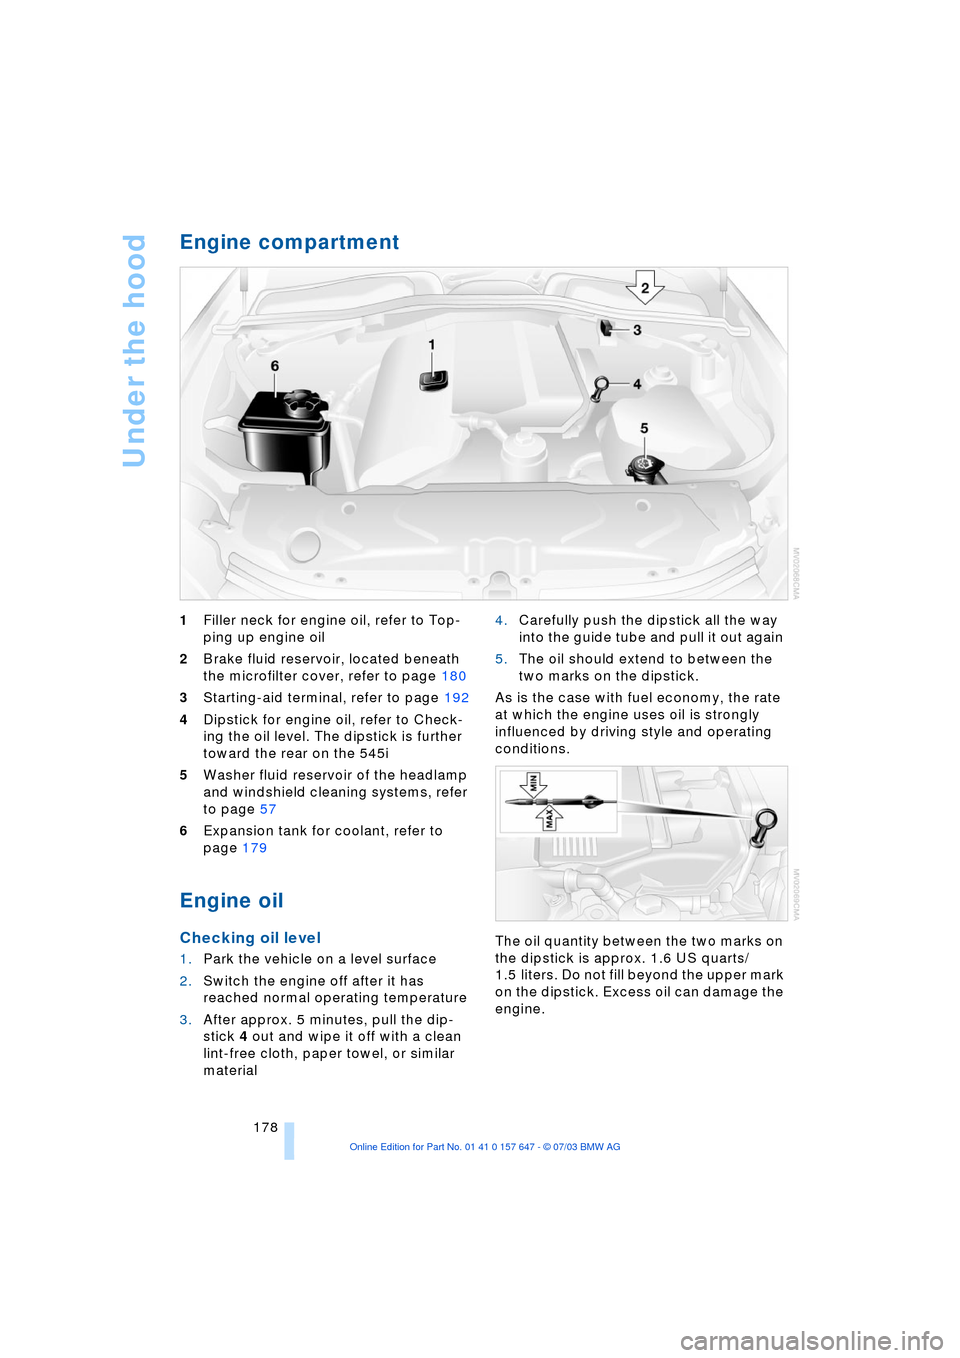
Engine compartment
1Filler neck for engine oil, refer to Top-
ping up engine oil
2Brake fluid reservoir, located beneath
the microfilter cover, refer to page 180
3Starting-aid terminal, refer to page 192
4Dipstick for engine oil, refer to Check-
ing the oil level. The dipstick is further
toward the rear on the 545i
5Washer fluid reservoir of the headlamp
and windshield cleaning systems, refer
to page 57
6Expansion tank for coolant, refer to
page 179
Engine oil
Checking oil level
1.Park the vehicle on a level surface
2.Switch the engine off after it has
reached normal operating temperature
3.After approx. 5 minutes, pull the dip-
stick 4 out and wipe it off with a clean
lint-free cloth, paper towel, or similar
material 4.Carefully push the dipstick all the way
into the guide tube and pull it out again
5.The oil should extend to between the
two marks on the dipstick.
As is the case with fuel economy, the rate
at which the engine uses oil is strongly
influenced by driving style and operating
conditions.
The oil quantity between the two marks on
the dipstick is approx. 1.6 US quarts/
1.5 liters. Do not fill beyond the upper mark
on the dipstick. Excess oil can damage the
engine.
Page 186 of 220
Replacing components
184
Replacing components
Onboard tool kit
The onboard tool kit is located in the lug-
gage compartment lid.
Loosen the wingnut to open.
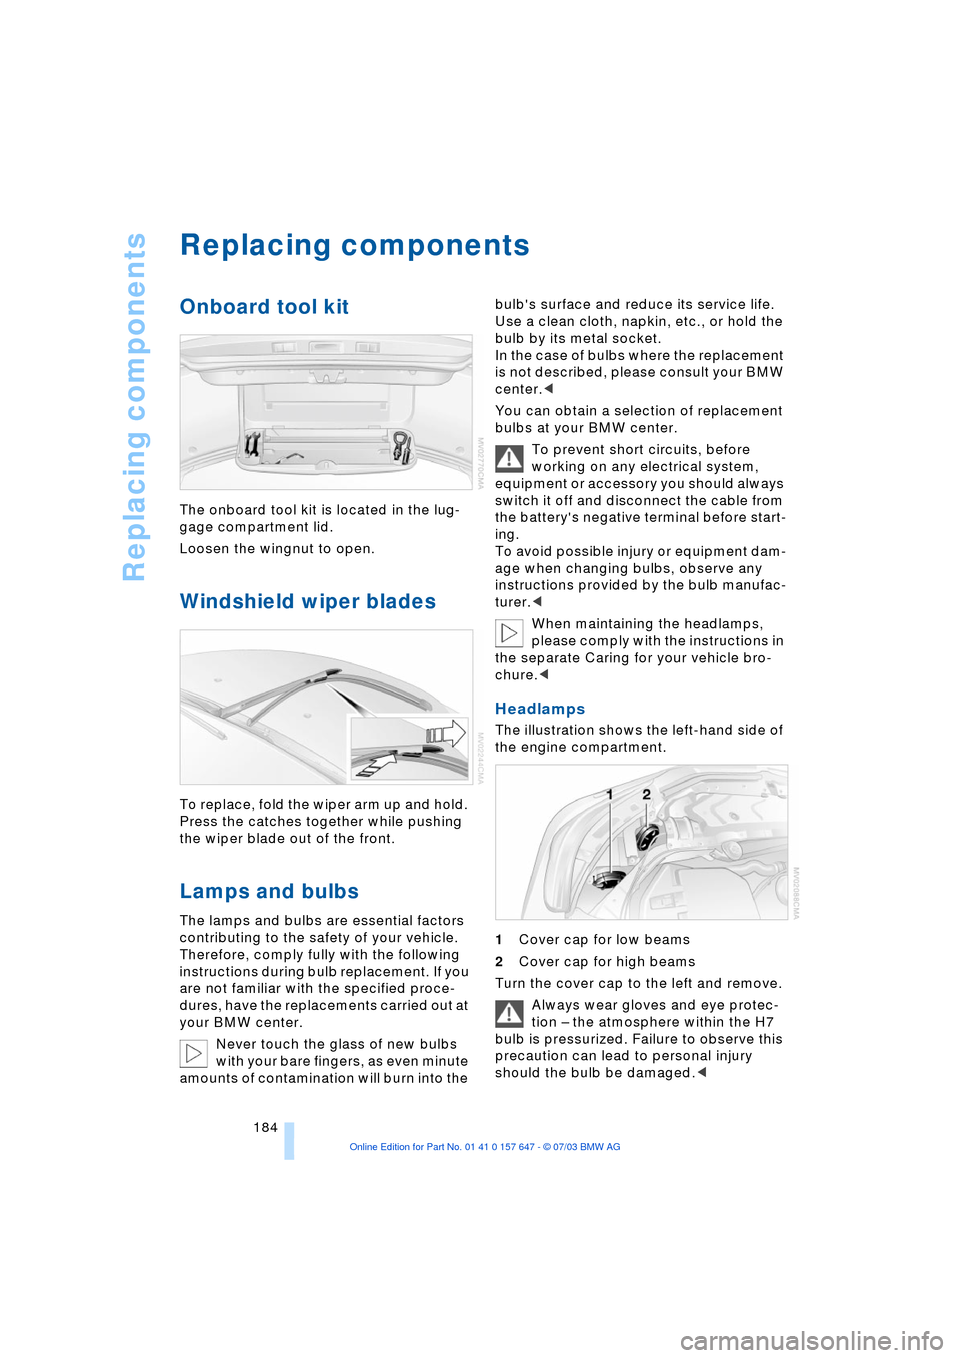
Windshield wiper blades
To replace, fold the wiper arm up and hold.
Press the catches together while pushing
the wiper blade out of the front.
Lamps and bulbs
The lamps and bulbs are essential factors
contributing to the safety of your vehicle.
Therefore, comply fully with the following
instructions during bulb replacement. If you
are not familiar with the specified proce-
dures, have the replacements carried out at
your BMW center.
Never touch the glass of new bulbs
with your bare fingers, as even minute
amounts of contamination will burn into the bulb's surface and reduce its service life.
Use a clean cloth, napkin, etc., or hold the
bulb by its metal socket.
In the case of bulbs where the replacement
is not described, please consult your BMW
center.<
You can obtain a selection of replacement
bulbs at your BMW center.
To prevent short circuits, before
working on any electrical system,
equipment or accessory you should always
switch it off and disconnect the cable from
the battery's negative terminal before start-
ing.
To avoid possible injury or equipment dam-
age when changing bulbs, observe any
instructions provided by the bulb manufac-
turer.<
When maintaining the headlamps,
please comply with the instructions in
the separate Caring for your vehicle bro-
chure.<
Headlamps
The illustration shows the left-hand side of
the engine compartment.
1Cover cap for low beams
2Cover cap for high beams
Turn the cover cap to the left and remove.
Always wear gloves and eye protec-
tion Ð the atmosphere within the H7
bulb is pressurized. Failure to observe this
precaution can lead to personal injury
should the bulb be damaged.<
Page 191 of 220
Mobility
189Reference
At a glance
Controls
Driving tips
Communications
Navigation
Entertainment
Charging the battery
Only charge the battery in the vehicle via
the terminals in the engine compartment
with the engine off. Connections, refer to
Jump-starting on page 192.
Disposal
Return used batteries to a recycling
point or your BMW center. Maintain
the battery in an upright position for trans-
port and storage. Always restrain the bat-
tery to prevent it from tipping over during
transport.<
Fuses
Never attempt to repair a blown fuse,
and do not replace a defective fuse
with a substitute of another color or amper-
age rating, as this could lead to a circuit
overload, ultimately resulting in a fire in the
vehicle.<
Spare fuses, plastic tweezers and details of
the fuse assignment are located in the
compartment for the onboard tool kit, refer
to page 184.
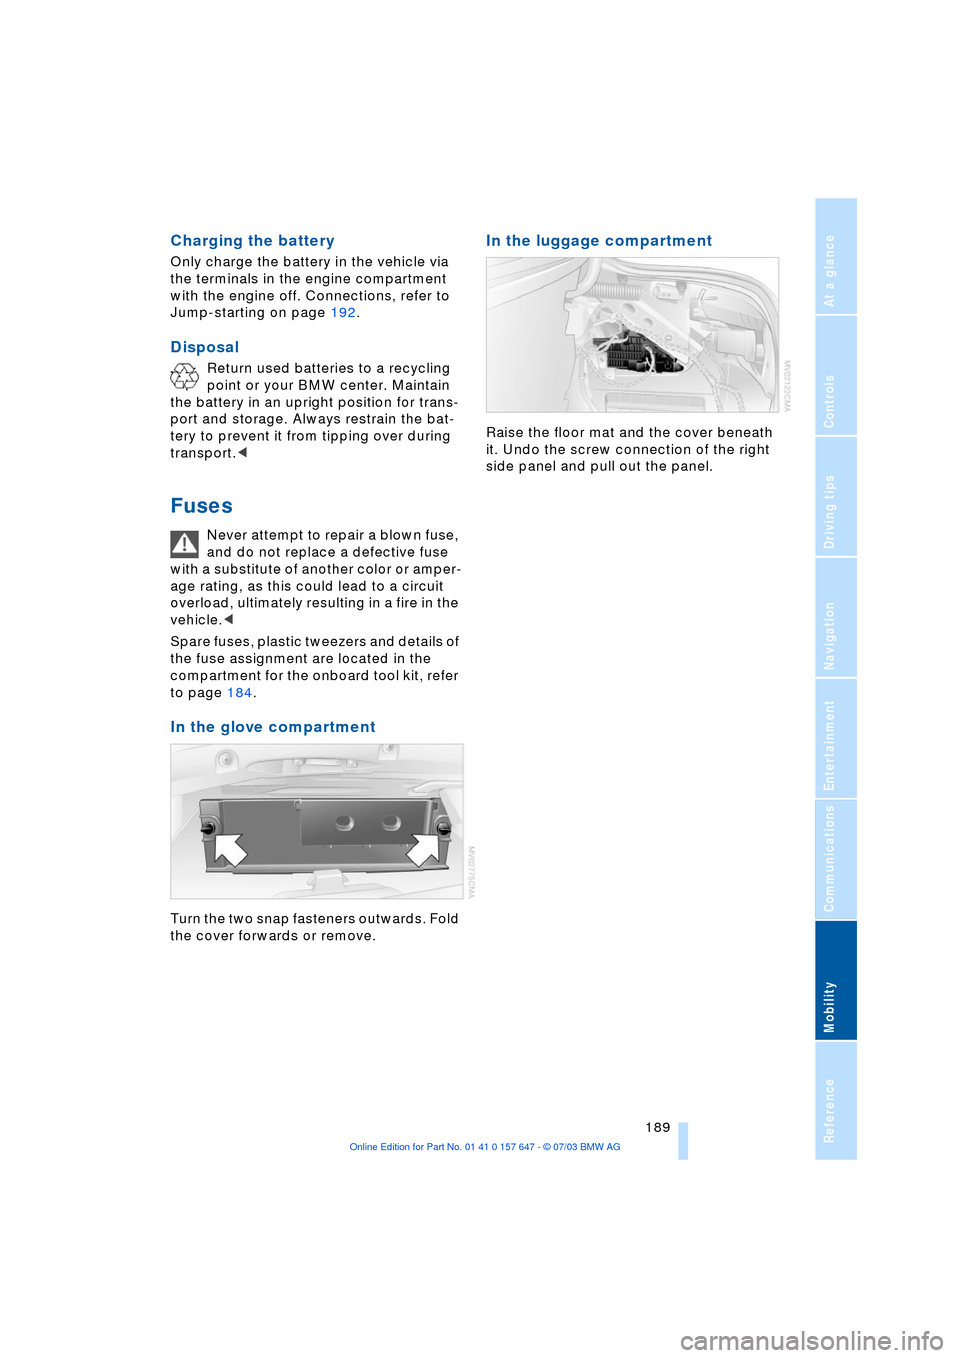
In the glove compartment
Turn the two snap fasteners outwards. Fold
the cover forwards or remove.
In the luggage compartment
Raise the floor mat and the cover beneath
it. Undo the screw connection of the right
side panel and pull out the panel.
Page 194 of 220
Giving and receiving assistance
192
Jump-starting
When your battery is discharged you can
use two jumper cables to start your vehicle
with power from the battery in a second
vehicle. You can also use the same method
to help start another vehicle.Use only
jumper cables with fully-insulated clamp
handles.
To avoid the risk of potentially fatal
injury, always avoid all contact with
electrical components while the engine is
running. Carefully adhere to the following
sequence, both to prevent damage to one
or both vehicles, and to guard against pos-
sible personal injuries.<
Preparing
1.Check whether the battery of the other
vehicle has a voltage of 12 Volts and
approximately the same capacitance in
Ah. This information can be found on
the battery
2.Switch off the engine of the support
vehicle
3.Switch off any consumer units in both
vehicles.
There must not be any contact
between the bodies of the two vehi-
cles, as otherwise there is a danger of short
circuits.<
Connecting the jumper cables
To avoid personal injury from sparks,
always observe this sequence when
connecting jumper cables.<
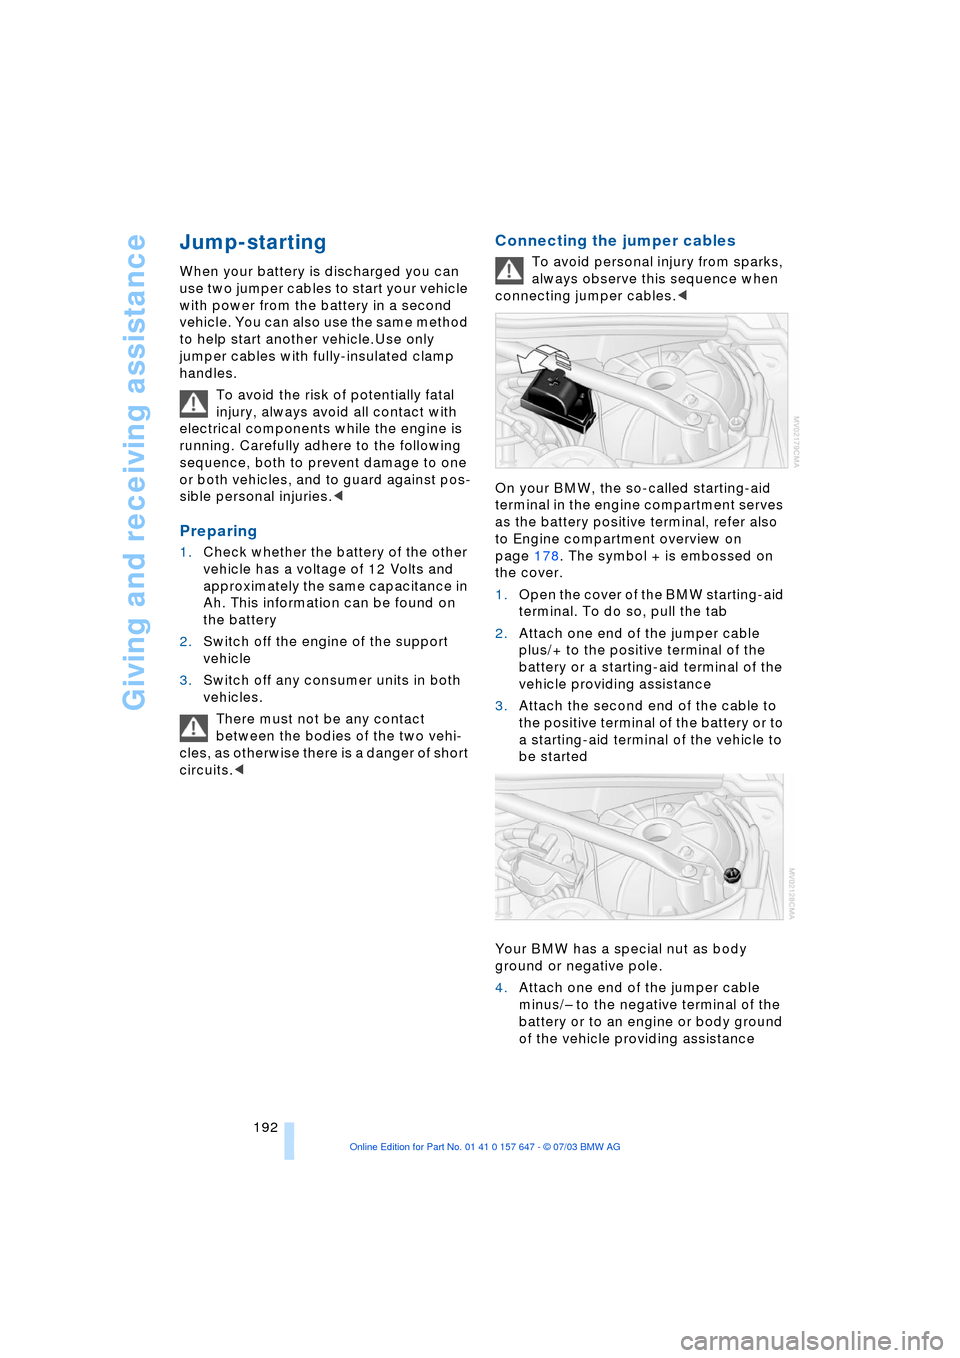
On your BMW, the so-called starting-aid
terminal in the engine compartment serves
as the battery positive terminal, refer also
to Engine compartment overview on
page 178. The symbol + is embossed on
the cover.
1.Open the cover of the BMW starting-aid
terminal. To do so, pull the tab
2.Attach one end of the jumper cable
plus/+ to the positive terminal of the
battery or a starting-aid terminal of the
vehicle providing assistance
3.Attach the second end of the cable to
the positive terminal of the battery or to
a starting-aid terminal of the vehicle to
be started
Your BMW has a special nut as body
ground or negative pole.
4.Attach one end of the jumper cable
minus/Ð to the negative terminal of the
battery or to an engine or body ground
of the vehicle providing assistance
Page 195 of 220
Mobility
193Reference
At a glance
Controls
Driving tips
Communications
Navigation
Entertainment
5.Attach the second end of the cable to
the negative terminal of the battery or to
the engine or body ground of the vehi-
cle to be started.
Starting the engine
1.Start the engine on the support vehicle
and allow it to run for several minutes at
a fast idle
2.Start the engine on the other vehicle in
the usual way.
If the first start attempt is not success-
ful, wait a few minutes before another
attempt in order to allow the discharged
battery to recharge
3.Let the engines run for a few minutes
4.Disconnect the jumper cables by
reversing the connection sequence.
If required, have the battery inspected and
recharged at your BMW center.
Never use spray fluids to start the
engine.<
Towing
Always observe all applicable towing
laws and regulations.<
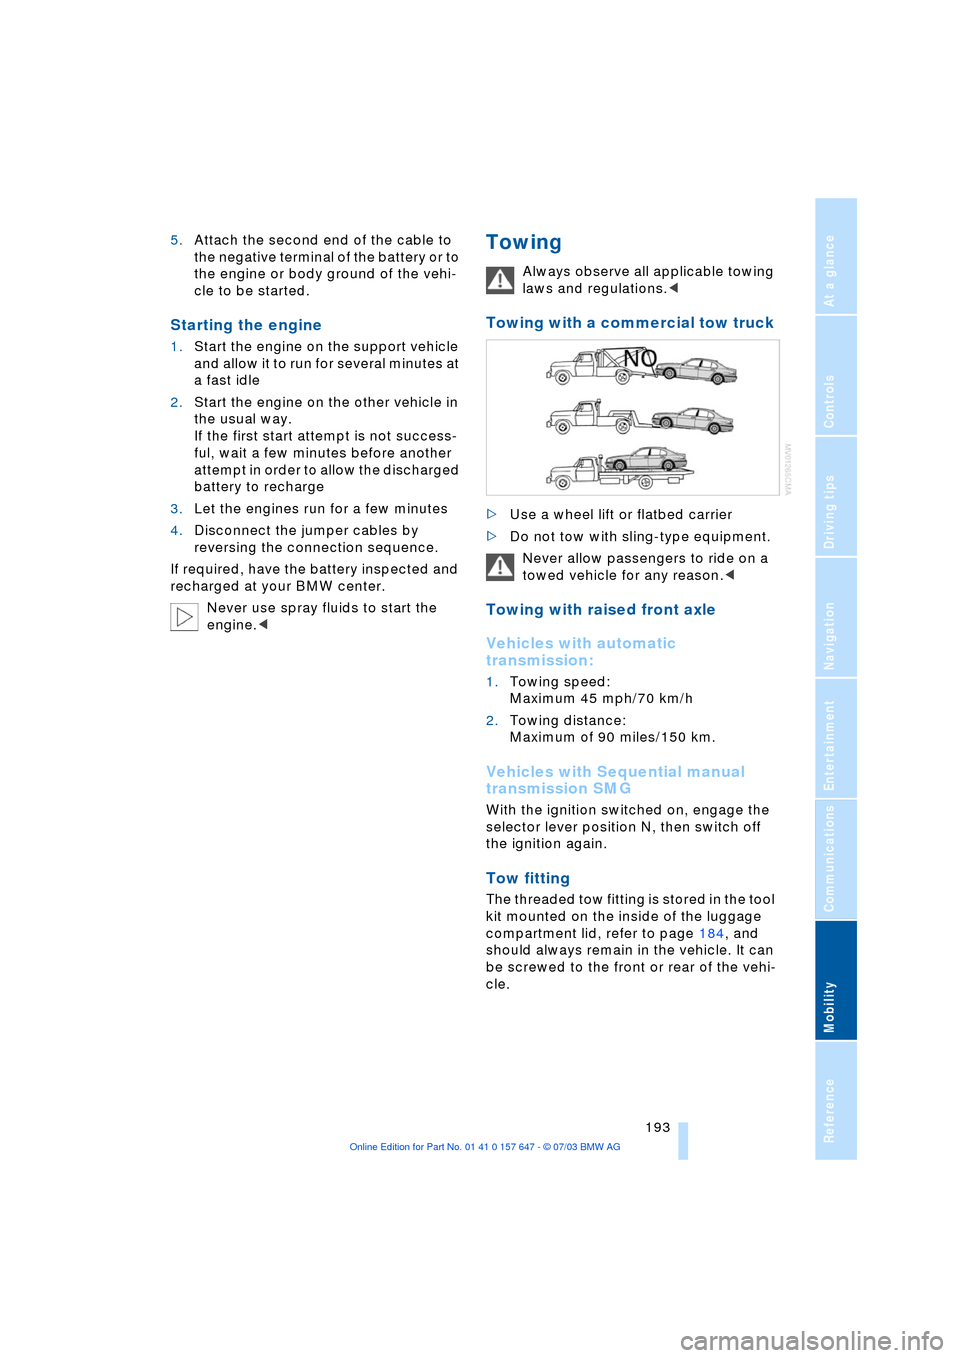
Towing with a commercial tow truck
>Use a wheel lift or flatbed carrier
>Do not tow with sling-type equipment.
Never allow passengers to ride on a
towed vehicle for any reason.<
Towing with raised front axle
Vehicles with automatic
transmission:
1.Towing speed:
Maximum 45 mph/70 km/h
2.Towing distance:
Maximum of 90 miles/150 km.
Vehicles with Sequential manual
transmission SMG
With the ignition switched on, engage the
selector lever position N, then switch off
the ignition again.
Tow fitting
The threaded tow fitting is stored in the tool
kit mounted on the inside of the luggage
compartment lid, refer to page 184, and
should always remain in the vehicle. It can
be screwed to the front or rear of the vehi-
cle.
Page 207 of 220
Reference 205
At a glance
Controls
Driving tips
Communications
Navigation
Entertainment
Mobility
Condition Based Service
CBS 181
"Confirmation" 28
Confirmation signals for
vehicle locking 28
"Confirm unlock code" 153
Connecting a vacuum
cleaner, refer to Lighter
socket 100
Consumption display
Ð refer to average
fuel consumption 70
Consumption indicator
Ð refer to Energy Control 66
"Continue guidance to
dest.?" 126
Control Center 16
Ð adjusting the
brightness 73
Ð assistance window 18
Ð automatic climate
control 92
Ð changing settings 73
Ð changing the menu
page 19
Ð confirming selection or
entry 19
Ð display, menus 16
Ð language selection 74
Ð lists 19
Ð menu item selection 19
Ð selecting units of measure
and display format 74
Ð setting time and date 74
Ð status information 18
Ð symbols 17
Control Display 16
Controller, refer to Control
Center 16
Controls, audio
systems 130
Controls, refer to
Cockpit 10
Convenience operation
Ð glass roof 28
Ð windows 28
Convenience start, refer to
Starting the engine 49
Coolant 179, 180
Ð level 180
Cooling, maximum 91Cornering Brake Control 78
"Country" for destination
entry 117
Country of destination for
navigation 116
Courtesy lighting 89
Cruise control 58
Ð active cruise control 59
Ð indicator lamp 11
Cruising range 70
Cup holder, refer to
Beverage holders 99
Curb weight, refer to
Weights 200
Current fuel
consumption 66
"Current position" 115
"Customer Relations" 163
Cylinders, refer to Engine
data 198
D
Dashboard, refer to
Cockpit 10
Data 198
Ð capacities 201
Ð dimensions 199
Ð engine 198
Ð weights 200
Date 65
Ð calling up 65
Ð display format 75
Ð setting 75
Daytime driving lamps 87
DBC Dynamic Brake
Control 79
Ð indicator lamp 79
Decommissioning the
vehicle, refer to Caring for
your vehicle brochure
Defect
Ð automatic
transmission 56
Ð door lock 29
Ð fuel filler door 168
Ð glass roof 35
Ð luggage compartment
lid 31
Ð Sequential manual
transmission SMG 53Defrosting the windshield,
refer to Defrosting
windows 91
Defrosting windows and
removing
condensation 91
Defrost position, refer to
Defrosting windows 91
"Delete address book" for
navigation 121
"Delete all numbers" on the
portable phone 155
"Delete data" for
navigation 121
"Delete" for portable
phone 155
Deleting the destination
address 120
Destination for navigation
Ð entry 116
Ð recent destinations 119
Ð selecting via map 118
Ð selecting with
information 118
Ð storing 120
Destination guidance 123
Ð changing specified
route 121
Ð interrupting voice
instructions 125
Ð selecting a new route 125
Ð terminating/
continuing 126
Ð volume of voice
instructions 125
"Detour" 126
"Dial number" 153
Digital clock 65
Dimensions 199
Dipstick for engine oil 178
Directional indicators, refer
to Turn signal
indicators 56
Direction announcements,
refer to Voice
instructions 124
Direction instructions, refer
to Voice instructions 124
Directory, refer to Phone
book 154