2004 BMW 545I SEDAN start
[x] Cancel search: startPage 165 of 220
163
Entertainment
Reference
At a glance
Controls
Driving tips Communications
Navigation
Mobility
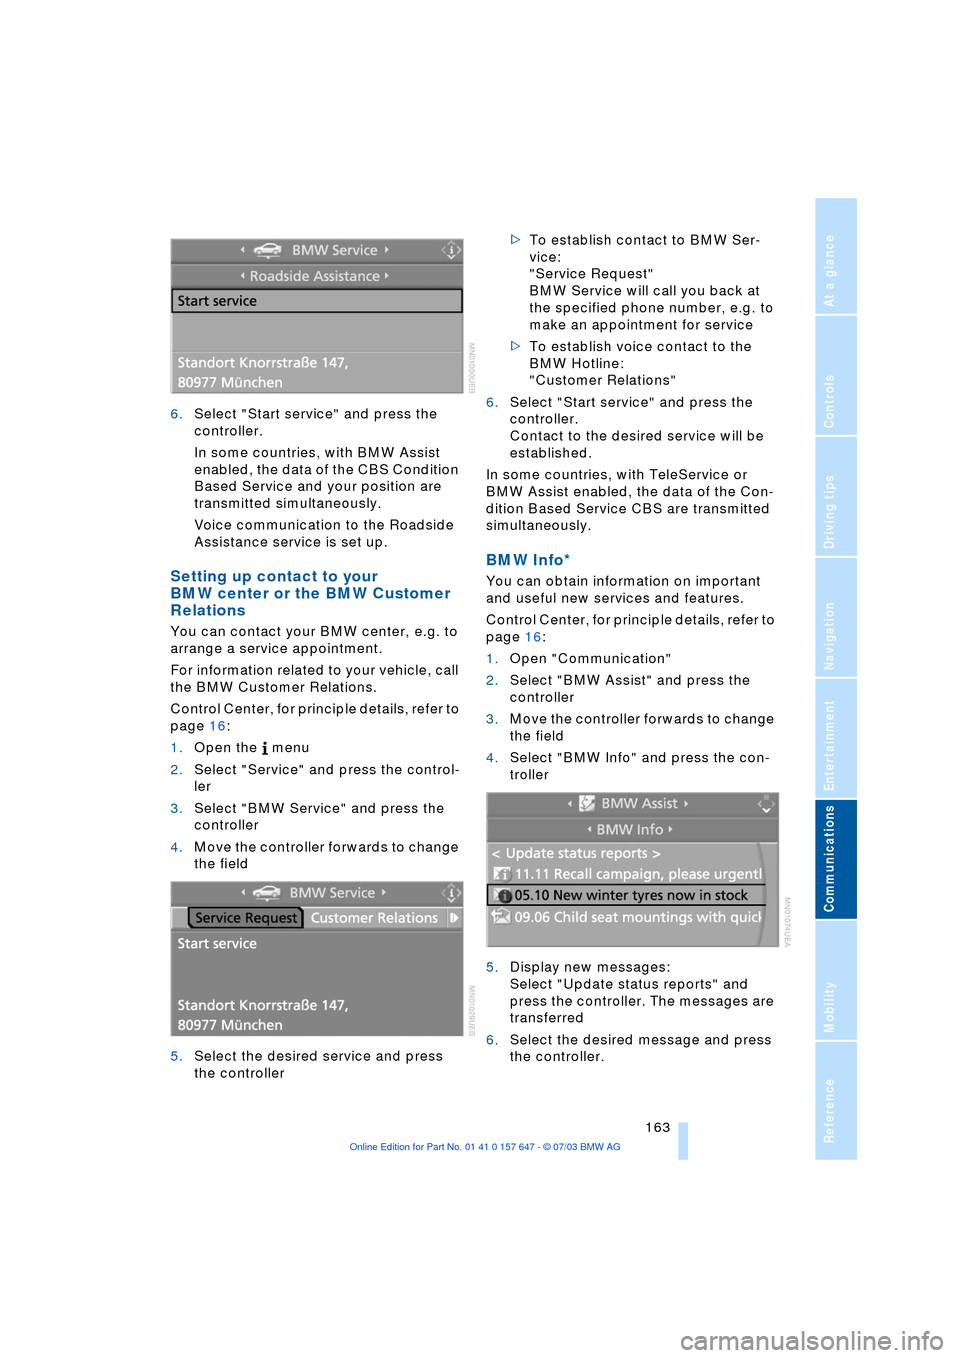
6.Select "Start service" and press the
controller.
In some countries, with BMW Assist
enabled, the data of the CBS Condition
Based Service and your position are
transmitted simultaneously.
Voice communication to the Roadside
Assistance service is set up.
Setting up contact to your
BMW center or the BMW Customer
Relations
You can contact your BMW center, e.g. to
arrange a service appointment.
For information related to your vehicle, call
the BMW Customer Relations.
Control Center, for principle details, refer to
page 16:
1.Open the menu
2.Select "Service" and press the control-
ler
3.Select "BMW Service" and press the
controller
4.Move the controller forwards to change
the field
5.Select the desired service and press
the controller >To establish contact to BMW Ser-
vice:
"Service Request"
BMW Service will call you back at
the specified phone number, e.g. to
make an appointment for service
>To establish voice contact to the
BMW Hotline:
"Customer Relations"
6.Select "Start service" and press the
controller.
Contact to the desired service will be
established.
In some countries, with TeleService or
BMW Assist enabled, the data of the Con-
dition Based Service CBS are transmitted
simultaneously.
BMW Info*
You can obtain information on important
and useful new services and features.
Control Center, for principle details, refer to
page 16:
1.Open "Communication"
2.Select "BMW Assist" and press the
controller
3.Move the controller forwards to change
the field
4.Select "BMW Info" and press the con-
troller
5.Display new messages:
Select "Update status reports" and
press the controller. The messages are
transferred
6.Select the desired message and press
the controller.
Page 167 of 220
165
Entertainment
Reference
At a glance
Controls
Driving tips Communications
Navigation
Mobility
4.Move the controller forward to change
the field
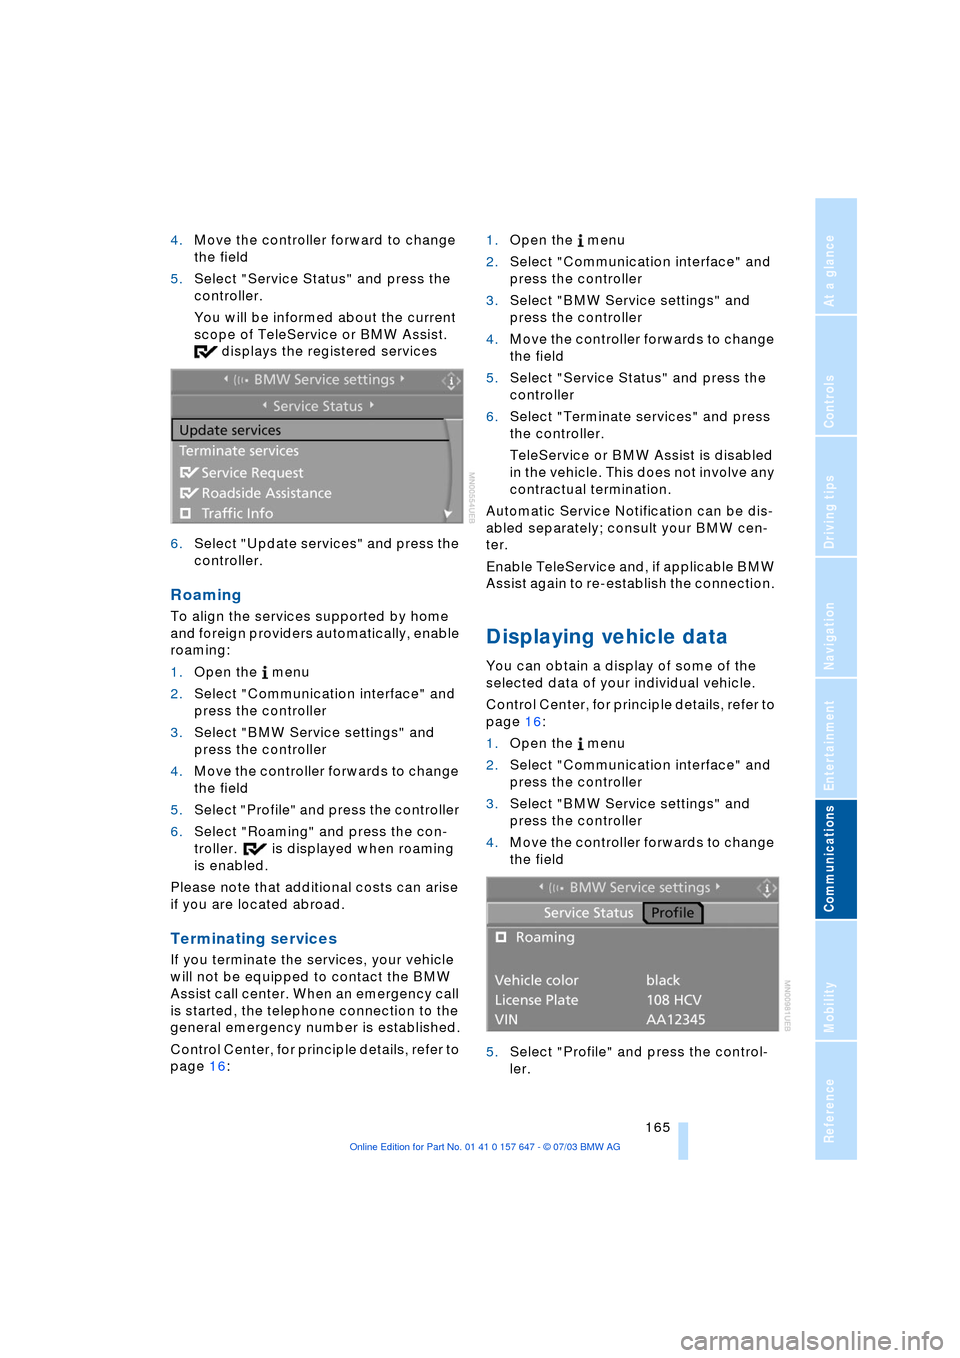
5.Select "Service Status" and press the
controller.
You will be informed about the current
scope of TeleService or BMW Assist.
displays the registered services
6.Select "Update services" and press the
controller.
Roaming
To align the services supported by home
and foreign providers automatically, enable
roaming:
1.Open the menu
2.Select "Communication interface" and
press the controller
3.Select "BMW Service settings" and
press the controller
4.Move the controller forwards to change
the field
5.Select "Profile" and press the controller
6.Select "Roaming" and press the con-
troller. is displayed when roaming
is enabled.
Please note that additional costs can arise
if you are located abroad.
Terminating services
If you terminate the services, your vehicle
will not be equipped to contact the BMW
Assist call center. When an emergency call
is started, the telephone connection to the
general emergency number is established.
Control Center, for principle details, refer to
page 16: 1.Open the menu
2.Select "Communication interface" and
press the controller
3.Select "BMW Service settings" and
press the controller
4.Move the controller forwards to change
the field
5.Select "Service Status" and press the
controller
6.Select "Terminate services" and press
the controller.
TeleService or BMW Assist is disabled
in the vehicle. This does not involve any
contractual termination.
Automatic Service Notification can be dis-
abled separately; consult your BMW cen-
ter.
Enable TeleService and, if applicable BMW
Assist again to re-establish the connection.
Displaying vehicle data
You can obtain a display of some of the
selected data of your individual vehicle.
Control Center, for principle details, refer to
page 16:
1.Open the menu
2.Select "Communication interface" and
press the controller
3.Select "BMW Service settings" and
press the controller
4.Move the controller forwards to change
the field
5.Select "Profile" and press the control-
ler.
Page 180 of 220
Under the hood
178
Engine compartment
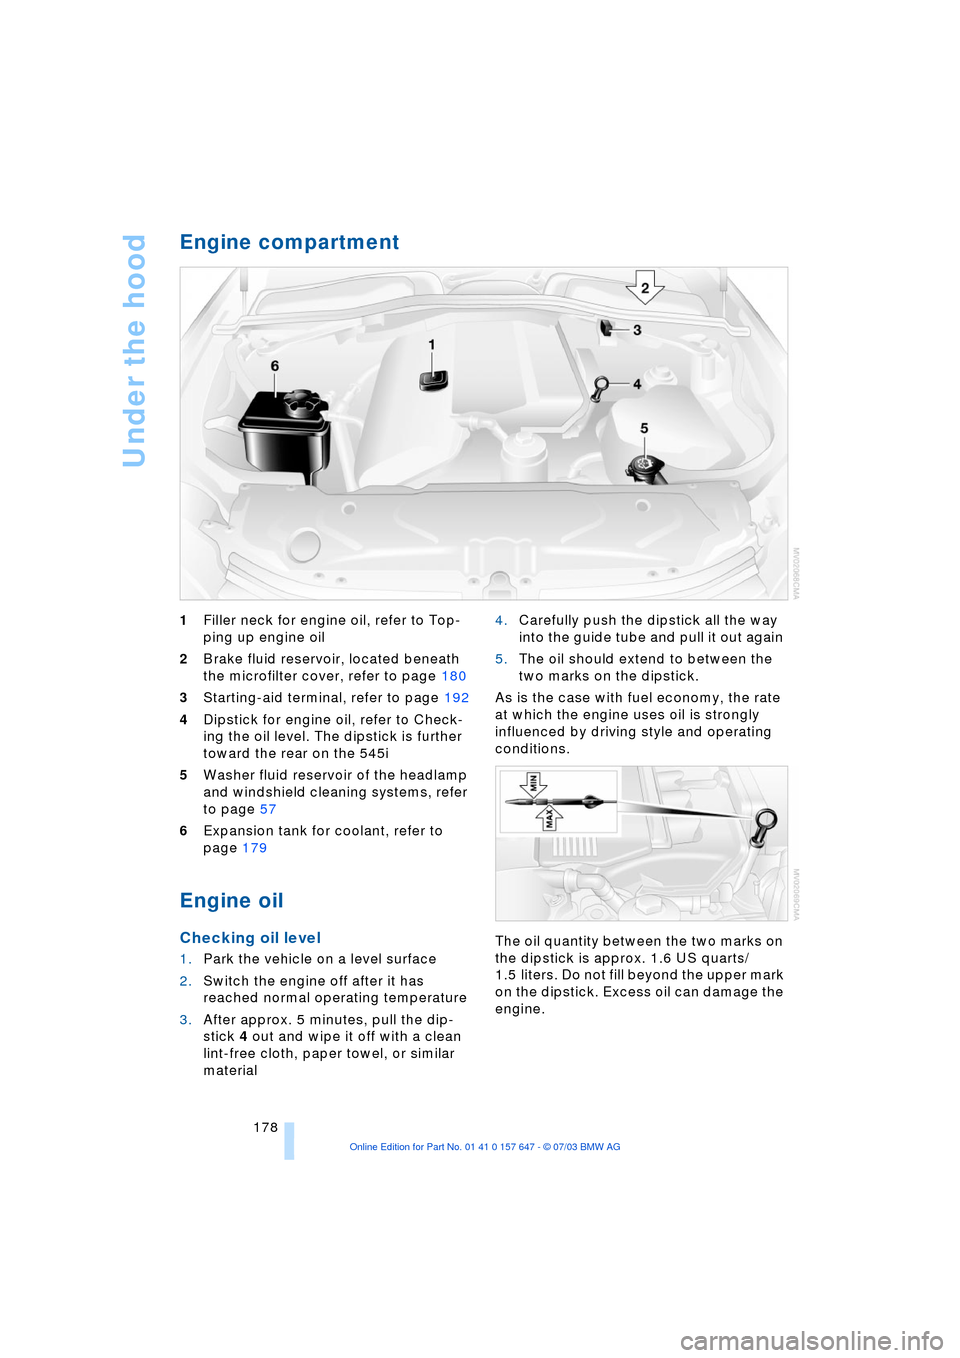
1Filler neck for engine oil, refer to Top-
ping up engine oil
2Brake fluid reservoir, located beneath
the microfilter cover, refer to page 180
3Starting-aid terminal, refer to page 192
4Dipstick for engine oil, refer to Check-
ing the oil level. The dipstick is further
toward the rear on the 545i
5Washer fluid reservoir of the headlamp
and windshield cleaning systems, refer
to page 57
6Expansion tank for coolant, refer to
page 179
Engine oil
Checking oil level
1.Park the vehicle on a level surface
2.Switch the engine off after it has
reached normal operating temperature
3.After approx. 5 minutes, pull the dip-
stick 4 out and wipe it off with a clean
lint-free cloth, paper towel, or similar
material 4.Carefully push the dipstick all the way
into the guide tube and pull it out again
5.The oil should extend to between the
two marks on the dipstick.
As is the case with fuel economy, the rate
at which the engine uses oil is strongly
influenced by driving style and operating
conditions.
The oil quantity between the two marks on
the dipstick is approx. 1.6 US quarts/
1.5 liters. Do not fill beyond the upper mark
on the dipstick. Excess oil can damage the
engine.
Page 186 of 220
Replacing components
184
Replacing components
Onboard tool kit
The onboard tool kit is located in the lug-
gage compartment lid.
Loosen the wingnut to open.
Windshield wiper blades
To replace, fold the wiper arm up and hold.
Press the catches together while pushing
the wiper blade out of the front.
Lamps and bulbs
The lamps and bulbs are essential factors
contributing to the safety of your vehicle.
Therefore, comply fully with the following
instructions during bulb replacement. If you
are not familiar with the specified proce-
dures, have the replacements carried out at
your BMW center.
Never touch the glass of new bulbs
with your bare fingers, as even minute
amounts of contamination will burn into the bulb's surface and reduce its service life.
Use a clean cloth, napkin, etc., or hold the
bulb by its metal socket.
In the case of bulbs where the replacement
is not described, please consult your BMW
center.<
You can obtain a selection of replacement
bulbs at your BMW center.
To prevent short circuits, before
working on any electrical system,
equipment or accessory you should always
switch it off and disconnect the cable from
the battery's negative terminal before start-
ing.
To avoid possible injury or equipment dam-
age when changing bulbs, observe any
instructions provided by the bulb manufac-
turer.<
When maintaining the headlamps,
please comply with the instructions in
the separate Caring for your vehicle bro-
chure.<
Headlamps
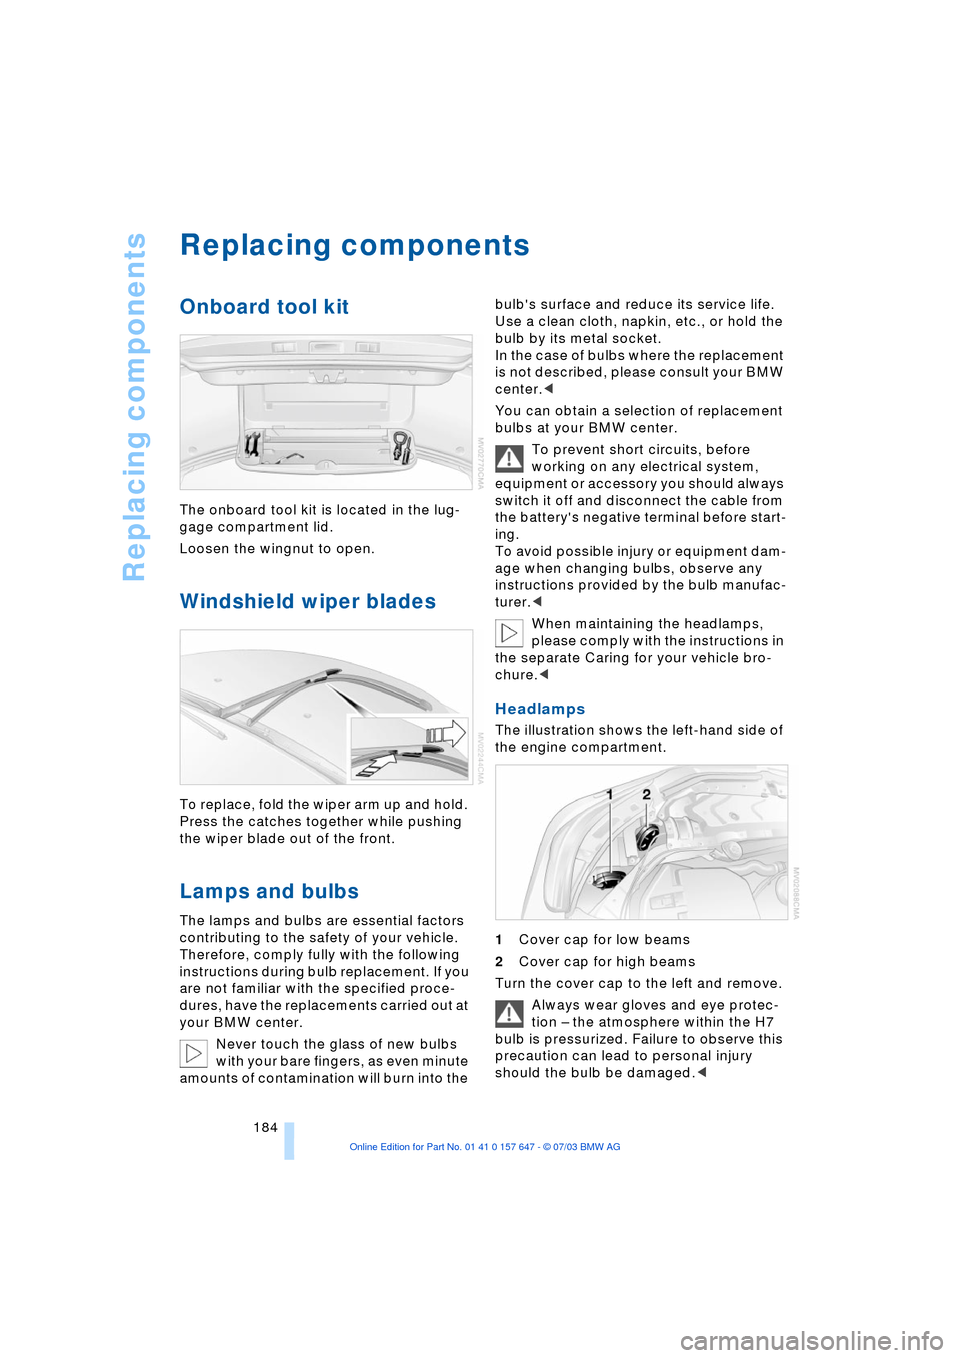
The illustration shows the left-hand side of
the engine compartment.
1Cover cap for low beams
2Cover cap for high beams
Turn the cover cap to the left and remove.
Always wear gloves and eye protec-
tion Ð the atmosphere within the H7
bulb is pressurized. Failure to observe this
precaution can lead to personal injury
should the bulb be damaged.<
Page 189 of 220
Mobility
187Reference
At a glance
Controls
Driving tips
Communications
Navigation
Entertainment
Changing a wheel
Safety measures in the event of a
breakdown or wheel change:
Park the vehicle as far away as possible
from moving traffic and on firm ground.
Switch on the hazard warning flashers.
Lock the steering wheel in straight-ahead
setting of the wheels. Apply the handbrake
and engage first gear, reverse gear or
selector lever to position P.
Have all vehicle occupants get out of the
vehicle and ensure that they remain outside
the immediate area in a safe place, such as
behind a guardrail.
If a warning triangle or portable hazard
warning lamp is required, set it up on the
roadside at an appropriate distance from
the rear of the vehicle.
Comply with all safety guidelines and regu-
lations.
Change the wheel only on a level, firm sur-
face which is not slippery.
The vehicle or the jack could slip to the side
if you attempt to raise the vehicle on a soft
or slippery surface such as snow, ice, tiles,
etc.
Position the jack on a firm support surface.
Do not use a wooden block or similar
object as a support base for the jack, as
this would prevent it from extending to its
full support height and reduce its load-car-
rying capacity.
To avoid serious or fatal injury: never lie
under the vehicle, and never start the
engine while it is supported by the jack.<
What you will need
To avoid rattling noises later on, note the
positions of the tools before removing
them, then return them to their initial posi-
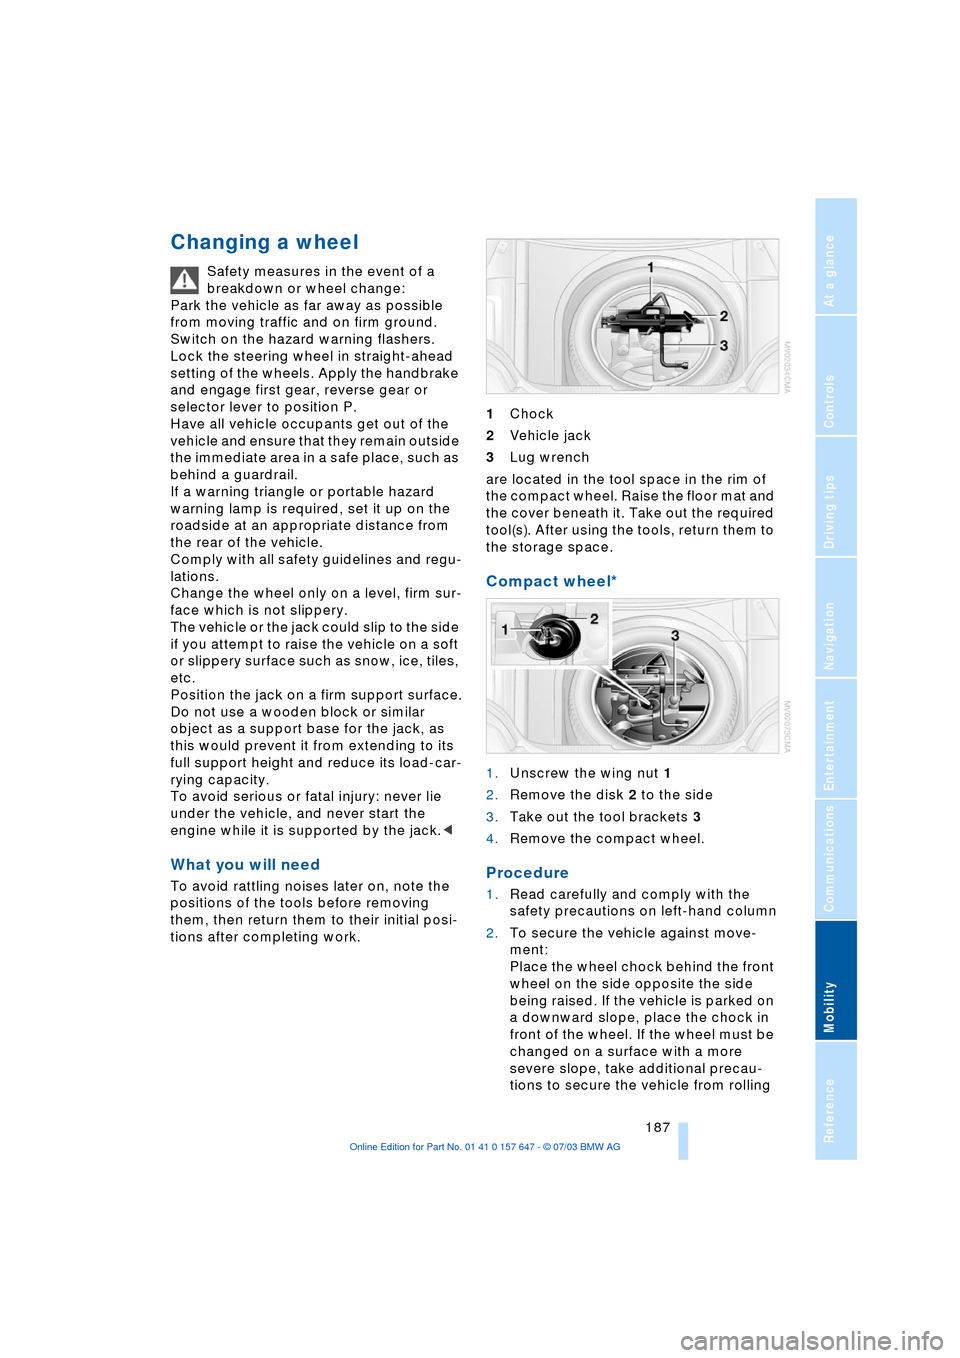
tions after completing work.1Chock
2Vehicle jack
3Lug wrench
are located in the tool space in the rim of
the compact wheel. Raise the floor mat and
the cover beneath it. Take out the required
tool(s). After using the tools, return them to
the storage space.
Compact wheel*
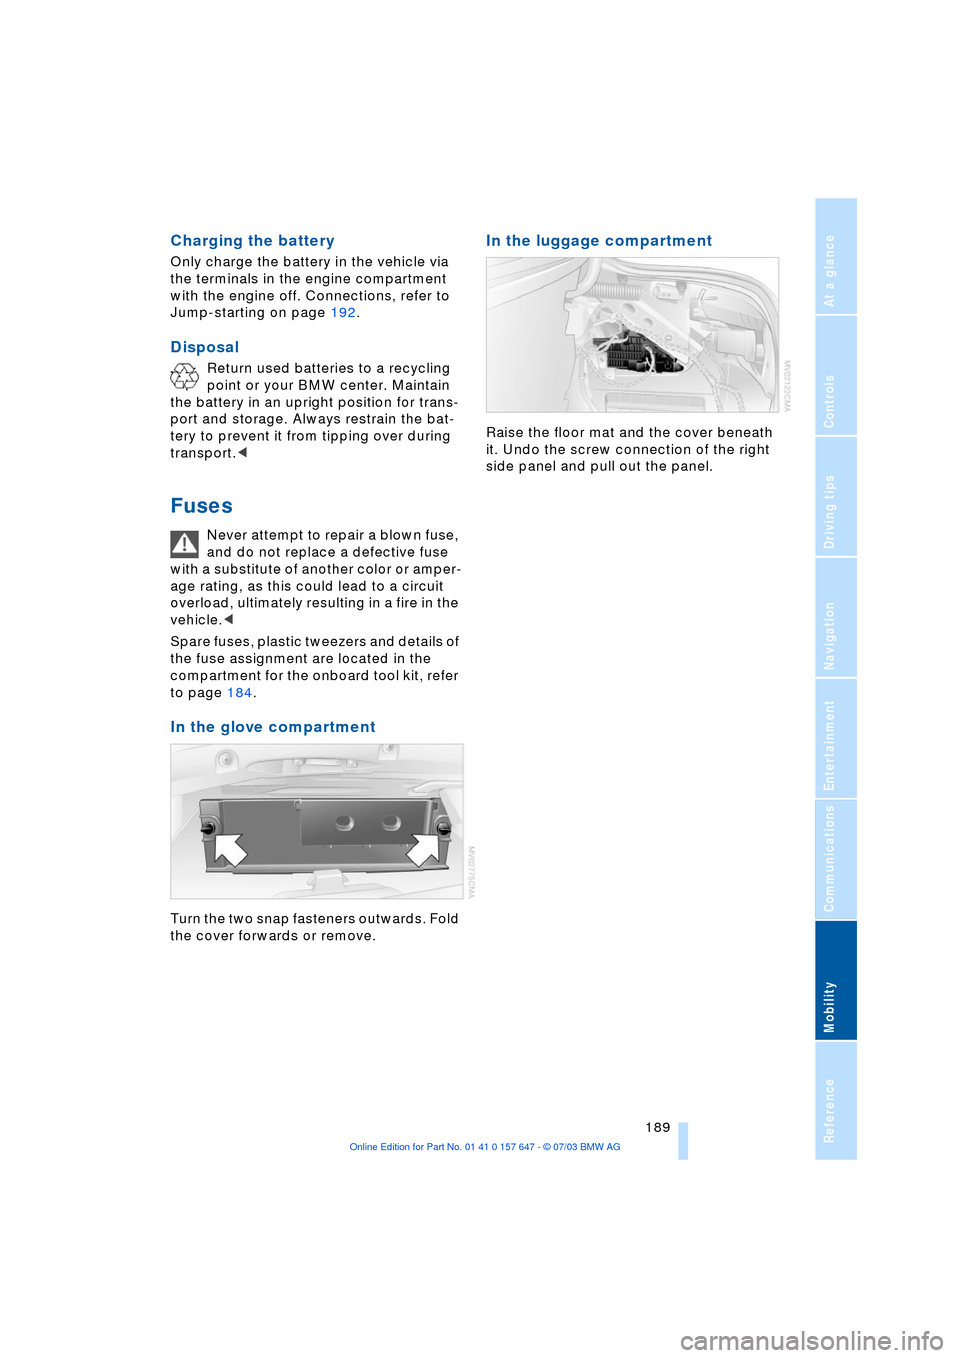
1.Unscrew the wing nut 1
2.Remove the disk 2 to the side
3.Take out the tool brackets 3
4.Remove the compact wheel.
Procedure
1.Read carefully and comply with the
safety precautions on left-hand column
2.To secure the vehicle against move-
ment:
Place the wheel chock behind the front
wheel on the side opposite the side
being raised. If the vehicle is parked on
a downward slope, place the chock in
front of the wheel. If the wheel must be
changed on a surface with a more
severe slope, take additional precau-
tions to secure the vehicle from rolling
Page 191 of 220
Mobility
189Reference
At a glance
Controls
Driving tips
Communications
Navigation
Entertainment
Charging the battery
Only charge the battery in the vehicle via
the terminals in the engine compartment
with the engine off. Connections, refer to
Jump-starting on page 192.
Disposal
Return used batteries to a recycling
point or your BMW center. Maintain
the battery in an upright position for trans-
port and storage. Always restrain the bat-
tery to prevent it from tipping over during
transport.<
Fuses
Never attempt to repair a blown fuse,
and do not replace a defective fuse
with a substitute of another color or amper-
age rating, as this could lead to a circuit
overload, ultimately resulting in a fire in the
vehicle.<
Spare fuses, plastic tweezers and details of
the fuse assignment are located in the
compartment for the onboard tool kit, refer
to page 184.
In the glove compartment
Turn the two snap fasteners outwards. Fold
the cover forwards or remove.
In the luggage compartment
Raise the floor mat and the cover beneath
it. Undo the screw connection of the right
side panel and pull out the panel.
Page 192 of 220
Giving and receiving assistance
190
Giving and receiving assistance
Starting an emergency call*
Conditions for an emergency call:
>The car phone is logged on to a porta-
ble phone network
>The emergency call system is operable.
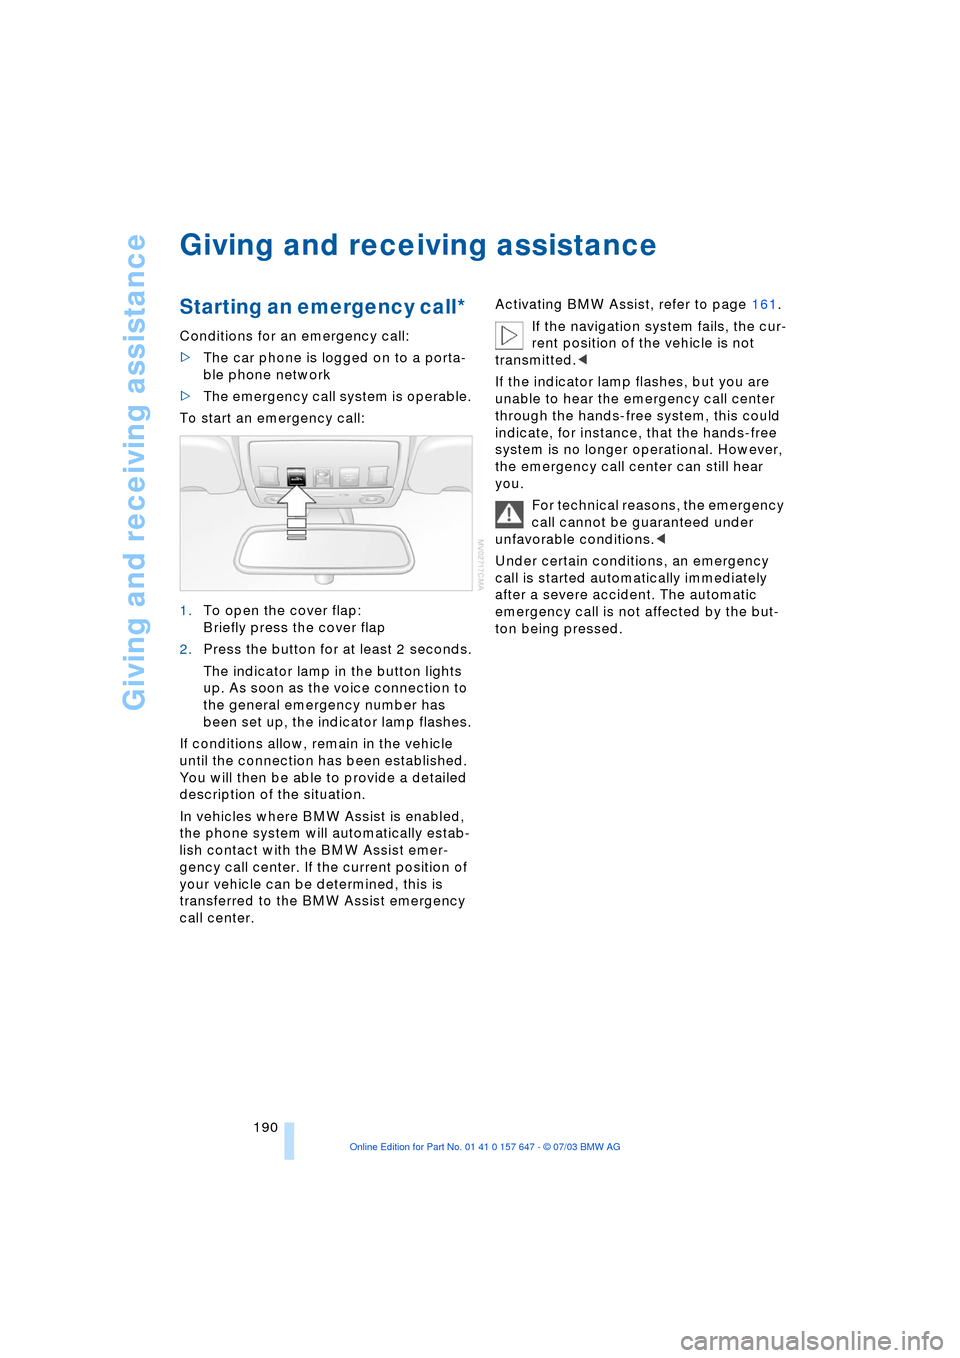
To start an emergency call:
1.To open the cover flap:
Briefly press the cover flap
2.Press the button for at least 2 seconds.
The indicator lamp in the button lights
up. As soon as the voice connection to
the general emergency number has
been set up, the indicator lamp flashes.
If conditions allow, remain in the vehicle
until the connection has been established.
You will then be able to provide a detailed
description of the situation.
In vehicles where BMW Assist is enabled,
the phone system will automatically estab-
lish contact with the BMW Assist emer-
gency call center. If the current position of
your vehicle can be determined, this is
transferred to the BMW Assist emergency
call center.Activating BMW Assist, refer to page 161.
If the navigation system fails, the cur-
rent position of the vehicle is not
transmitted.<
If the indicator lamp flashes, but you are
unable to hear the emergency call center
through the hands-free system, this could
indicate, for instance, that the hands-free
system is no longer operational. However,
the emergency call center can still hear
you.
For technical reasons, the emergency
call cannot be guaranteed under
unfavorable conditions.<
Under certain conditions, an emergency
call is started automatically immediately
after a severe accident. The automatic
emergency call is not affected by the but-
ton being pressed.
Page 194 of 220
Giving and receiving assistance
192
Jump-starting
When your battery is discharged you can
use two jumper cables to start your vehicle
with power from the battery in a second
vehicle. You can also use the same method
to help start another vehicle.Use only
jumper cables with fully-insulated clamp
handles.
To avoid the risk of potentially fatal
injury, always avoid all contact with
electrical components while the engine is
running. Carefully adhere to the following
sequence, both to prevent damage to one
or both vehicles, and to guard against pos-
sible personal injuries.<
Preparing
1.Check whether the battery of the other
vehicle has a voltage of 12 Volts and
approximately the same capacitance in
Ah. This information can be found on
the battery
2.Switch off the engine of the support
vehicle
3.Switch off any consumer units in both
vehicles.
There must not be any contact
between the bodies of the two vehi-
cles, as otherwise there is a danger of short
circuits.<
Connecting the jumper cables
To avoid personal injury from sparks,
always observe this sequence when
connecting jumper cables.<
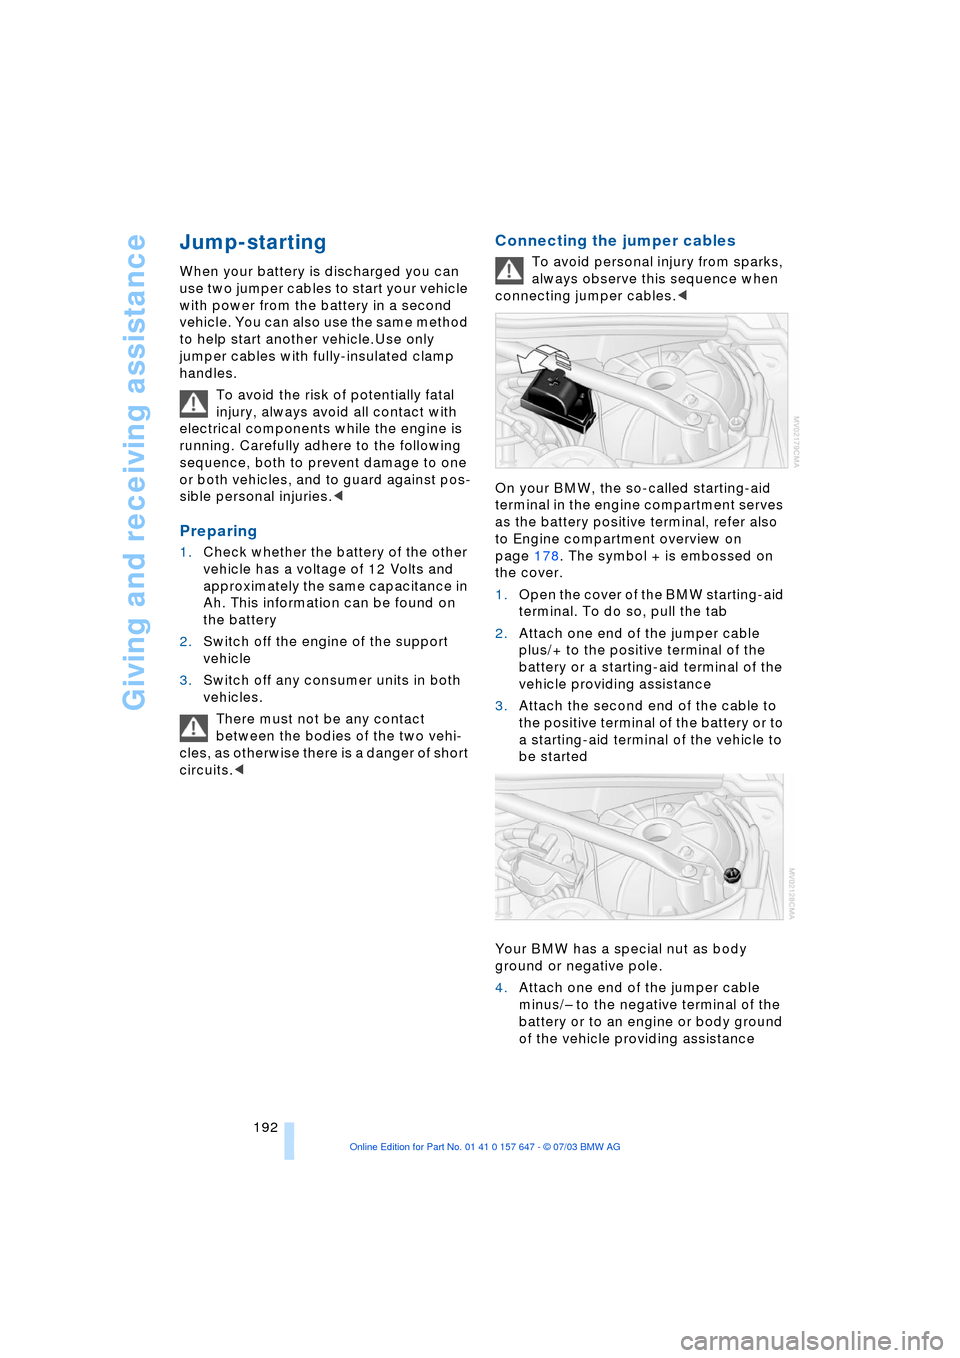
On your BMW, the so-called starting-aid
terminal in the engine compartment serves
as the battery positive terminal, refer also
to Engine compartment overview on
page 178. The symbol + is embossed on
the cover.
1.Open the cover of the BMW starting-aid
terminal. To do so, pull the tab
2.Attach one end of the jumper cable
plus/+ to the positive terminal of the
battery or a starting-aid terminal of the
vehicle providing assistance
3.Attach the second end of the cable to
the positive terminal of the battery or to
a starting-aid terminal of the vehicle to
be started
Your BMW has a special nut as body
ground or negative pole.
4.Attach one end of the jumper cable
minus/Ð to the negative terminal of the
battery or to an engine or body ground
of the vehicle providing assistance