2004 BMW 545I SEDAN high beam
[x] Cancel search: high beamPage 12 of 220
Cockpit
10
Cockpit
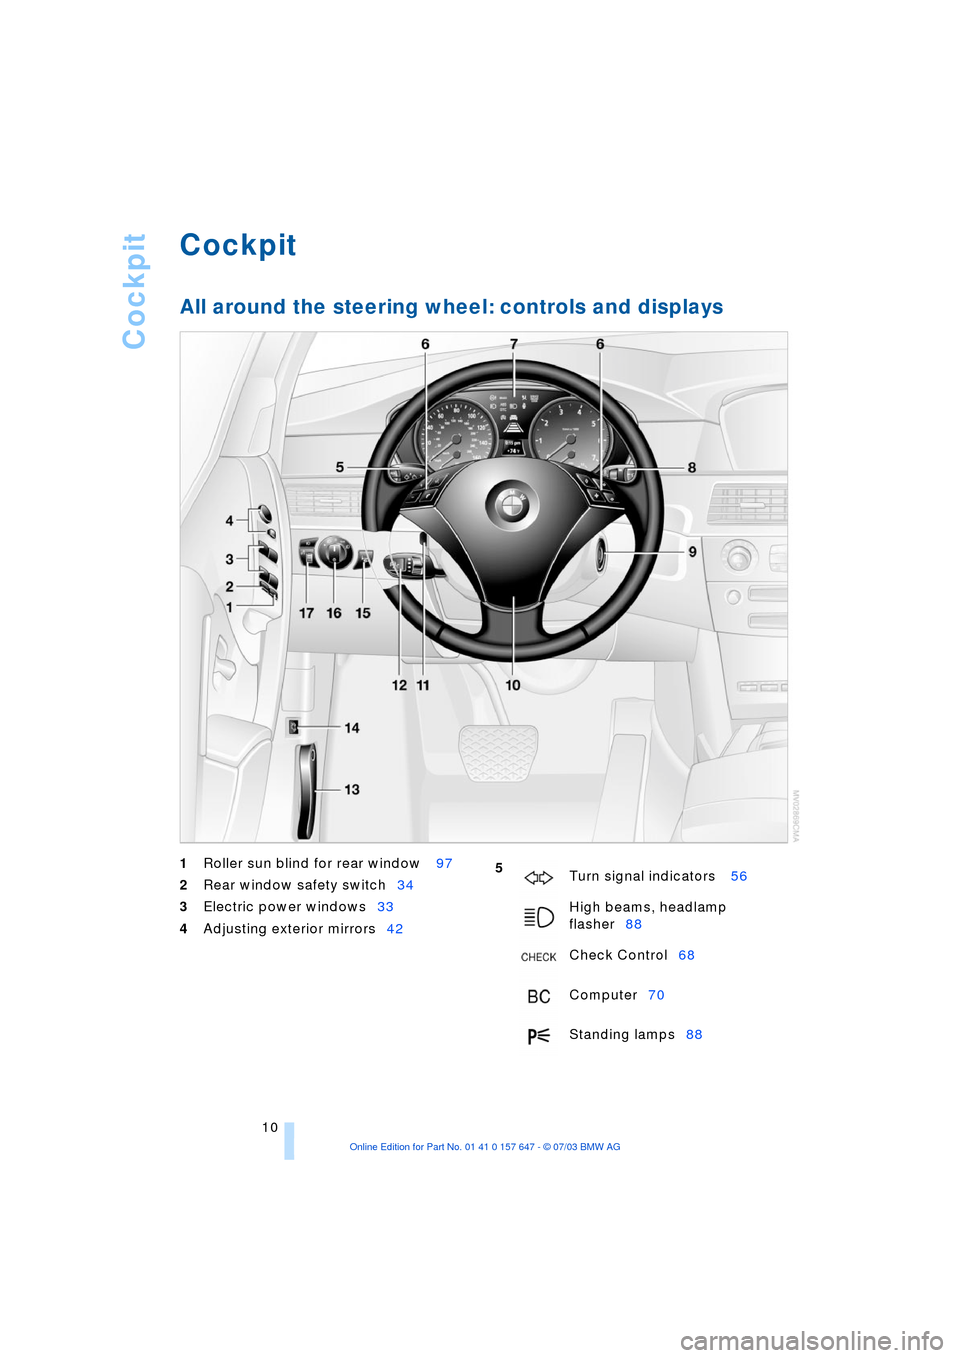
All around the steering wheel: controls and displays
1
Roller sun blind for rear window 97
2
Rear window safety switch34
3
Electric power windows33
4
Adjusting exterior mirrors42
5
Turn signal indicators 56
High beams, headlamp
flasher88
Check Control68
Computer70
Standing lamps88
Page 15 of 220

At a glance
13Reference
Controls
Driving tips
Communications
Navigation
Entertainment
Mobility
Indicator and warning
lamps
Technology that monitors itself
The indicator and warning lamps identified
by the
+ symbol are subjected to an oper-
ation check each time you switch on the
ignition or start the engine. They each light
up once for different periods of time.
When a malfunction occurs in a monitored
system, the corresponding lamp will either
fail to go out when the engine is started, or
it will come on again during normal driving.
For information on how you should respond
when this happens, please refer to the
pages indicated.
Colors
The indicator and warning lamps can light
up in different colors and combinations.
The following section explains the signifi-
cance of the individual colors as well as
how you should respond when they
appear.
>Red:
Stop immediately
or
important reminder
>Red and yellow:
Continue driving moderately
>Yellow:
Have checked soon
or
for your information
>Green or blue:
For your information.
Indicator and warning lamps of the
Check Control
Other indicator and warning lamps appear
in display 6 of the instrument cluster as
necessary, accompanied by supplemen-
tary text on the Control Display, refer to
Check Control, page 68. Turn signal indicators 56
Active steering
+82
Handbrake/brake fluid, brake
hydraulics/DBC Dynamic Brake
Control
+50/ 180/ 79
Handbrake/brake fluid, brake
hydraulics/DBC Dynamic Brake
Control for Canadian models
Airbags
+83
Service Engine Soon
+183
If the indicator lamp comes on
either continuously or intermit-
tently, this indicates a fault in the
emissions-related electronic sys-
tems. Although the vehicle
remains operational, you should
have the systems checked by your
BMW center at the earliest possi-
ble opportunity.
Service Engine Soon indicator
lamp for Canadian models.
Front fog lamps 89
ABS Antilock Brake System
+77
DTC Dynamic Traction Control79
High beams/headlamp flasher 88
Please fasten safety belt
+40
DSC Dynamic Stability
Control
+78
Check Gas Cap168
lamp for US models
Page 34 of 220
Opening and closing
32
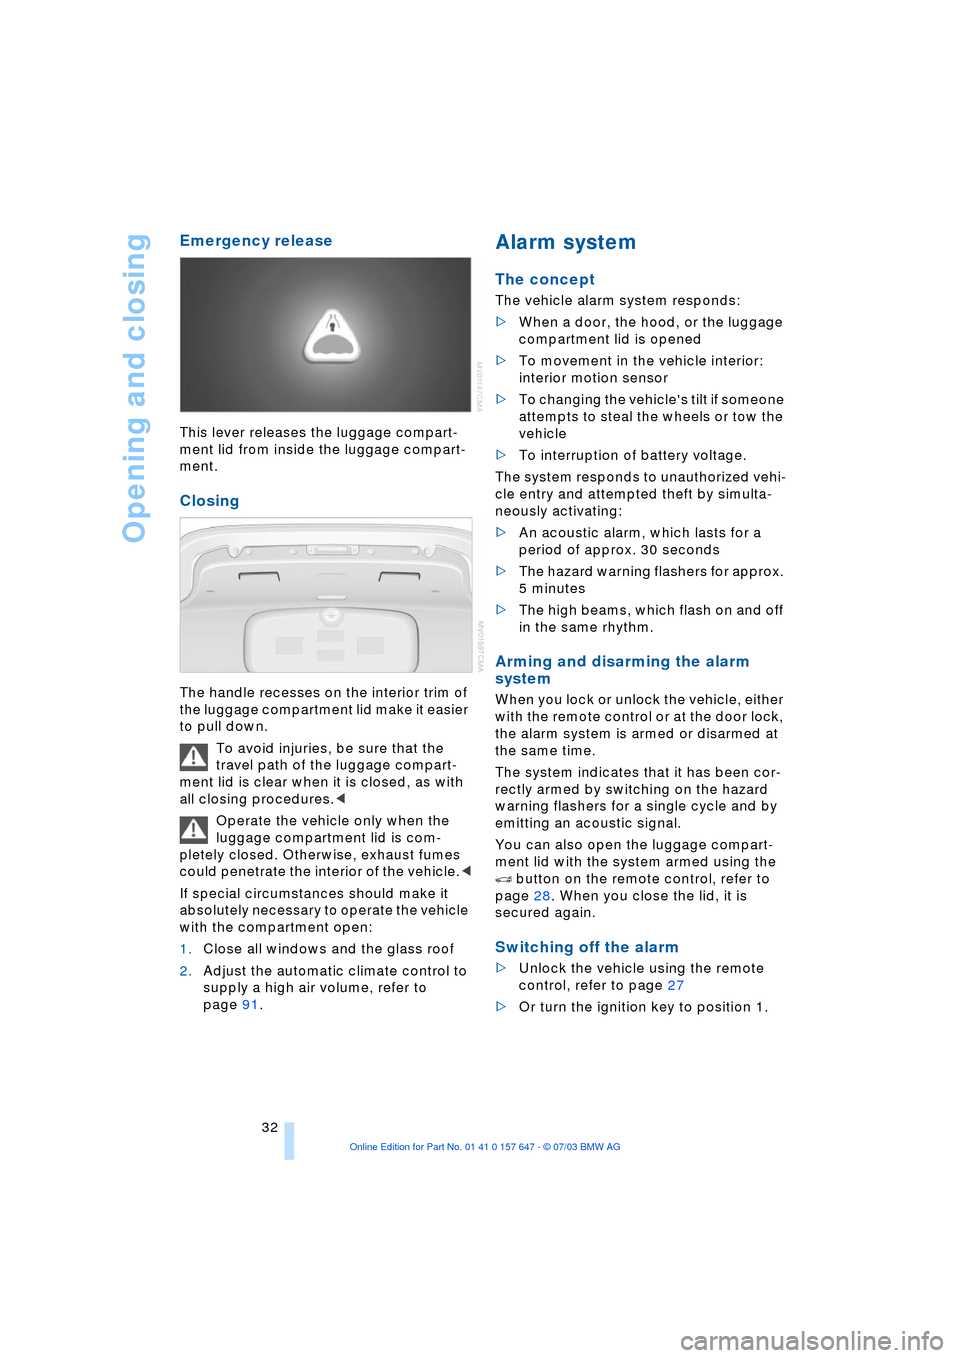
Emergency release
This lever releases the luggage compart-
ment lid from inside the luggage compart-
ment.
Closing
The handle recesses on the interior trim of
the luggage compartment lid make it easier
to pull down.
To avoid injuries, be sure that the
travel path of the luggage compart-
ment lid is clear when it is closed, as with
all closing procedures.<
Operate the vehicle only when the
luggage compartment lid is com-
pletely closed. Otherwise, exhaust fumes
could penetrate the interior of the vehicle.<
If special circumstances should make it
absolutely necessary to operate the vehicle
with the compartment open:
1.Close all windows and the glass roof
2.Adjust the automatic climate control to
supply a high air volume, refer to
page 91.
Alarm system
The concept
The vehicle alarm system responds:
>When a door, the hood, or the luggage
compartment lid is opened
>To movement in the vehicle interior:
interior motion sensor
>To changing the vehicle's tilt if someone
attempts to steal the wheels or tow the
vehicle
>To interruption of battery voltage.
The system responds to unauthorized vehi-
cle entry and attempted theft by simulta-
neously activating:
>An acoustic alarm, which lasts for a
period of approx. 30 seconds
>The hazard warning flashers for approx.
5 minutes
>The high beams, which flash on and off
in the same rhythm.
Arming and disarming the alarm
system
When you lock or unlock the vehicle, either
with the remote control or at the door lock,
the alarm system is armed or disarmed at
the same time.
The system indicates that it has been cor-
rectly armed by switching on the hazard
warning flashers for a single cycle and by
emitting an acoustic signal.
You can also open the luggage compart-
ment lid with the system armed using the
button on the remote control, refer to
page 28. When you close the lid, it is
secured again.
Switching off the alarm
>Unlock the vehicle using the remote
control, refer to page 27
>Or turn the ignition key to position 1.
Page 58 of 220
Driving
56 Shifting from M/S to the selector-lever
positions P, R and N is only possible by
going through D.
Malfunctions
Indicator lamp
If the indicator lamp lights up, a
malfunction has occurred in the
transmission system.
While it will remain still possible to move
the selector lever to any desired position,
the transmission will revert to operation in
its default mode with only a limited number
of forward gears.
If this happens, avoid extreme engine loads
and consult the nearest BMW center.
Information on jump-starting and towing
begins on page 192.
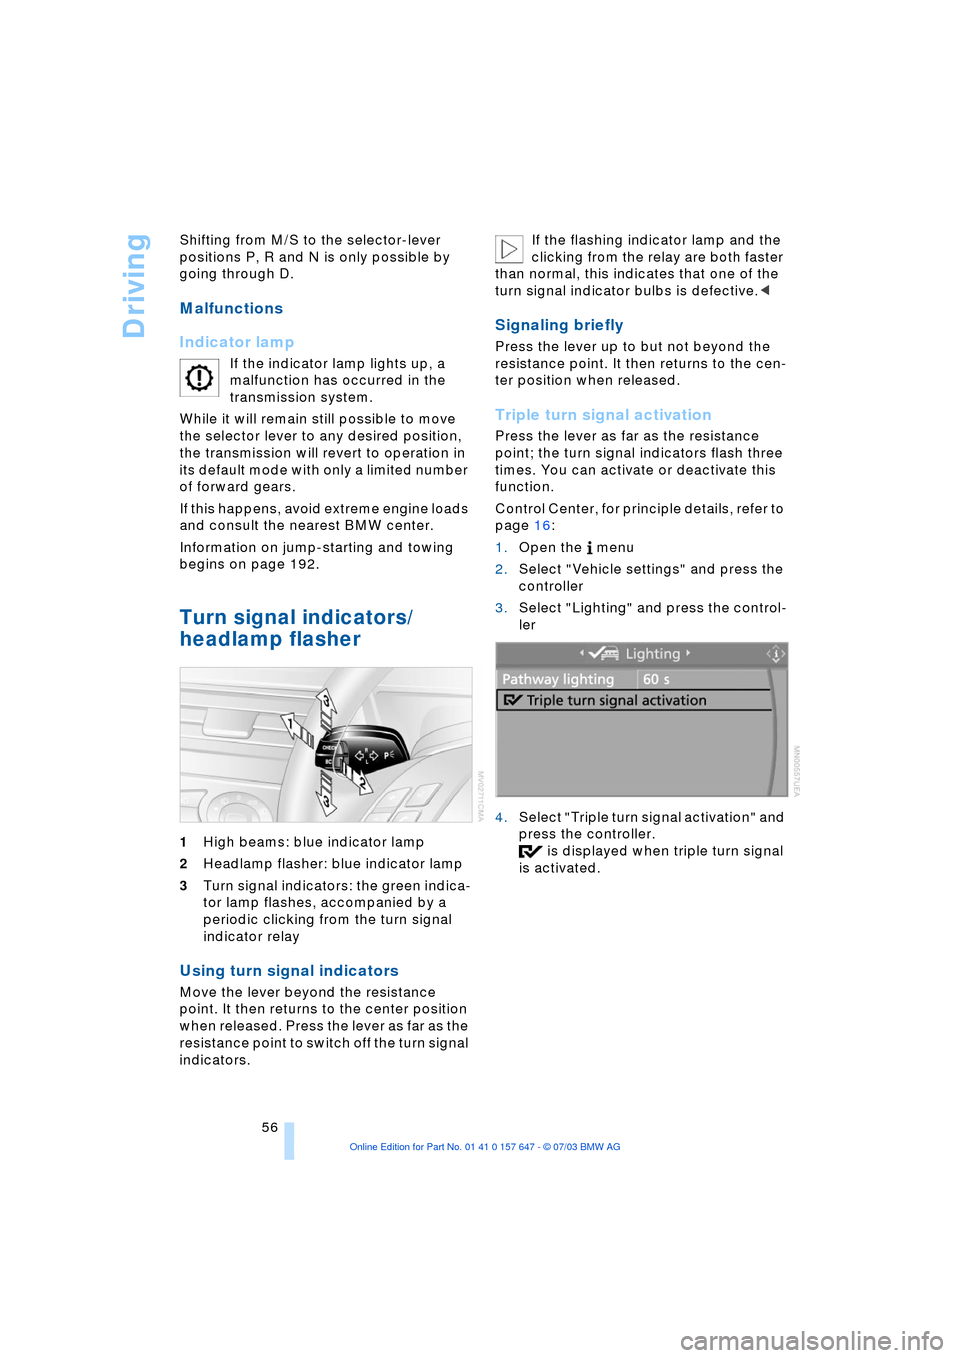
Turn signal indicators/
headlamp flasher
1High beams: blue indicator lamp
2Headlamp flasher: blue indicator lamp
3Turn signal indicators: the green indica-
tor lamp flashes, accompanied by a
periodic clicking from the turn signal
indicator relay
Using turn signal indicators
Move the lever beyond the resistance
point. It then returns to the center position
when released. Press the lever as far as the
resistance point to switch off the turn signal
indicators. If the flashing indicator lamp and the
clicking from the relay are both faster
than normal, this indicates that one of the
turn signal indicator bulbs is defective.<
Signaling briefly
Press the lever up to but not beyond the
resistance point. It then returns to the cen-
ter position when released.
Triple turn signal activation
Press the lever as far as the resistance
point; the turn signal indicators flash three
times. You can activate or deactivate this
function.
Control Center, for principle details, refer to
page 16:
1.Open the menu
2.Select "Vehicle settings" and press the
controller
3.Select "Lighting" and press the control-
ler
4.Select "Triple turn signal activation" and
press the controller.
is displayed when triple turn signal
is activated.
Page 90 of 220
Lamps
88 Following automatic activation, the
vehicle's external lighting remains on
when you switch on the fog lamps.<
The automatic headlamp control can-
not serve as a substitute for your per-
sonal judgment in determining when the
lamps should be switched on in response
to ambient lighting conditions. For exam-
ple, the system cannot detect fog. To avoid
safety risks, you should always switch on
the lamps manually under these condi-
tions.<
Adaptive Head Light*
The concept
Adaptive Head Light is a variable headlamp
control system that enables dynamic illumi-
nation of the road surface. Depending on
the steering angle and other assumptions,
the light from the headlamp follows the
course of the road.
Activating Adaptive Head Light
In ignition key position 2, turn the
light switch to the position 'Auto-
matic headlamp control', refer to
page 87.
When reversing, the Adaptive Head
Light is inactive; when the vehicle is
stationary, it is only active in one direc-
tion.<
In case of malfunction
The LED above the symbol for automatic
headlamp control flashes. Please have the
system inspected at your BMW center.
Instrument lighting
Turn the serrated dial to adjust the illumina-
tion intensity.
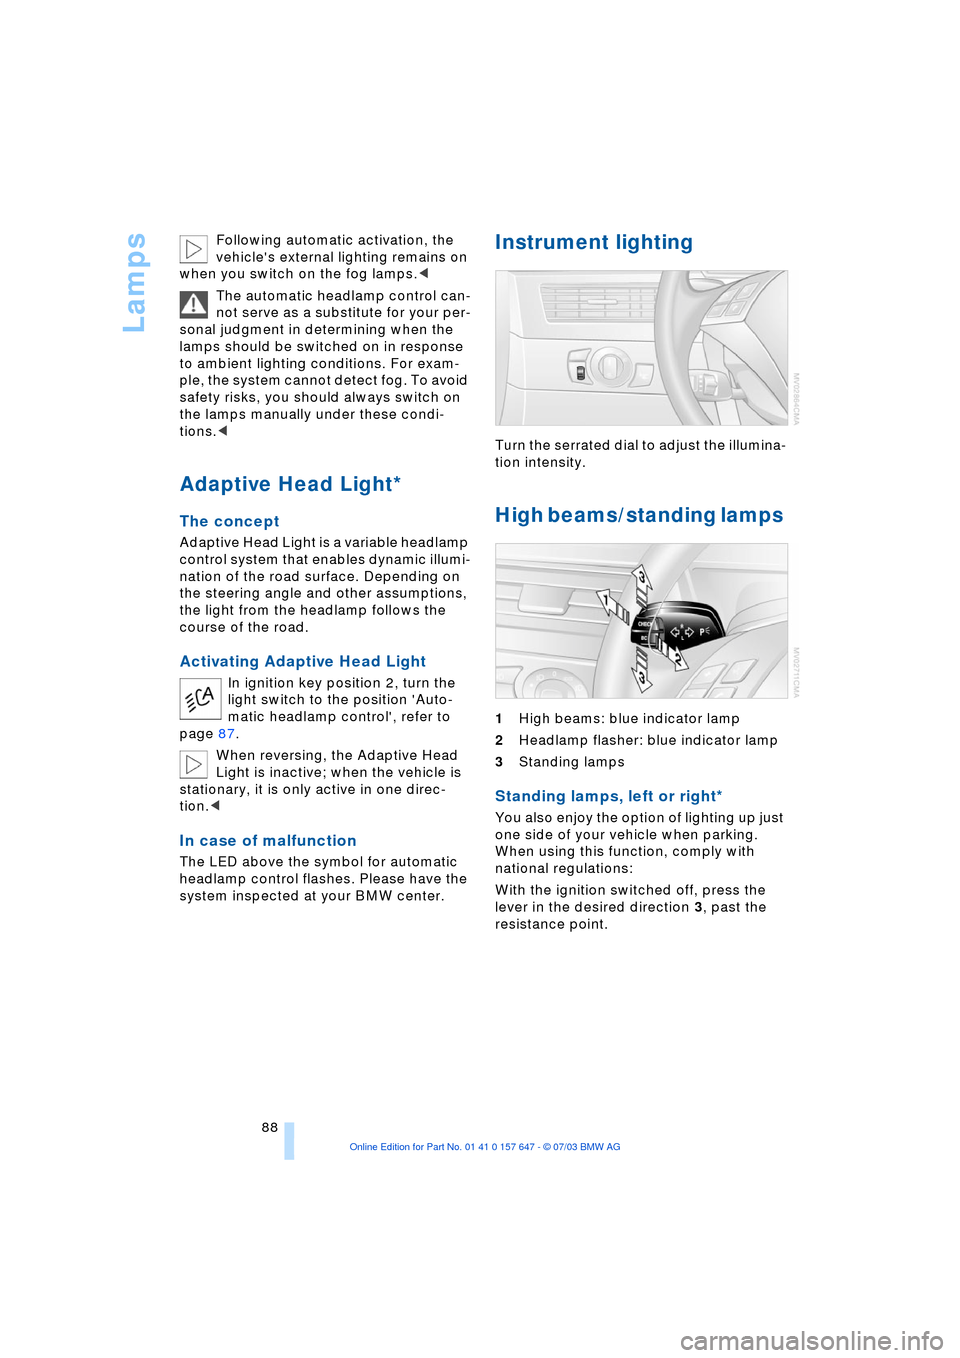
High beams/standing lamps
1High beams: blue indicator lamp
2Headlamp flasher: blue indicator lamp
3Standing lamps
Standing lamps, left or right*
You also enjoy the option of lighting up just
one side of your vehicle when parking.
When using this function, comply with
national regulations:
With the ignition switched off, press the
lever in the desired direction 3, past the
resistance point.
Page 91 of 220
Controls
89Reference
At a glance
Driving tips
Communications
Navigation
Entertainment
Mobility
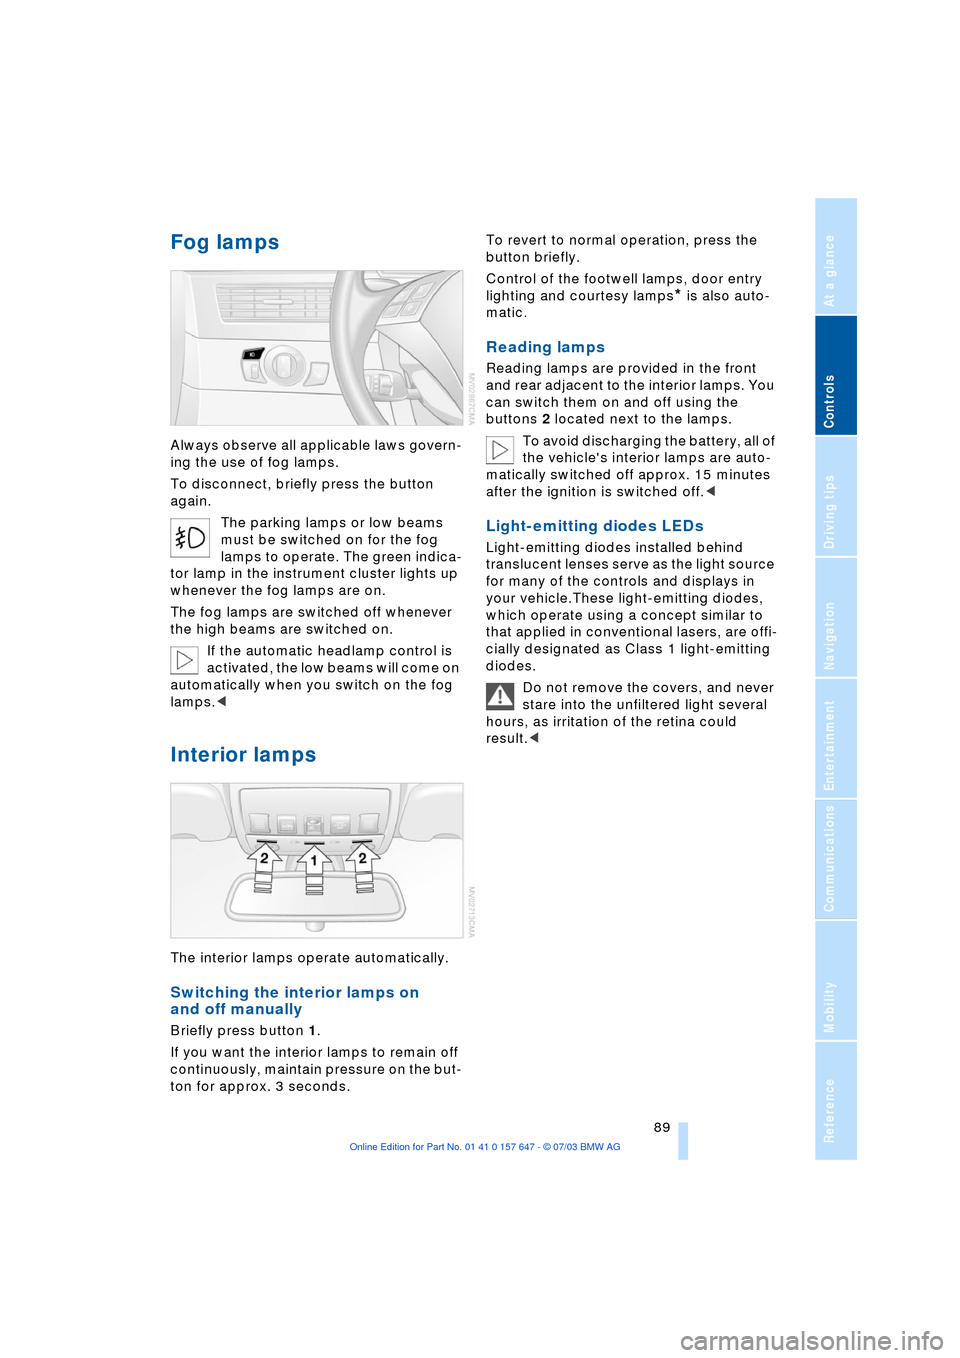
Fog lamps
Always observe all applicable laws govern-
ing the use of fog lamps.
To disconnect, briefly press the button
again.
The parking lamps or low beams
must be switched on for the fog
lamps to operate. The green indica-
tor lamp in the instrument cluster lights up
whenever the fog lamps are on.
The fog lamps are switched off whenever
the high beams are switched on.
If the automatic headlamp control is
activated, the low beams will come on
automatically when you switch on the fog
lamps.<
Interior lamps
The interior lamps operate automatically.
Switching the interior lamps on
and off manually
Briefly press button 1.
If you want the interior lamps to remain off
continuously, maintain pressure on the but-
ton for approx. 3 seconds. To revert to normal operation, press the
button briefly.
Control of the footwell lamps, door entry
lighting and courtesy lamps
* is also auto-
matic.
Reading lamps
Reading lamps are provided in the front
and rear adjacent to the interior lamps. You
can switch them on and off using the
buttons 2 located next to the lamps.
To avoid discharging the battery, all of
the vehicle's interior lamps are auto-
matically switched off approx. 15 minutes
after the ignition is switched off.<
Light-emitting diodes LEDs
Light-emitting diodes installed behind
translucent lenses serve as the light source
for many of the controls and displays in
your vehicle.These light-emitting diodes,
which operate using a concept similar to
that applied in conventional lasers, are offi-
cially designated as Class 1 light-emitting
diodes.
Do not remove the covers, and never
stare into the unfiltered light several
hours, as irritation of the retina could
result.<
Page 186 of 220
Replacing components
184
Replacing components
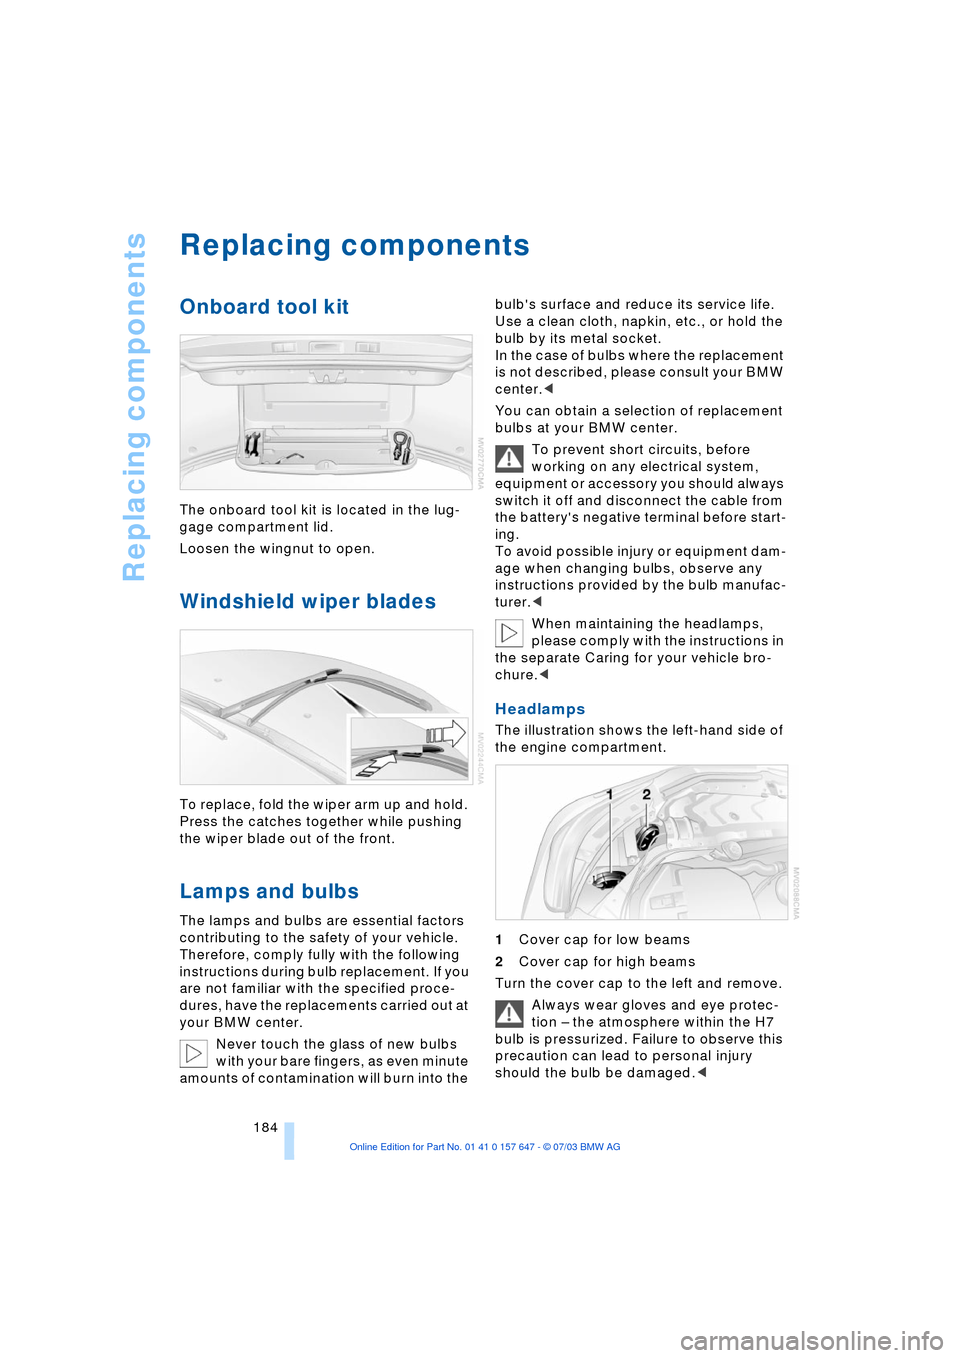
Onboard tool kit
The onboard tool kit is located in the lug-
gage compartment lid.
Loosen the wingnut to open.
Windshield wiper blades
To replace, fold the wiper arm up and hold.
Press the catches together while pushing
the wiper blade out of the front.
Lamps and bulbs
The lamps and bulbs are essential factors
contributing to the safety of your vehicle.
Therefore, comply fully with the following
instructions during bulb replacement. If you
are not familiar with the specified proce-
dures, have the replacements carried out at
your BMW center.
Never touch the glass of new bulbs
with your bare fingers, as even minute
amounts of contamination will burn into the bulb's surface and reduce its service life.
Use a clean cloth, napkin, etc., or hold the
bulb by its metal socket.
In the case of bulbs where the replacement
is not described, please consult your BMW
center.<
You can obtain a selection of replacement
bulbs at your BMW center.
To prevent short circuits, before
working on any electrical system,
equipment or accessory you should always
switch it off and disconnect the cable from
the battery's negative terminal before start-
ing.
To avoid possible injury or equipment dam-
age when changing bulbs, observe any
instructions provided by the bulb manufac-
turer.<
When maintaining the headlamps,
please comply with the instructions in
the separate Caring for your vehicle bro-
chure.<
Headlamps
The illustration shows the left-hand side of
the engine compartment.
1Cover cap for low beams
2Cover cap for high beams
Turn the cover cap to the left and remove.
Always wear gloves and eye protec-
tion Ð the atmosphere within the H7
bulb is pressurized. Failure to observe this
precaution can lead to personal injury
should the bulb be damaged.<
Page 187 of 220
Mobility
185Reference
At a glance
Controls
Driving tips
Communications
Navigation
Entertainment
For checking and adjusting headlamp
aim, please contact your BMW cen-
ter.<
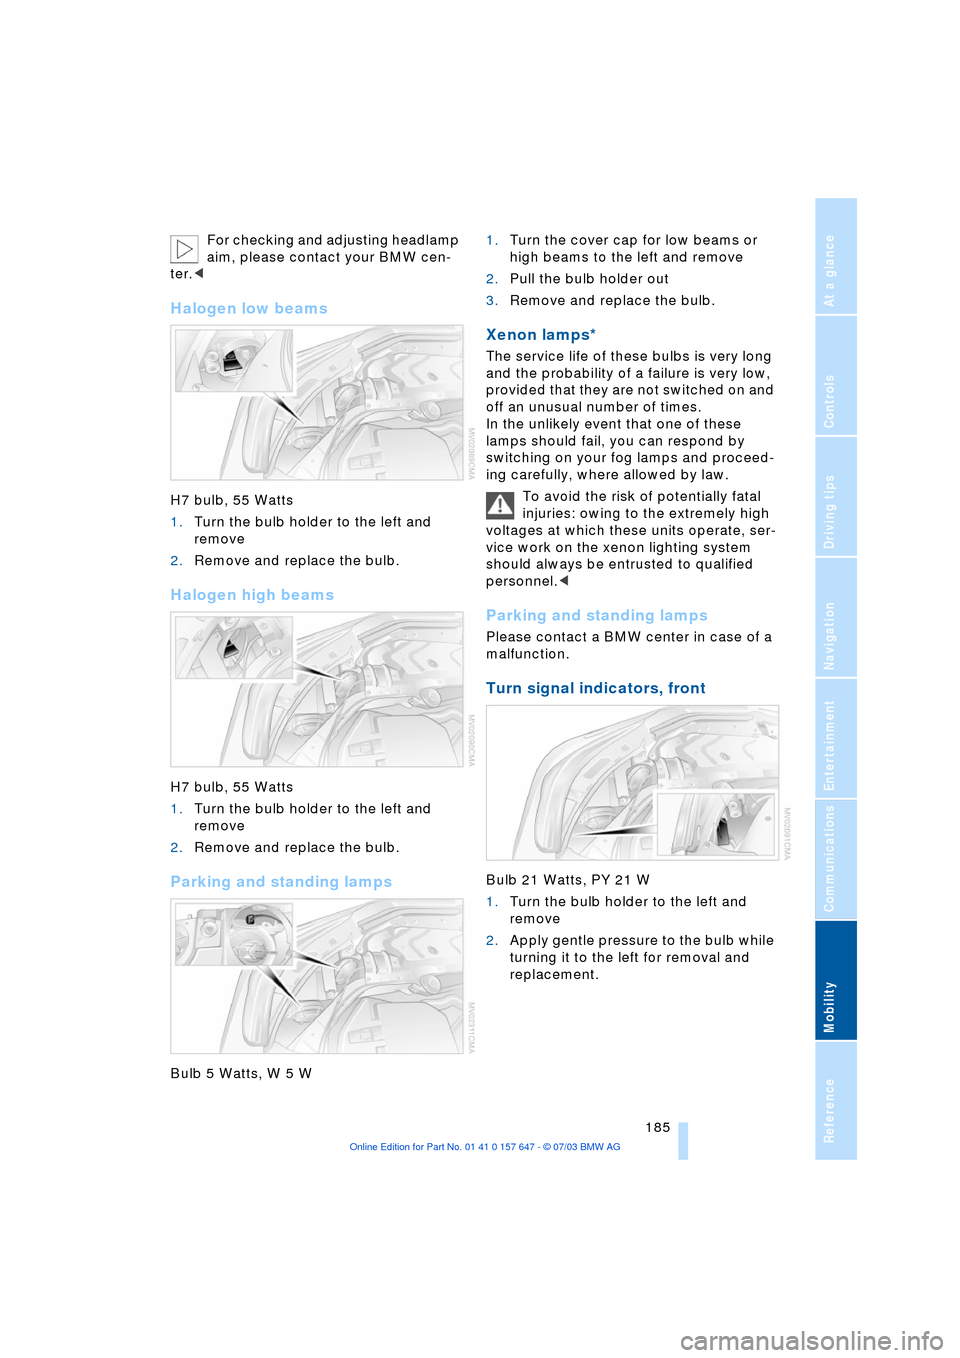
Halogen low beams
H7 bulb, 55 Watts
1.Turn the bulb holder to the left and
remove
2.Remove and replace the bulb.
Halogen high beams
H7 bulb, 55 Watts
1.Turn the bulb holder to the left and
remove
2.Remove and replace the bulb.
Parking and standing lamps
Bulb 5 Watts, W 5 W 1.Turn the cover cap for low beams or
high beams to the left and remove
2.Pull the bulb holder out
3.Remove and replace the bulb.
Xenon lamps*
The service life of these bulbs is very long
and the probability of a failure is very low,
provided that they are not switched on and
off an unusual number of times.
In the unlikely event that one of these
lamps should fail, you can respond by
switching on your fog lamps and proceed-
ing carefully, where allowed by law.
To avoid the risk of potentially fatal
injuries: owing to the extremely high
voltages at which these units operate, ser-
vice work on the xenon lighting system
should always be entrusted to qualified
personnel.<
Parking and standing lamps
Please contact a BMW center in case of a
malfunction.
Turn signal indicators, front
Bulb 21 Watts, PY 21 W
1.Turn the bulb holder to the left and
remove
2.Apply gentle pressure to the bulb while
turning it to the left for removal and
replacement.