2004 BMW 330CI CONVERTIBLE towing
[x] Cancel search: towingPage 10 of 186

Contents
Operation, maintenance
Special operating instructions:
Break-in procedures124
General driving notes125
Antilock Brake System
(ABS)125
Brake system126
Hardtop*127
Wheels and tires:
Tire inflation pressure129
Tire condition129
Tire replacement130
Wheel and tire
combinations132
Winter tires132
In the engine compartment:
Hood134
Engine compartment
essentials136
Washer fluid138
Engine oil138
Coolant140
Brake fluid141
Maintenance:
The BMW Maintenance
System142
Laws and regulations:
California Proposition 65
warning143
OBD interface socket143
Owner service procedures
Replacement procedures:
Onboard tool kit148
Windshield wiper blades148
Lamps and bulbs149
Changing a wheel153
Run Flat tires*156
Battery157
Fuses157
Giving and receiving
assistance: Receiving assistance158
Jump-starting159
Towing the vehicle160
Technical data
Engine data166
Dimensions167
Weights168
Capacities169
Page 77 of 186

77
instance, downshifts that would
result in excessive engine speed can-
not be executed.
>When you brake the car to a stop, the
transmission automatically shifts
down to first gear
>As speed diminishes the transmission
will shift down automatically, without
any action on your part, just before
the vehicle slows to below each
gear's minimum speed.
Available displaysR N 1 2 3 4 5 6
D1 D2 D3 D4 D5 D6
The currently engaged gear, the
selected mode, and any malfunctions
are displayed in the instrument cluster.Indicator lamp
If the indicator lamp comes on,
there is a malfunction in the
transmission system.
All selector lever positions can still be
engaged, but in the forward driving
positions only certain gears are actually
available when the vehicle is driven.
Avoid extreme loads and proceed to
the nearest BMW center.
For information on jump-starting and
towing the vehicle, refer to page 159.Warning toneAn acoustic signal sounds if the SMG
gearbox overheats; if possible you
should either stop or increase your pull-
away speed so that the system can
cool down.
Sequential manual gearbox SMG*
OverviewControlsMaintenanceRepairsDataIndex
Page 81 of 186

81
Available displaysP R N D SD M1 M2 M3 M4 M5Electronic transmission control
module
If the indicator lamp comes on,
there is a malfunction in the
transmission system.
Bring the vehicle to a stop. Move the
transmission selector lever to P. Set the
parking brake and turn the engine off –
ignition key to position 0.
Wait a few seconds, then start the
engine.
If the indicator lamp goes out after a
few seconds, normal transmission per-
formance has been restored. You may
continue to drive as usual.
If the indicator lamp does not go out,
you can place the selector lever in all
positions. However, the vehicle will now
only operate in 3rd and 4th gear.
If this happens, avoid extreme engine
loads and consult the nearest autho-
rized BMW center.
Never work in the engine com-
partment when a drive gear – for-
ward or reverse – is engaged. If you do
this, the vehicle could move.<
For towing or jump-starting, refer to the
information beginning on page 159.
Automatic transmission with Steptronic*
OverviewControlsMaintenanceRepairsDataIndex
Page 119 of 186

119
4. The resulting figure equals the avail-
able amount of cargo and luggage
load capacity.
For example, if the XXX amount
equals 1,400 lbs. and there will be
five 150 lbs. passengers in your vehi-
cle, the amount of available cargo
and luggage load capacity is
650 lbs.:
1,400 lbs. minus 750 lbs. = 650 lbs.
5. Determine the combined weight of
luggage and cargo being loaded on
the vehicle. That weight may not
safely exceed the available cargo
and luggage load capacity calculated
in Step 4
6. If your vehicle will be towing a trailer,
load from your trailer will be trans-
fered to your vehicle. Consult the
manual for transporting a trailer to
determine how this may reduce the
available cargo and luggage load
capacity of your vehicle.
Stowing cargo>Load heavy cargo as far forward as
possible – directly behind the lug-
gage compartment partition – and as
low as possible
>Cover sharp edges and corners.
With the convertible top closed,
you can increase the space in the
luggage compartment – refer to
page 37 – by folding back the convert-
ible top compartment panel.
We recommend that you always fold
the convertible top compartment panel
down as soon as you have removed
your cargo from the luggage compart-
ment. This way, you can be sure that
you can always operate your convert-
ible top at any time.
At the same time, when the top is
raised you should fold the convertible
top compartment panel back up before
stowing large objects in the luggage
compartment; this precaution will help
reduce the likelihood of damage to
either the convertible top compartment
or your luggage.<
Cargo loading
OverviewControlsMaintenanceRepairsDataIndex
Page 160 of 186

160
2. Start the engine of the other vehicle
as usual.
If the first start attempt is not suc-
cessful, wait a few minutes before
another attempt in order to allow the
discharged battery to recharge
3. Allow the engines to run for several
minutes
4. Disconnect the jumper cables in
reverse sequence.
Depending on the cause of the fault,
have the battery checked and
recharged by your BMW center.
Do not use spray starter fluids to
start the engine.<
Towing the vehicle
Always comply with all applicable
towing laws and regulations.<
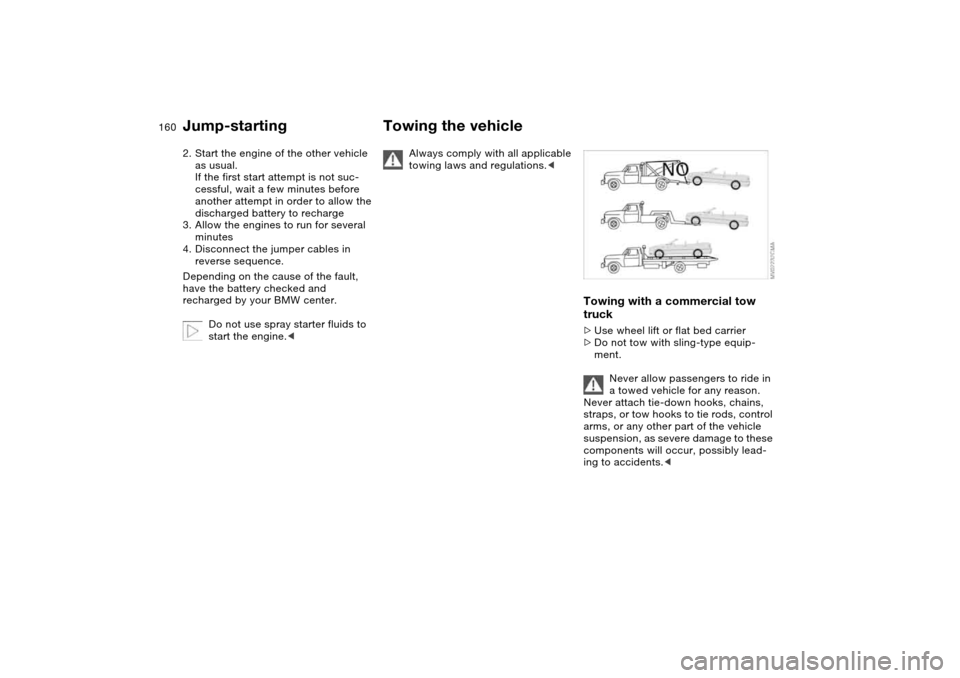
Towing with a commercial tow
truck>Use wheel lift or flat bed carrier
>Do not tow with sling-type equip-
ment.
Never allow passengers to ride in
a towed vehicle for any reason.
Never attach tie-down hooks, chains,
straps, or tow hooks to tie rods, control
arms, or any other part of the vehicle
suspension, as severe damage to these
components will occur, possibly lead-
ing to accidents.<
Jump-starting
Page 161 of 186

161
Towing the vehicle with the front
axle raisedVehicles with automatic transmission:
1. Towing speed: maximum 45 mph /
70 km/h
2. Towing distance: maximum
90 miles/150 km.
Vehicles with sequential manual gear-
box SMG:
While the ignition is on, move the selec-
tor lever to position N, then turn off the
ignition.Towing eyeletThe screw-in towing eyelet is stored in
the onboard tool kit; be sure that it
remains in the vehicle at all times. It can
be attached at the front or rear of the
vehicle. It should not be used to pull a
vehicle out of deep snow, mud, sand,
etc.
Always observe all applicable towing
laws and regulations.
Access to tow socketsFront:
Press out the cover panel with a screw-
driver inserted in the recess at the top.
Rear:
Press out the cover panel with a screw-
driver inserted in the recess at the top.
Use only the towing eyelet sup-
plied with the vehicle and screw it
in firmly until it stops. Use the towing
eyelet for towing on paved roads only. If
you do not follow these instructions, the
towing eyelet could be torn out and
vehicle damage could occur.
Never attach tie-down hooks, chains,
straps, or tow hooks to tie rods, control
arms, or any other part of the vehicle
suspension, as severe damage to these
components will occur, possibly lead-
ing to accidents.<
Towing the vehicle
OverviewControlsMaintenanceRepairsDataIndex
Page 162 of 186

162
Avoid staggered towing and be
careful that the towing strap is
taut before starting to drive the vehicle
doing the towing.<
Use only a nylon towing strap to tow
the vehicle, since the inherent resil-
ience of this material helps protect both
vehicles from sudden jerking move-
ments.
The towed vehicle should always
be the lighter of the two vehicles.
If this is not the case, it will not be pos-
sible to control vehicle handling.<
Tow-startingFor instructions on jump-starting, refer
to page 159.
Never attempt to use your vehicle to
push another car, since damage to the
energy-absorbing bumpers could
result.Towing the vehicle
Page 172 of 186

Everything from A to ZA
ABS Antilock Brake
System 125
indicator lamp 19
Acceleration assistant 78
Accessories, refer to For
your own safety 5
Accident, refer to Emer-
gency call 158
Activated-charcoal filter 110
Adaptive headlights 98
Adding brake fluid 141
Additional sources of infor-
mation 4
Air conditioning 102
Air conditioning mode 104
automatic climate
control 108
Air distribution
air conditioning 104
automatic climate
control 108
Air distribution,
individual 108
Air outlets, refer to Ventila-
tion 102, 106
Air pressure, refer to Tire
inflation pressure 25, 129
Air recirculation, refer to
Recirculated-air mode
104, 109Air supply
air conditioning 104
automatic climate
control 108
Air, drying, refer to Air con-
ditioning mode 104, 108
Airbags 61
deactivating 64
indicator lamp 18, 63
sitting safely 52
Airing out, refer to Ventila-
tion 102, 106
AKI, refer to Fuel specifica-
tions 25
Alarm system 38
avoiding unintentional
alarms 39
All-season tires, refer to
Winter tires 132
Antifreeze 140
coolant 140
washer fluid 138
Antilock Brake System
(ABS) 125
indicator lamp 19
Anti-theft system 30
Anti-theft warning system,
refer to Alarm system 38
Approved axle loads, refer
to Weights 168
Approved gross weight,
refer to Weights 168Armrest 114
Artificial leather, refer to the
Caring for your vehicle
brochure
Ashtray
front 115
rear 116
Assistant systems, refer to
Dynamic Stability Control
(DSC) 93
AUC Automatic recircu-
lated-air control 109
AUTO program, refer to
Automatic air
distribution 108
Automatic
air distribution 108
air supply 108
cruise control 84
headlamp control 97
Automatic car wash, refer to
the Caring for your vehicle
brochure
Automatic climate
control 106
Automatic curb monitor 58
Automatic dimming, interior
rearview mirror 60
Automatic recirculated-air
control (AUC) 109Automatic transmission with
Steptronic 79
indicator lamp 19, 81
interlock 71
selector lever lock 79
shiftlock 79
Automatic windshield
washer, refer to Rain sen-
sor 83
Average fuel
consumption 91
Average speed 91
Avoiding unintentional
alarms 39
Axle loads, refer to
Weights 168
B
Backrest
unlock 55
Backrest, refer to Seat
adjustment 53
Backup lamps 74
bulb replacement 151
Bandages, refer to First-aid
kit 23
Bar, towing 161