2004 BMW 325CI CONVERTIBLE ABS
[x] Cancel search: ABSPage 132 of 186

132
Wheel and tire combinationsThe right choice
BMW recommends using only
wheels and tires that have been
approved by BMW for your particular
vehicle model, as otherwise body con-
tact and serious accidents can result
despite the use of the same nominal
size, e.g. due to manufacturing toler-
ances. BMW cannot evaluate all tires
and wheels on the market, and is thus
unable to guarantee that the vehicle will
continue to perform safely if unap-
proved tires and/or wheels are
mounted.<
For each tire size, BMW has assessed
the safe performance of specific tire
brands and approved them for use.
Consult any BMW center for details.
Comply with any local/national regula-
tions, for example by recording the tire
type in the vehicle documents.
The correct wheel and tire combi-
nation affects various systems
that would otherwise be impaired, for
example ABS, DSC and DBC.
For this reason, use only tires of the
same manufacture and tread configura-
tion. In the event of a flat tire, for exam-
ple, remount the approved wheel and
tire combination as soon as possible.<
StorageAlways store tires in a cool, dry place.
Store them away from light whenever
possible. Protect the tires against con-
tact with oil, grease and fuel.
Do not exceed the maximum tire infla-
tion pressures specified on the tire
sidewall.
Winter tiresChoosing the right tireBMW recommends the use of winter
tires for operation under winter road
conditions. While all-season tires – with
M+S designation – provide better winter
traction than the corresponding sum-
mer tires, they generally do not achieve
the performance of winter tires.
In the interest of safe tracking and
steering response, install winter tires
made by the same manufacturer and
with the same tread configuration on all
four wheels.
Never exceed the maximum
speed for which the winter tires
are rated.
Unprofessional attempts by laymen to
service tires can lead to damage and
accidents.
Have this work performed by trained
professionals only. Any BMW center
has the required technical knowledge
and the proper equipment and will be
happy to assist you.
tires. These are indicated by a circular
symbol containing the letters RSC on
Page 141 of 186

141
Brake fluidIndicator lamp
The brake warning lamp comes
on when the parking brake is
not engaged: the brake fluid
level is too low, refer to page 18.
Brake warning lamp for Cana-
dian models.
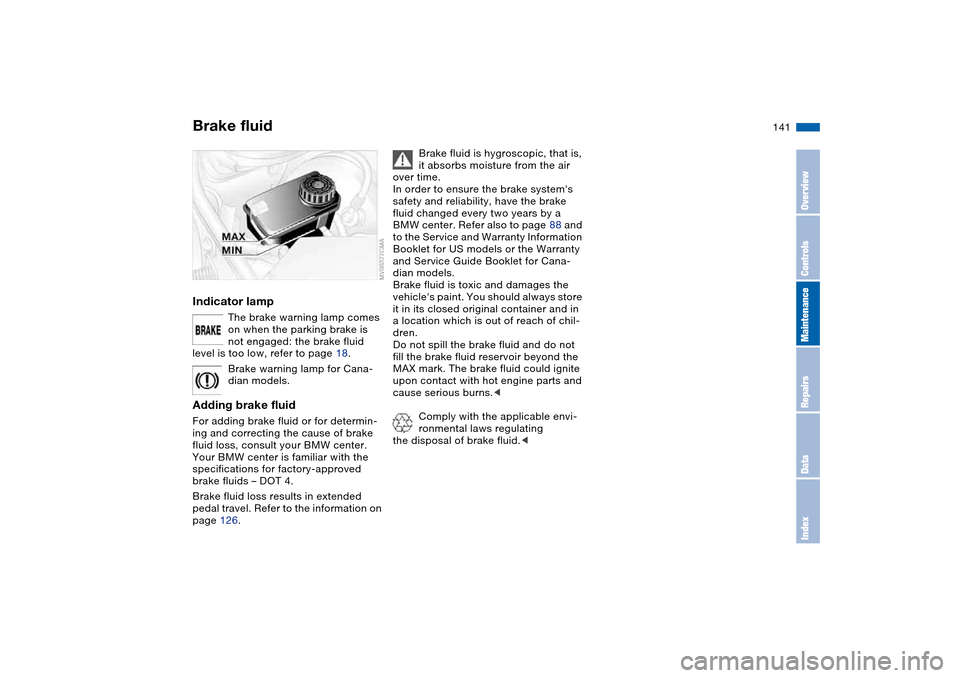
Adding brake fluidFor adding brake fluid or for determin-
ing and correcting the cause of brake
fluid loss, consult your BMW center.
Your BMW center is familiar with the
specifications for factory-approved
brake fluids – DOT 4.
Brake fluid loss results in extended
pedal travel. Refer to the information on
page 126.
Brake fluid is hygroscopic, that is,
it absorbs moisture from the air
over time.
In order to ensure the brake system's
safety and reliability, have the brake
fluid changed every two years by a
BMW center. Refer also to page 88 and
to the Service and Warranty Information
Booklet for US models or the Warranty
and Service Guide Booklet for Cana-
dian models.
Brake fluid is toxic and damages the
vehicle's paint. You should always store
it in its closed original container and in
a location which is out of reach of chil-
dren.
Do not spill the brake fluid and do not
fill the brake fluid reservoir beyond the
MAX mark. The brake fluid could ignite
upon contact with hot engine parts and
cause serious burns.<
Comply with the applicable envi-
ronmental laws regulating
the disposal of brake fluid.<
OverviewControlsMaintenanceRepairsDataIndex
Page 159 of 186

159
Jump-startingWhen your battery is discharged you
can use two jumper cables to start your
vehicle with power from the battery in a
second vehicle. You can also use the
same method to help start another
vehicle. Only use jumper cables with
fully insulated handles on the terminal
clamps.
Do not touch high-voltage wiring
and cables on a running engine.
Contact with components carrying high
voltage can be harmful or fatal. Care-
fully observe the following instructions
to avoid personal injury and/or damage
to one or both vehicles.
approximately the same capacity –
measured in Ah. This information is
provided on the battery
2. Stop the engine of the support vehi-
cle
3. Switch off all electrical components
in both vehicles.
Make absolutely certain that there
is no contact between the body-
work of the two vehicles, otherwise
there is a short circuit hazard.<
Connecting the jumper cables
Always adhere to this sequence
when connecting jumper cables;
failure to observe this procedure can
lead to sparks at the battery terminals
and pose an injury hazard.<
The auxiliary jump-starting terminal
located in your BMW's engine compart-
ment acts as the positive battery termi-
nal. Refer to the engine compartment
overview on page, 136. The cover of
this auxiliary terminal is marked with
a +.
1. Open the cover of the BMW auxiliary
jump-starting terminal. Do so by pull-
ing the tab – see arrow 1
2. Connect one terminal clamp of the
plus/+ jumper cable to the positive
terminal of the battery or to an auxil-
iary jump-starting terminal of the
support vehicle
3. Connect the second terminal clamp
of the plus/+ jumper cable to the
positive terminal of the battery or to
an auxiliary jump-starting terminal of
the vehicle to be started
4. Your BMW is equipped with a special
nut – see arrow 2 – to serve as the
ground or negatvie terminal.
Attach a terminal clamp of the
minus/– jumper cable to the negative
terminal of the support vehicle's bat-
tery or to a suitable ground on its
engine or bodywork
5. Attach the second terminal clamp of
the minus/– jumper cable to the neg-
ative terminal of the battery or to a
suitable ground on the engine or
bodywork of the vehicle to be
started.Starting the engine1. Start the engine of the support vehi-
cle and let it run for several minutes
at a slightly elevated engine idle
speed
OverviewControlsMaintenanceRepairsDataIndex
Page 162 of 186

162
Avoid staggered towing and be
careful that the towing strap is
taut before starting to drive the vehicle
doing the towing.<
Use only a nylon towing strap to tow
the vehicle, since the inherent resil-
ience of this material helps protect both
vehicles from sudden jerking move-
ments.
The towed vehicle should always
be the lighter of the two vehicles.
If this is not the case, it will not be pos-
sible to control vehicle handling.<
Tow-startingFor instructions on jump-starting, refer
to page 159.
Never attempt to use your vehicle to
push another car, since damage to the
energy-absorbing bumpers could
result.Towing the vehicle
Page 172 of 186

Everything from A to ZA
ABS Antilock Brake
System 125
indicator lamp 19
Acceleration assistant 78
Accessories, refer to For
your own safety 5
Accident, refer to Emer-
gency call 158
Activated-charcoal filter 110
Adaptive headlights 98
Adding brake fluid 141
Additional sources of infor-
mation 4
Air conditioning 102
Air conditioning mode 104
automatic climate
control 108
Air distribution
air conditioning 104
automatic climate
control 108
Air distribution,
individual 108
Air outlets, refer to Ventila-
tion 102, 106
Air pressure, refer to Tire
inflation pressure 25, 129
Air recirculation, refer to
Recirculated-air mode
104, 109Air supply
air conditioning 104
automatic climate
control 108
Air, drying, refer to Air con-
ditioning mode 104, 108
Airbags 61
deactivating 64
indicator lamp 18, 63
sitting safely 52
Airing out, refer to Ventila-
tion 102, 106
AKI, refer to Fuel specifica-
tions 25
Alarm system 38
avoiding unintentional
alarms 39
All-season tires, refer to
Winter tires 132
Antifreeze 140
coolant 140
washer fluid 138
Antilock Brake System
(ABS) 125
indicator lamp 19
Anti-theft system 30
Anti-theft warning system,
refer to Alarm system 38
Approved axle loads, refer
to Weights 168
Approved gross weight,
refer to Weights 168Armrest 114
Artificial leather, refer to the
Caring for your vehicle
brochure
Ashtray
front 115
rear 116
Assistant systems, refer to
Dynamic Stability Control
(DSC) 93
AUC Automatic recircu-
lated-air control 109
AUTO program, refer to
Automatic air
distribution 108
Automatic
air distribution 108
air supply 108
cruise control 84
headlamp control 97
Automatic car wash, refer to
the Caring for your vehicle
brochure
Automatic climate
control 106
Automatic curb monitor 58
Automatic dimming, interior
rearview mirror 60
Automatic recirculated-air
control (AUC) 109Automatic transmission with
Steptronic 79
indicator lamp 19, 81
interlock 71
selector lever lock 79
shiftlock 79
Automatic windshield
washer, refer to Rain sen-
sor 83
Average fuel
consumption 91
Average speed 91
Avoiding unintentional
alarms 39
Axle loads, refer to
Weights 168
B
Backrest
unlock 55
Backrest, refer to Seat
adjustment 53
Backup lamps 74
bulb replacement 151
Bandages, refer to First-aid
kit 23
Bar, towing 161
Page 173 of 186

Everything from A to Z
173
Battery 157
charge 157
disposal 157
indicator lamp 18
jump-starting 159
remote control 30, 31
Battery charge current 18
Belts, refer to Safety
belts 56
Beverage holders 115
Blower
air conditioning 104
automatic climate
control 108
BMW High Performance
Synthetic Oils 139
BMW Maintenance
System 142
BMW sports seat 53
Bore, refer to Engine
data 166
Bottle holders, see Bever-
age holders 115
Brake fluid 141
indicator lamp 18, 141
level 141
Brake force display 96
Brake hydraulic system 126
Brake lamps
bulb replacement 151
indicator lamp, defective
lamp 88Brake lights
brake force display 96
Brake pads 126
brake fluid level
18, 126, 141
breaking in 124
disc brakes 126
indicator lamp 19
Brake rotors
brake system 126
breaking in 124
Brake wear warning
indicator lamp 19
Brakes
ABS 125
brake fluid 141
breaking in 124
indicator/warning lamp
18, 19
parking brake 73
Break-in procedures 124
Bulb replacement, refer to
Lamps and bulbs 149
Bulb, replacing 149
Buttons in steering wheel 22
C
California Proposition
65 warning 143
Can holders, see Beverage
holders 115
Capacities 169Car battery 157
Car care, refer to the Caring
for your vehicle brochure
Car keys, refer to Keys 30
Car radio, refer to the
Owner's Manual for Radio
Car telephone
preparation 115
Car telephone, refer to the
separate Owner's Manual
Car vacuum cleaner, con-
necting 116
Car wash, refer to the Caring
for your vehicle brochure
Carpet care, refer to the
Caring for your vehicle
brochure
Cassette operation, refer to
the Owner's Manual for
Radio/Onboard Computer
CBC Cornering Brake Con-
trol 125
warning lamp 19
CD changer, refer to the
Owner's Manual for
Radio/Onboard Computer
CD operation, refer to the
Owner's Manual for
Radio/Onboard Computer
Cellular phone 115
Center armrest
front 114Center high-mount brake
lamp
bulb replacement 152
Central locking system 30
button 34
passenger
compartment 34
Changing a wheel 153
Charge indicator lamp 18
Check Control 88
Check Gas Cap
indicator lamp 19
Child seats, refer to Child-
restraint systems 64
Child-restraint mounting
system (LATCH) 66
Child-restraint system 64
Chock 154
Cigarette lighter 115
Cigarette lighter socket 116
Cleaning chrome parts, refer
to the Caring for your vehi-
cle brochure
Cleaning light alloy wheels,
refer to the Caring for your
vehicle brochure
Cleaning position, convert-
ible top 45, 50
Cleaning the vehicle, refer to
the Caring for your vehicle
brochure
Cleaning windshield 84
OverviewControlsMaintenanceRepairsDataIndex