Page 75 of 364
 and
release the parking brake. They
rem")
With the headlight switch off, the
high beam headlights and the high
beam indicator come on with
reduced brightness when you turn
the ignition switch to ON (II) and
release the parking brake. They
remain on until you turn the ignition
of f , even if you set the parking brake.
The headlights revert to normal
operation when you turn them on
with the switch.The instrument panel will illuminate
with reduced brightness when you
unlock and open the driver’s door.
The brightness will increase slightly
when you insert the key in the
ignitionswitch,thengotonormal
brightness when you turn the
ignition switch to ON (II).
Turntheknobontherightsideof
the instrument panel to adjust the
instrument panel brightness. There
are six brightness levels. When you
turn the knob, the odometer display
changes to circles that show you the
current level. The display returns to
the odometer values f ive seconds
af ter you stop adjusting the knob. If you do not insert the key in the
ignition switch af ter opening and
closing the driver’s door, the
illumination turns of f in about 30
seconds.
If you insert the key but do not turn
the ignition switch to ON (II), the
illumination turns of f in about 10
seconds.
Controls Near the Steering Wheel
Inst rument s and Cont rols
Daytime Running L ights
(Canadian Models)
Instrument Panel Brightness
72
Page 77 of 364
To operate the wipers in mist mode,
push the control lever up f rom the
OFF position. The wipers run at high
speed until you release the lever.
This gives you a quick way to clear
the windshield.
In intermittent, the wipers operate
every f ew seconds. The sweep
interval will change slightly with
speed; getting shorter as you drive
f aster. While the car is stopped and
in gear, the wipers sweep the
windshield whenever you remove
your f oot f rom the brake pedal. In
low speed and high speed, the wipers
run continuously.
You can vary how of ten the wipers
sweep the windshield by turning the
INT TIME ring on the lever.
If you turn the INT TIME ring to the
shortest delay, the wipers will
change from intermittent to low
speed operation when car speed
exceeds 12 mph (20 km/h).
Controls Near the Steering Wheel
Inst rument s and Cont rols74
Page 88 of 364
When the remote transmitter’s
battery begins to get weak, it may
take several pushes on the button to
lock or unlock the doors, and the
LED will not light. Replace the
battery as soon as possible.
Panic mode allows you to remotely
activate your car’s horn and exterior
lights to attract attention. The horn
sounds and the exterior lights f lash
f or about 30 seconds. To activate
panic mode, press and hold the
PANIC button f or about two seconds.
To cancel Panic mode bef ore 30
seconds, press any button on the
remote transmitter. You can also
turn the ignition switch to ON (II).
Panic mode will not activate if the
ignition switch is in the ON (II)
position.
To replace the battery, place a cloth
on the edge of the transmitter and
remove the upper half by carefully
prying on the edge with a small f lat-
tip screwdriver.
Battery type: CR2025
CONT INUED
Replacing the Battery
Panic Mode
Keys and Locks
Inst rument s and Cont rols85
Page 125 of 364

Pressing the OFF button shuts the
climate control system completely
off. No air flow can cause the
windows to fog up. It is
recommended that you keep the f an
on at all times so stale air and
moisture do not build up in the
interior and cause f ogging.
When you set the temperature to its
lower limit ‘‘ ’’ or its upper
limit ‘‘ ’’, the system runs at
f ull cooling or heating only. It does
not regulate the interior temperature.
When the temperature is set
between the lower and upper limits,
the system regulates the interior
temperature to the set value.
In cold weather, the f an will not
come on automatically until the car
has been driven f or a short time and
the heater starts to develop warm air. You can manually select various
f unctions of the Climate Control
system when it is in f ully automatic
mode. All other f eatures remain
automatically controlled. Some of
these functions appear in the
Navigation System display. Press the
A/C button under the display to
show these functions. Making any
manual selection causes the
indicator in the AUTO button to go
out. Semi-automatic Operation
Climat e Cont rol Syst em
Comf ort and Convenience Feat ures122
Page 135 of 364
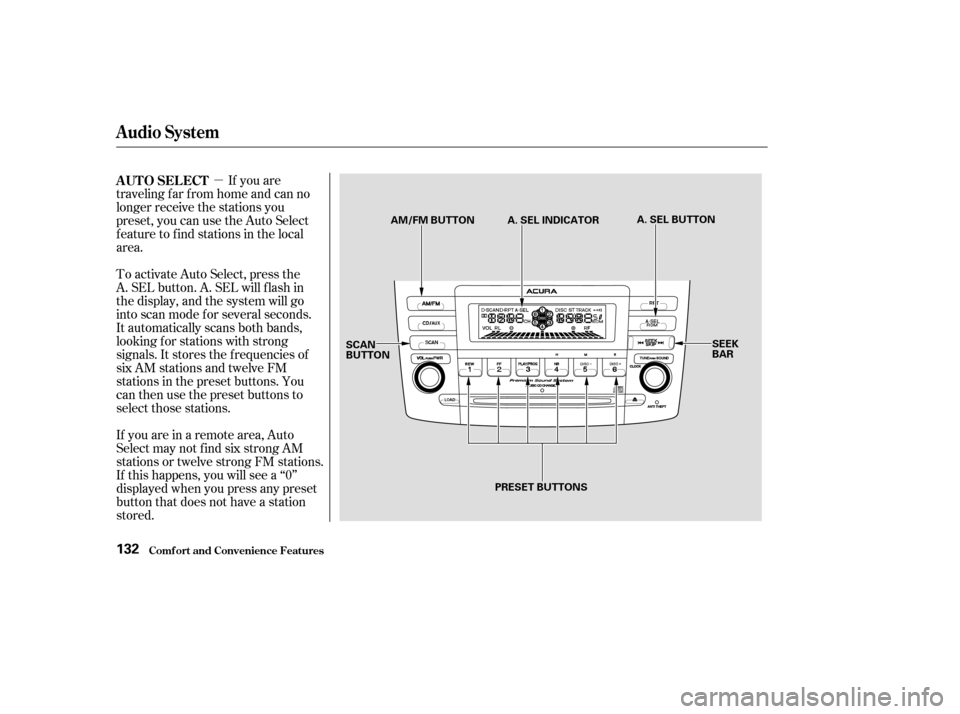
�µIf you are
traveling far from home and can no
longer receive the stations you
preset, you can use the Auto Select
feature to find stations in the local
area.
To activate Auto Select, press the
A. SEL button. A. SEL will f lash in
the display, and the system will go
into scan mode f or several seconds.
It automatically scans both bands,
looking f or stations with strong
signals. It stores the f requencies of
six AM stations and twelve FM
stations in the preset buttons. You
can then use the preset buttons to
select those stations.
If you are in a remote area, Auto
Select may not f ind six strong AM
stations or twelve strong FM stations.
If this happens, you will see a ‘‘0’’
displayed when you press any preset
button that does not have a station
stored. AUTO SELECT
Audio System
Comf ort and Convenience Feat ures132
AM/FM BUTTON A. SEL INDICATOR A. SEL BUTTON
SEEK
BAR
SCAN
BUTTON
PRESET BUTTONS
Page 137 of 364

�µ
�µ
These two
modes adjust the strength of the
sound coming f rom each speaker.
BAL adjusts the side-to-side strength,
while FAD adjusts the f ront-to-back
strength. For inf ormation, see page .
Bass, Treble, Balance, and Fader are
each adjustable. You select which of
these you want to adjust by pressing
the TUNE/SOUND knob. The mode
changes from BAS to TRE to FAD to
BAL,andthenbacktotheselected
audio mode, each time you press the
TUNE/SOUND knob.
Select BAL or FAD by pressing the
TUNE/SOUND knob. Adjust the
Balance or Fader to your liking by
turning the knob.
The displayed number shows you
the current setting.
When the adjustment level reaches
the center, you will see ‘‘ ’’.The system will automatically return
the display to the selected audio
mode about 5 seconds af ter you stop
adjusting a mode with the TUNE/
SOUND knob.
Use these modes to
adjust the tone to your liking. Select
TRE or BAS by pressing the TUNE/
SOUND knob. Adjust the desired
mode by turning the knob.
The displayed number shows you
the current setting.
When the adjustment level reaches
the center, you will see ‘‘ ’’.
154
Adjusting the Sound
Balance/Fader
Radio Frequencies and Reception
Treble/Bass
Audio System
Comf ort and Convenience Feat ures134
ADJUSTMENT LEVEL
TUNE/SOUND
KNOB
Page 142 of 364

�µ�µ
When that disc ends, the next disc in
the CD changer is loaded and played.
Af ter the last disc f inishes, the
system returns to disc one. Each time you press and
release it, the system skips forward
to the beginning of the next track.
Press and release to skip
backward to the beginning of the
current track. Press and release it
again to skip to the beginning of the
previous track. To move rapidly within a track, press
andholdtheleftorrightsideof the
SKIP bar. You will hear a beep and
the system will continue to move.
Press to move f orward, or
to move backward. Release the
bar when the system reaches the
point you want.
Select the CD changer by pressing
the CD button. You will see ‘‘CD’’ in
the display. The system will begin
playing the last selected disc in the
CD changer. You will see the disc
and track numbers displayed.
To select a dif f erent disc, press the
appropriate Preset button (1 6). If
youselectanemptypositioninthe
CD changer, the system will go into
the loading sequence (see page ).
You can use the SKIP bar while a
disc is playing to select passages and
change tracks. This f eature, when
activated, samples all the tracks on
the selected disc in the order they
are recorded on the CD. To activate
the Scan f eature, select the Scan
mode by pressing the SCAN button.
You will see SCAN in the display.
The system will then play the first
track f or about 10 seconds. If you do
nothing, the system will then play
the f ollowing tracks f or 10 seconds
each. When it plays a track that you
want to continue listening to, press
the SCAN button again.
158
CONT INUED
Operat ion
Audio System
Comf ort and Convenience Feat ures
SCAN
139
Page 143 of 364

To take the system out of CD mode,
press the AM/FM button. Each time
you press the AM/FM button, the
system will change to the next mode;
FM1, FM2, or AM. When you return
to CD mode by pressing the CD
button, play will continue at the same
point that it lef t of f .
If you turn the system of f while a CD
is playing, either with the PWR/VOL
knob or the ignition switch, play will
continue at the same point when you
turn it back on.
When activated, Disc Scan plays
about 10 seconds of the f irst track of
each CD in the order they are stored
in the CD changer. To activate Disc
Scan, press and hold the SCAN
button until you see D-SCAN in the
display.
If you do nothing, the system will
then play the next CD’s first track.
When it plays a disc that you want to
continue listening to, press the
SCAN button again.
When activated, Disc Repeat plays
the current CD continuously. To
activate Disc Repeat, press and hold
the RPT button until you see D-RPT
in the display. To turn of f Disc
Repeat, press the RPT button again,
or press either side of the SKIP bar.
When activated, Track Repeat plays
the current track continuously. To
activate Track Repeat, press and
release the RPT button. You will see
RPT in the display as a reminder. To
turn of f Track Repeat, press the RPT
button again, or press either side of
the SKIP bar. Disc Scan Disc Repeat
T rack Repeat
Audio System
Comf ort and Convenience Feat ures140