Page 75 of 662
 SPEC
2 - 2
GENERAL SPECIFICATIONS
Oil capacity:
Engine oil
Periodic oil change 1.0 L (0.88 Imp qt, 1.06 US qt)
With oil filter replacement 1.1 L (0.97 Imp qt, 1.16 US qt)
Total amount 1.2 L (1.06")
SPEC
2 - 2
GENERAL SPECIFICATIONS
Oil capacity:
Engine oil
Periodic oil change 1.0 L (0.88 Imp qt, 1.06 US qt)
With oil filter replacement 1.1 L (0.97 Imp qt, 1.16 US qt)
Total amount 1.2 L (1.06 Imp qt, 1.27 US qt)
Coolant capacity (including all routes): 0.9 L (0.79 Imp qt, 0.95 US qt)
Air filter: Wet type element
Fuel:
Type Premium unleaded gasoline only with a
research octane number of 95 or higher.
(Except for ZA)
Premium gasoline (For ZA)
Tank capacity 7.0 L (1.54 Imp gal, 1.85 US gal)
Carburetor:
Type FCR-MX37
Manufacturer KEIHIN
Spark plug:
Type/manufacturer CR8E/NGK (resistance type)
Gap 0.7 ~ 0.8 mm (0.028 ~ 0.031 in)
Clutch type: Wet, multiple-disc
Transmission:
Primary reduction system Gear
Primary reduction ratio 57/17 (3.353)
Secondary reduction system Chain drive
Secondary reduction ratio 48/13 (3.692)
Transmission type Constant mesh, 5-speed
Operation Left foot operation
Gear ratio: 1st 30/14 (2.143)
2nd 28/16 (1.750)
3rd 29/20 (1.450)
4th 27/22 (1.227)
5th 25/24 (1.042)
Chassis:
Frame type Semi double cradle
Caster angle 27.1˚
Trail 117.4 mm (4.62 in)
Tire:
Type With tube
Size (front) 80/100-21 51M (For USA, CDN, ZA, AUS, NZ
and F)
80/100-21 51R (For EUROPE except F)
Size (rear) 100/90-19 57M (For USA, CDN, ZA, AUS, NZ
and F)
100/90-19 MT320 (For EUROPE except F)
Tire pressure (front and rear) 100 kPa (1.0 kgf/cm
2
, 15 psi)
2
Page 142 of 662
 2 - 18
SPECCABLE ROUTING DIAGRAM
EC240000
CABLE ROUTING DIAGRAM
1Fuel tank breather hose
2Clutch cable
3Oil tank breather hose
4Hot starter cable
5Cylinder head breather hose
6Cable guide
7Hose guide")
2 - 18
SPECCABLE ROUTING DIAGRAM
EC240000
CABLE ROUTING DIAGRAM
1Fuel tank breather hose
2Clutch cable
3Oil tank breather hose
4Hot starter cable
5Cylinder head breather hose
6Cable guide
7Hose guide
8Brake hose
9Engine stop switch lead
0Clamp
ASub-wire harness
BThrottle position sensor lead
CNeutral switch lead
DOil hose
ECDI magneto lead
FRadiator breather hose
GCarburetor breather hose
HCarburetor overflow hoseÅPass the fuel tank breather hose
between the handlebar and ten-
sion bar, then insert its end into
the hole of the number plate.
ıPass the hot starter cable
between the cylinder head
breather hose, oil tank breather
hose and ignition coil, then on
the outside of the left engine
bracket.
ÇPass the clutch cable through
the cable guides.
ÎPass the clutch cable in front of
the radiator mounting boss.
‰Fit the brake hose into the
guides on the protector.ÏFasten the neutral switch lead
and CDI magneto lead to the
cable guide with a plastic locking
tie and cut off the tie end.
ÌFasten the engine stop switch
lead, neutral switch lead and
CDI magneto lead.
ÓFasten the engine stop switch
lead and sub-wire harness.
ÈFasten the sub-wire harness
and hot starter cable at the white
tape for the sub-wire harness.
ÔFasten the sub-wire harness.
Pass the sub-wire harness
between the engine brackets.
Page 152 of 662
 3 - 1
INSP
ADJ
MAINTENANCE INTERVALS
EC300000
REGULAR INSPECTION AND ADJUSTMENTS
MAINTENANCE INTERVALS
The following schedule is intended as a general guide to maintenance and lubrication. Bear in min")
3 - 1
INSP
ADJ
MAINTENANCE INTERVALS
EC300000
REGULAR INSPECTION AND ADJUSTMENTS
MAINTENANCE INTERVALS
The following schedule is intended as a general guide to maintenance and lubrication. Bear in mind
that such factors as weather, terrain, geographical location, and individual usage will alter the
required maintenance and lubrication intervals. If you are a doubt as to what intervals to follow in
maintaining and lubricating your machine, consult your Yamaha dealer.
ItemAfter
break-inEvery
race
Every
third
(or
500 km)Every
fifth
(or
1,000 km)As re-
quiredRemarks
ENGINE OIL
Replace
Inspect
●
●●
●
OIL FILTER ELEMENT, OIL STRAINER
Clean
●
VALVES
Check the valve clearances
Inspect
Replace
● ●
●
● The engine must be cold.
Check the valve seats
and valve stems for wear.
VALVE SPRINGS
Inspect
Replace
●
● Check the free length and
the tilt.
VALVE LIFTERS
Inspect
Replace
●
● Check for scratches and
wear.
CAMSHAFTS
Inspect
Replace
●
● Inspect the camshaft sur-
face.
Inspect the decompres-
sion system.
TIMING CHAIN SPROCKETS, TIMING
CHAIN
Inspect
Replace
●
● Check for wear on the
teeth and for damage.
PISTON
Inspect
Clean
Replace
● ●
●
● Inspect crack
Inspect carbon deposits
and eliminate them.
PISTON RING
Inspect
Replace
●
● ● Check ring end gap
PISTON PIN
Inspect
Replace
●
●
CYLINDER HEAD
Inspect and clean
● Inspect carbon deposits
and eliminate them.
Change gasket
CYLINDER
Inspect and clean
Replace
●
● Inspect score marks
Inspect wear
CLUTCH
Inspect and adjust
Replace
● ●
● Inspect housing, friction
plate, clutch plate and
spring
TRANSMISSION
Inspect
Replace bearing
●
●
Page 164 of 662
 3 - 4
INSP
ADJ
PRE-OPERATION INSPECTION AND MAINTENANCE
EC320000
PRE-OPERATION INSPECTION AND MAINTENANCE
Before riding for break-in operation, practice or a race, make sure the machine is in good ope")
3 - 4
INSP
ADJ
PRE-OPERATION INSPECTION AND MAINTENANCE
EC320000
PRE-OPERATION INSPECTION AND MAINTENANCE
Before riding for break-in operation, practice or a race, make sure the machine is in good operating
condition.
Before using this machine, check the following points.
GENERAL INSPECTION AND MAINTENANCE
Item Routine Page
CoolantCheck that coolant is filled up to the radiator cap.
Check the cooling system for leakage.P.3-5 ~ 9
FuelCheck that a fresh gasoline is filled in the fuel tank. Check the
fuel line for leakage.P.1-13
Engine oilCheck that the oil level is correct. Check the crankcase and
frame oil line for leakage.P.3-13 ~ 16
Gear shifter and clutchCheck that gears can be shifted correctly in order and that the
clutch operates smoothly.P.3-9
Throttle grip/HousingCheck that the throttle grip operation and free play are correctly
adjusted. Lubricate the throttle grip and housing, if necessary.P.3-10
Brakes Check the play of front brake and effect of front and rear brake. P.3-24 ~ 30
Drive chainCheck drive chain slack and alignment. Check that the drive
chain is lubricated properly.P.3-31 ~ 33
WheelsCheck for excessive wear and tire pressure. Check for loose
spokes and have no excessive play.P.3-41 ~ 42
SteeringCheck that the handlebar can be turned smoothly and have no
excessive play.P.3-42 ~ 43
Front forks and rear shock
absorberCheck that they operate smoothly and there is no oil leakage. P.3-33 ~ 40
Cables (wires)Check that the clutch and throttle cables move smoothly. Check
that they are not caught when the handlebars are turned or
when the front forks travel up and down.—
Exhaust pipeCheck that the exhaust pipe is tightly mounted and has no
cracks.P.4-3
Rear wheel sprocket Check that the rear wheel sprocket tightening bolt is not loose. P.3-31
Lubrication Check for smooth operation. Lubricate if necessary. P.3-44
Bolts and nuts Check the chassis and engine for loose bolts and nuts. P.1-18
Lead connectorsCheck that the CDI magneto, CDI unit, and ignition coil are con-
nected tightly.P.1-6
SettingsIs the machine set suitably for the condition of the racing course
and weather or by taking into account the results of test runs
before racing? Are inspection and maintenance completely
done?P.7-1 ~ 22
Page 172 of 662
3 - 7
INSP
ADJ
RADIATOR CAP INSPECTION
CAUTION:
�Do not mix more than one type of ethyl-
ene glycol antifreeze containing corro-
sion inhibitors for aluminum engine.
�Do not use water containing impurities or
oil.
7. Install:
�Radiator cap
Start the engine and warm it up for a
several minutes.
8. Check:
�Coolant level
Coolant level low → Add coolant. Handling notes of coolant:
The coolant is harmful so it should be han-
dled with special care.
WARNING
�When coolant splashes to your eye.
Thoroughly wash your eye with water
and see your doctor.
�When coolant splashes to your clothes.
Quickly wash it away with water and
then with soap.
�When coolant is swallowed.
Quickly make him vomit and take him
to a doctor.
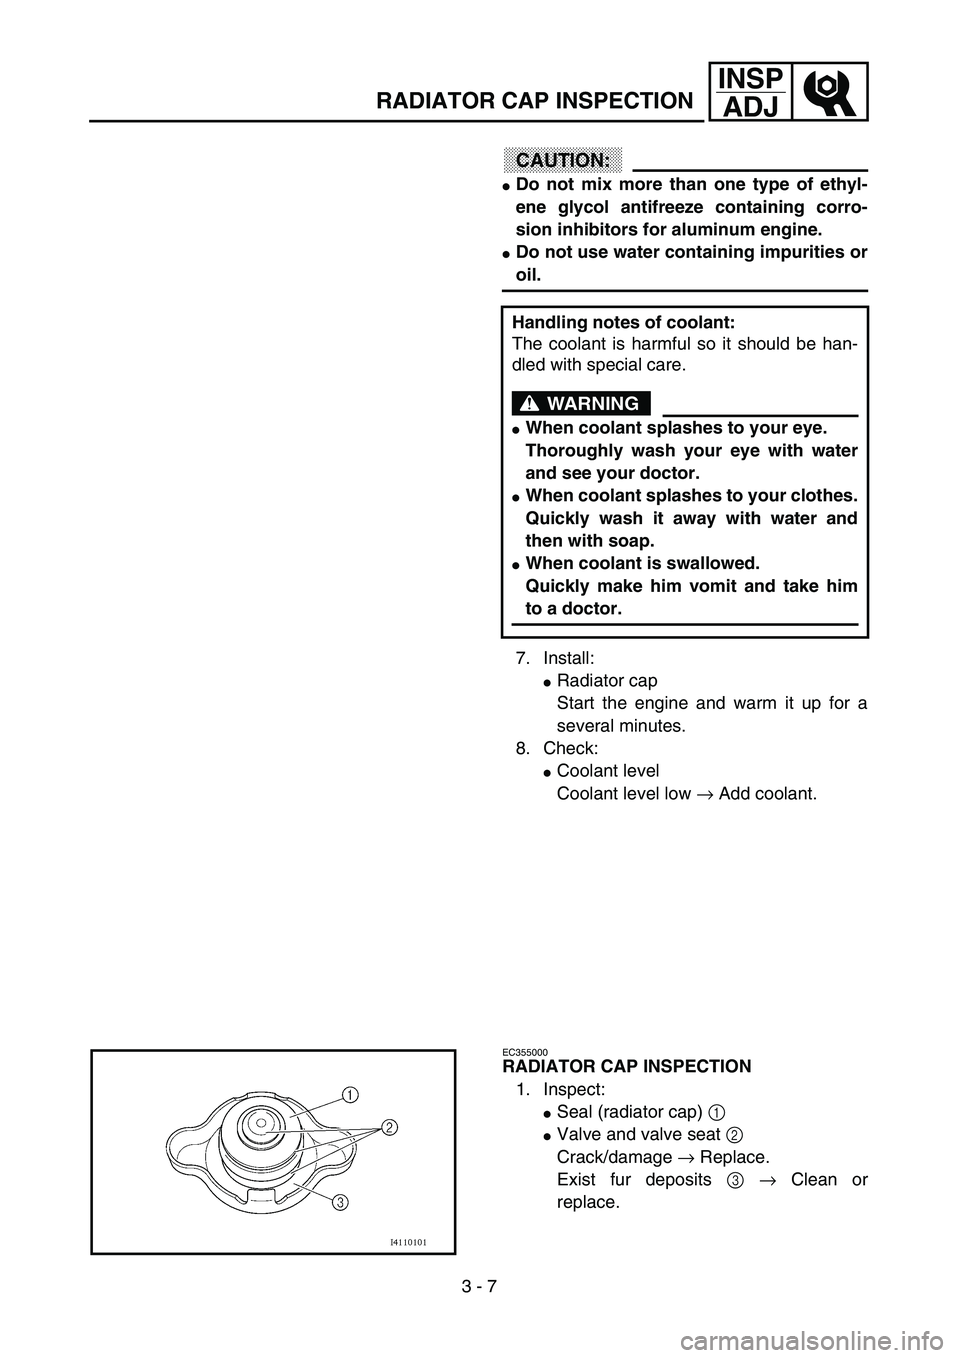
EC355000
RADIATOR CAP INSPECTION
1. Inspect:
�Seal (radiator cap) 1
�Valve and valve seat 2
Crack/damage → Replace.
Exist fur deposits 3 → Clean or
replace.
Page 184 of 662
3 - 13
INSP
ADJ
7. Install:
�Air filter element 1
�Washer
�Fitting bolt
NOTE:
Align the projection a on filter guide with the
hole b in air filter case.
T R..2 Nm (0.2 m · kg, 1.4 ft · lb)
ENGINE OIL LEVEL INSPECTION
1. Start the engine, warm it up for several
minutes, and then turn off the engine and
wait for five minutes.
2. Place the machine on a level place and
hold it up on upright position by placing
the suitable stand under the engine.
3. Remove:
�Oil tank cap 1
1
4. Inspect:
�Oil level
Oil level should be between maximum
a and minimum b marks.
Oil level is low → Add oil to proper
level.
NOTE:
When inspecting the oil level, do not screw the
oil tank cap into the oil tank. Insert the gauge
lightly.
a
b
ENGINE OIL LEVEL INSPECTION
Page 186 of 662
 3 - 14
INSP
ADJ
ENGINE OIL LEVEL INSPECTION
(For USA and CDN)
CAUTION:
�Do not add any chemical additives.
Engine oil also lubricates the clutch and
additives could cause clutch slippage.
�Do not allo")
3 - 14
INSP
ADJ
ENGINE OIL LEVEL INSPECTION
(For USA and CDN)
CAUTION:
�Do not add any chemical additives.
Engine oil also lubricates the clutch and
additives could cause clutch slippage.
�Do not allow foreign material to enter the
crankcase.
(Except for USA and CDN)
CAUTION:
�Do not add any chemical additives or use
oils with a grade of CD a or higher.
�Do not use oils labeled “ENERGY CON-
SERVING II” b or higher. Engine oil also
lubricates the clutch and additives could
cause clutch slippage.
�Do not allow foreign materials to enter the
crankcase.
5. Install:
�Oil tank cap
6. Start the engine and let it warm up for
several minutes.
7. Turn off the engine and inspect the oil
level once again.
NOTE:
Wait a few minutes until the oil settles before
inspecting the oil level.
Recommended oil:
At 5 ˚C (40 ˚F) or higher Å
Yamalube 4 (20W-40) or SAE
20W-40 type SG motor oil (Non-
Friction modified)
At 15 ˚C (60 ˚F) or lower ı
Yamalube 4 (10W-30) or SAE
10W-30 type SG motor oil (Non-
Friction modified)
and/or
Yamalube 4-R (15W-50)
(Non-Friction modified)
Recommended oil:
Refer to the following chart for
selection of oils which are suited
to the atmospheric temperatures.
Recommended engine oil classi-
fication:
API STANDARD:
API “SG” or higher grade
(Designed primarily for motor-
cycles)
-20
-4-10
140
3010
5020
6830
8640 50
104
122°CTemp.
°F
10W-30
10W-40
20W-40
20W-50
15W-40
a
b
Page 188 of 662
3 - 15
INSP
ADJ
ENGINE OIL REPLACEMENT
ENGINE OIL REPLACEMENT
1. Start the engine and warm it up for sev-
eral minutes, and then turn off the engine
and wait for five minute.
2. Place the machine on a level place and
hold it on upright position by placing the
suitable stand under the engine.
3. Place a suitable container under the
engine.
4. Remove:
�Oil tank cap 1
�Oil filler cap 2
�Frame oil drain bolt 3
�Crankcase oil drain bolt 4
�Oil filter element drain bolt 5
Drain the crankcase and oil tank
(frame) of its oil.
1
5. Remove:
�Lower engine bracket
�Oil hose clamp 1
�Bolt (oil hose) 2
�Oil hose 3
�Oil strainer (frame) 4
6. Inspect:
�Oil strainer (frame)
Clogged → Blow.

 3 - 15
INSP
ADJ
ENGINE OIL REPLACEMENT
ENGINE OIL REPLACEMENT
1. Start the engine and warm it up for sev-
eral minutes, and then turn off the engine
and wait for five minute.
2. Place the machine on a")