Page 226 of 860

3 - 35
INSP
ADJ
AIR FILTER CLEANING
NOTE:Proper air filter maintenance is the
biggest key to preventing premature
engine wear and damage.
CAUTION:
Never run the engine without the
air filter element in place; this
would allow dirt and dust to enter
the engine and cause rapid wear
and possible engine damage.
1. Remove:
Air filter case cover
1
NOTE:Loosen the quick screw
2 and draw
the air filter case cover to remove it
because its claws
a are inserted in
the side cover as shown.
2. Unhook:
Binder
1
3. Remove:
Air filter element
1
Filter guide
2
4. Clean:
Air filter element
Clean them with solvent.
NOTE:After cleaning, remove the remaining
solvent by squeezing the element.
CAUTION:
Do not twist the element when
squeezing the element.
Leaving too much of solvent in
the element may result in poor
starting.
NETTOYAGE DU FILTRE A AIR
N.B.:
Un entretien convenable du filtre à air
est la clé pour éviter l’usure prématurée
et l’endommagement du moteur.
ATTENTION:
Ne jamais faire tourner le moteur
lorsque l’élément du filtre à air n’est
pas en place; ceci permettrait la péné-
tration de poussière dans le moteur et
causerait son usure rapide et son
endommagement.
1. Déposer:
Le couvercle du boîtier du filtre à
air 1
N.B.:
Desserrer la vis rapide 2 et tirer le cou-
vercle du boîtier de filtre à air pour
l’enlever comme indiqué car les griffes
a sont insérées dans le capot latéral.
2. Décrocher:
Ressort 1
3. Déposer:
Elément du filtre à air 1
Guide de filtre 2
4. Nettoyer:
Elément du filtre à air
Les nettoyer avec du dissolvant.
N.B.:
Une fois l’entretien terminé, éliminer ce
qui reste de solvant en serrant l’élément.
ATTENTION:
Ne pas tordre l’élément en l’esso-
rant.
Un excès de dissolvant sur l’élément
risque de rendre la mise en marche
du moteur plus difficile.
ENGINE
MOTEUR
Page 704 of 860

5 - 127
CHASSWINGARM
EC573000REMOVAL POINTSEC573200Bearing
1. Remove:
Bearing
1
NOTE:Remove the bearing by pressing its
outer race.
INSPECTION
Wash the bearings, bushings, col-
lars, and covers in a solvent.
Swingarm
1. Inspect:
Bearing
1
Bushing
2
Free play exists/unsmooth
revolution/rust
→ Replace
bearing and bushing as a set.
2. Inspect:
Oil seal
3
Damage
→ Replace.
EC574210Relay arm
1. Inspect:
Bearing (polylube bearing)
1
Collar
2
Free play exists/unsmooth
revolution/rust
→ Replace
bearing and collar as a set.
2. Inspect:
Bearing (polylube bearing)
1
Loss of solid lubrication
→
Replace.
Oil seal
3
Damage
→ Replace.
NOTE:Polylube bearings, with solid lubrica-
tion, have been adopted with the
intent to make the needle bearings,
used in this model, maintenance
free. With polylube bearings, no
grease nipple and regular lubrication
is necessary. However, grease
should be applied to all oil seals and
collars when removed or installed.
POINTS DE DEPOSE
Roulement
1. Déposer:
Roulement 1
N.B.:
Retirer le roulement en appuyant sur la
cage extérieure.
CONTROLE
Laver les roulements, les bagues, les col-
lerettes et les caches dans un dissolvant.
Bras oscillant
1. Contrôler:
Roulement 1
Bague 2
Jeu/rotation irrégulière/rouille →
Remplacer à la fois le roulement
et la bague.
2. Contrôler:
Bague d’étanchéité 3
Endommagement → Changer.
Bras de relais
1. Contrôler:
Roulement
(roulement polylube) 1
Collerette 2
Jeu/rotation irrégulière/rouille →
Remplacer à la fois le roulement
et la collerette.
2. Contrôler:
Roulement
(roulement polylube) 1
Perte de lubrification solide →
Remplacer.
Bague d’étanchéité 3
Endommagement → Remplacer.
N.B.:
Les roulements polylube, à lubrification
solide, ont été adoptés pour éliminer la
maintenance des roulements à aiguilles,
utilisés sur ce modèle. Les roulements
polylube rendent le graissage par les
graisseurs et le graissage ordinaire inuti-
les. Tous les colliers et joints à huile doi-
vent néanmoins être graissés lorsqu’ils
sont retirés ou installés.
BRAS OSCILLANT
Page 706 of 860

5 - 129
CHASSWINGARM
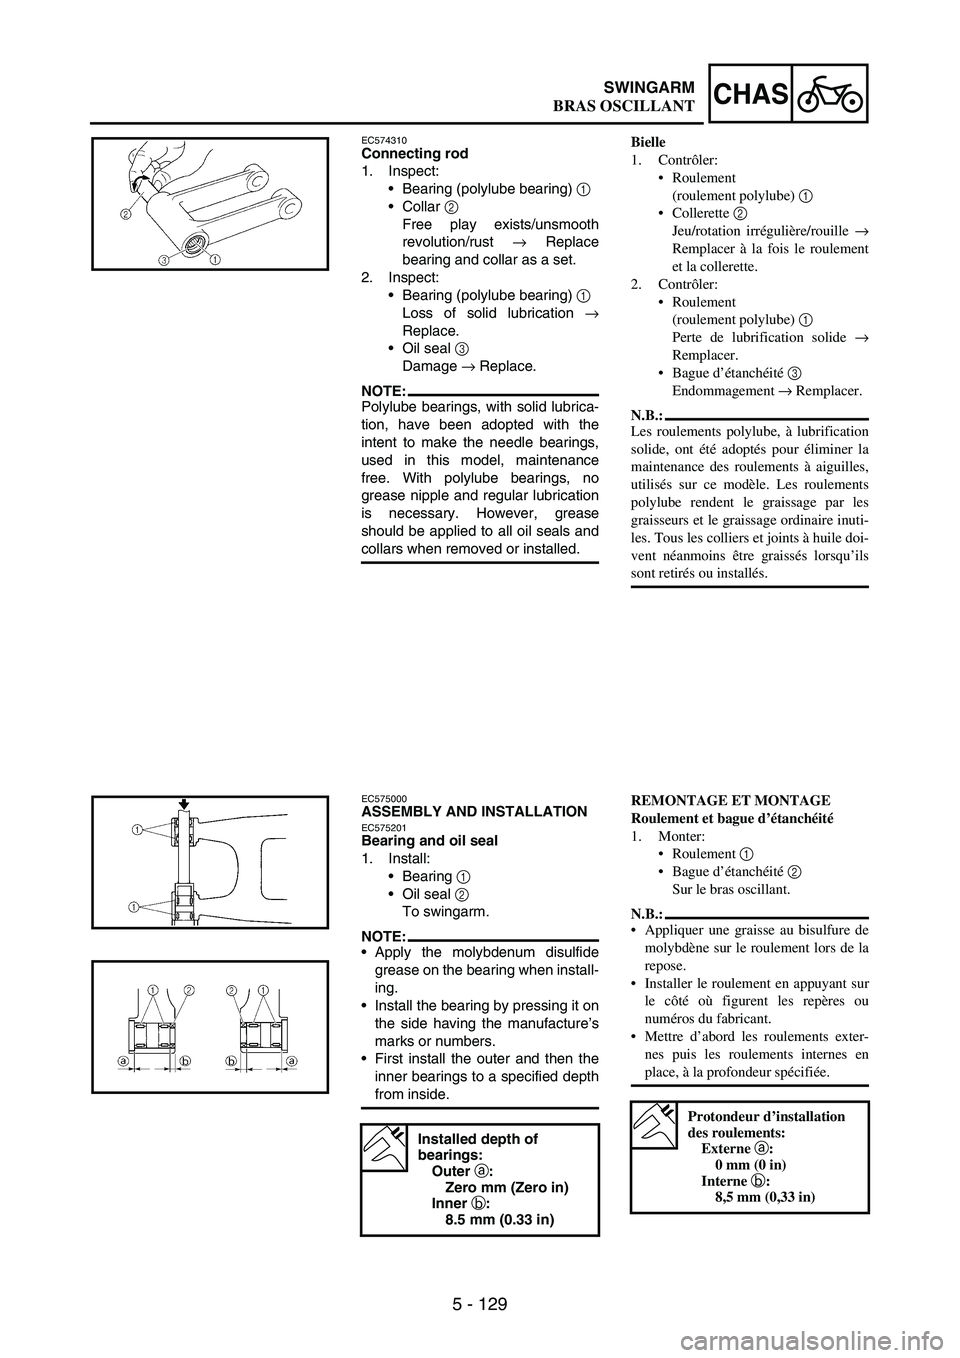
EC574310Connecting rod
1. Inspect:
Bearing (polylube bearing)
1
Collar
2
Free play exists/unsmooth
revolution/rust
→ Replace
bearing and collar as a set.
2. Inspect:
Bearing (polylube bearing)
1
Loss of solid lubrication
→
Replace.
Oil seal
3
Damage
→ Replace.
NOTE:Polylube bearings, with solid lubrica-
tion, have been adopted with the
intent to make the needle bearings,
used in this model, maintenance
free. With polylube bearings, no
grease nipple and regular lubrication
is necessary. However, grease
should be applied to all oil seals and
collars when removed or installed.
EC575000ASSEMBLY AND INSTALLATIONEC575201Bearing and oil seal
1. Install:
Bearing
1
Oil seal
2
To swingarm.
NOTE:Apply the molybdenum disulfide
grease on the bearing when install-
ing.
Install the bearing by pressing it on
the side having the manufacture’s
marks or numbers.
First install the outer and then the
inner bearings to a specified depth
from inside.
Installed depth of
bearings:
Outer a
:
Zero mm (Zero in)
Inner b
:
8.5 mm (0.33 in)
Bielle
1. Contrôler:
Roulement
(roulement polylube) 1
Collerette 2
Jeu/rotation irrégulière/rouille →
Remplacer à la fois le roulement
et la collerette.
2. Contrôler:
Roulement
(roulement polylube) 1
Perte de lubrification solide →
Remplacer.
Bague d’étanchéité 3
Endommagement → Remplacer.
N.B.:
Les roulements polylube, à lubrification
solide, ont été adoptés pour éliminer la
maintenance des roulements à aiguilles,
utilisés sur ce modèle. Les roulements
polylube rendent le graissage par les
graisseurs et le graissage ordinaire inuti-
les. Tous les colliers et joints à huile doi-
vent néanmoins être graissés lorsqu’ils
sont retirés ou installés.
REMONTAGE ET MONTAGE
Roulement et bague d’étanchéité
1. Monter:
Roulement 1
Bague d’étanchéité 2
Sur le bras oscillant.
N.B.:
Appliquer une graisse au bisulfure de
molybdène sur le roulement lors de la
repose.
Installer le roulement en appuyant sur
le côté où figurent les repères ou
numéros du fabricant.
Mettre d’abord les roulements exter-
nes puis les roulements internes en
place, à la profondeur spécifiée.
Protondeur d’installation
des roulements:
Externe a:
0 mm (0 in)
Interne b:
8,5 mm (0,33 in)
BRAS OSCILLANT